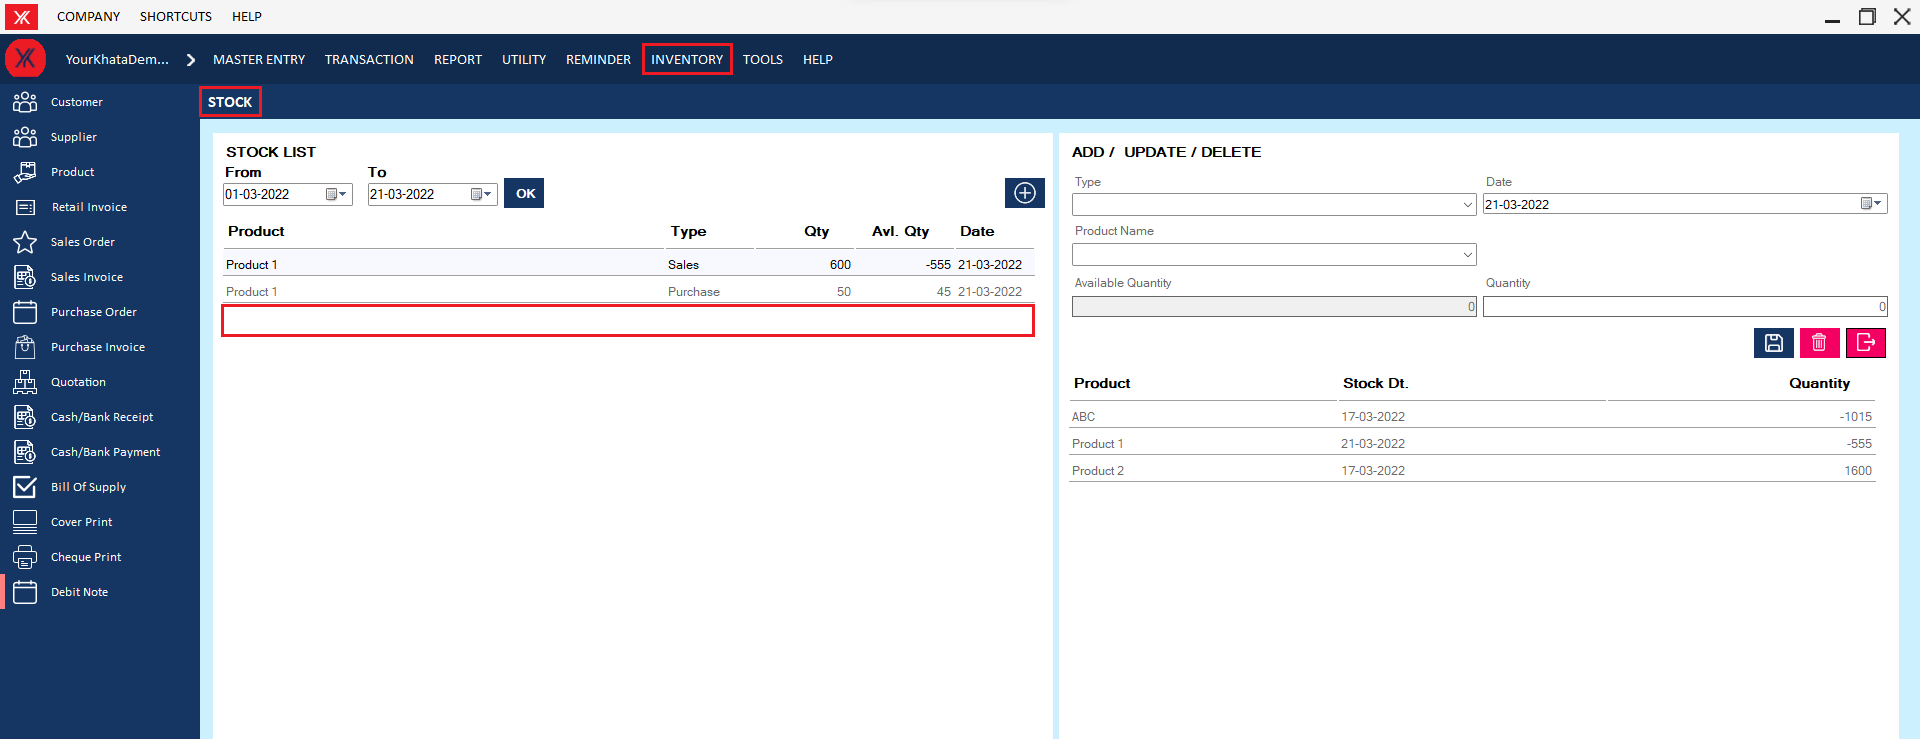
Looking for an instant answer to a question?
Installation
- How to Install YourKhata accounting & billing software?
Step 1: Click on URL “https://yourkhata.com”
Step 2: Go to Home Page & click on Download option.

Step 3: Locate & Download the zip file

Step 4: Locate and double-click the zip file. (It will usually be in Downloads folder.)

Step 5: A dialog box will appear. Follow the instructions to install the software.

- How to Create License key for YourKhata accounting & billing software?
Step 1: Click on Login
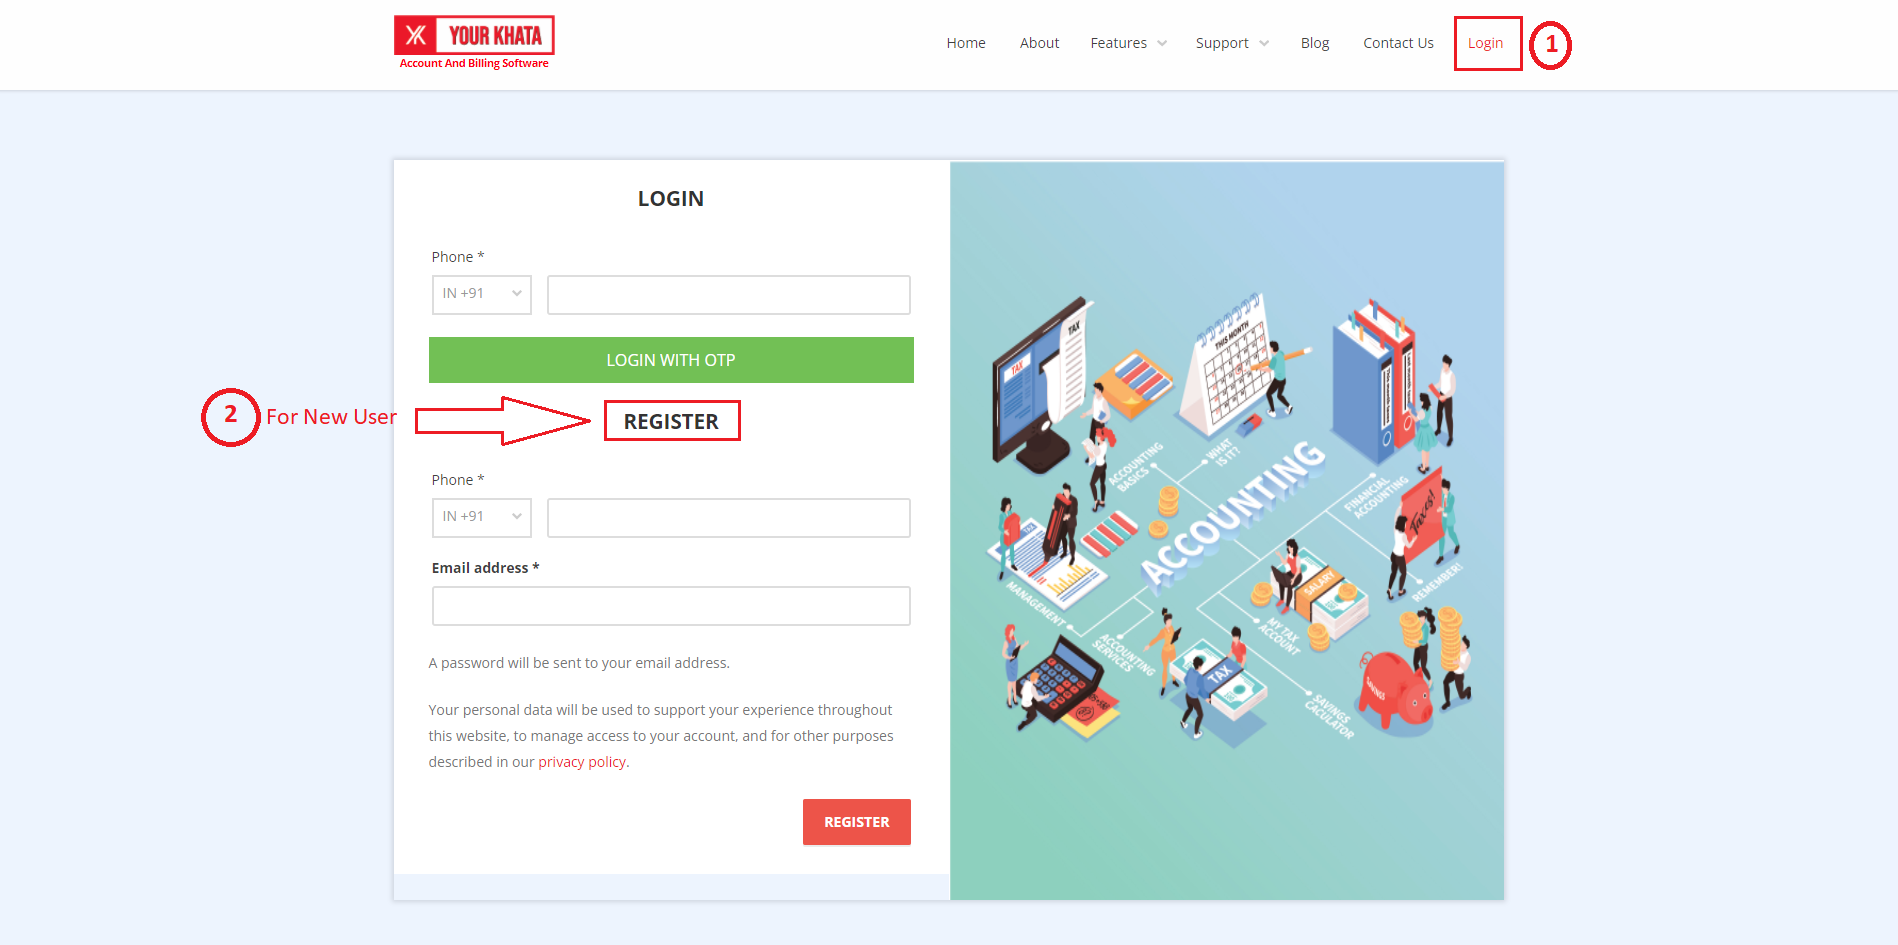
Step 2: Fill-up Phone number & Email address & click on register button

Step 3: OTP will be generate on your number then enter OTP & verify.

Step 4: Enter the number again & Login with OTP.

Step 5: Select the company Name & generate the license.

Step 6: Customer License Key will generate.

- How to Create company for YourKhata accounting & billing software?
Step 1: Go to “+” Button

Step 2: Enter the license key & Go to next.

Step 3: Verification message will be display click on ok button.

Step 5: Fill all the details & submit
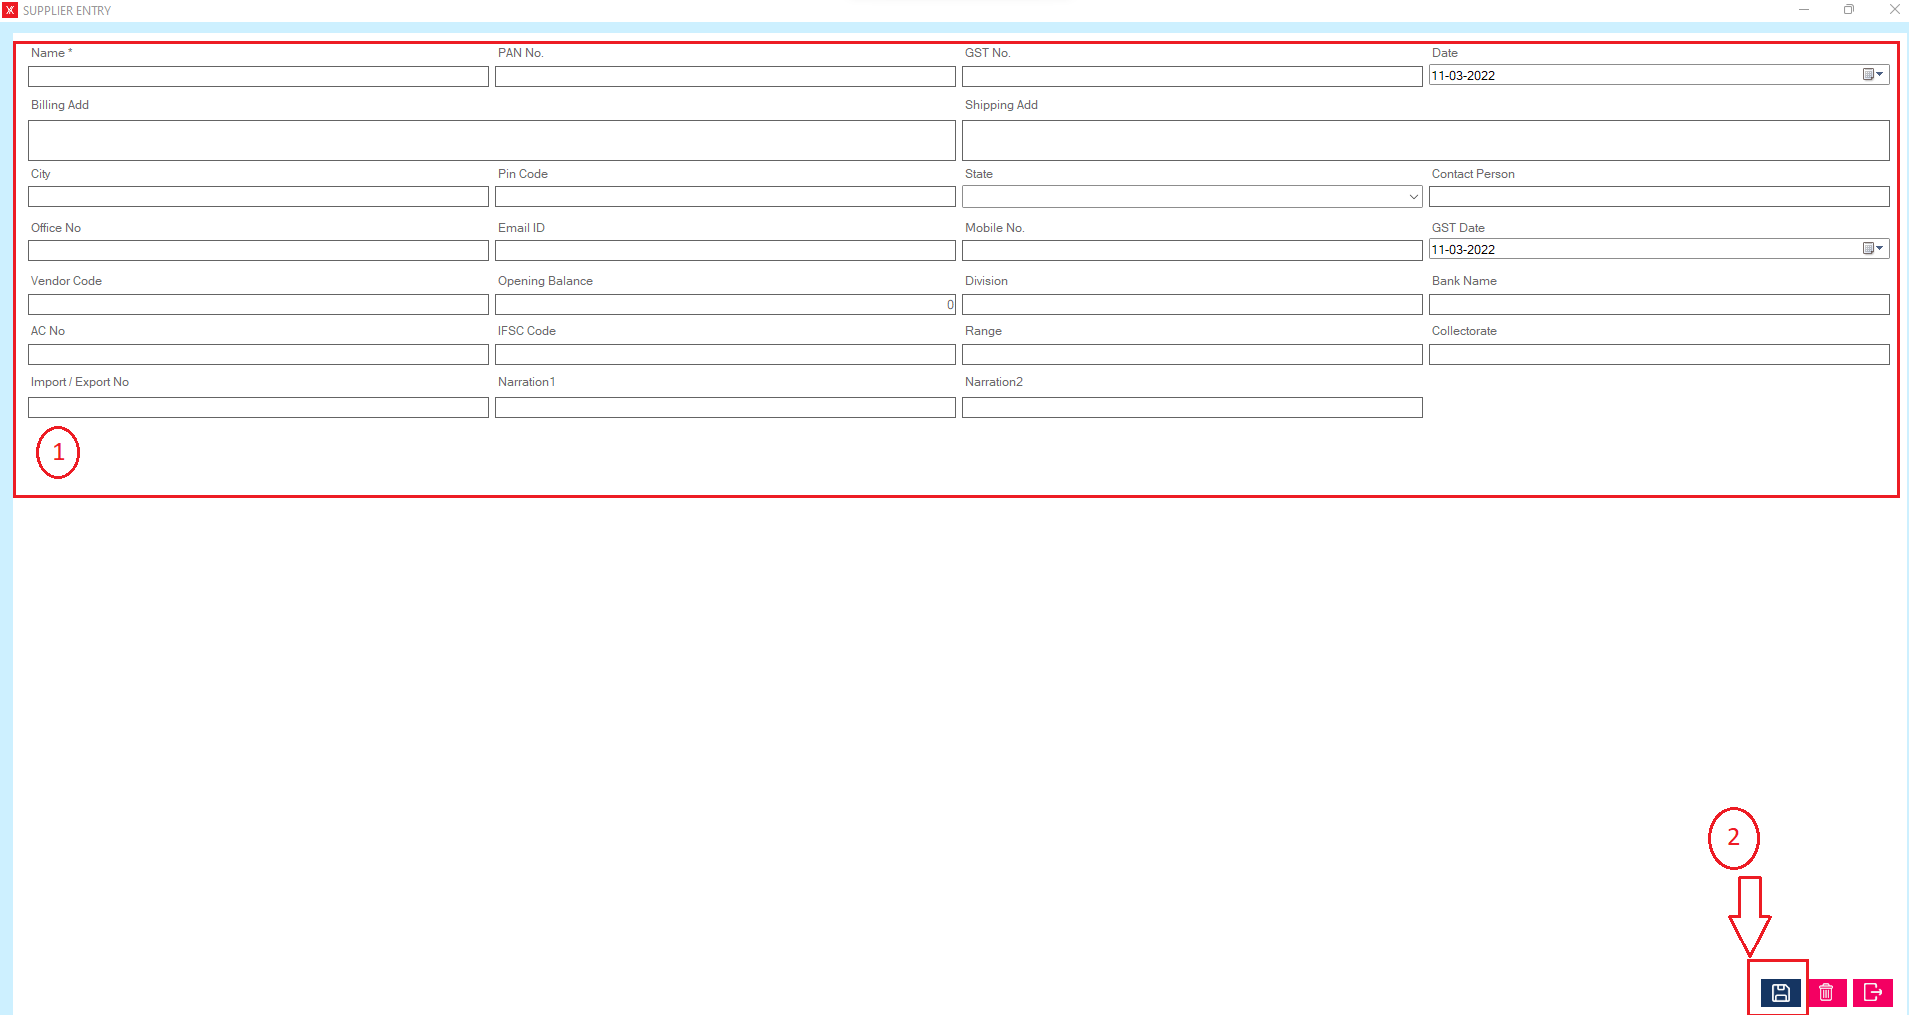
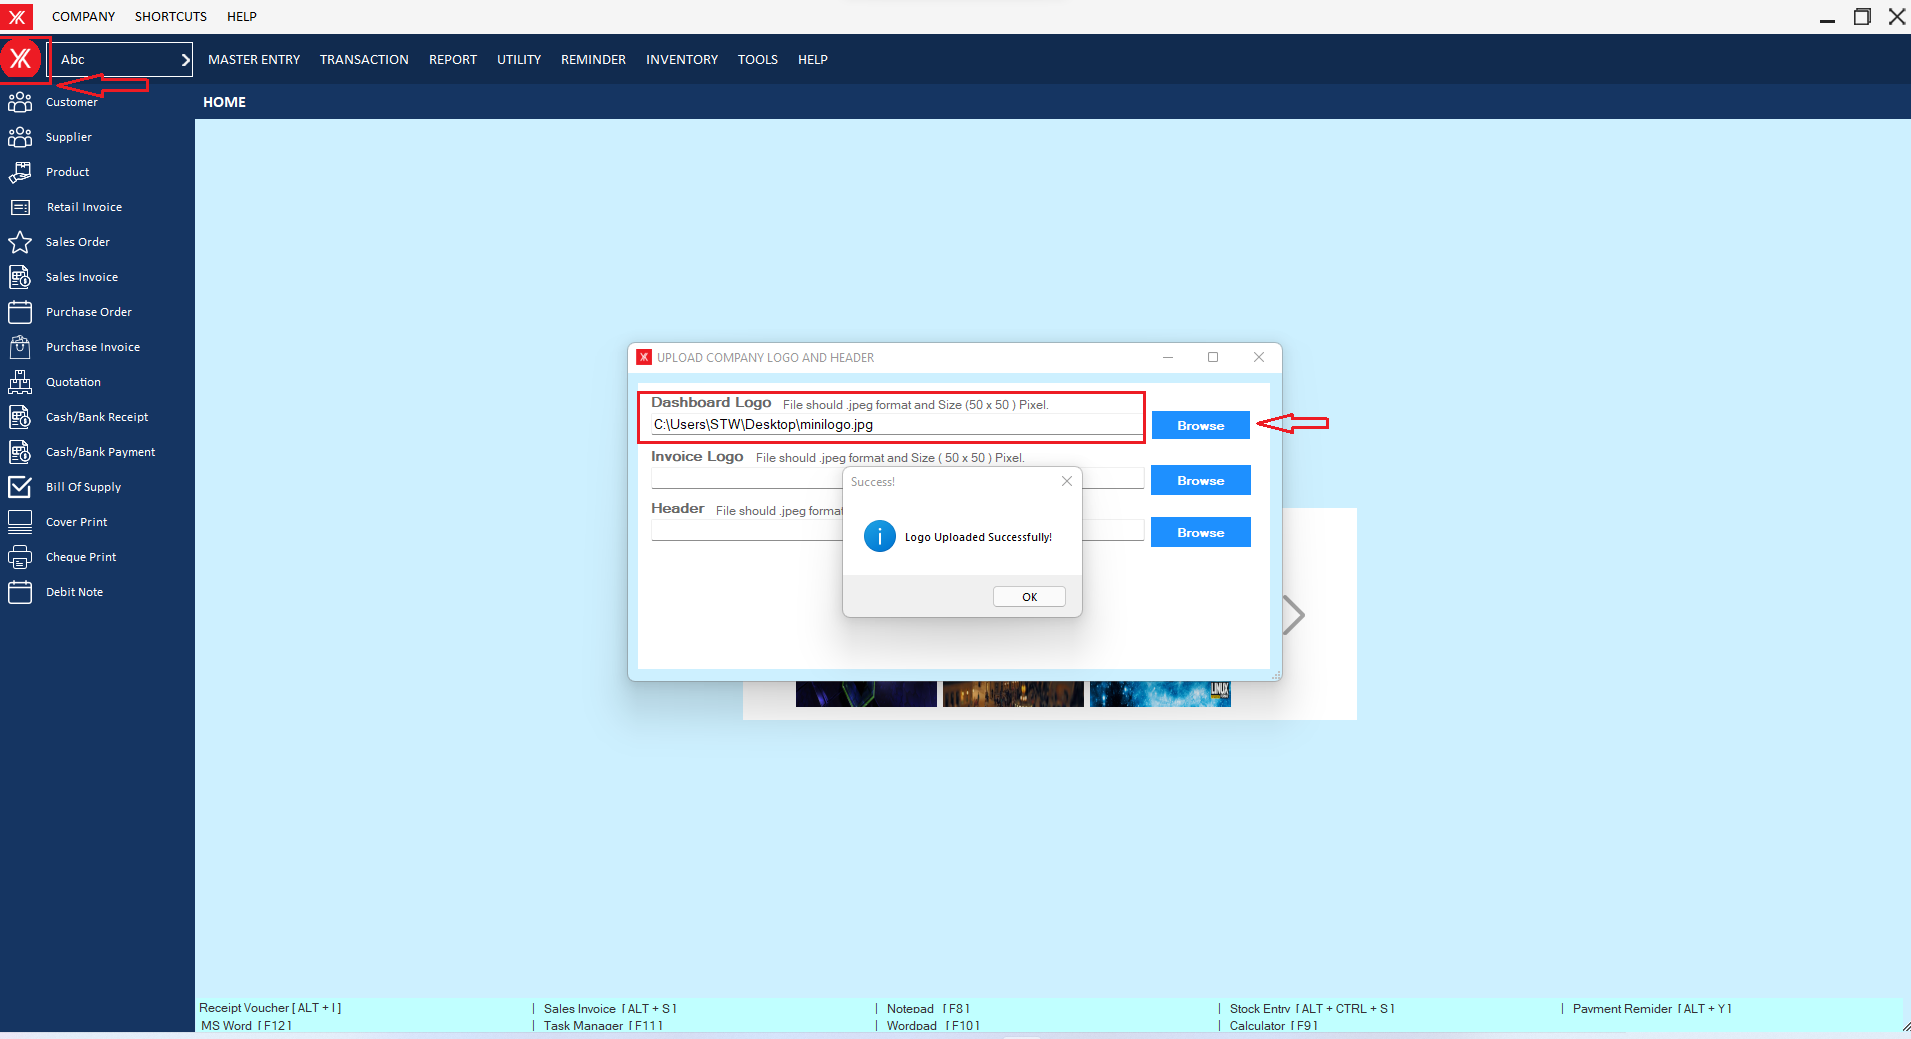
Step 6: Click on company logo
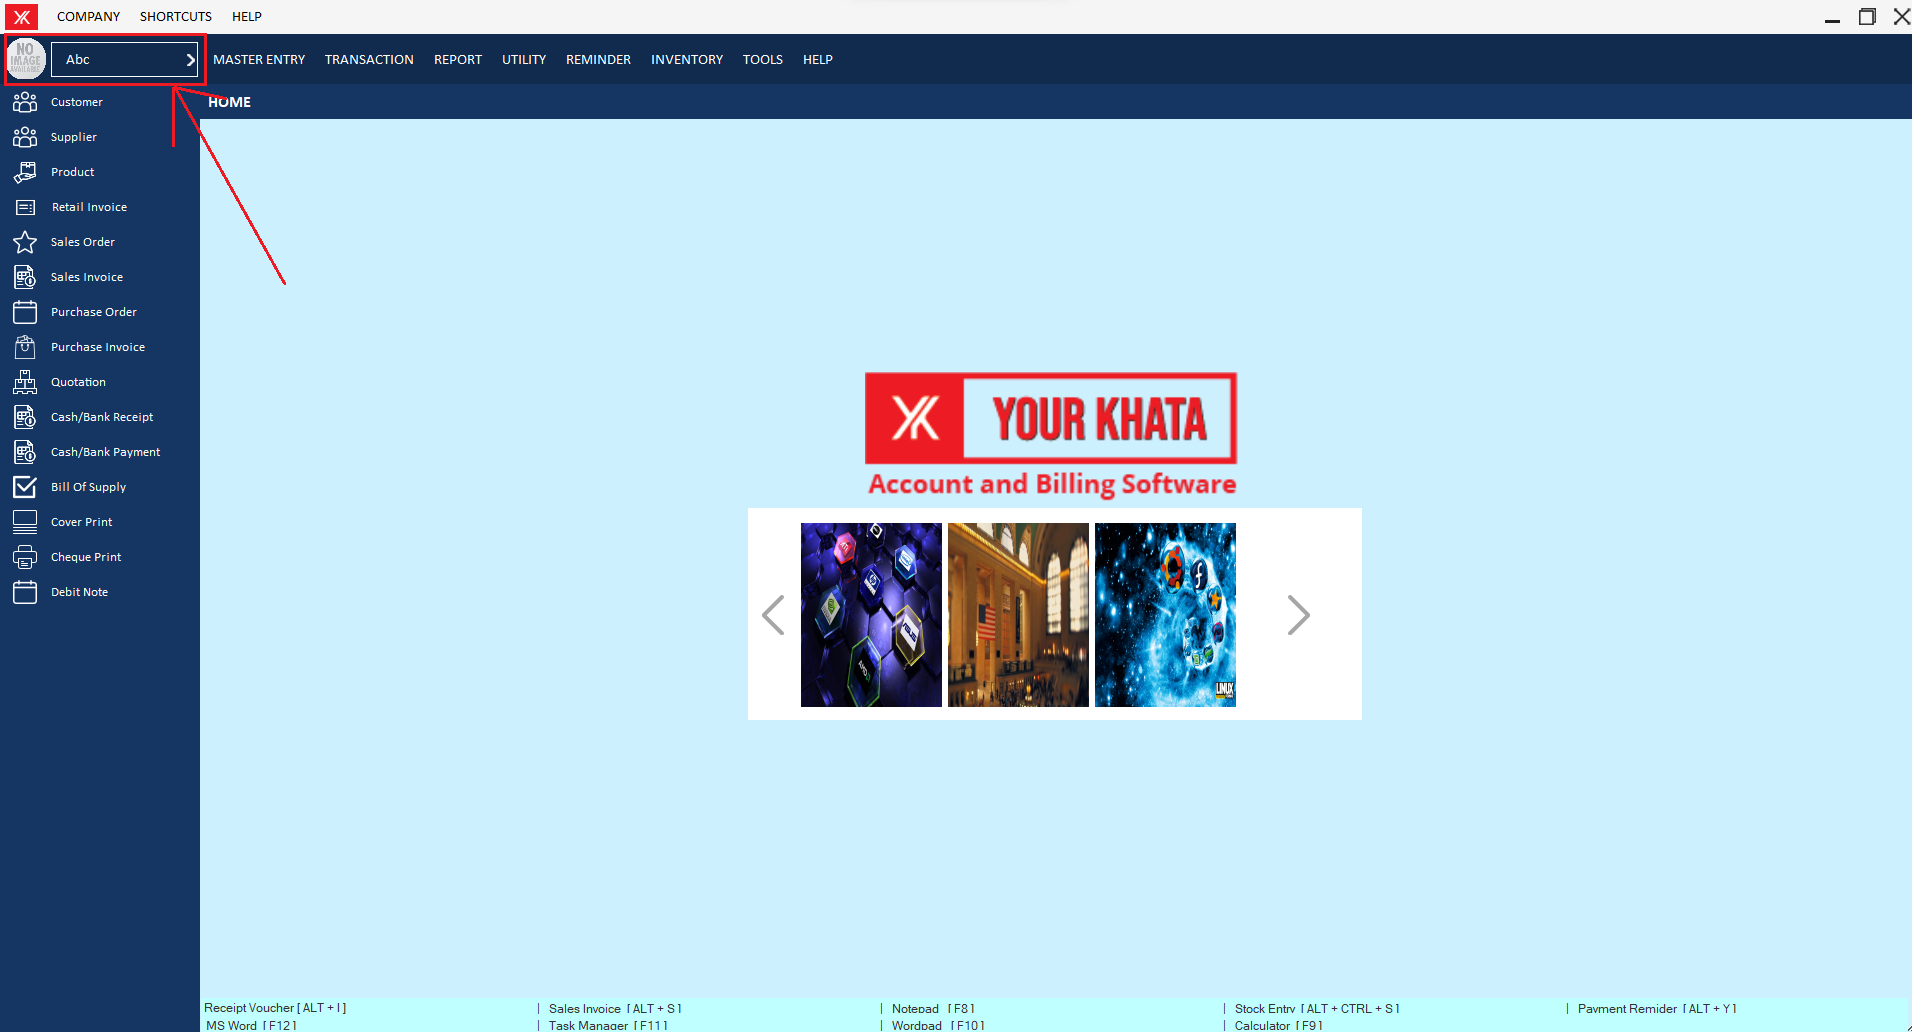
Step 7: Select & submit
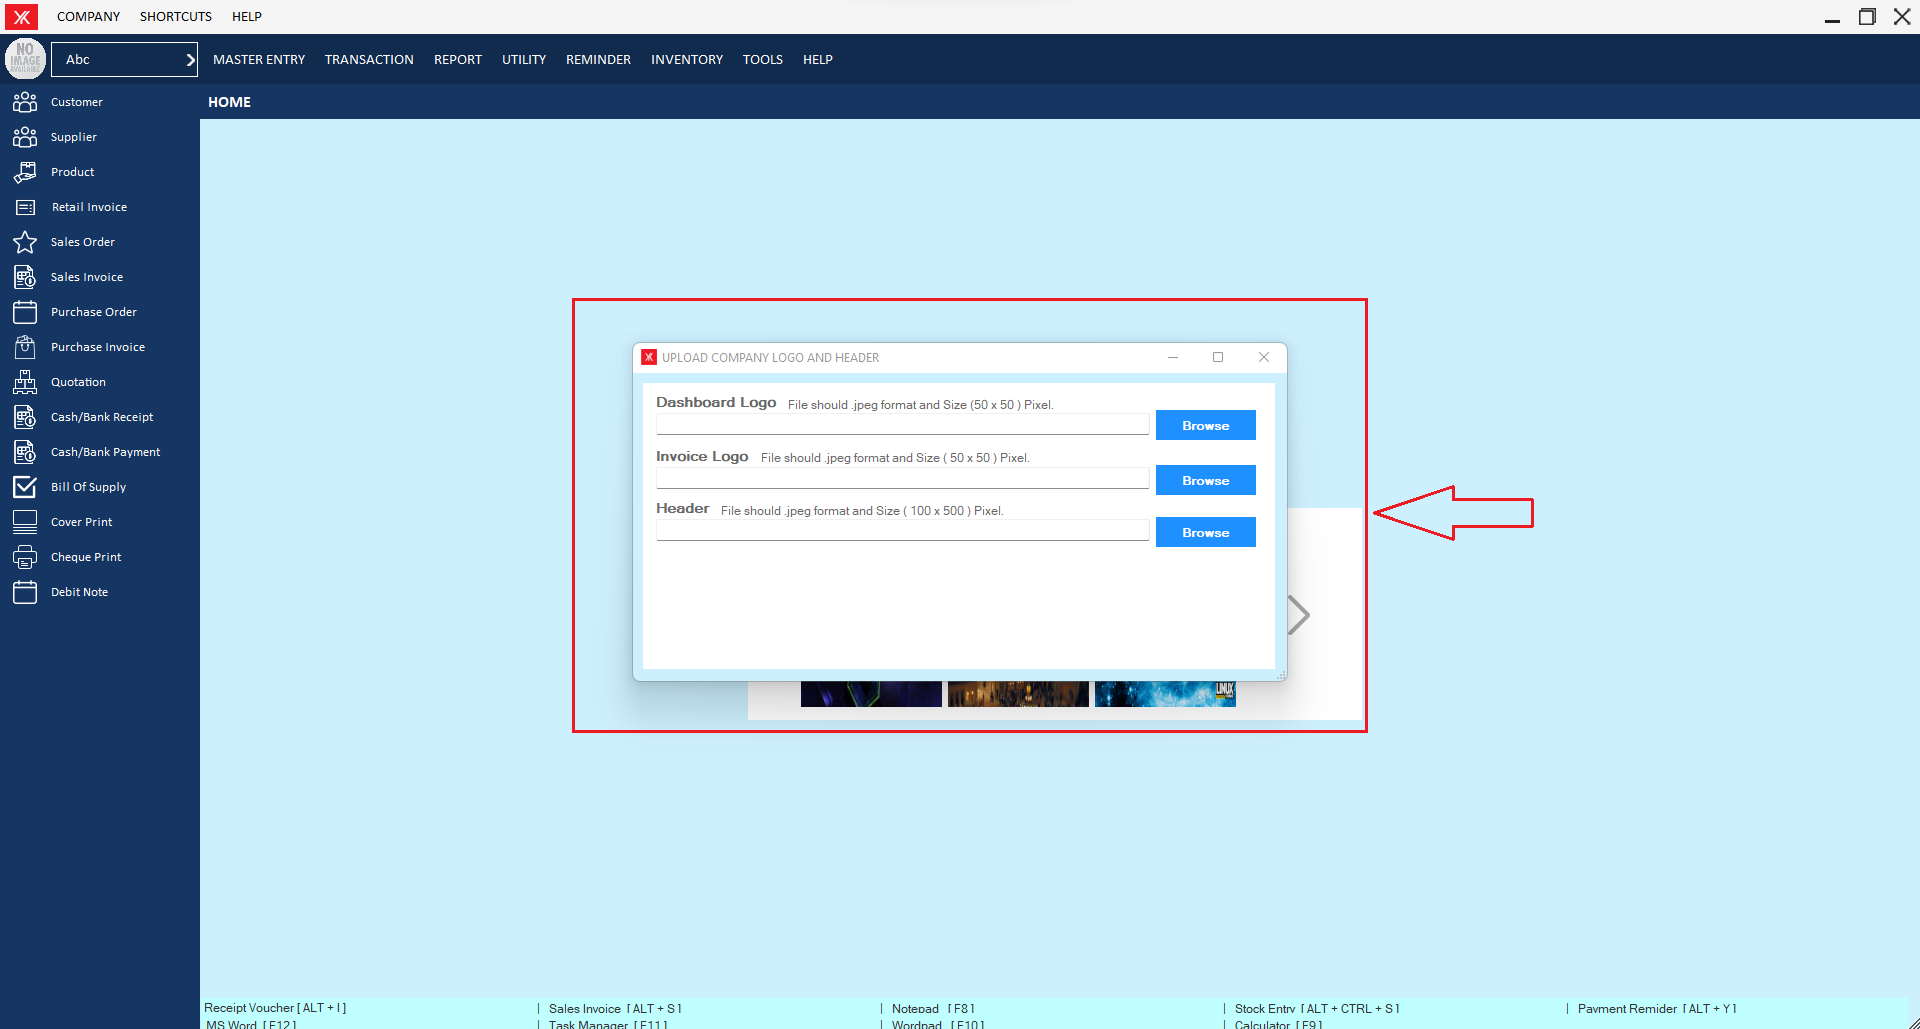
Step 8: Company logo will change.
How to use Your Khata
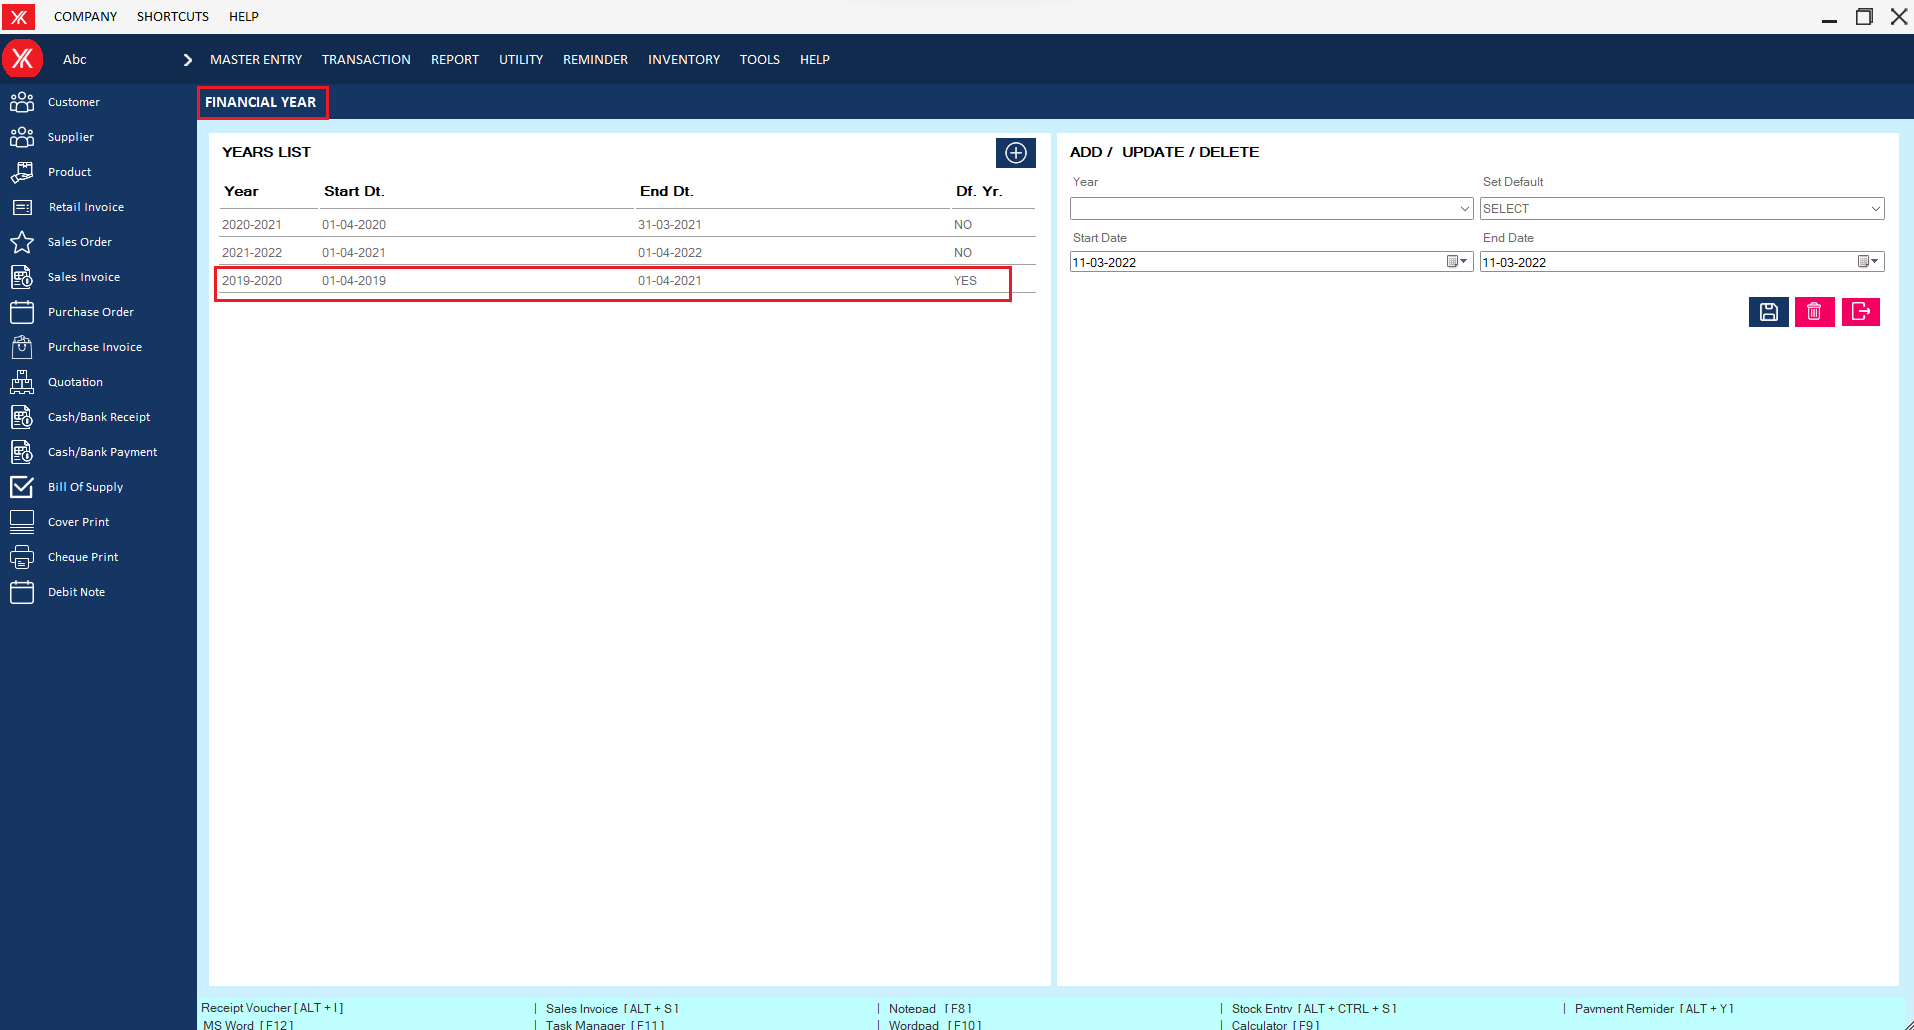
- How to add Financial year for YourKhata accounting and billing software?
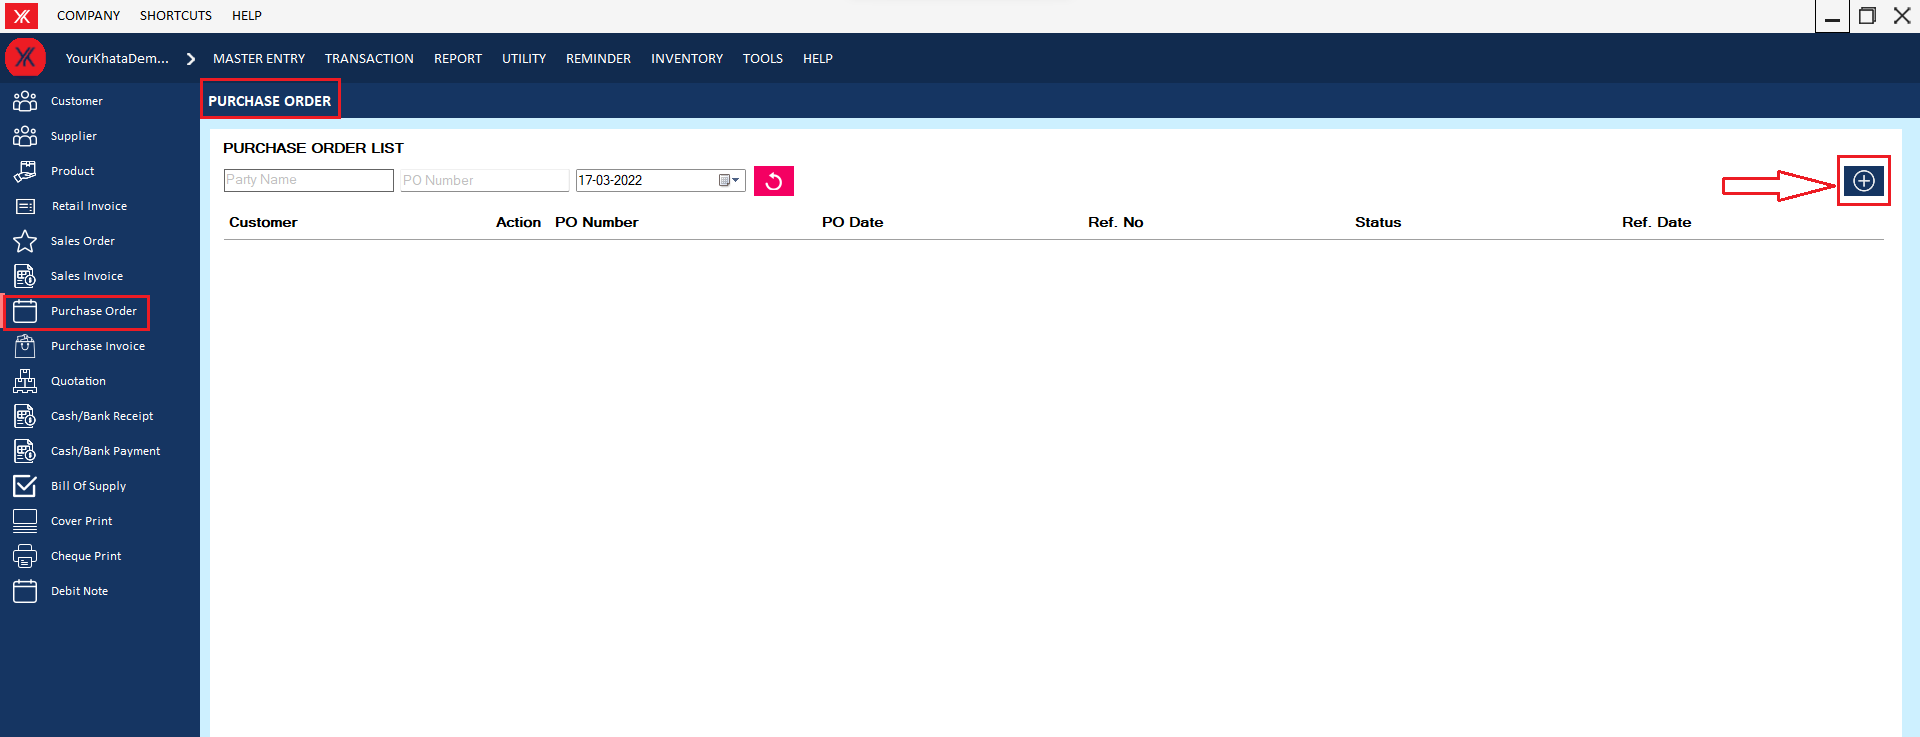
Step 1: Go to Financial year
Step 2: Fill all details &submit”
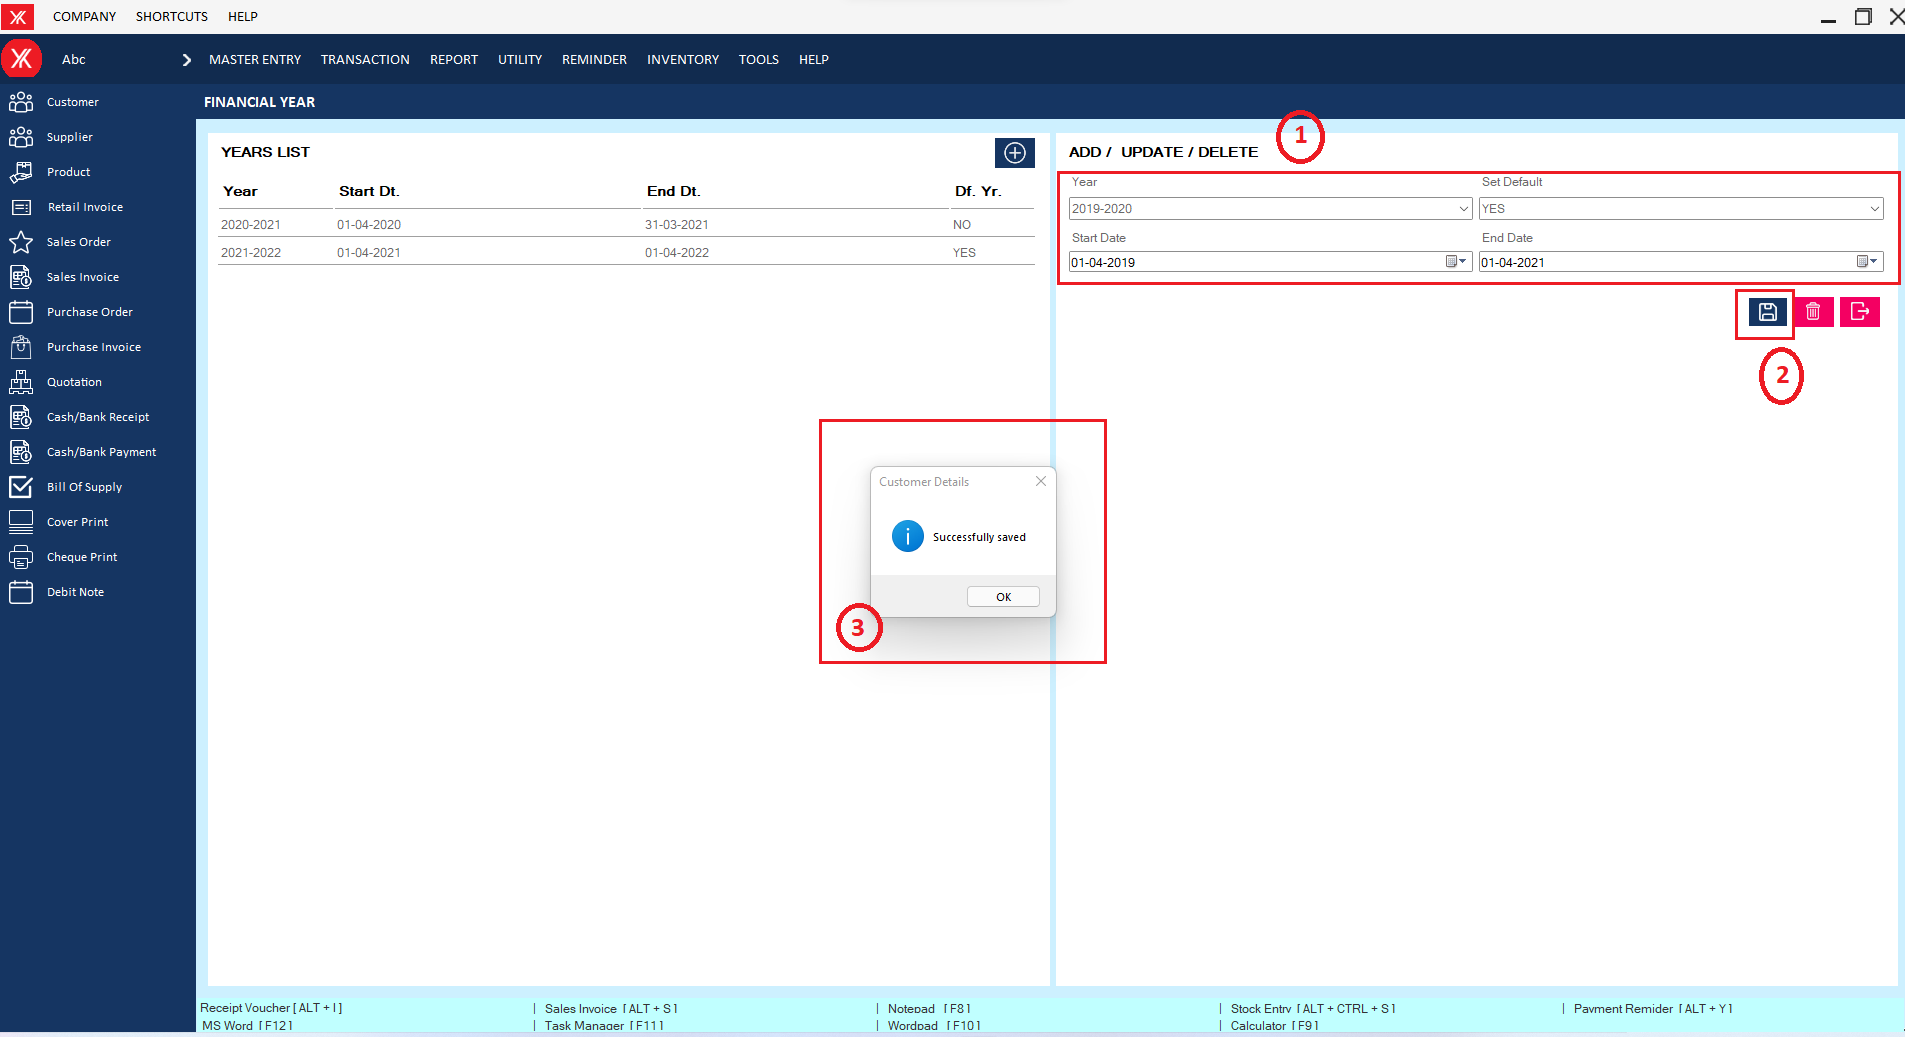
Step 3: New entry of financial year will be display on screen
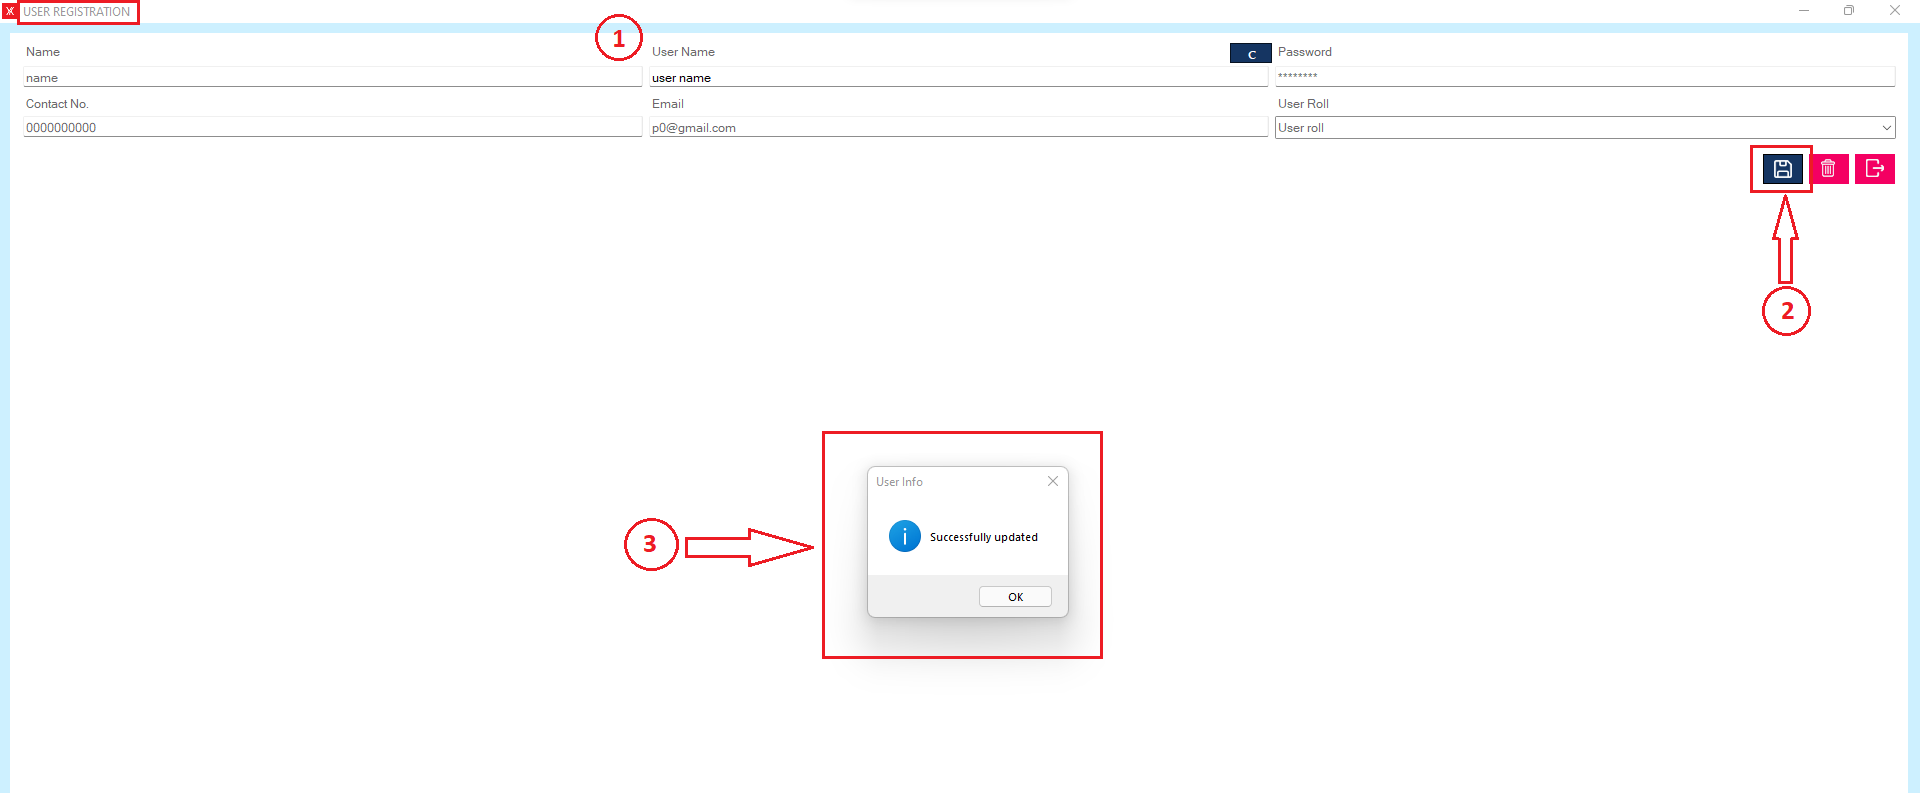
- How to add User registration for YouKhata accounting and billing software?
Step 1: Go to user registration in utility.

Step 2: Click on “+”
Step 3: Fill all details & submit
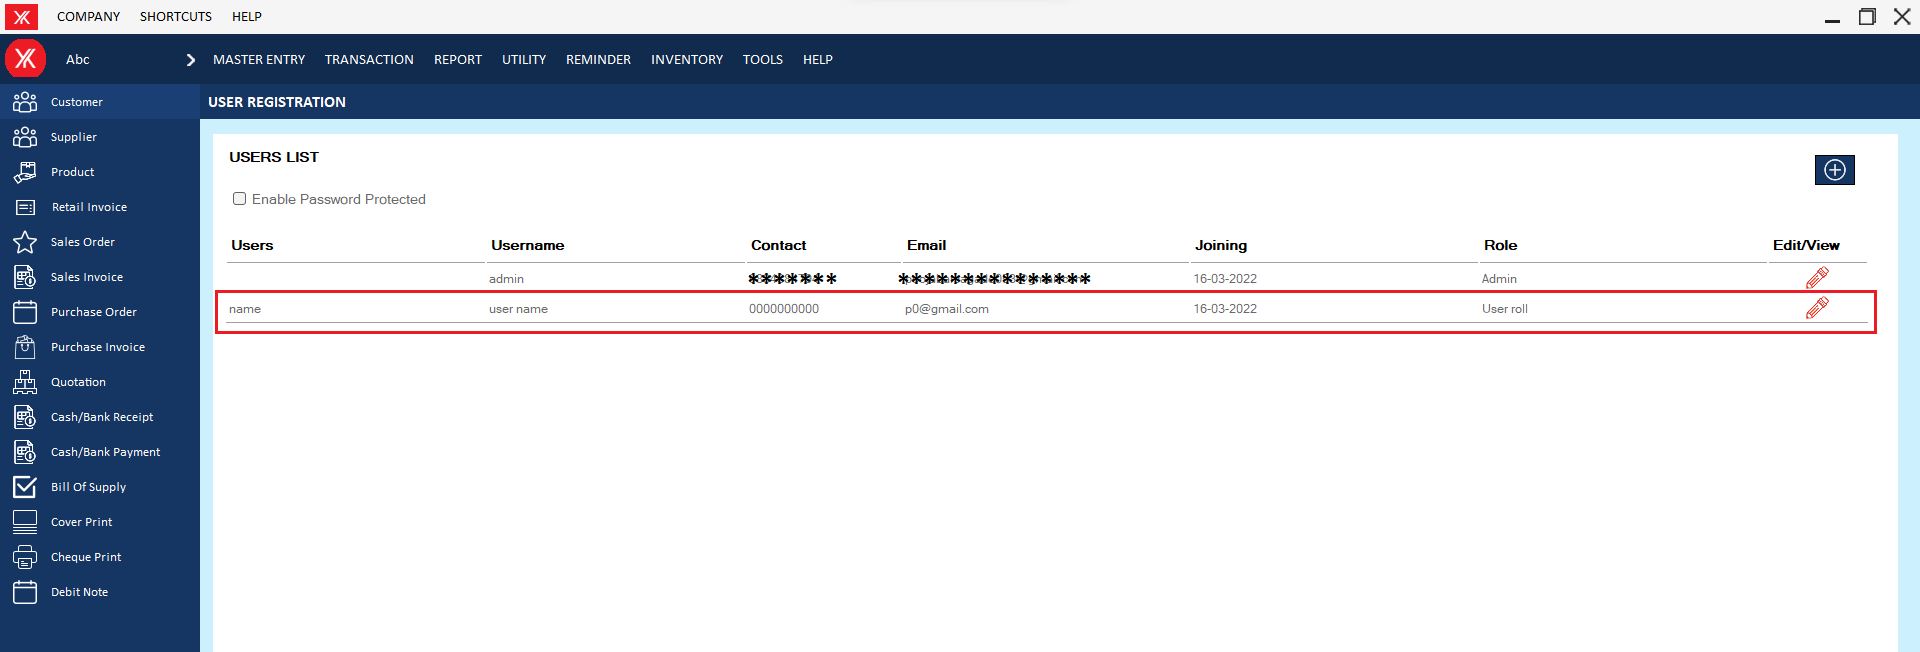
Step 4: New user registration will be display on user registration screen
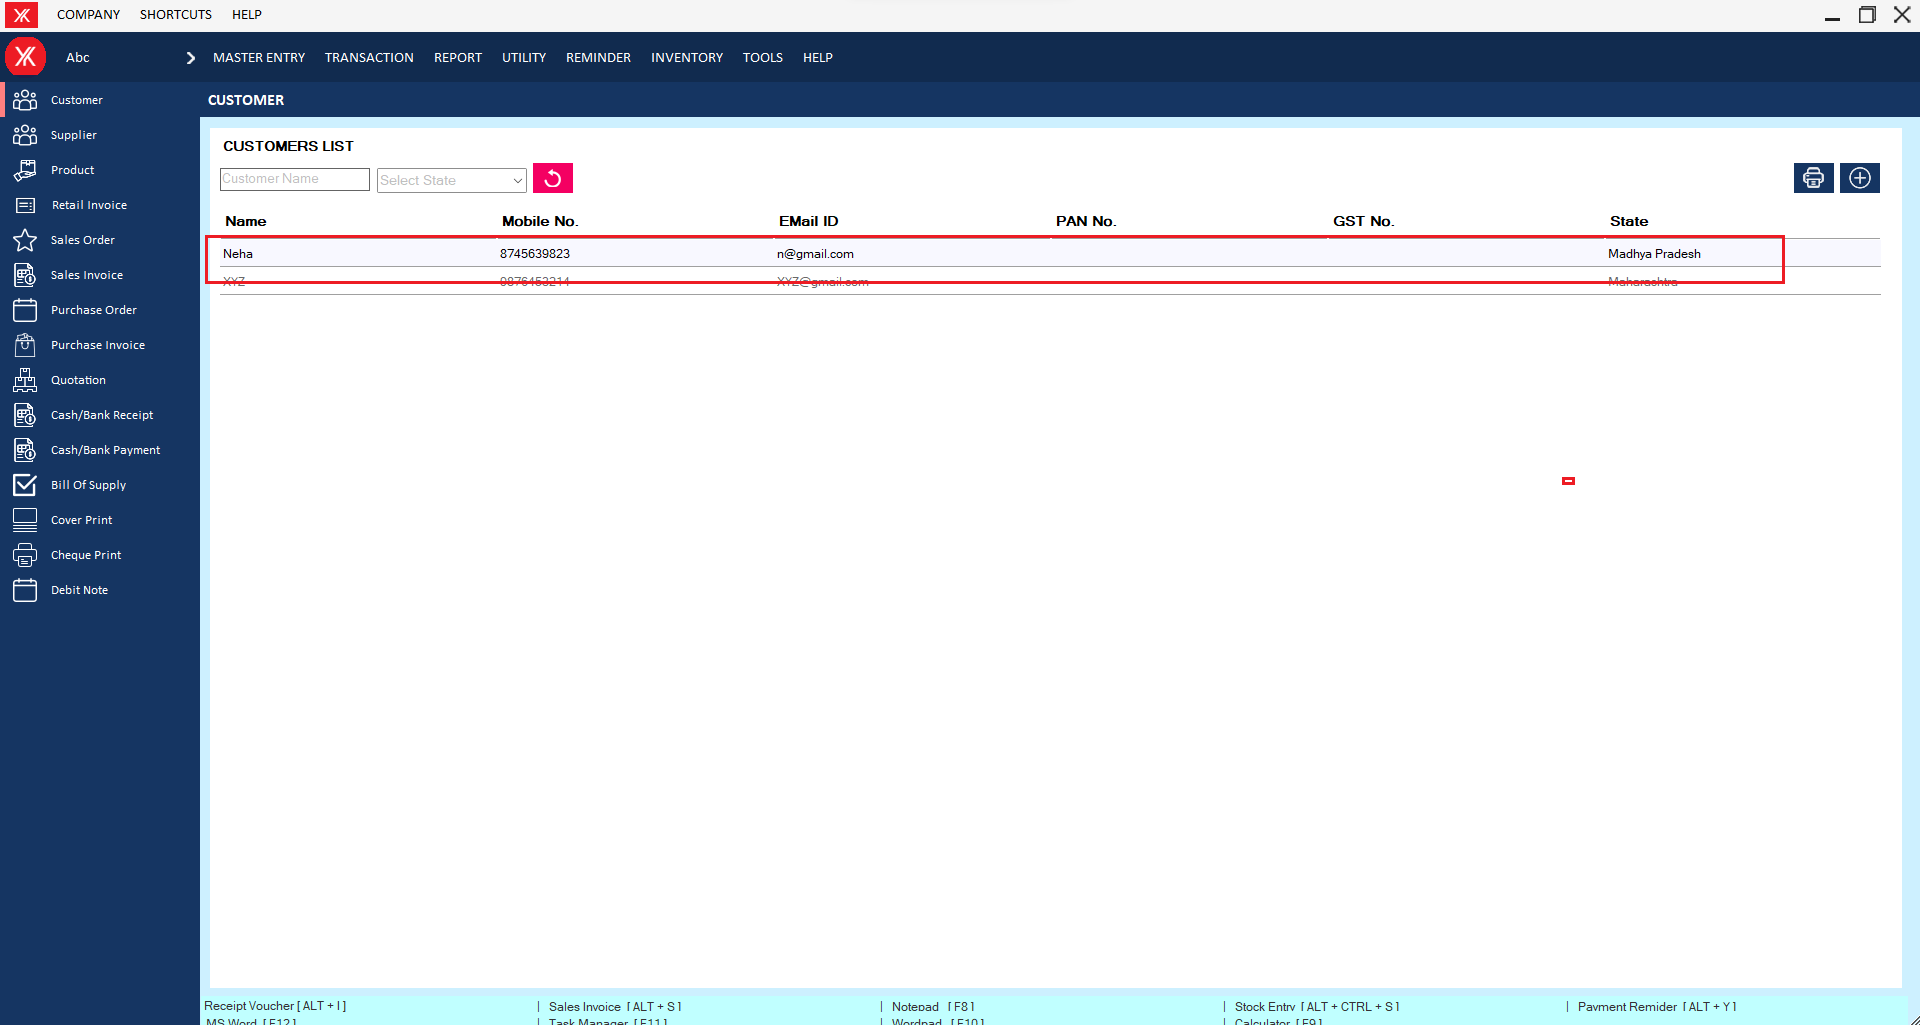
- How to add Customer for Yourkhata accounting and billing software?
Step 1: Go to Customer & click “+”.
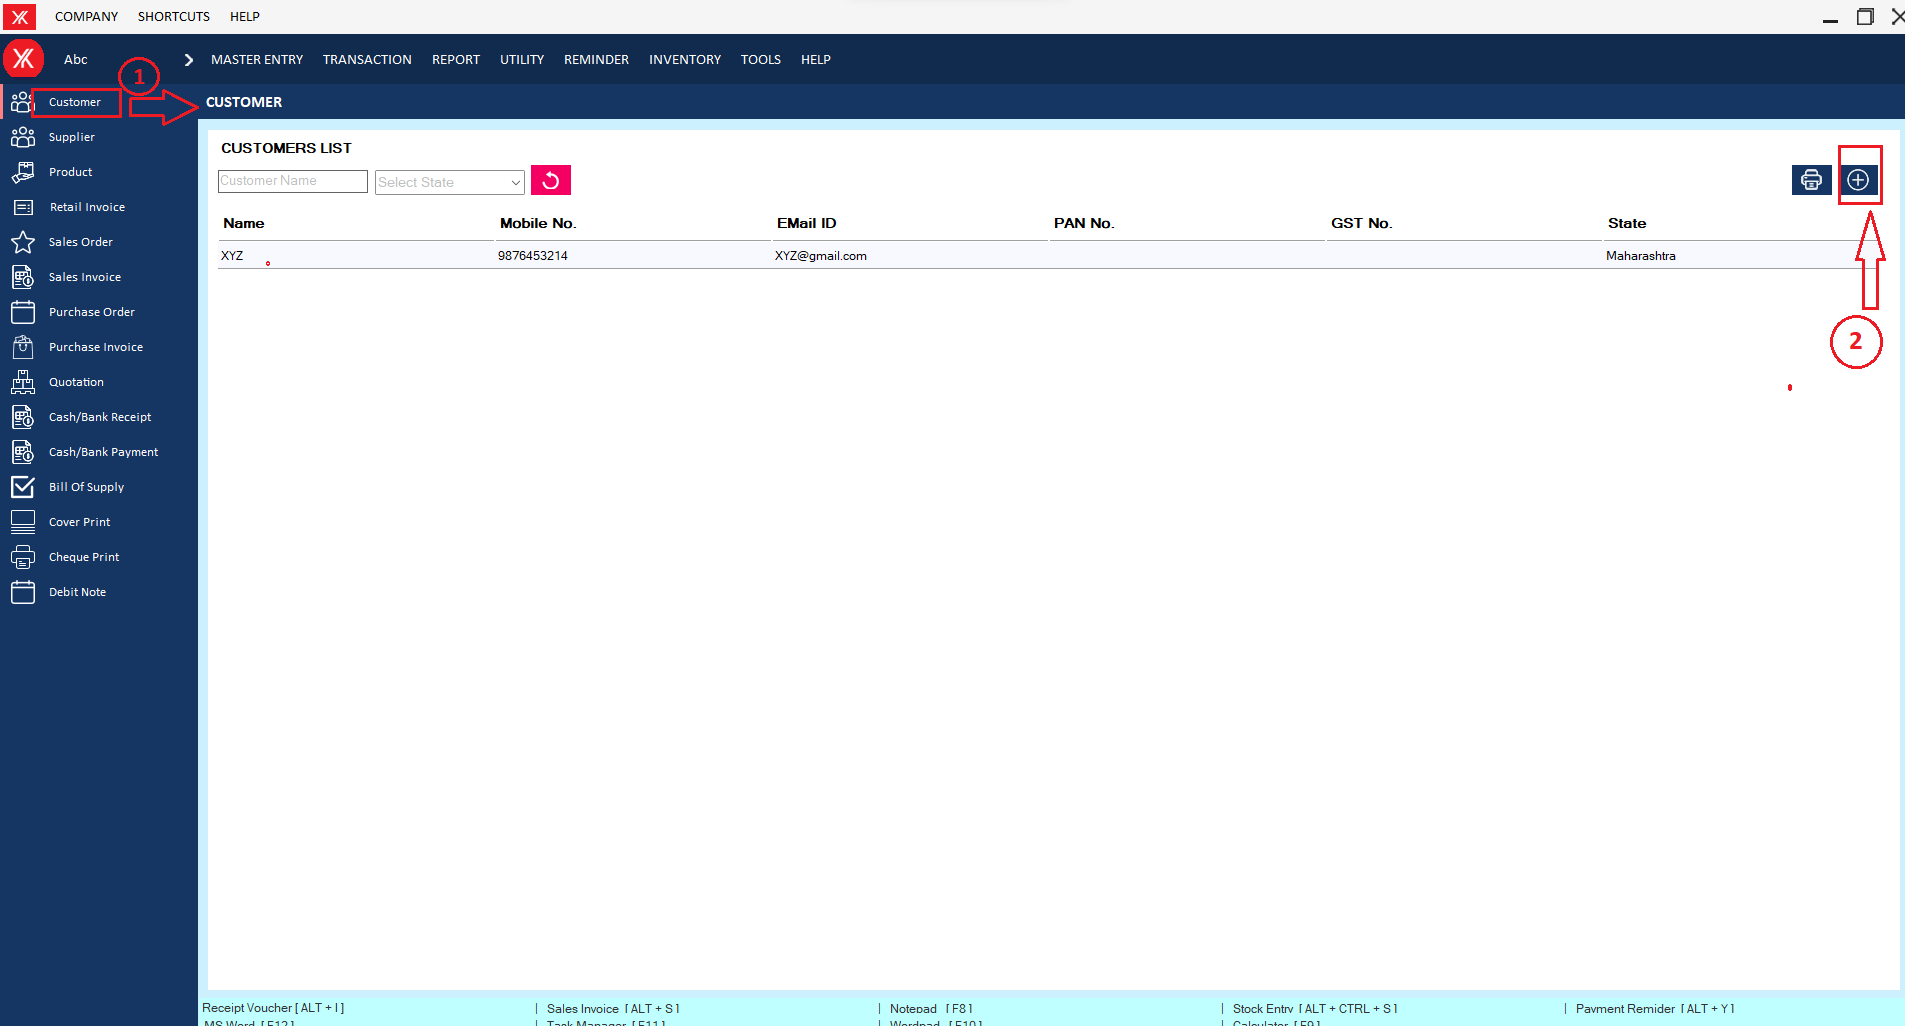
Step 2: Fill all details & submit
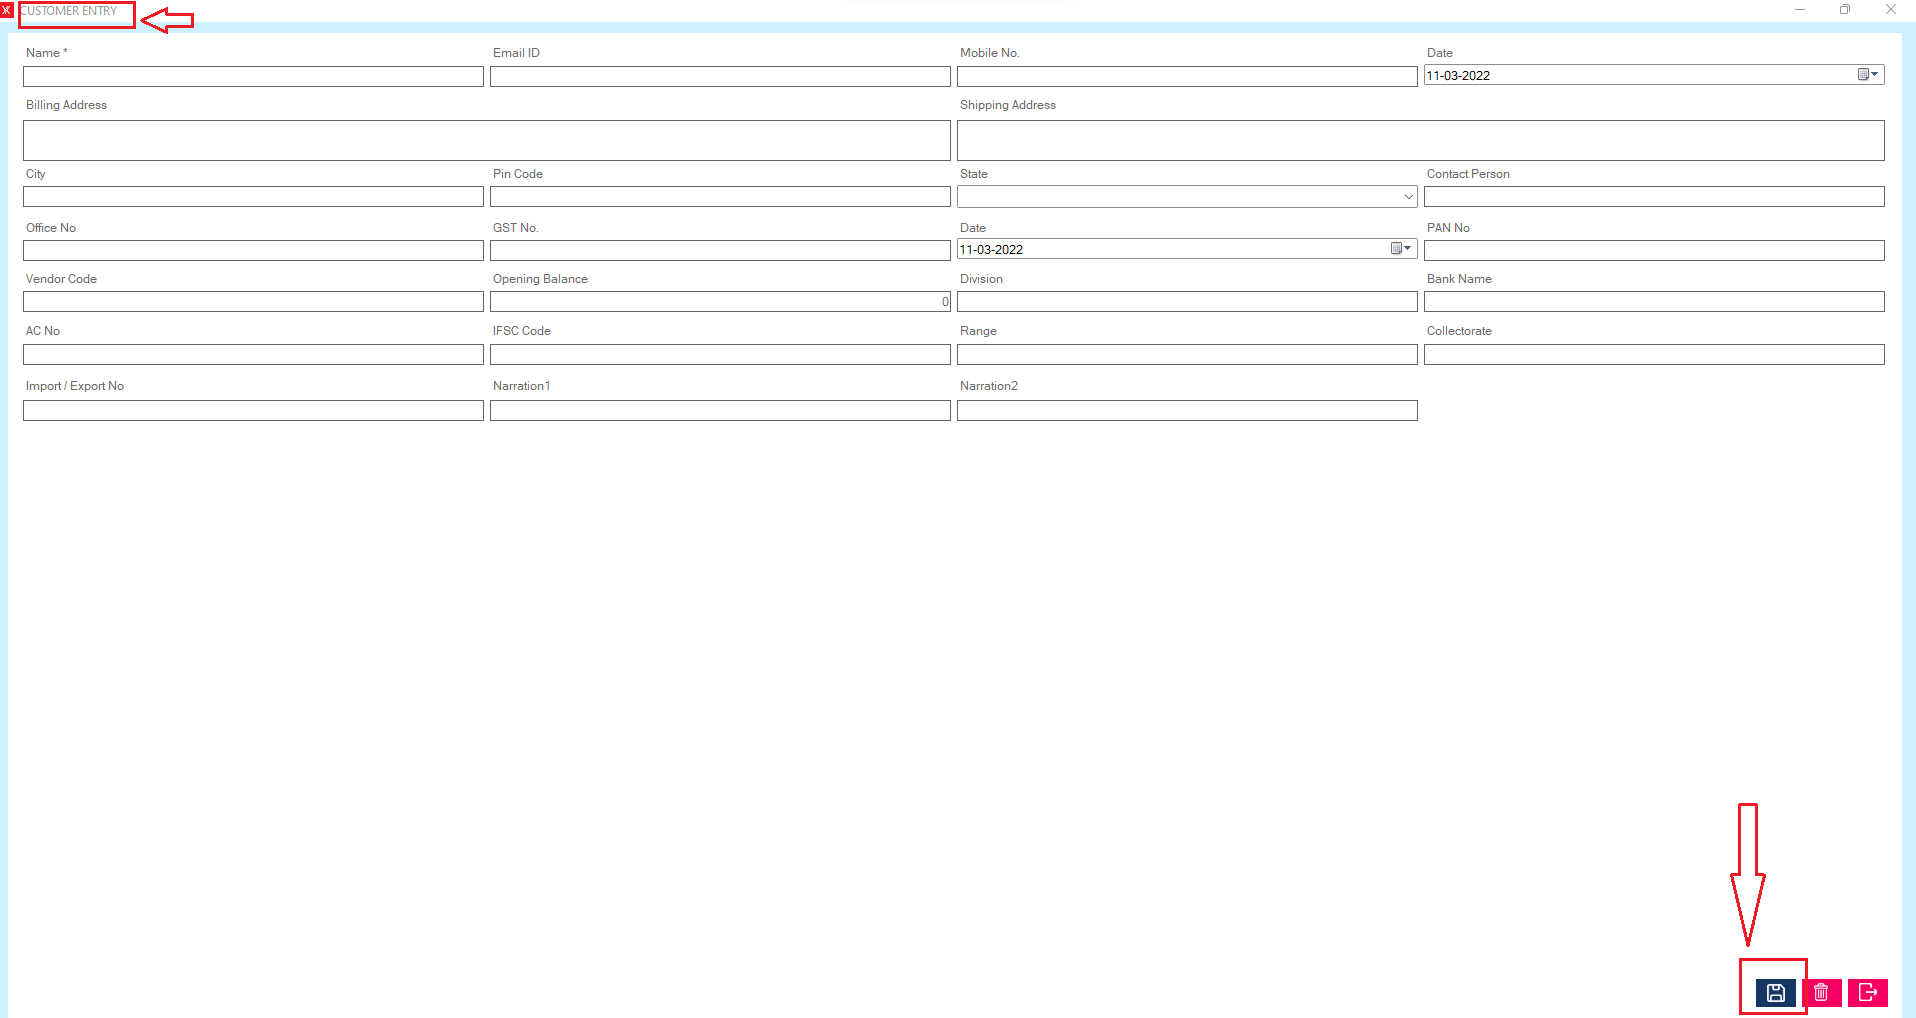
Step 3: New Entry will be display on customer list screen.
- How to add Supplier for Yourkhata accounting and billing software?
Step 1: Go to supplier & Click on “+”.

Step 2: Fill all details & submit

Step 3: New Entry will be display on supplier screen.

- How to add Tax master for Yourkhata accounting and billing software?
Step 1: Go to Tax master in master entry
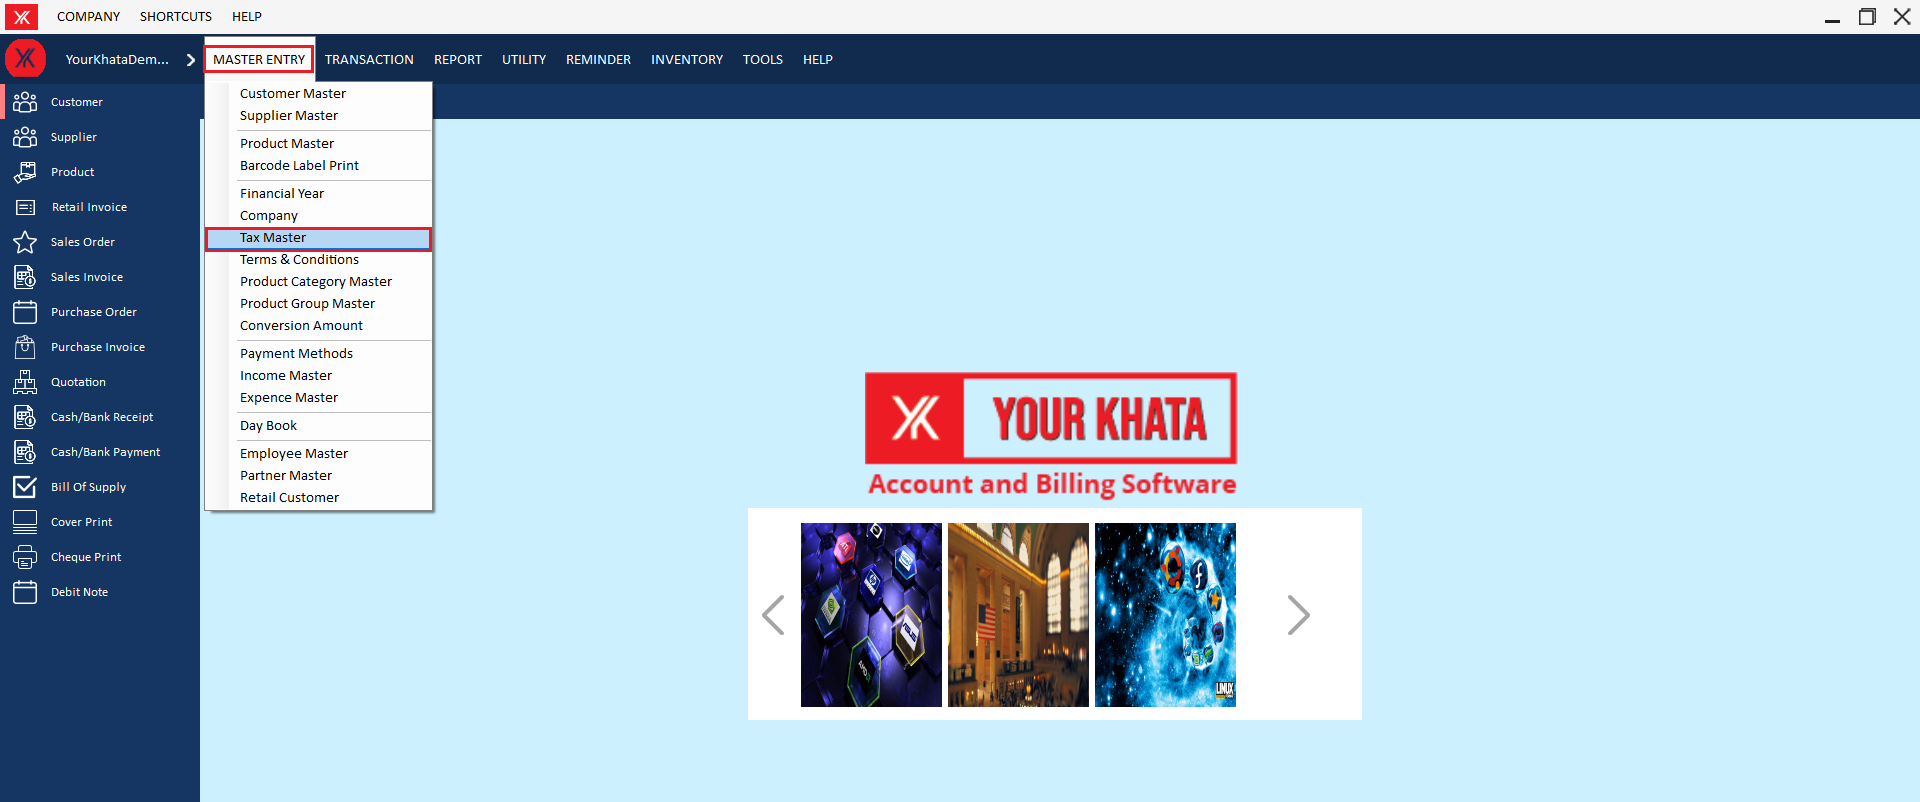
Step 2: Click on “+”

Step 3: Fill all details & submit.
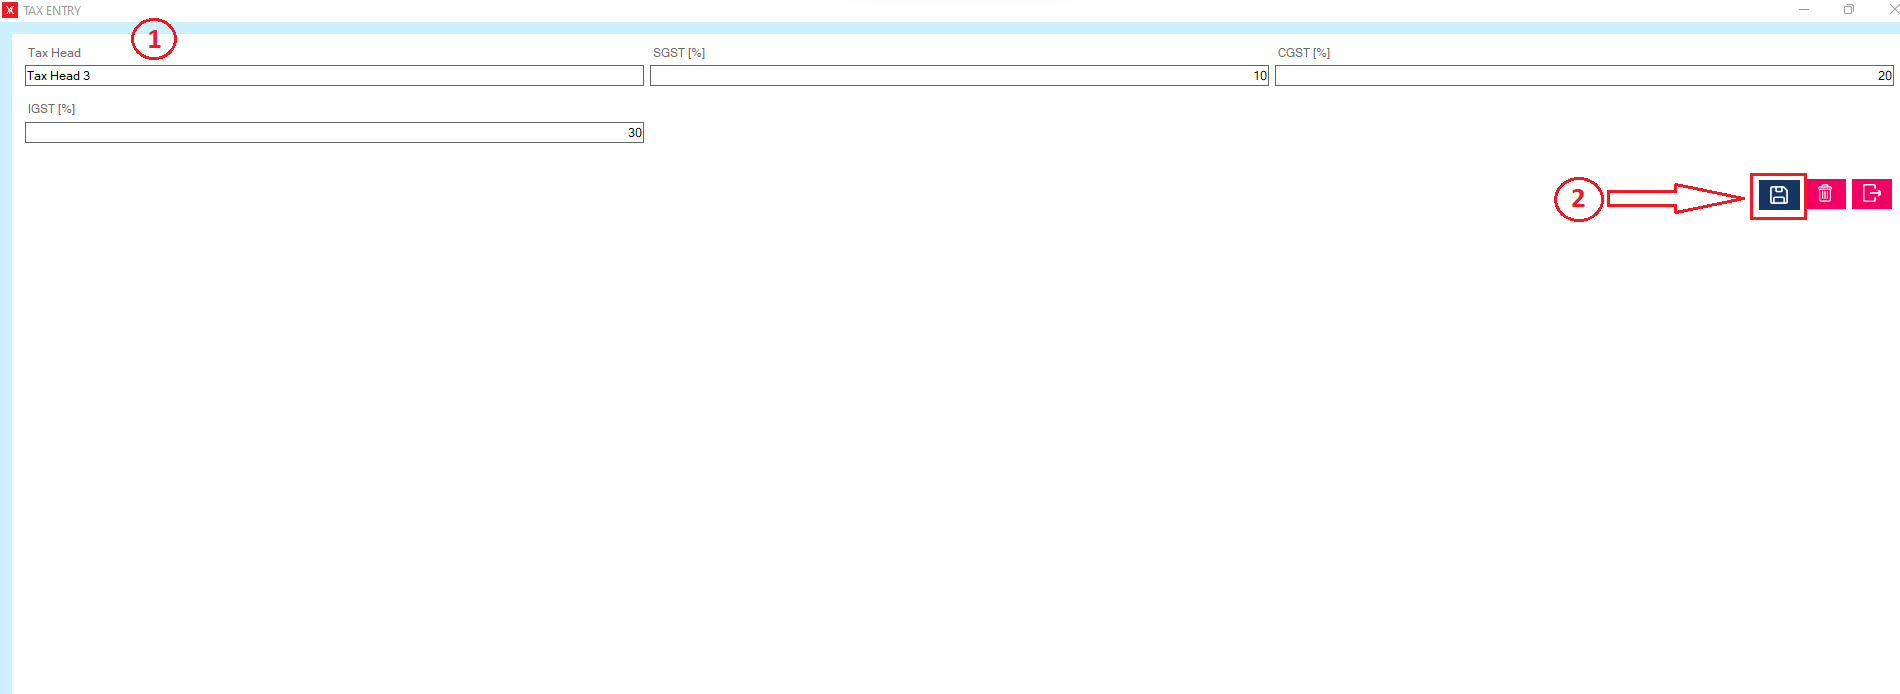
Step 3: New record will be listed in tax master

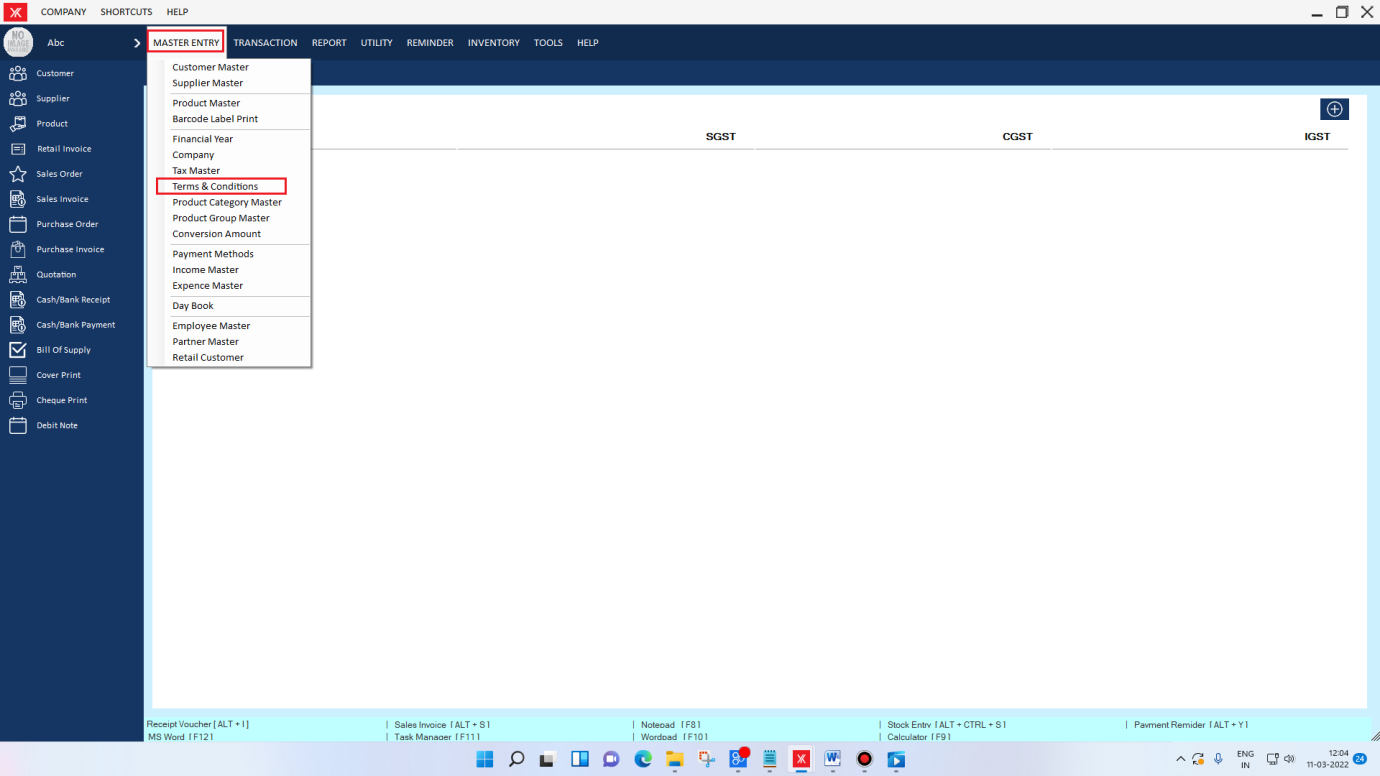
- How to get Terms & conditions for YourKhata accounting & billing software?
Step 1: Go to terms & conditions in Master entry
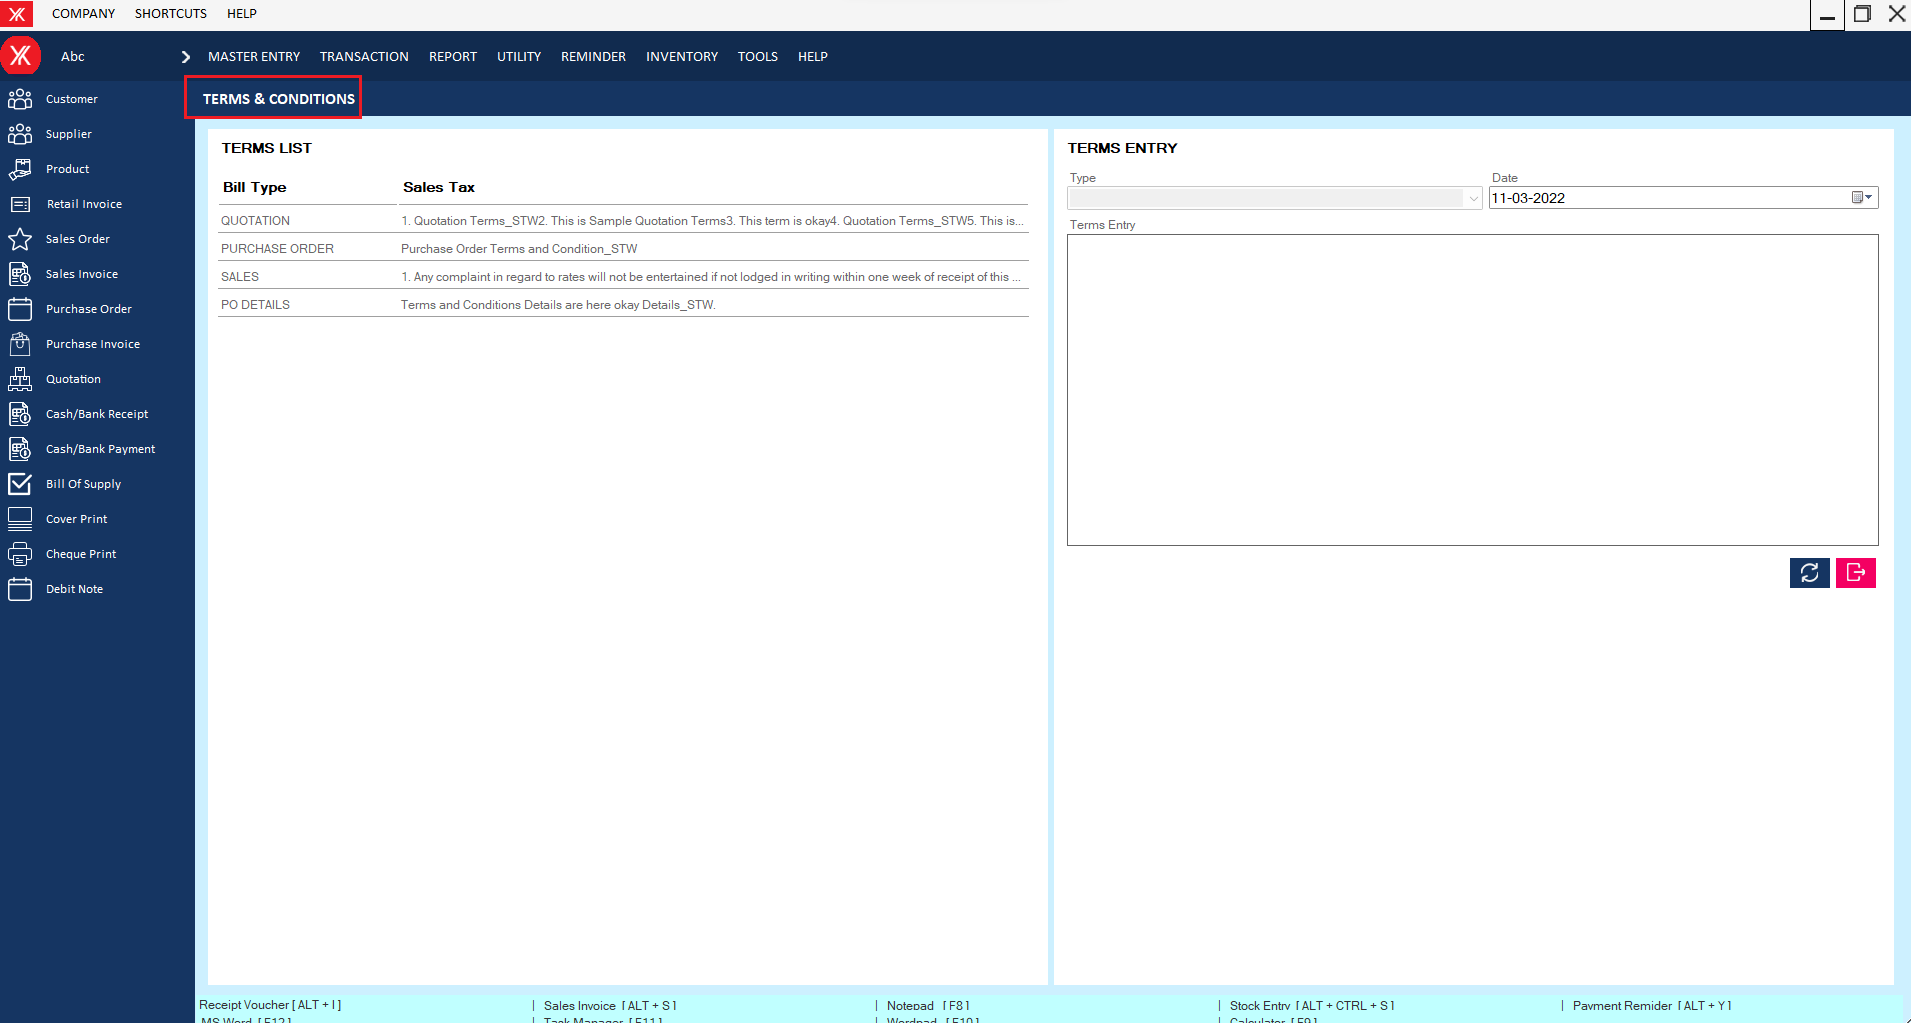
Step 2: Go with the details
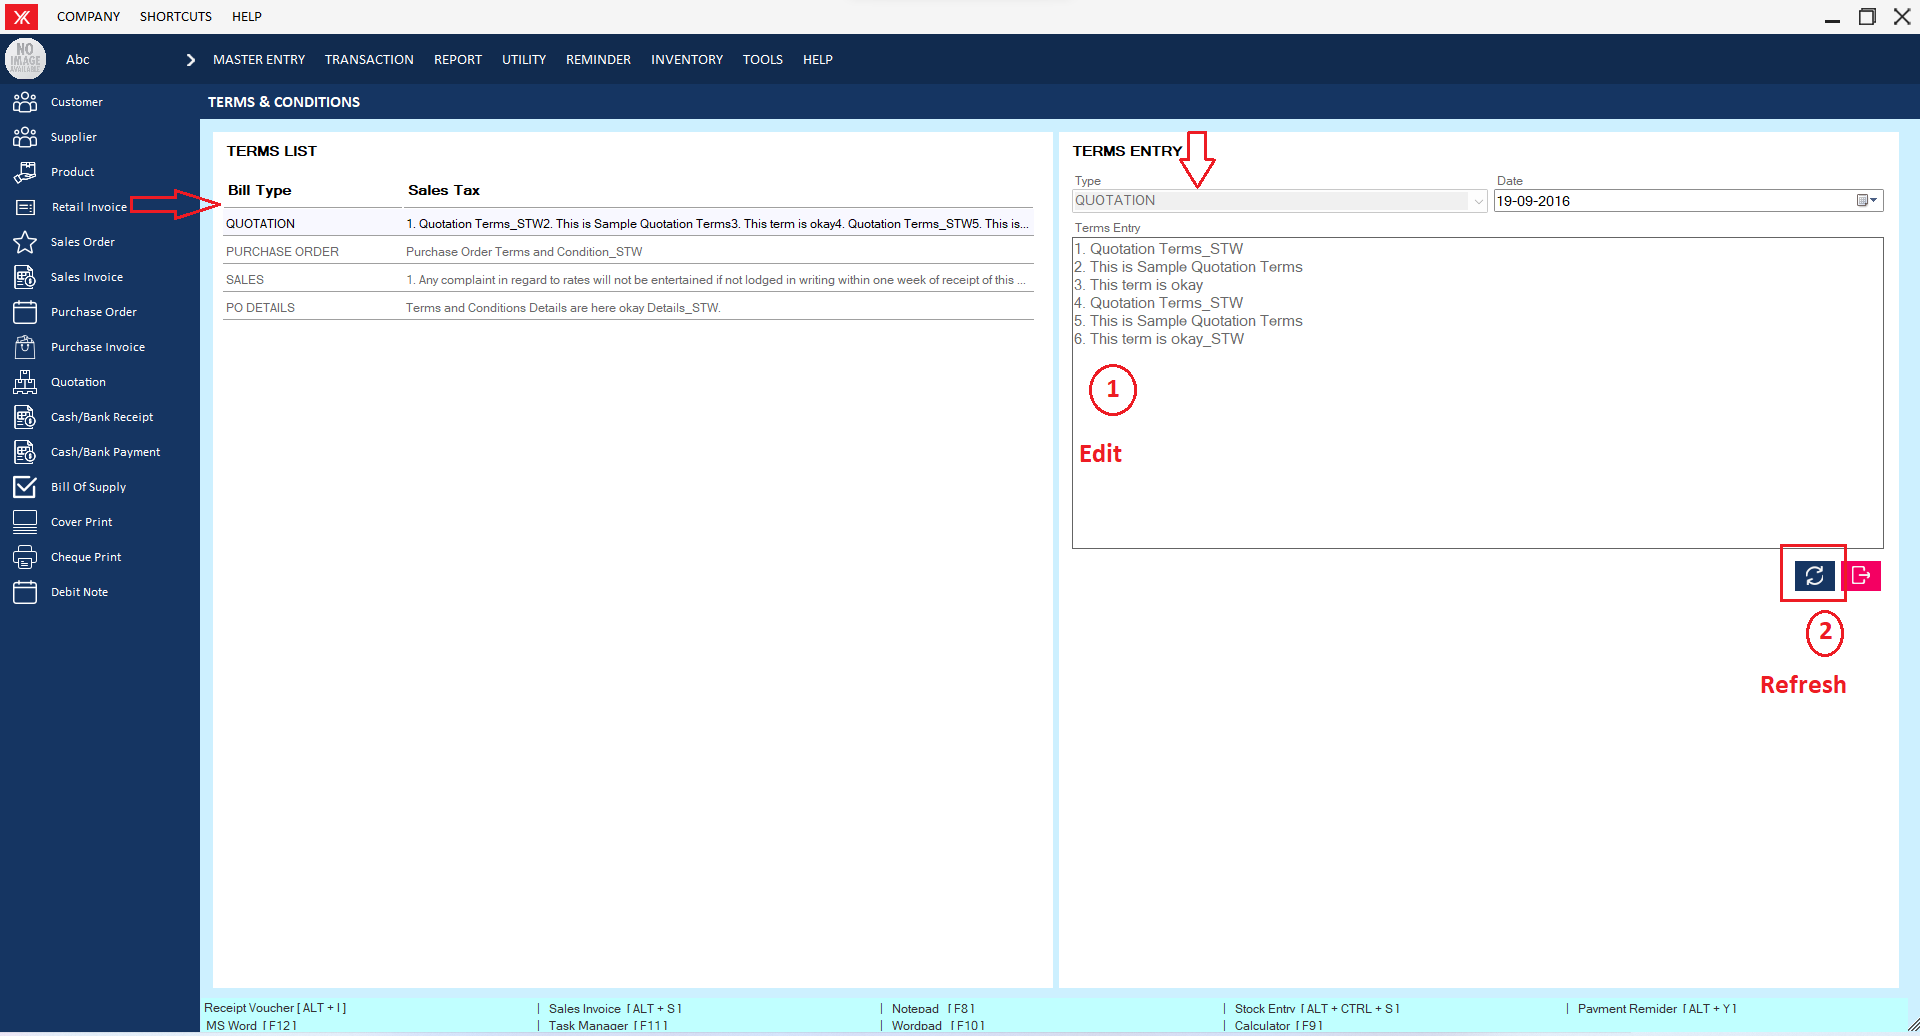
Step 3: Double click (You can edit & refresh)
- How to add Product category for Yourkhata accounting and billing software?
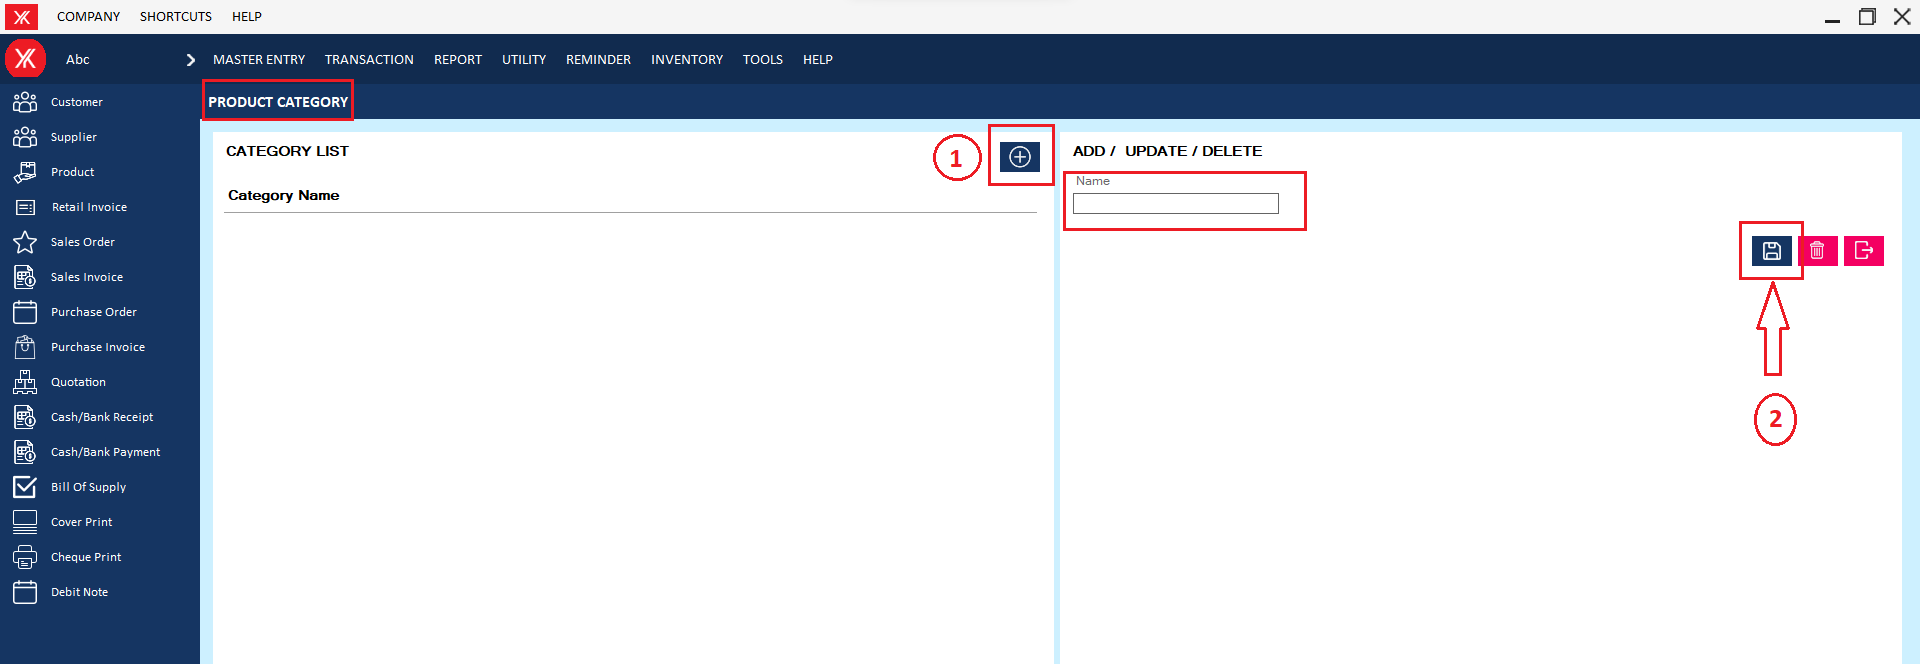
Step 1: Go to product category in master entry
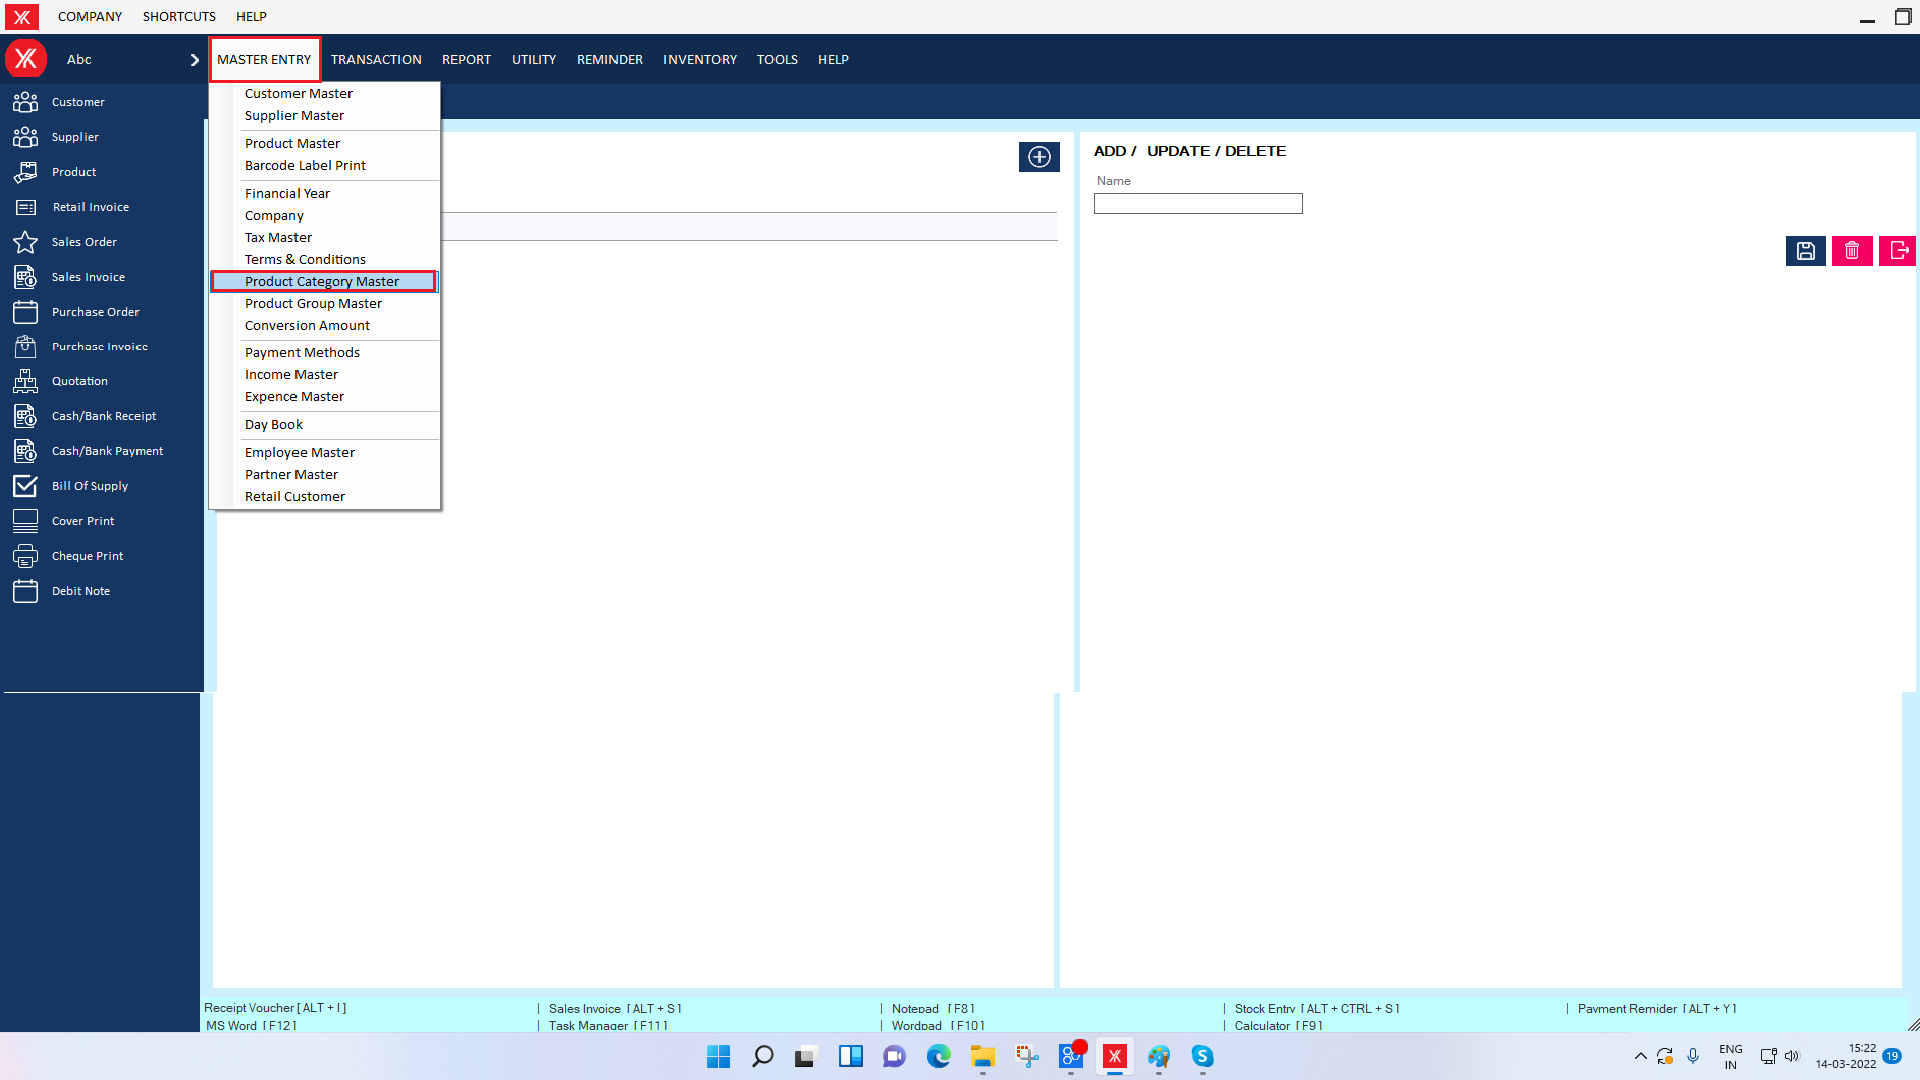
Step 2: Click on “+” & enter category name & submit.
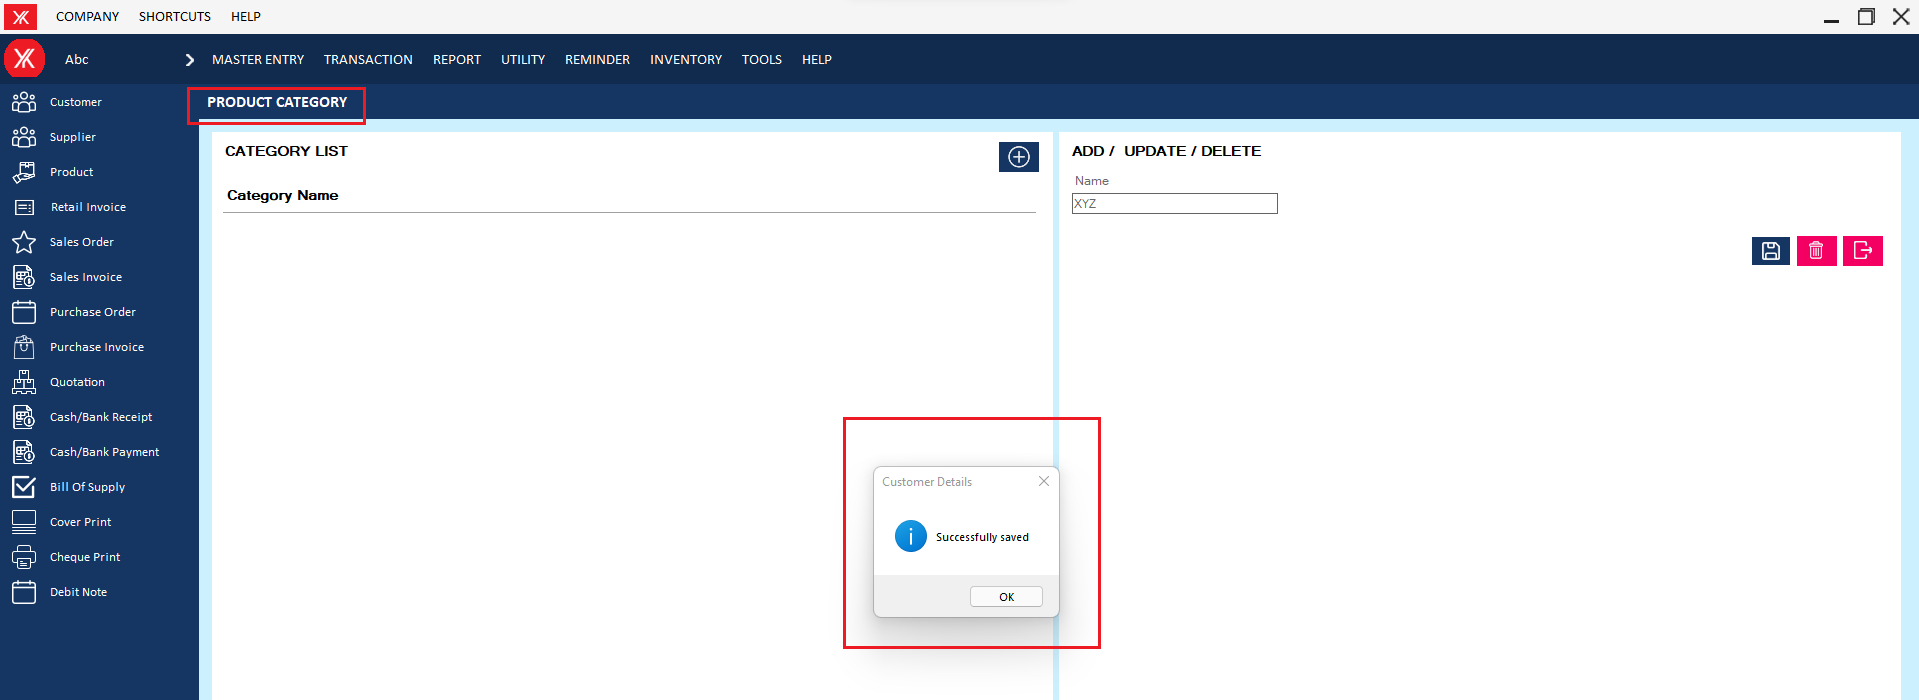
Step 3: You will get the message that “Successfully saved”
Step 4: New Entry will be display on product category screen

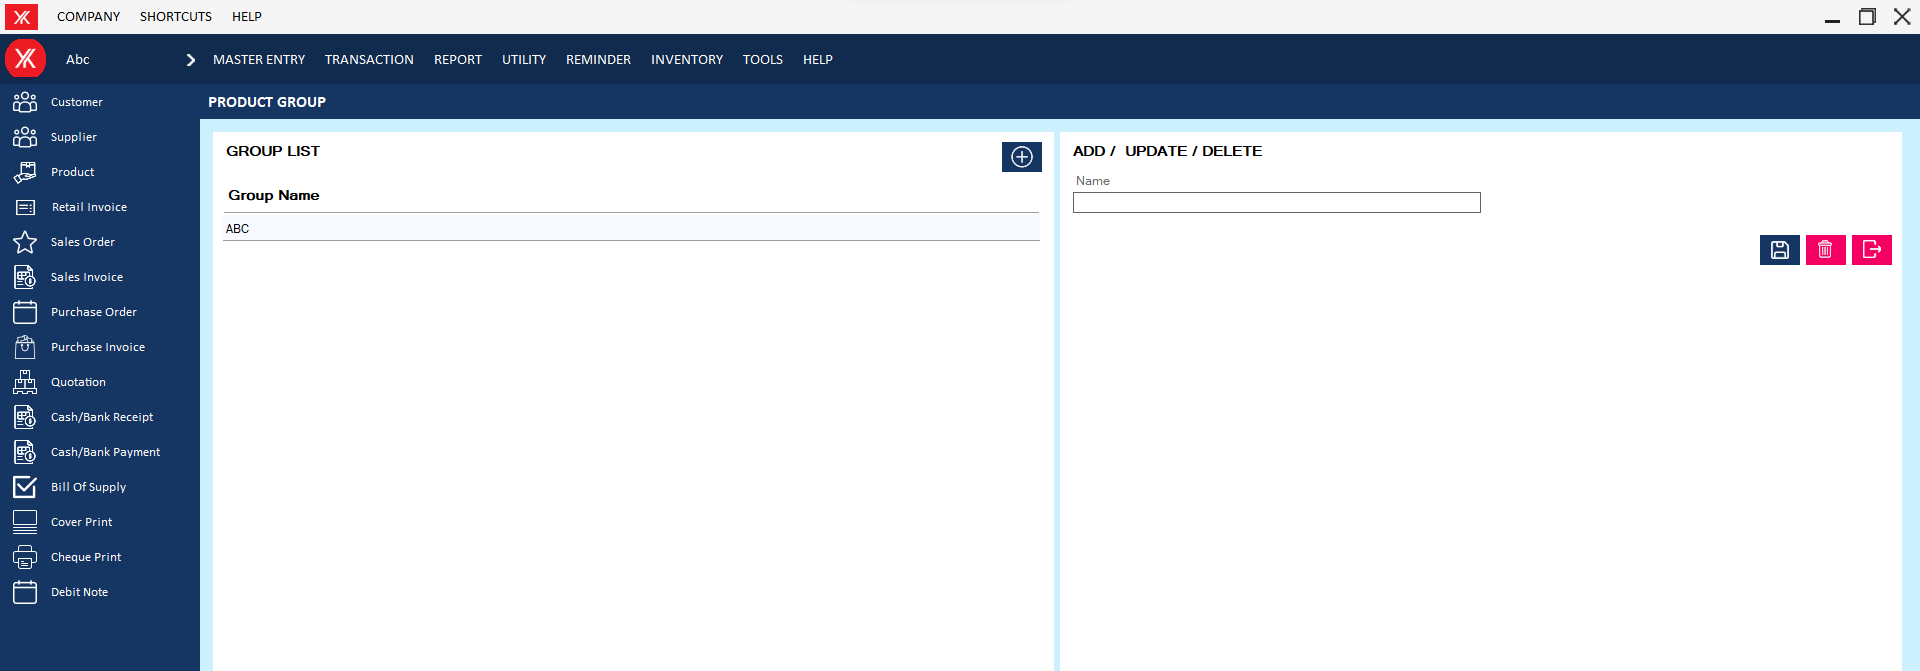
- How to add Product group for Yourkhata accounting and billing software?
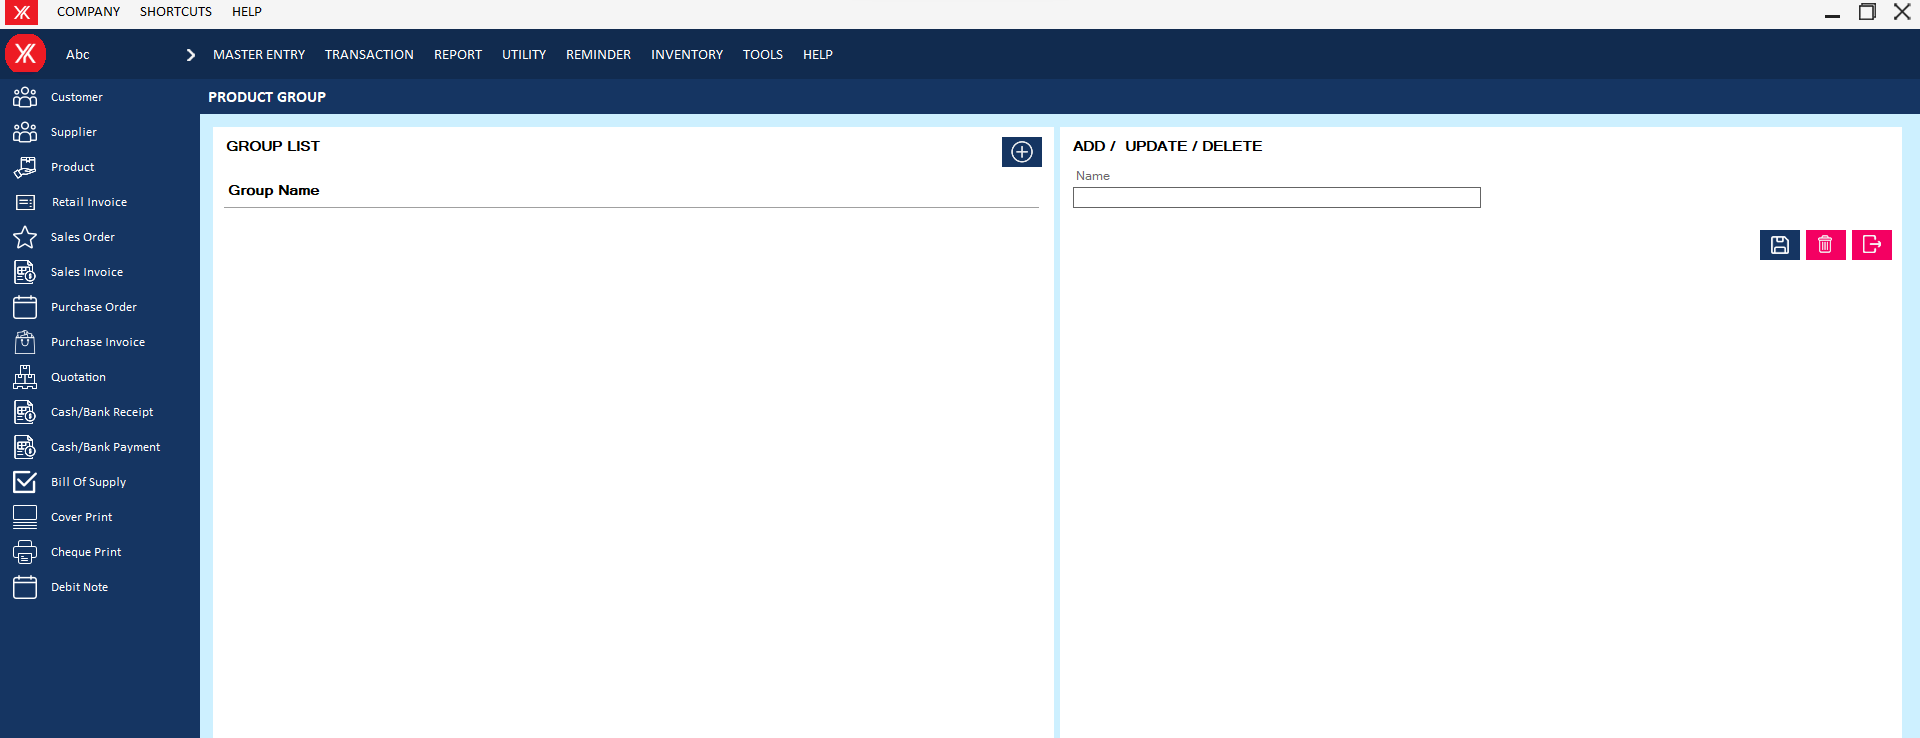
Step 1: Go to product group in master entry.

Step 2: Click on “+” & enter group name & submit.
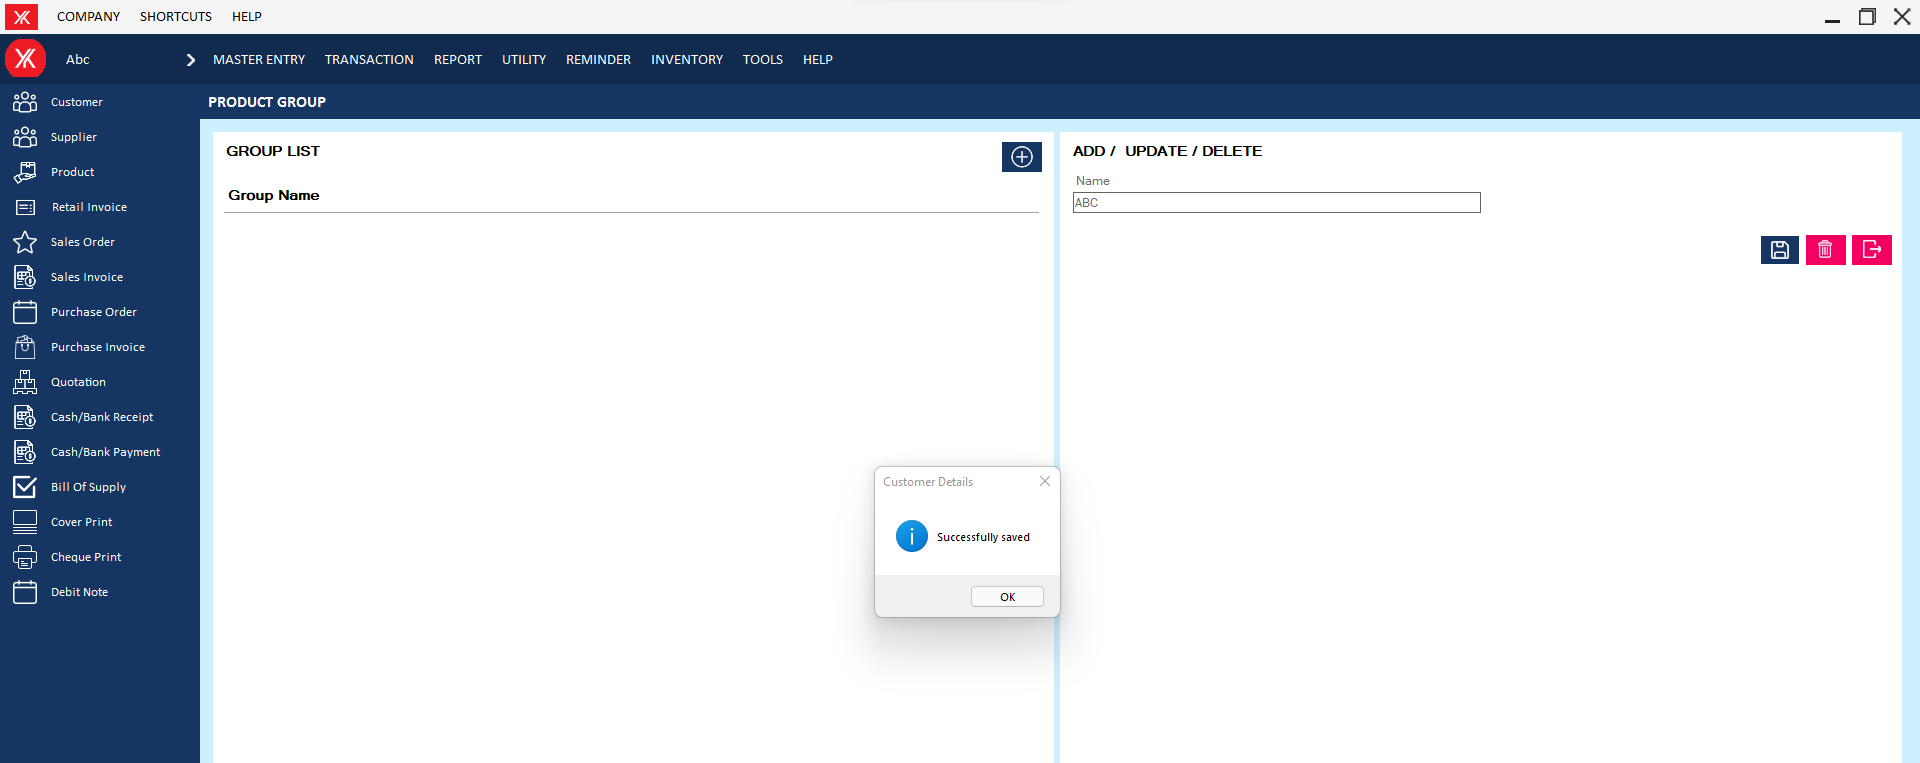
Step 3: You will get the message that “Successfully saved”
Step 4: New Entry will be display on product group screen
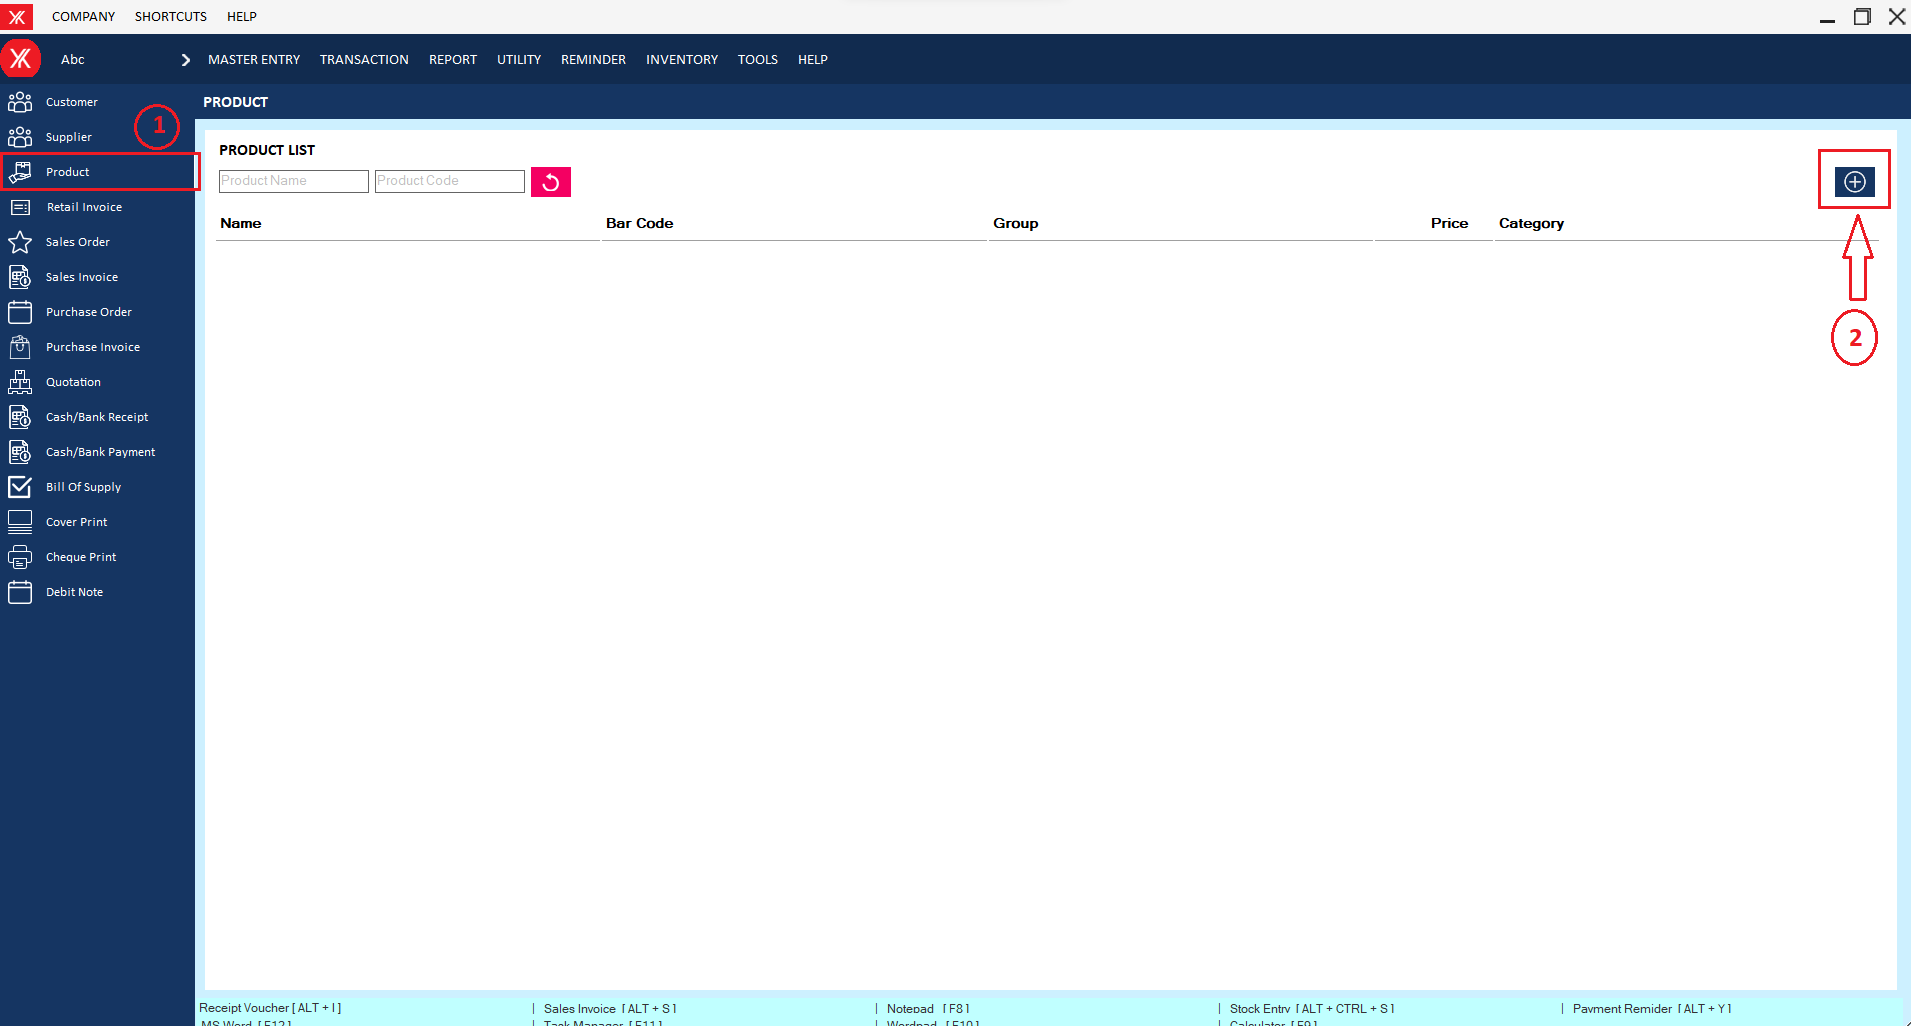
- How to add Product for Yourkhata accounting and billing software?
Step 1: Go to product & Click on “+”.
Step 2: Fill all details & submit
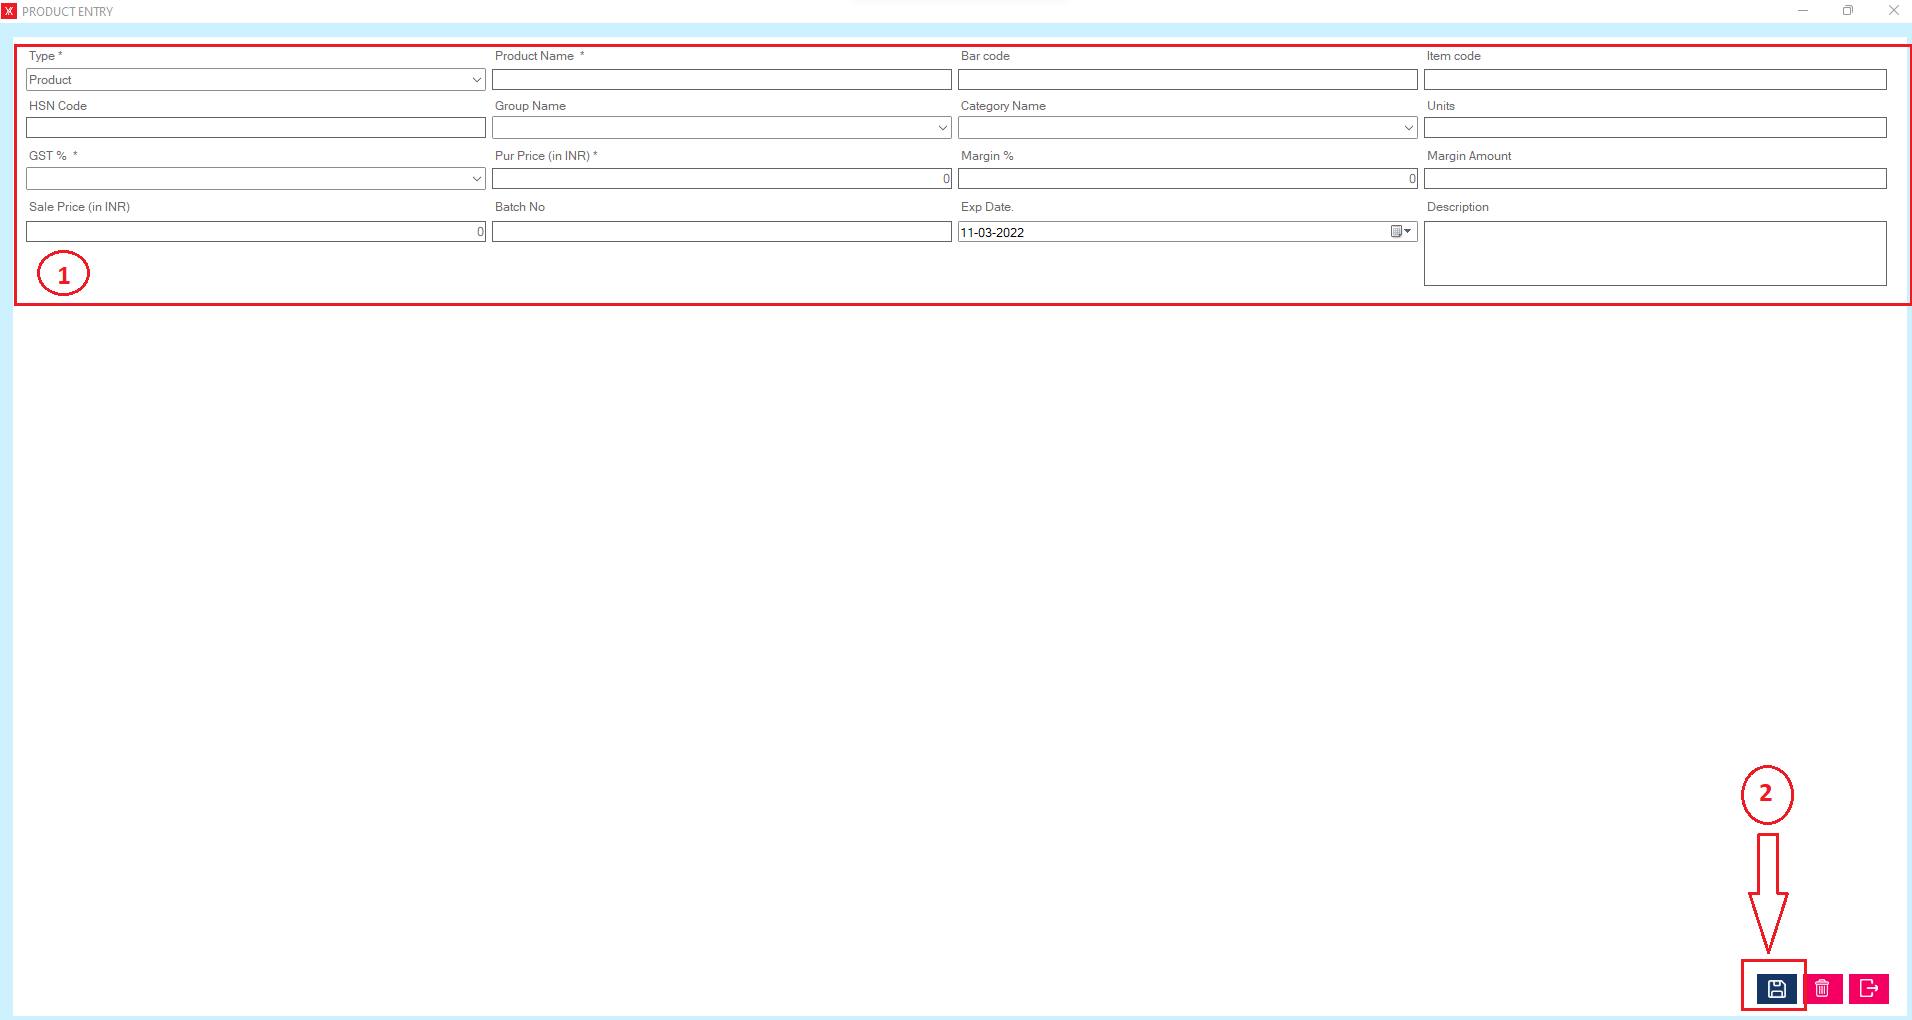
Step 3: New Entry will be display on Product screen.

- How to add Cash payment method for Yourkhata accounting and billing software?
Step 1: Go to payment method in master entry
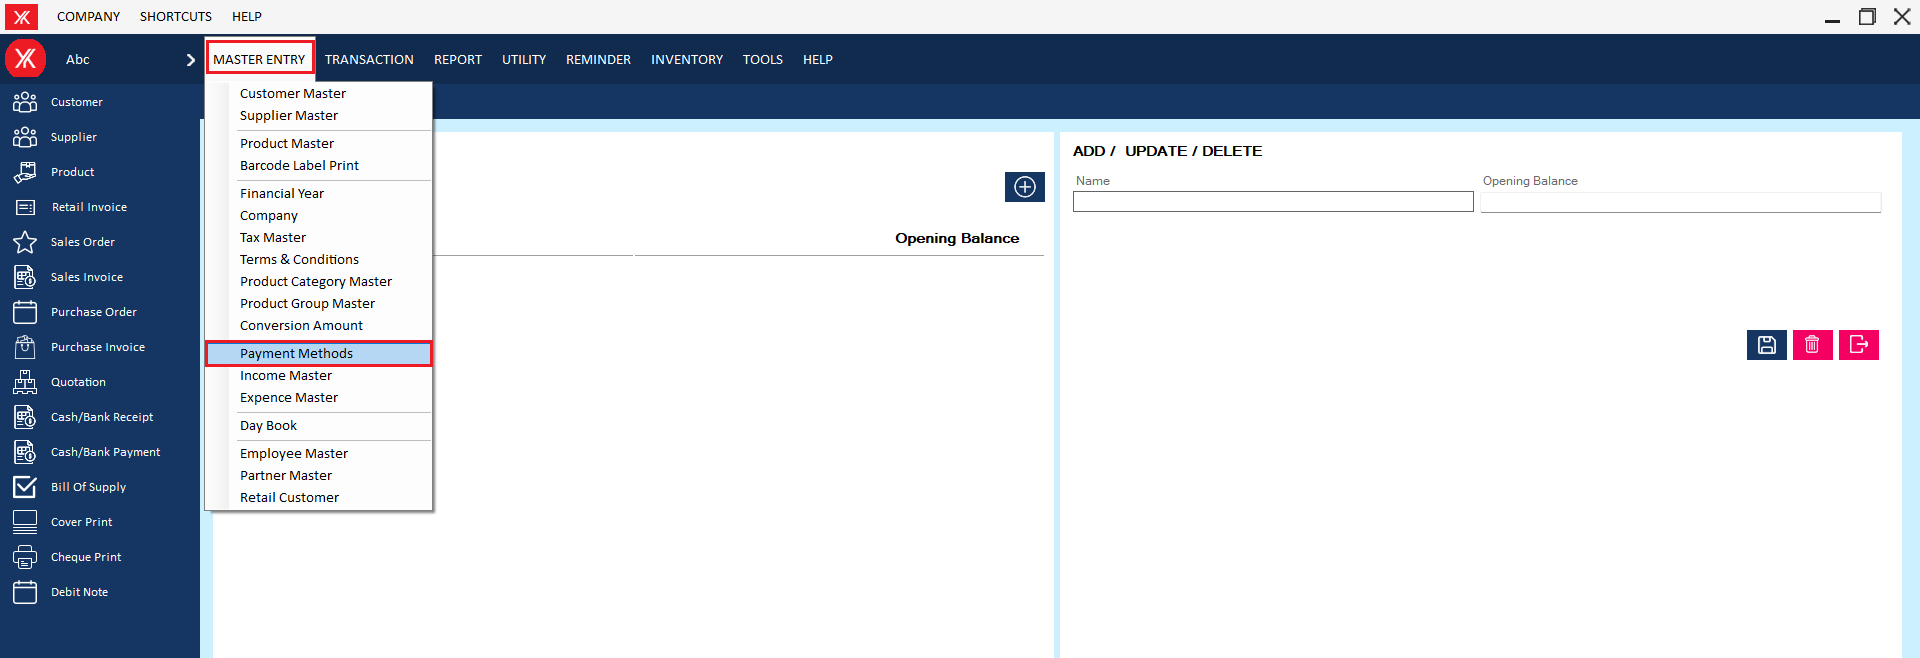
Step 2: Select cash > Fill all details & submit , You will get the message that “Successfully saved”
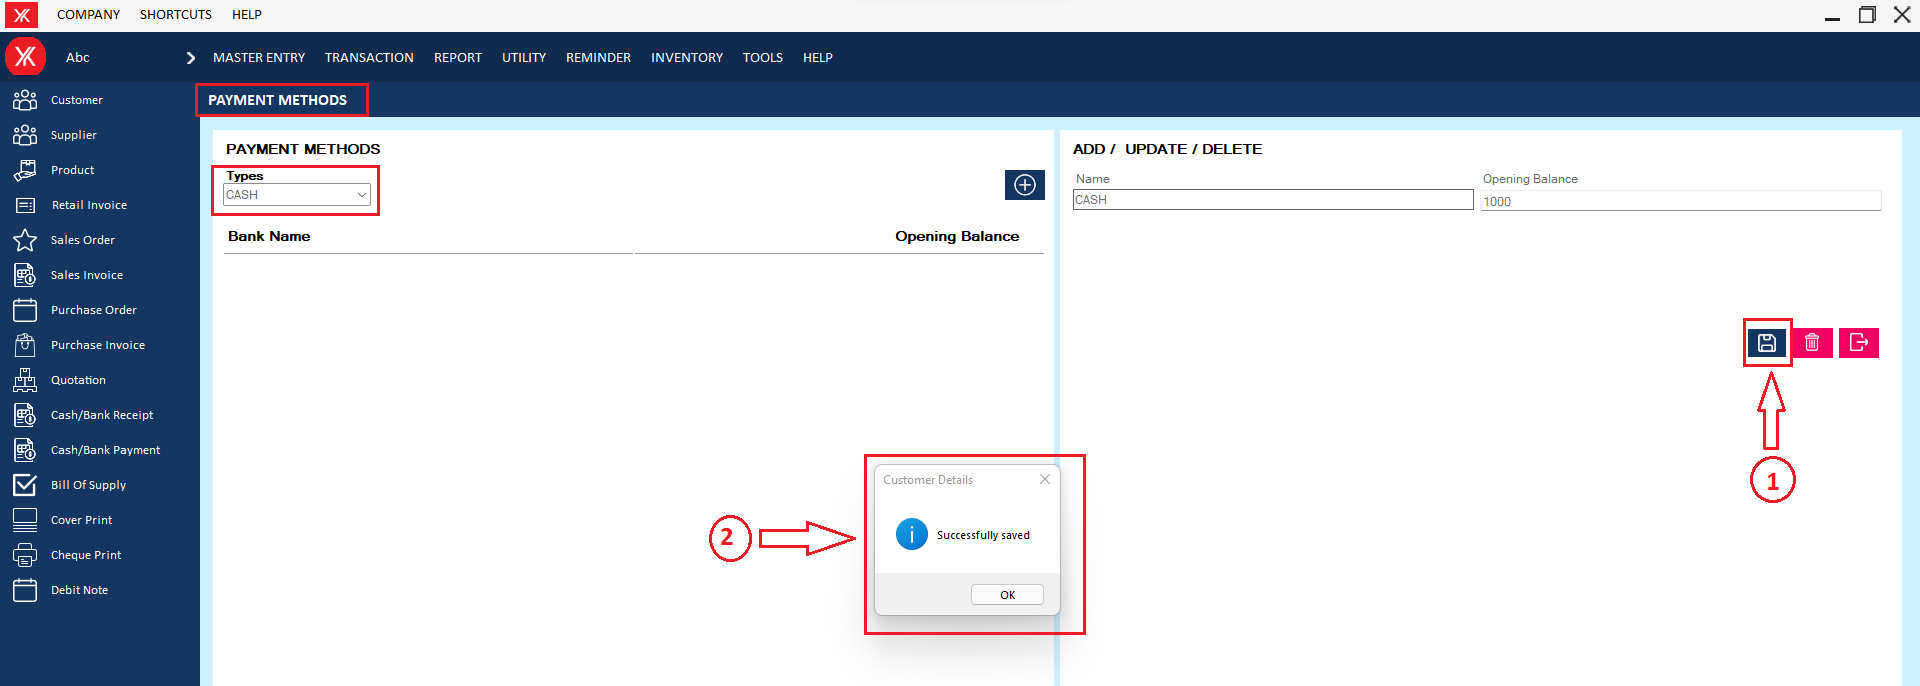
Step 3: New record will be display on Cash payment screen

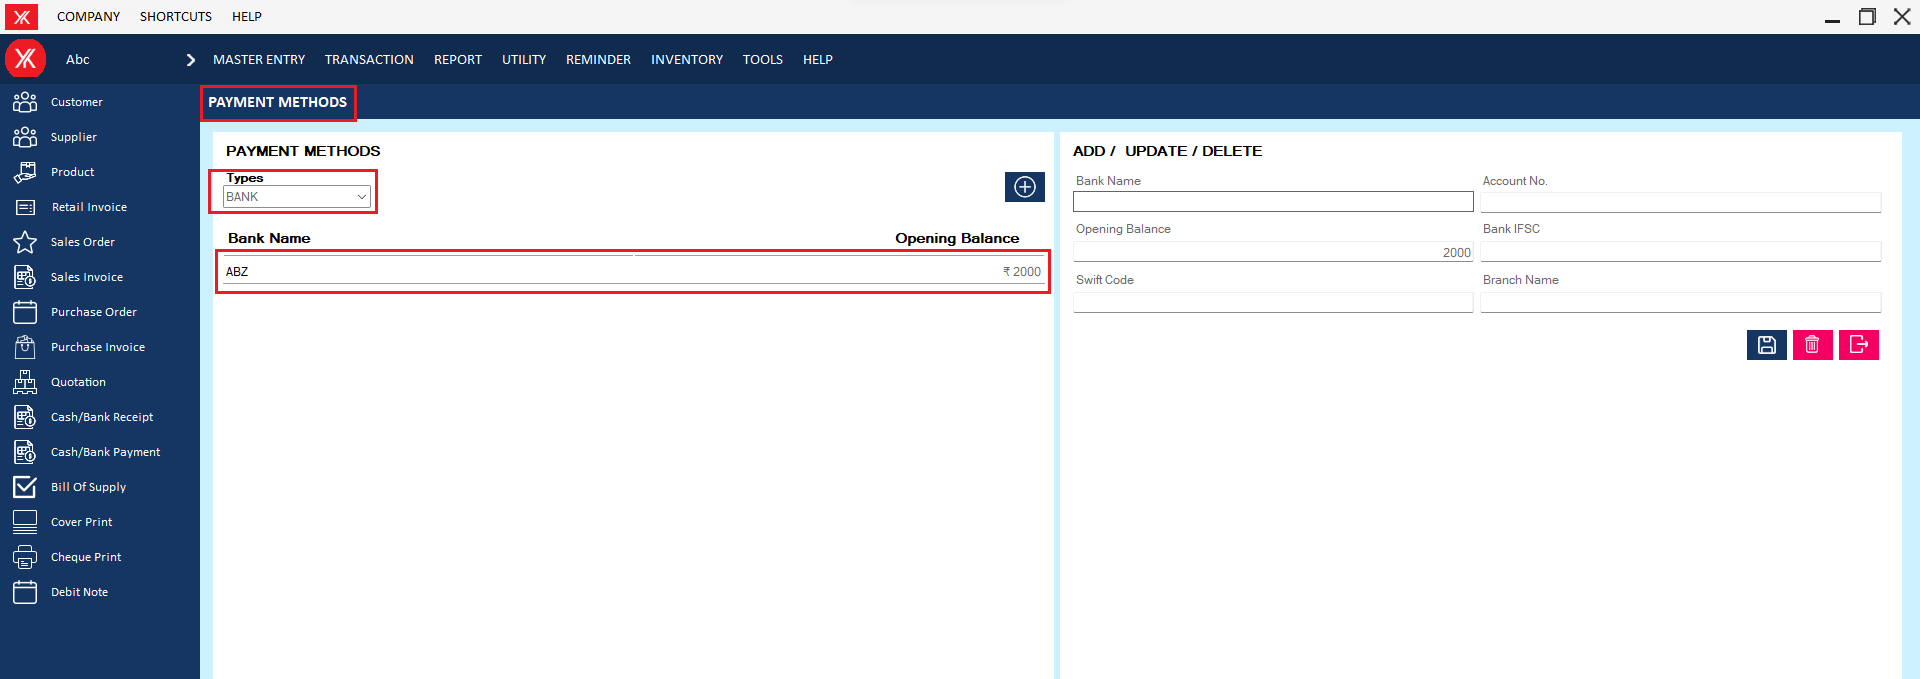
- How to add Bank payment method for Yourkhata accounting and billing software?
Step 1: Go to payment methods in master entry.

Step 2: Select bank > Fill all details & submit , You will get the message that “Successfully saved”.
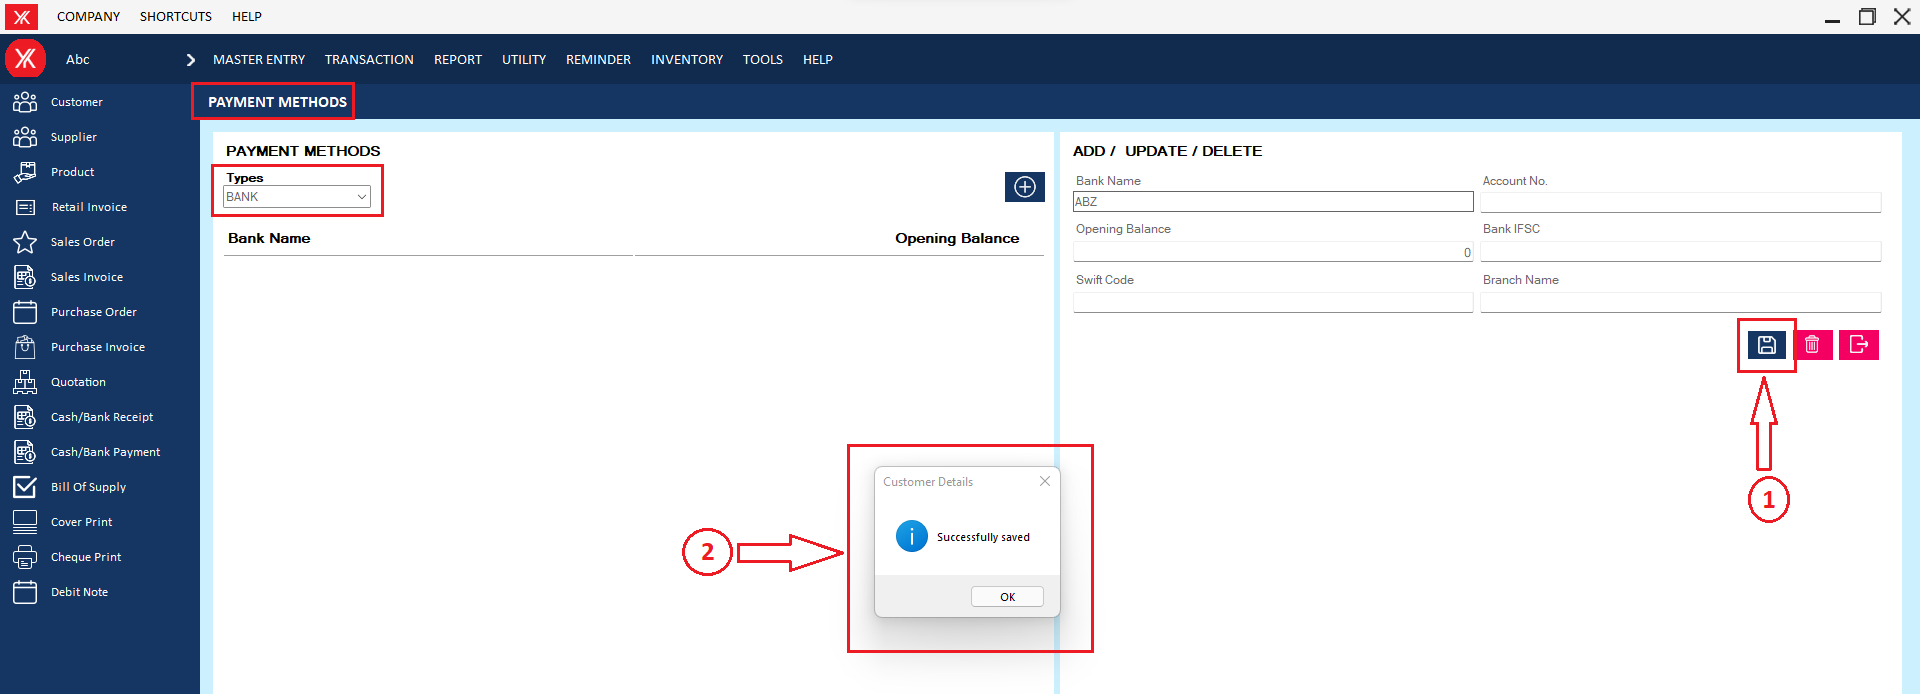
Step 3: New record will be display on bank payment screen
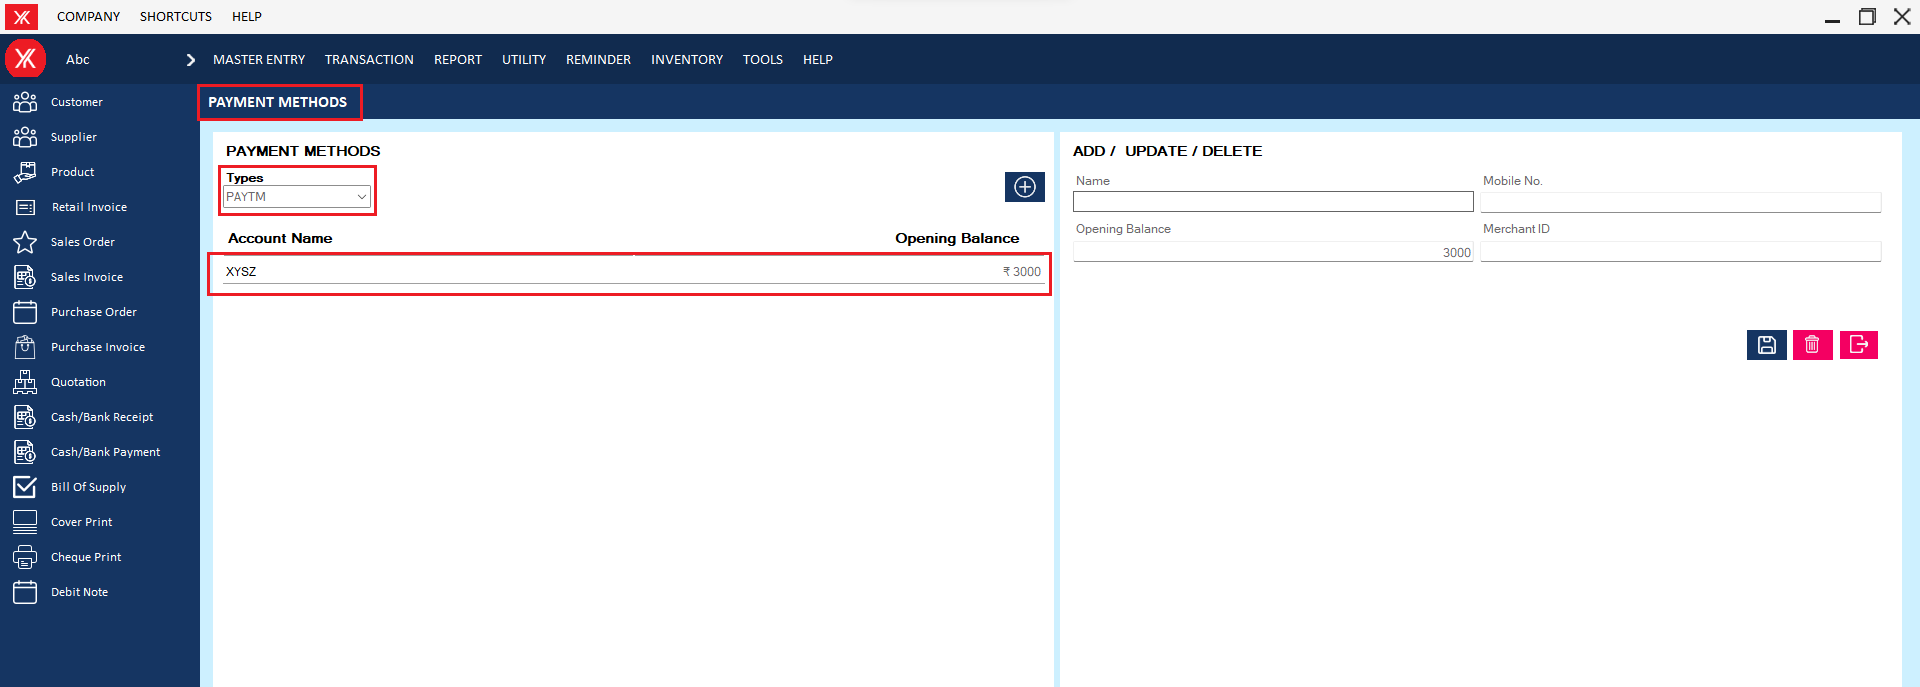
- How to add Paytm payment method Yourkhata accounting and billing software?
Step 1: Go to payment methods in master entry

Step 2: Select bank > Fill all details & submit , You will get the message that “Successfully saved”
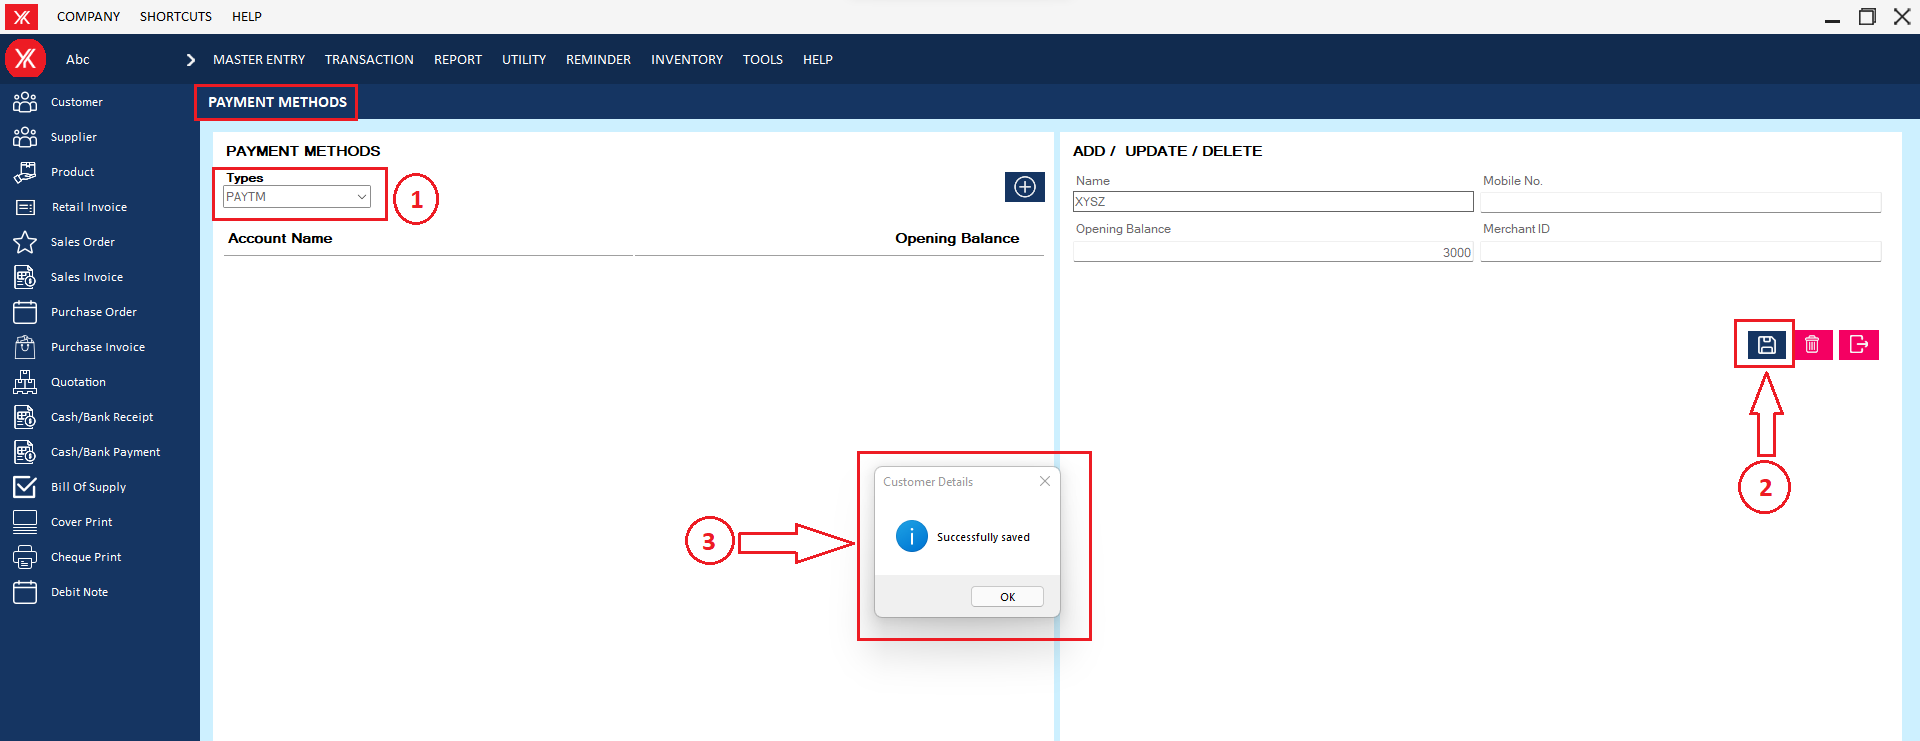
Step 3: New Entry will be display on Paytm method screen.
- How to add UPI payment method for Yourkhata accounting and billing software?
Step 1: Go to payment methods in master entry

Step 2: Select bank > Fill all details & submit , You will get the message that “Successfully saved”
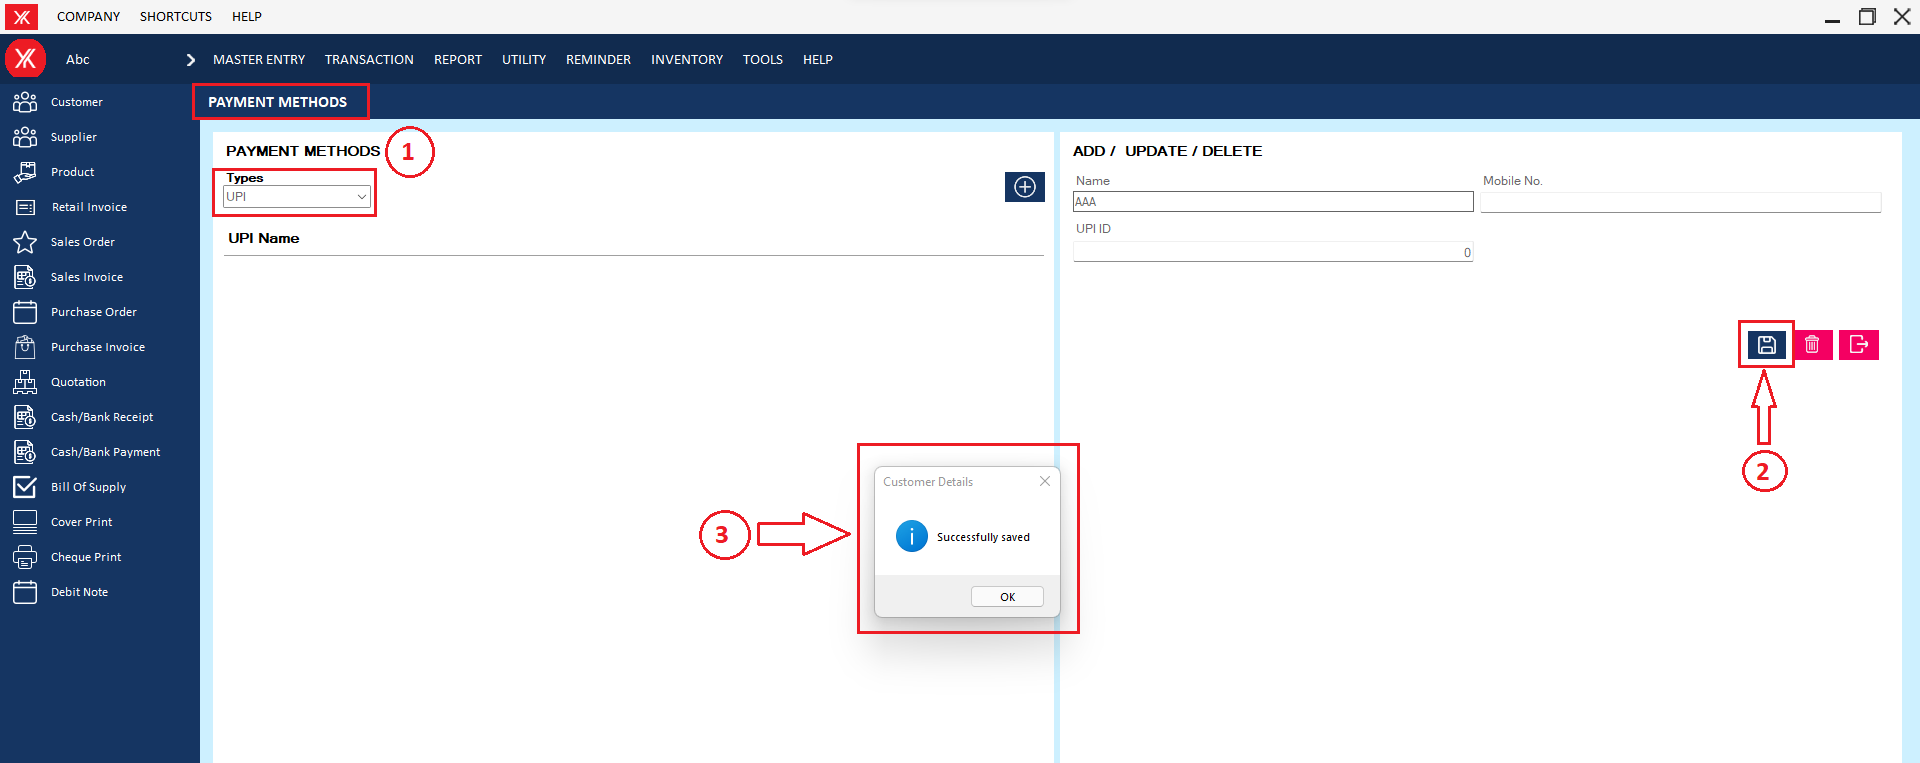
Step 3: New Entry will be display on UPI method screen.

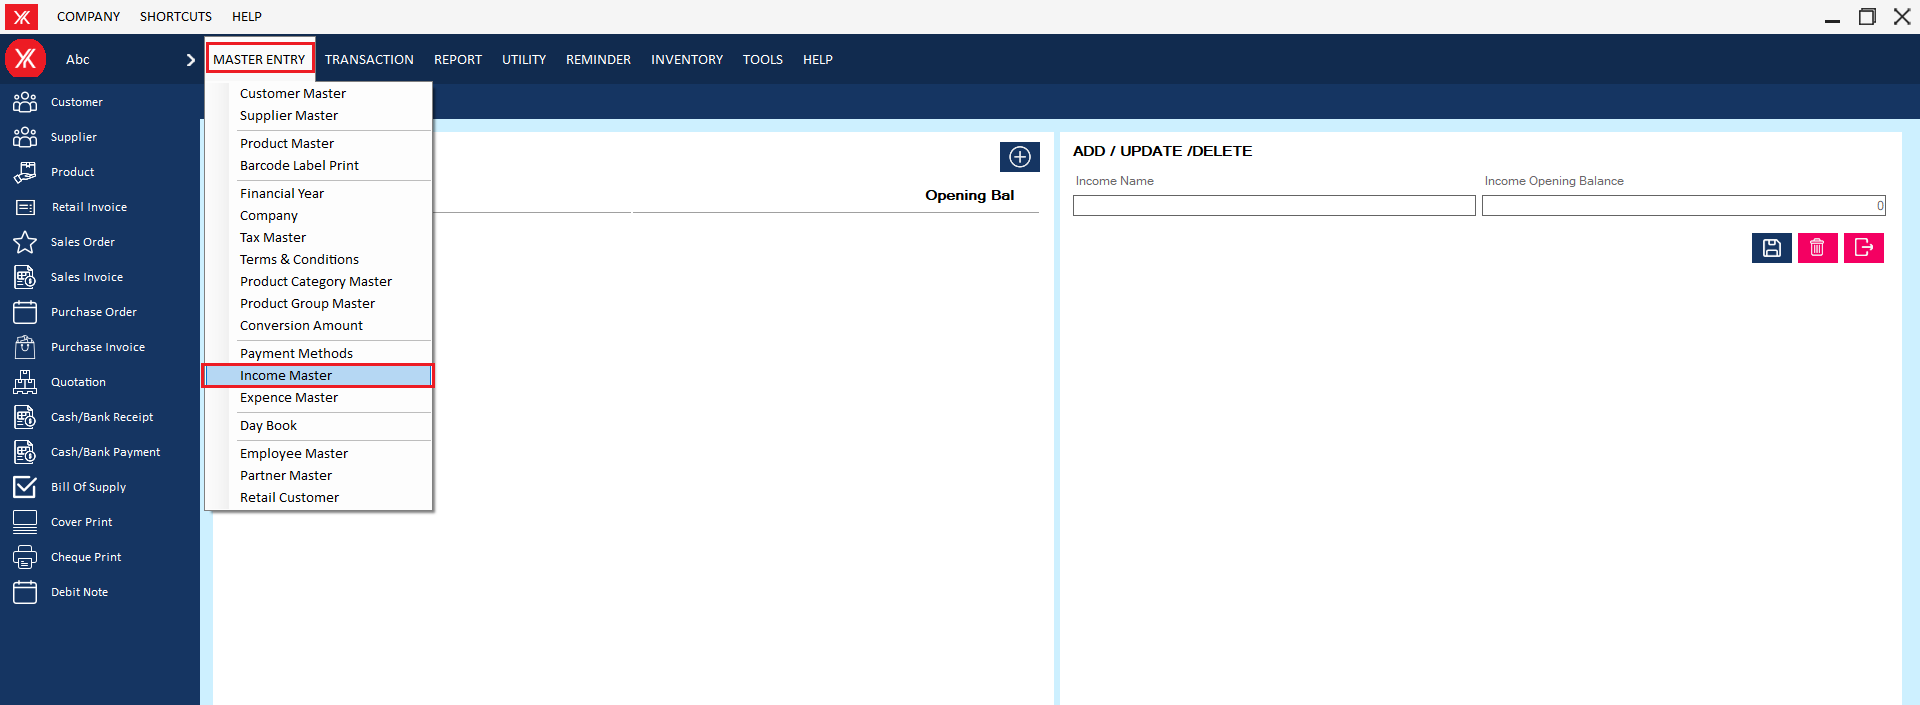
- How to add Income master for Yourkhata accounting and billing software?
Step 1: Go to income master in master entry
Step 2: Click on “+”, Fill details & submit ,you will get the message that “Successfully saved”
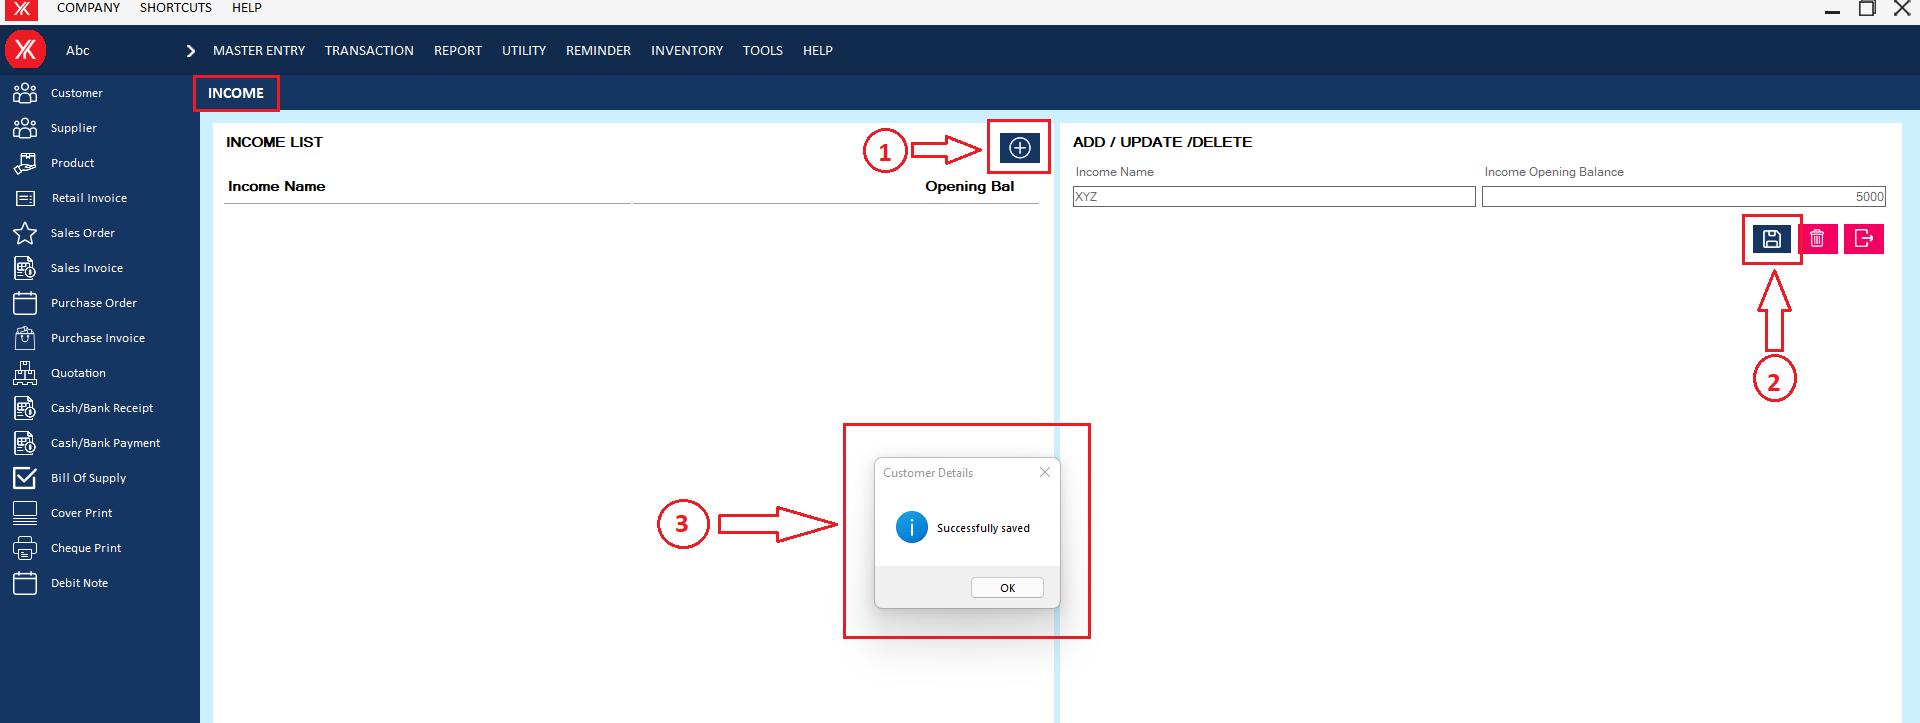
Step 3:New income record will be display on the screen/list
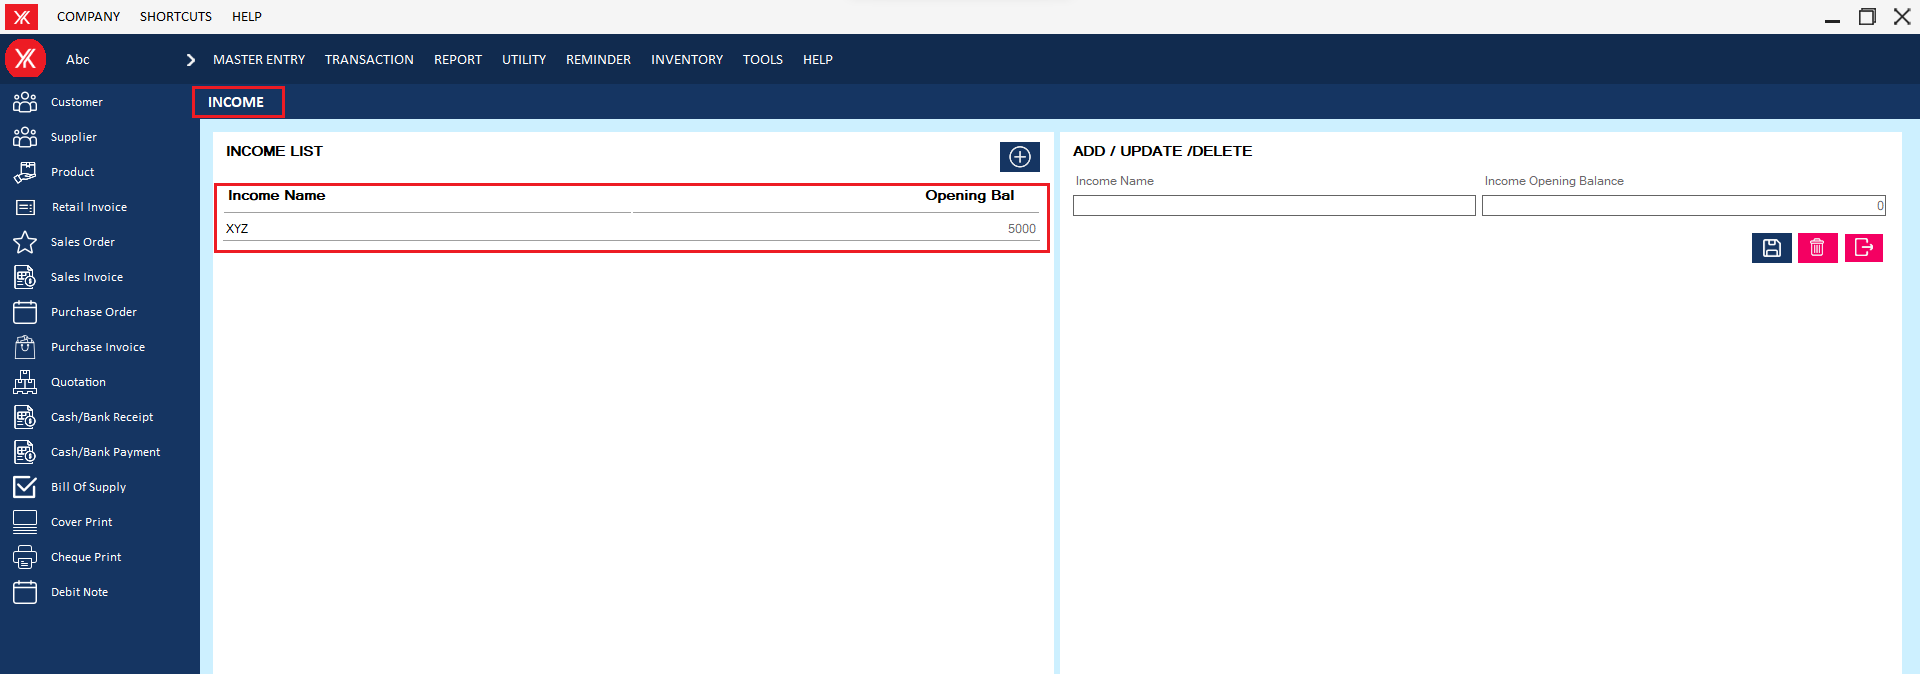
- How to add Employee master for Yourkhata accounting and billing software?
Step 1: Go to employee master in master entry
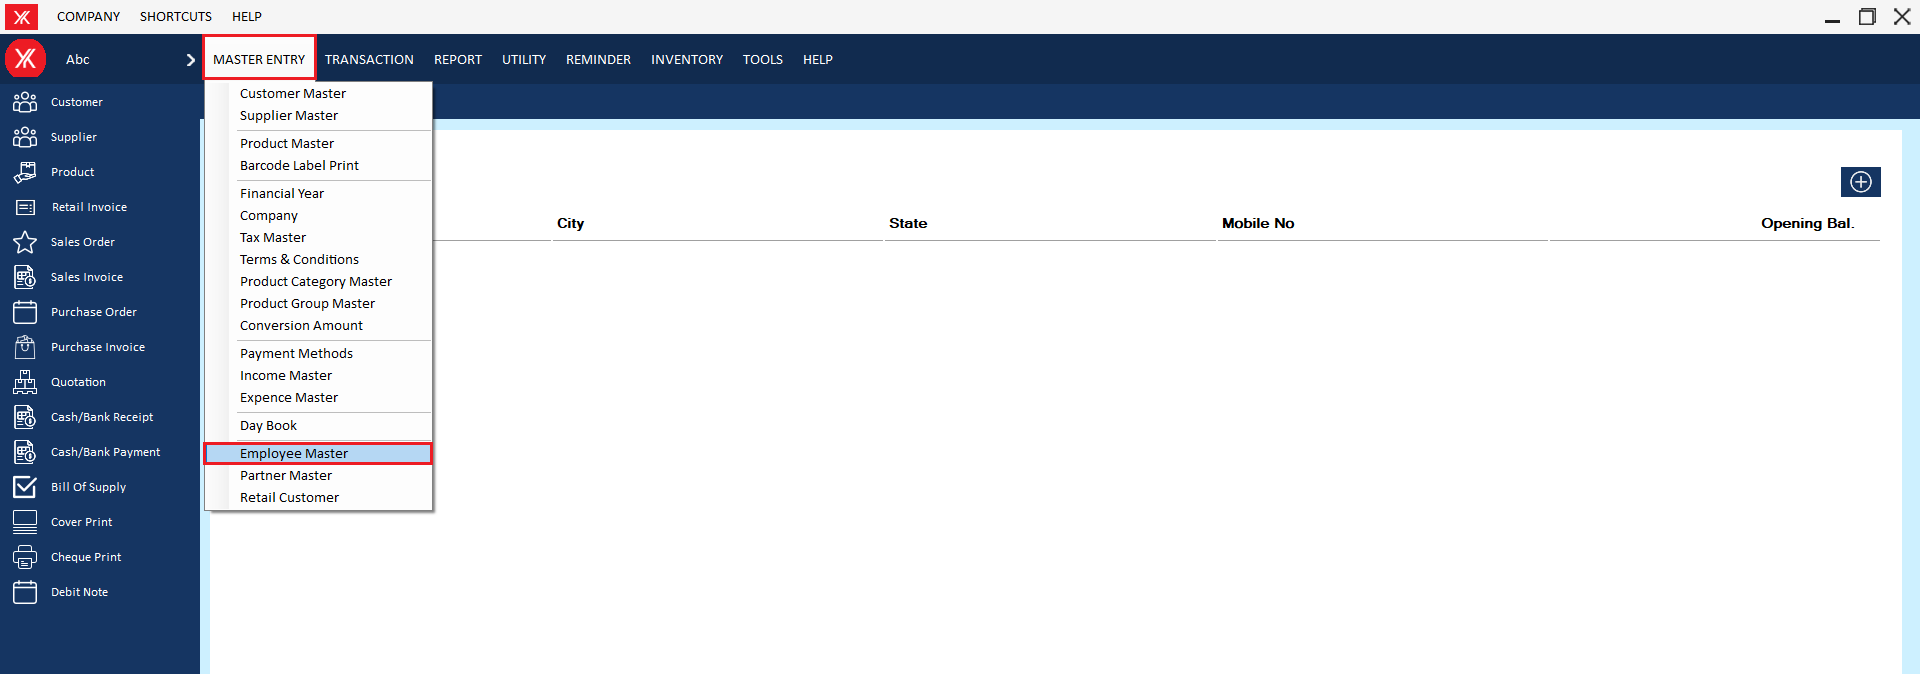
Step 2: Click on “+” for new record.

Step 3: Enter all details & submit, You will get the message that is “Successfully saved”
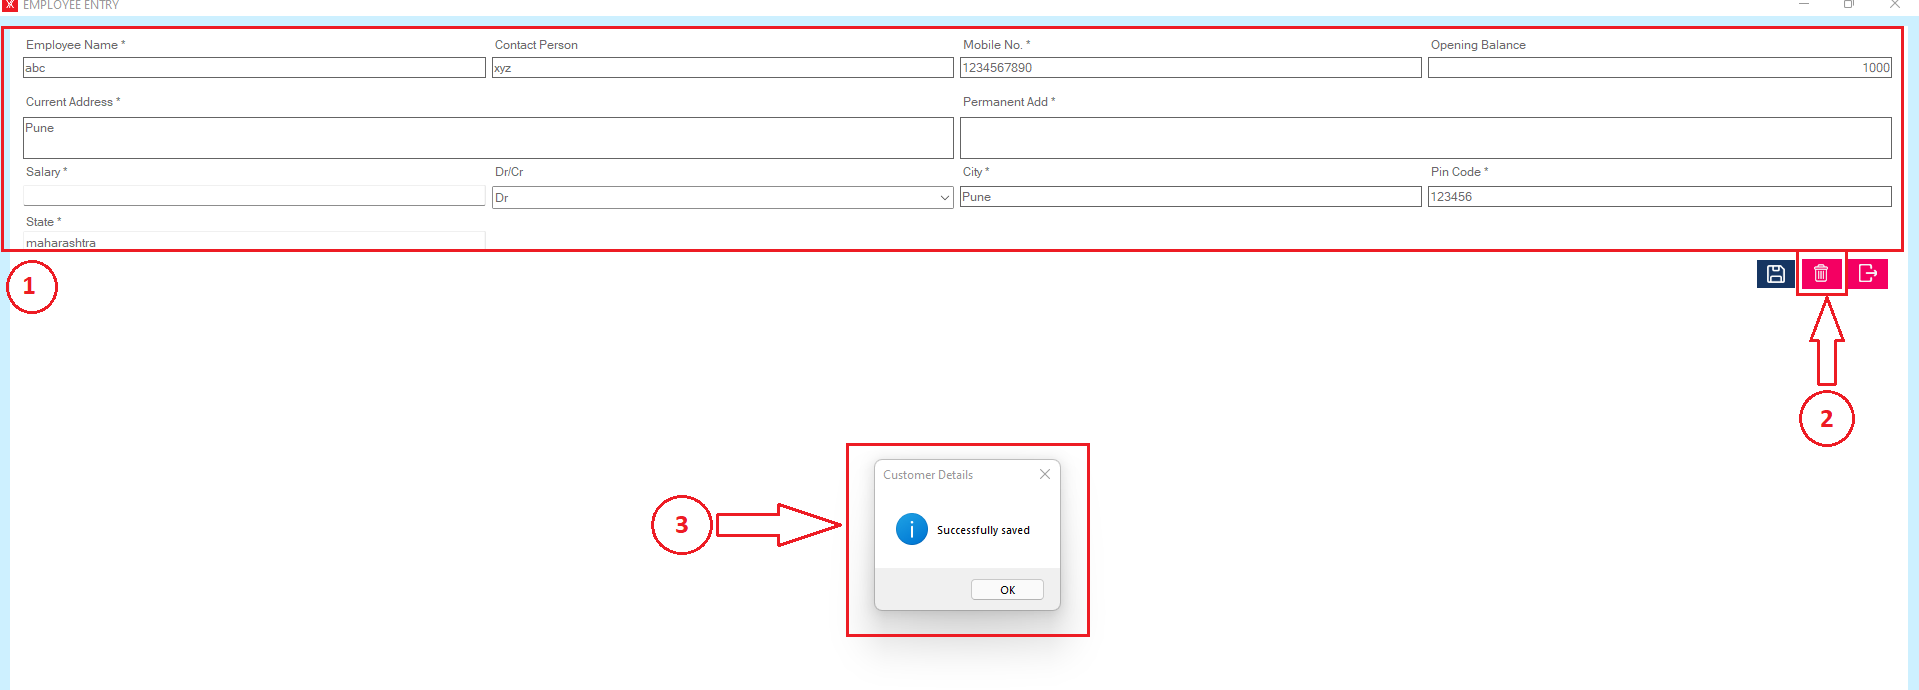
Step 4: New record will be display on employee master screen
- How to add Partner master for Yourkhata accounting and billing software?
Step 1: Go to partner master in master entry.
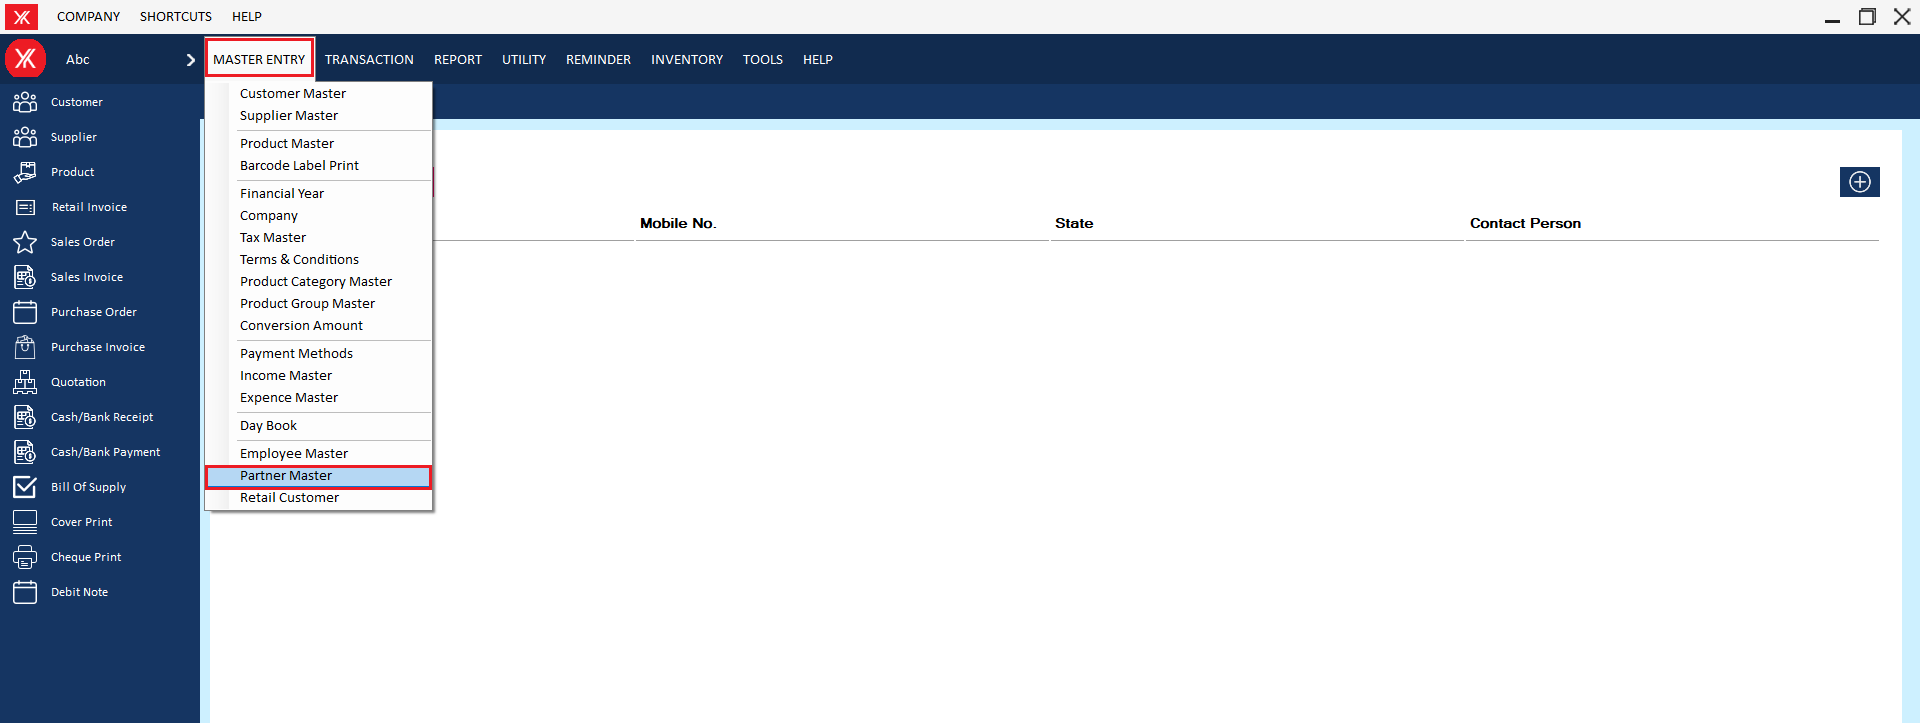
Step 2: Click on “+”for new record.
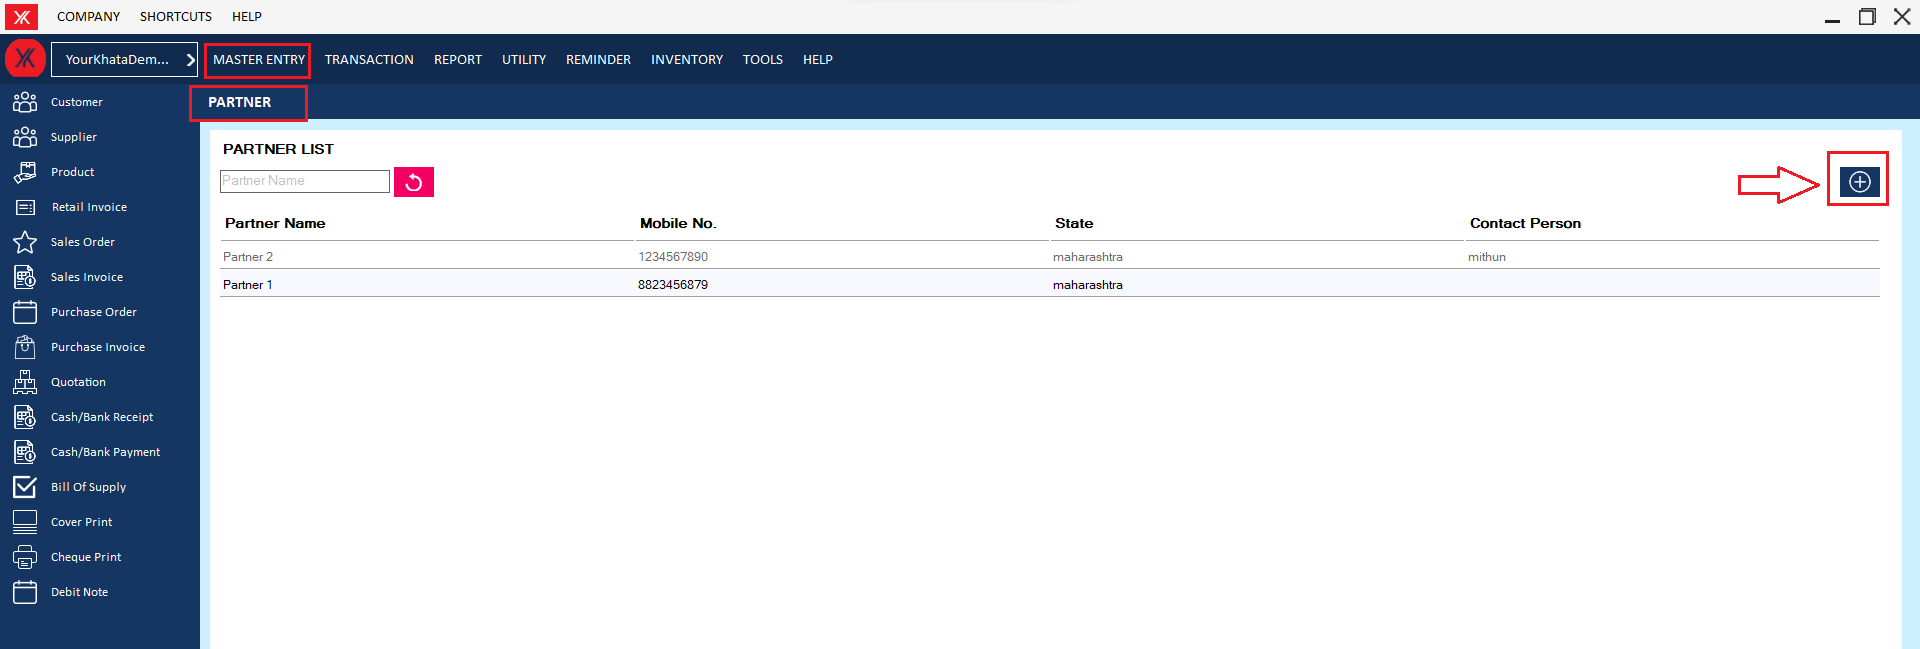
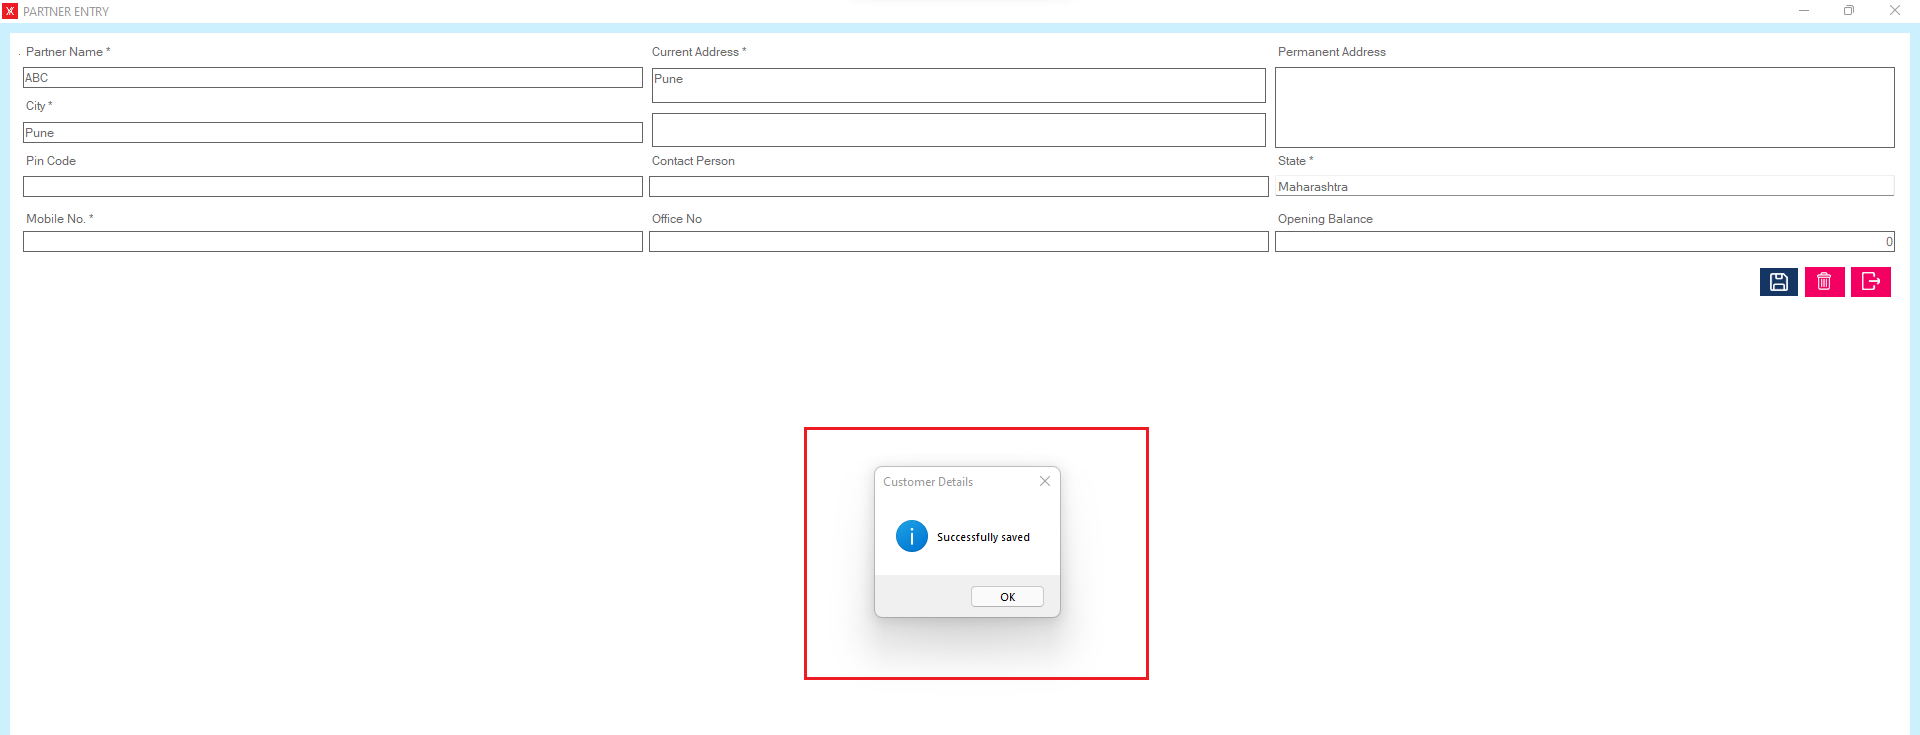
Step 3: Enter all details & submit

Step 4: You will get the message that “Successfully saved”
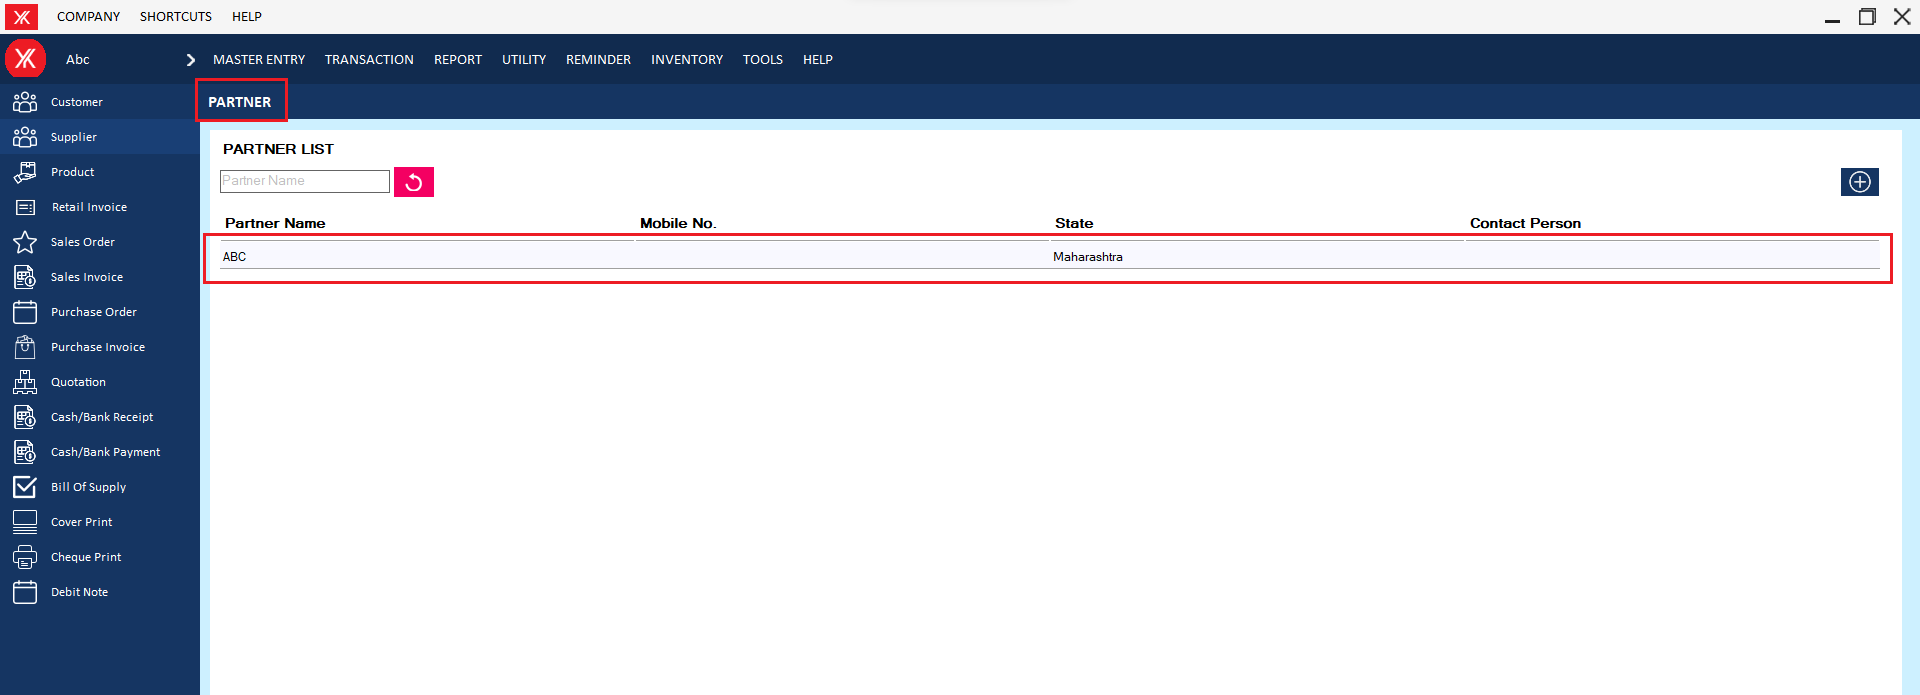
Step 5: New record will be display on partner master screen
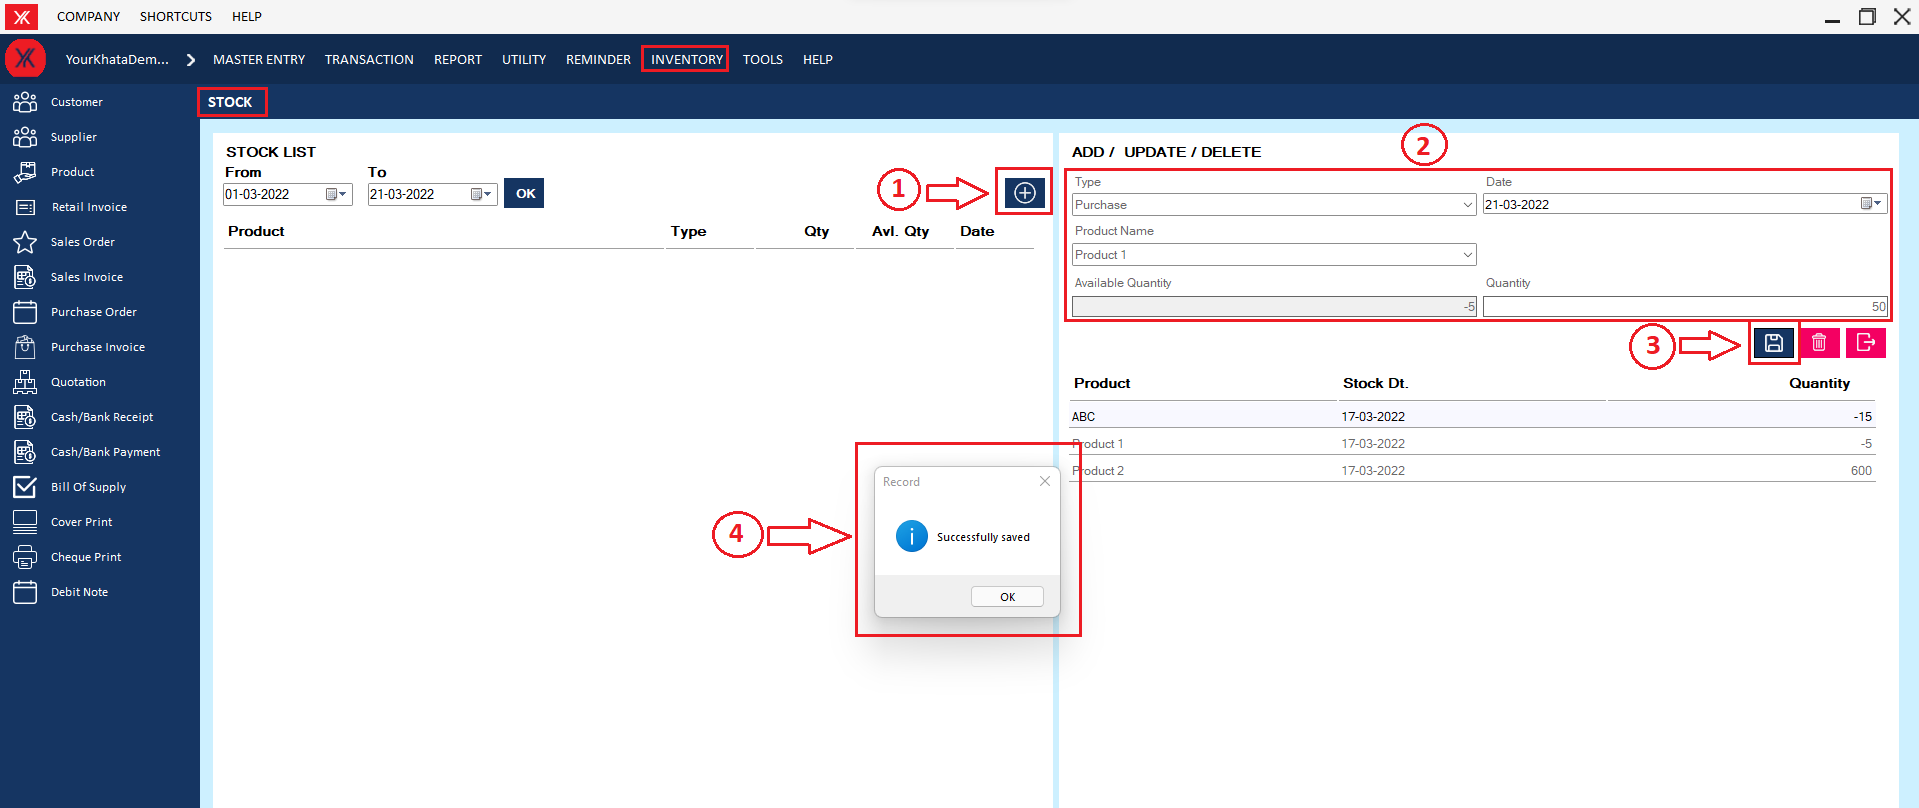
- How to add Stock Entry for Yourkhata accounting and billing software?
Step 1: Go to Stock entry in inventory.
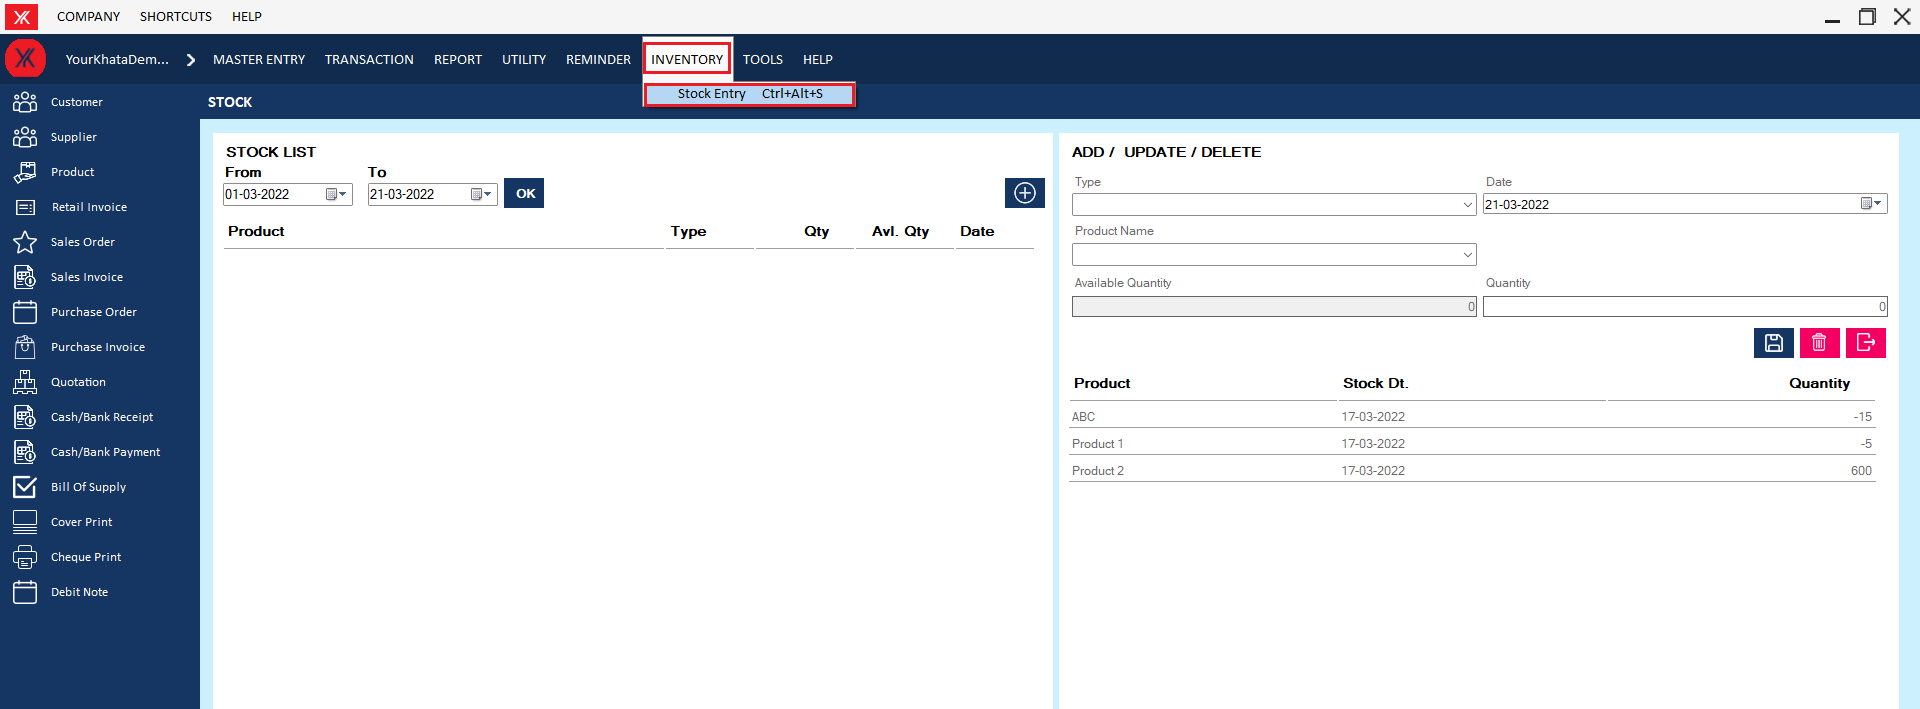
Step 2: Click on “+” > Fill all details > submit , You will get the message that “Successfully saved”
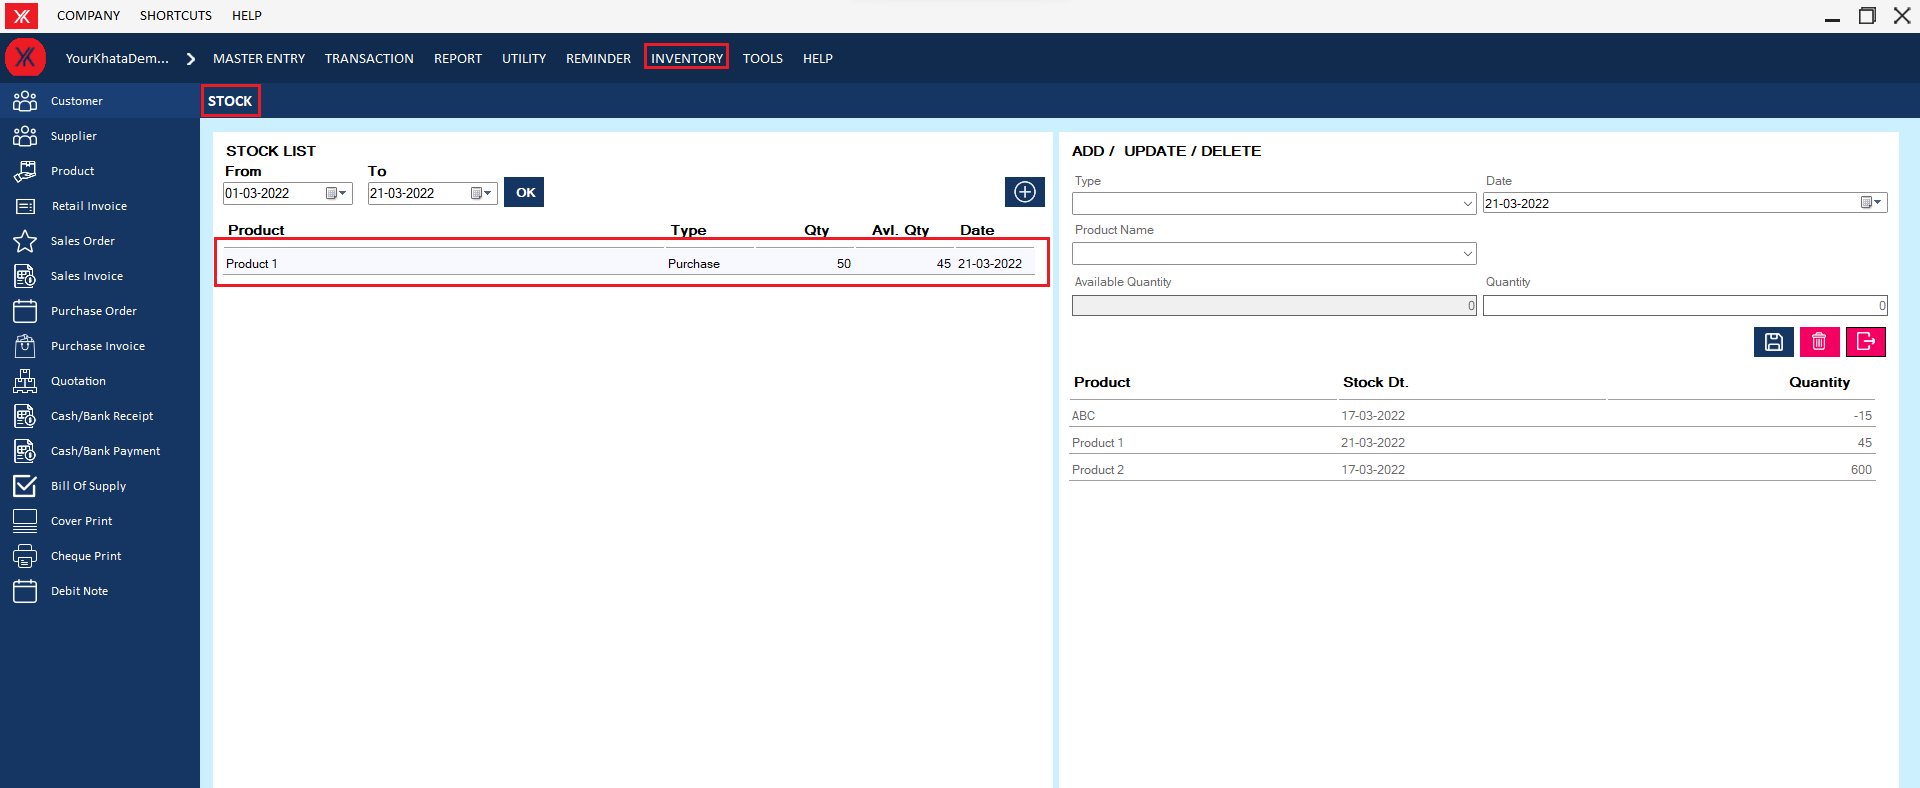
Step 3: New record will be display on Stock entry screen
How to use Accounting Transactions
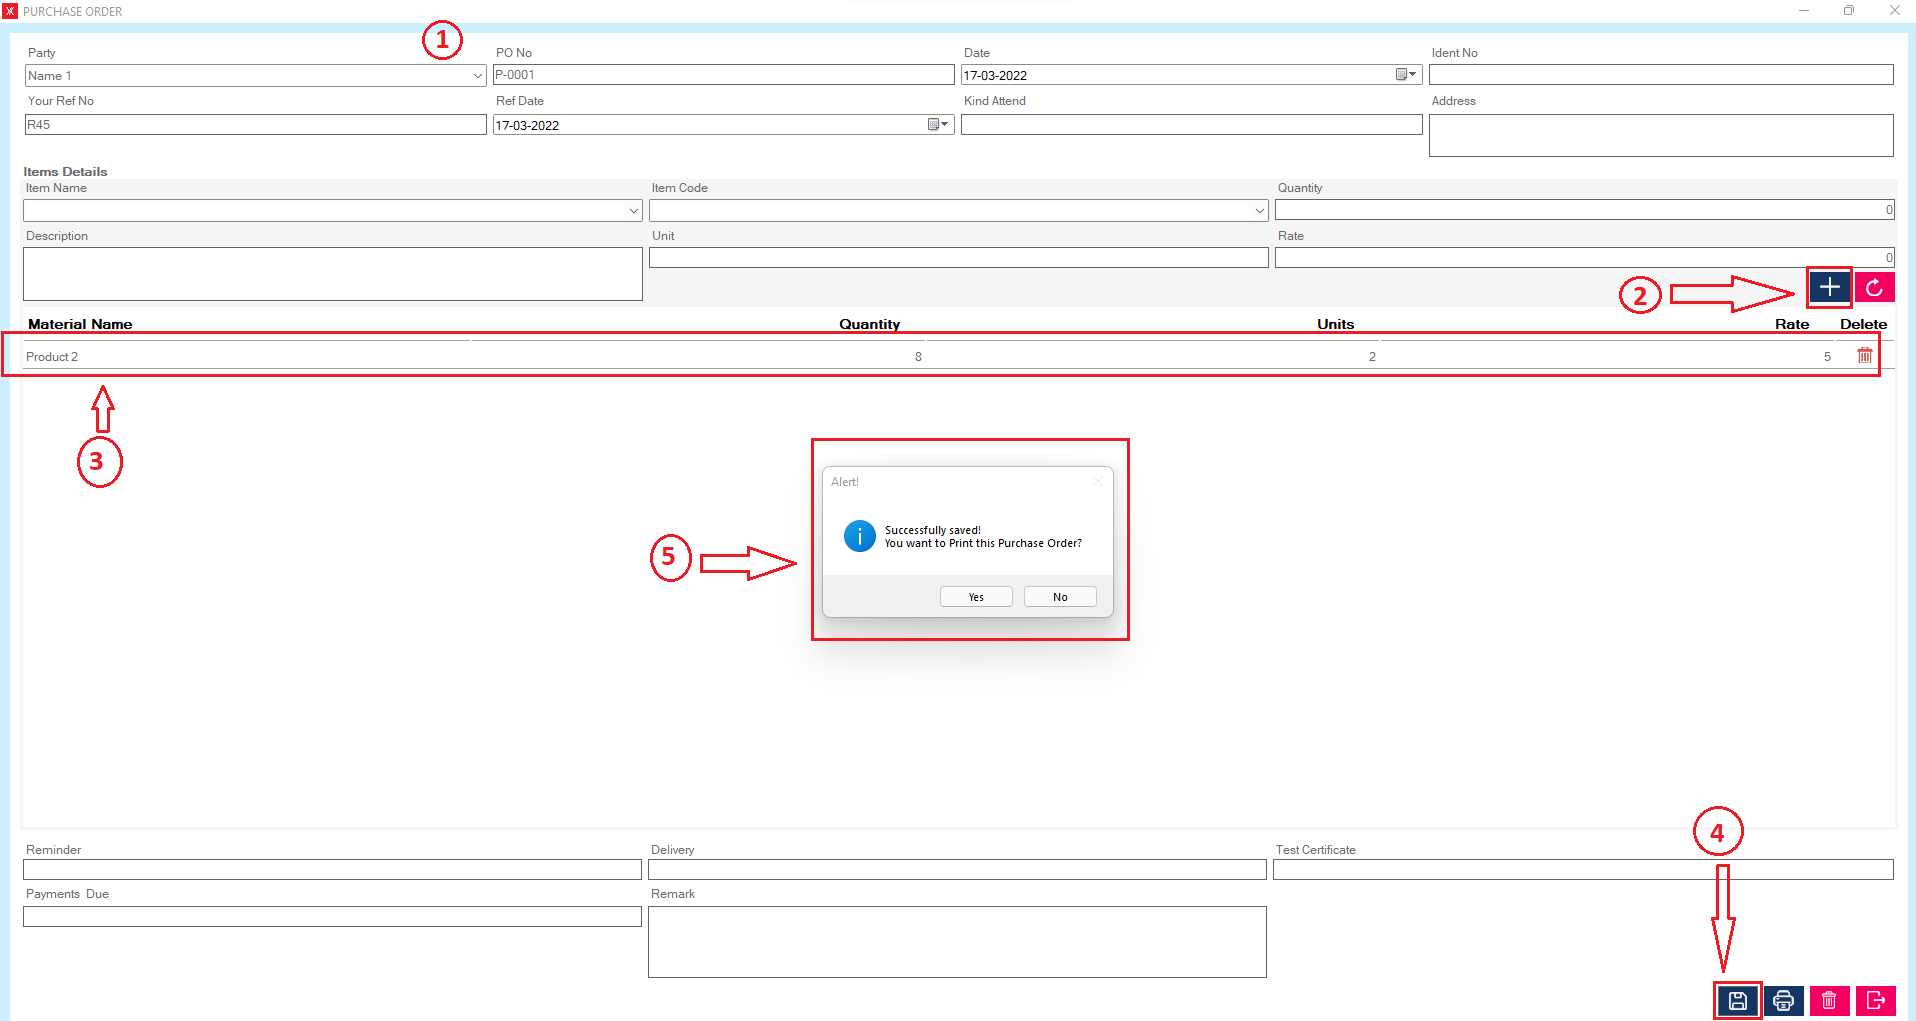
- How to add Purchase order for Yourkhata accounting and billing software?
Step 1: Go to purchase order & click on “+”

Step 2: Fill all details & submit > Click on save button , you will get the message “Successfully saved. Do you want to print this sales order?”
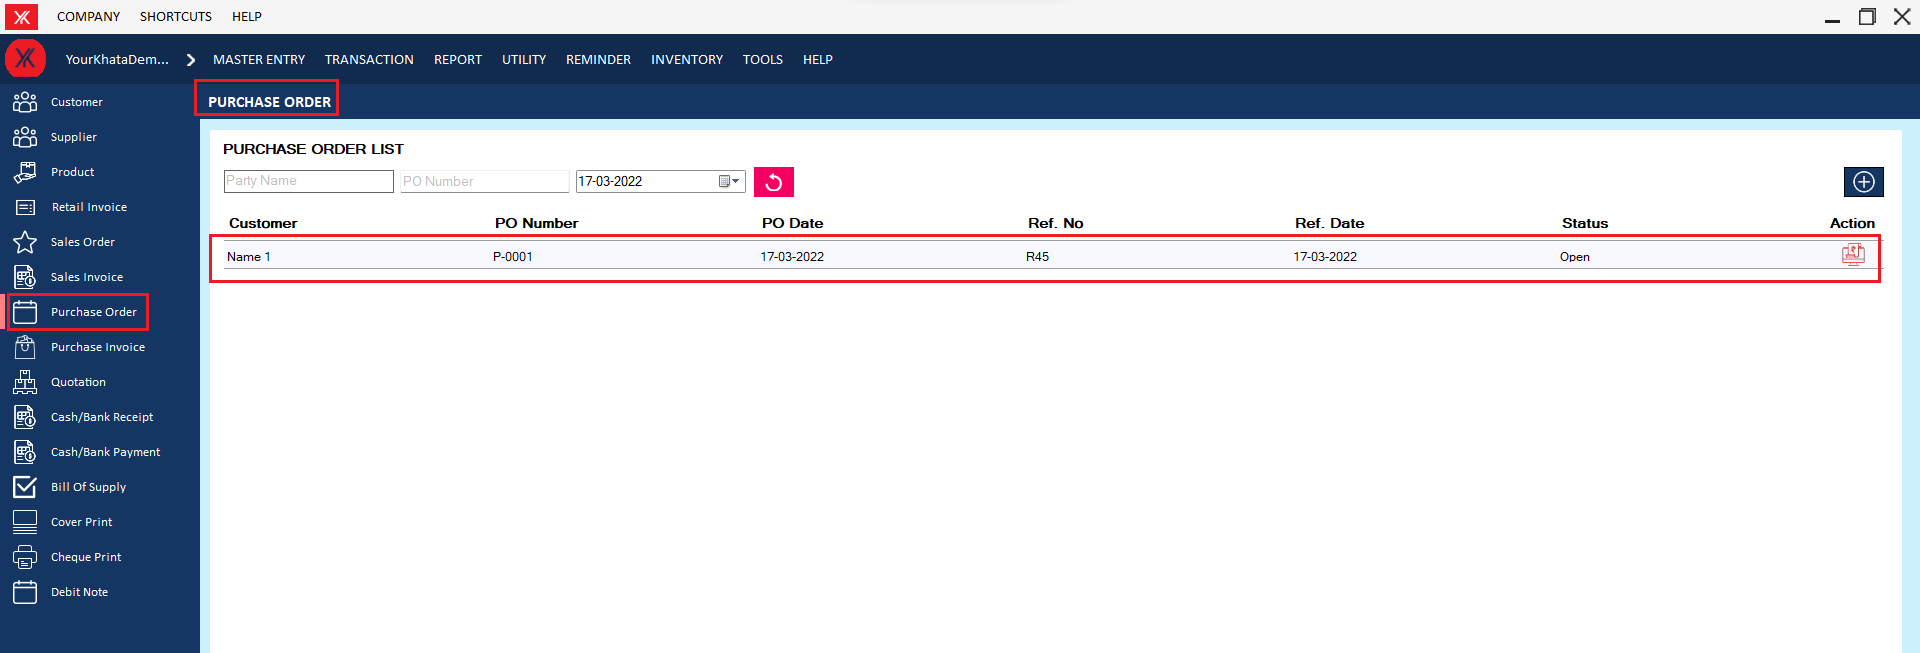
Step 3: New record will be display on purchase order screen
- How to add Purchase invoice for Yourkhata accounting and billing software?
Step 1: Go to purchase invoice & click on “+”
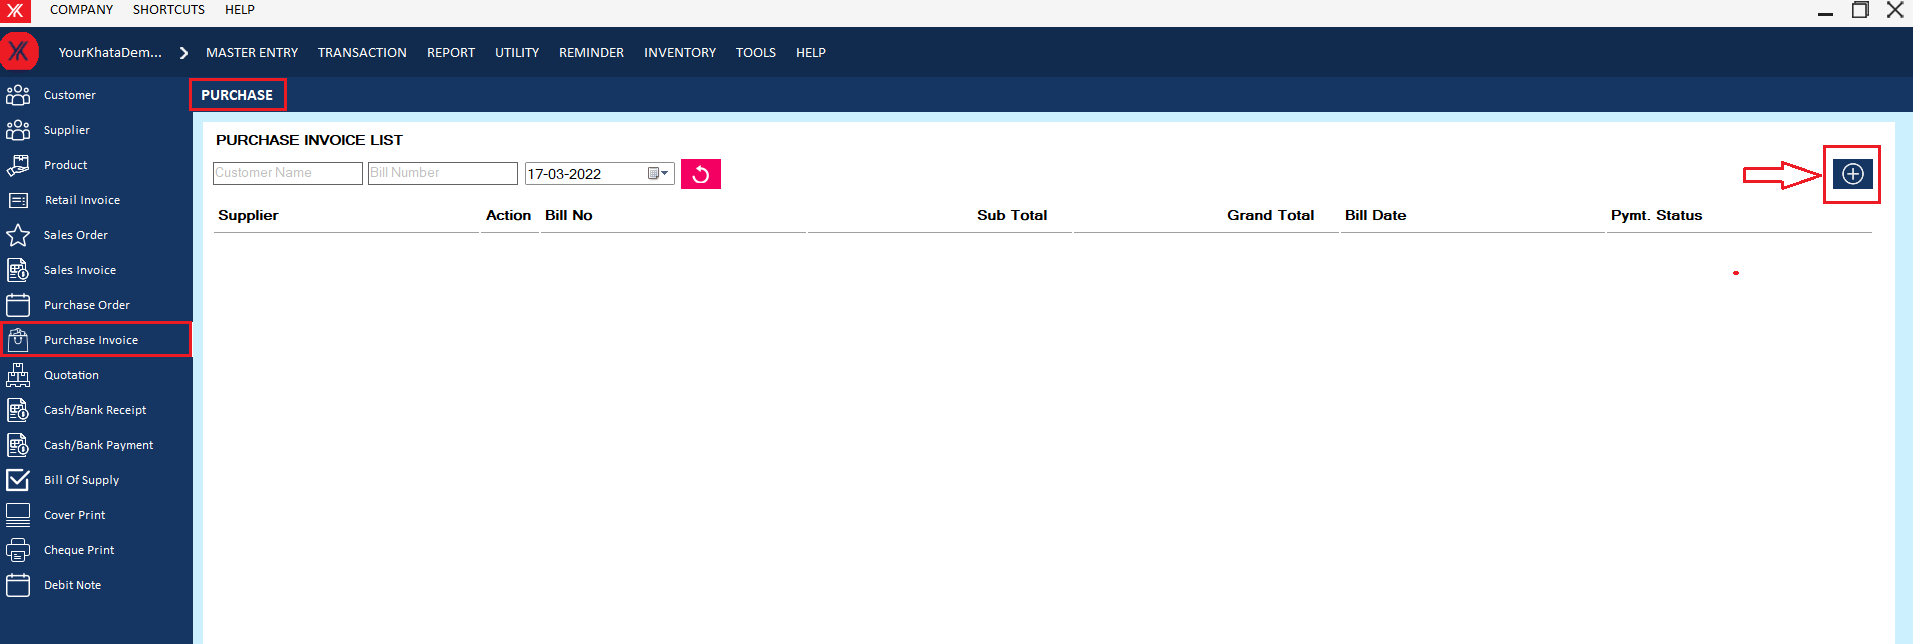
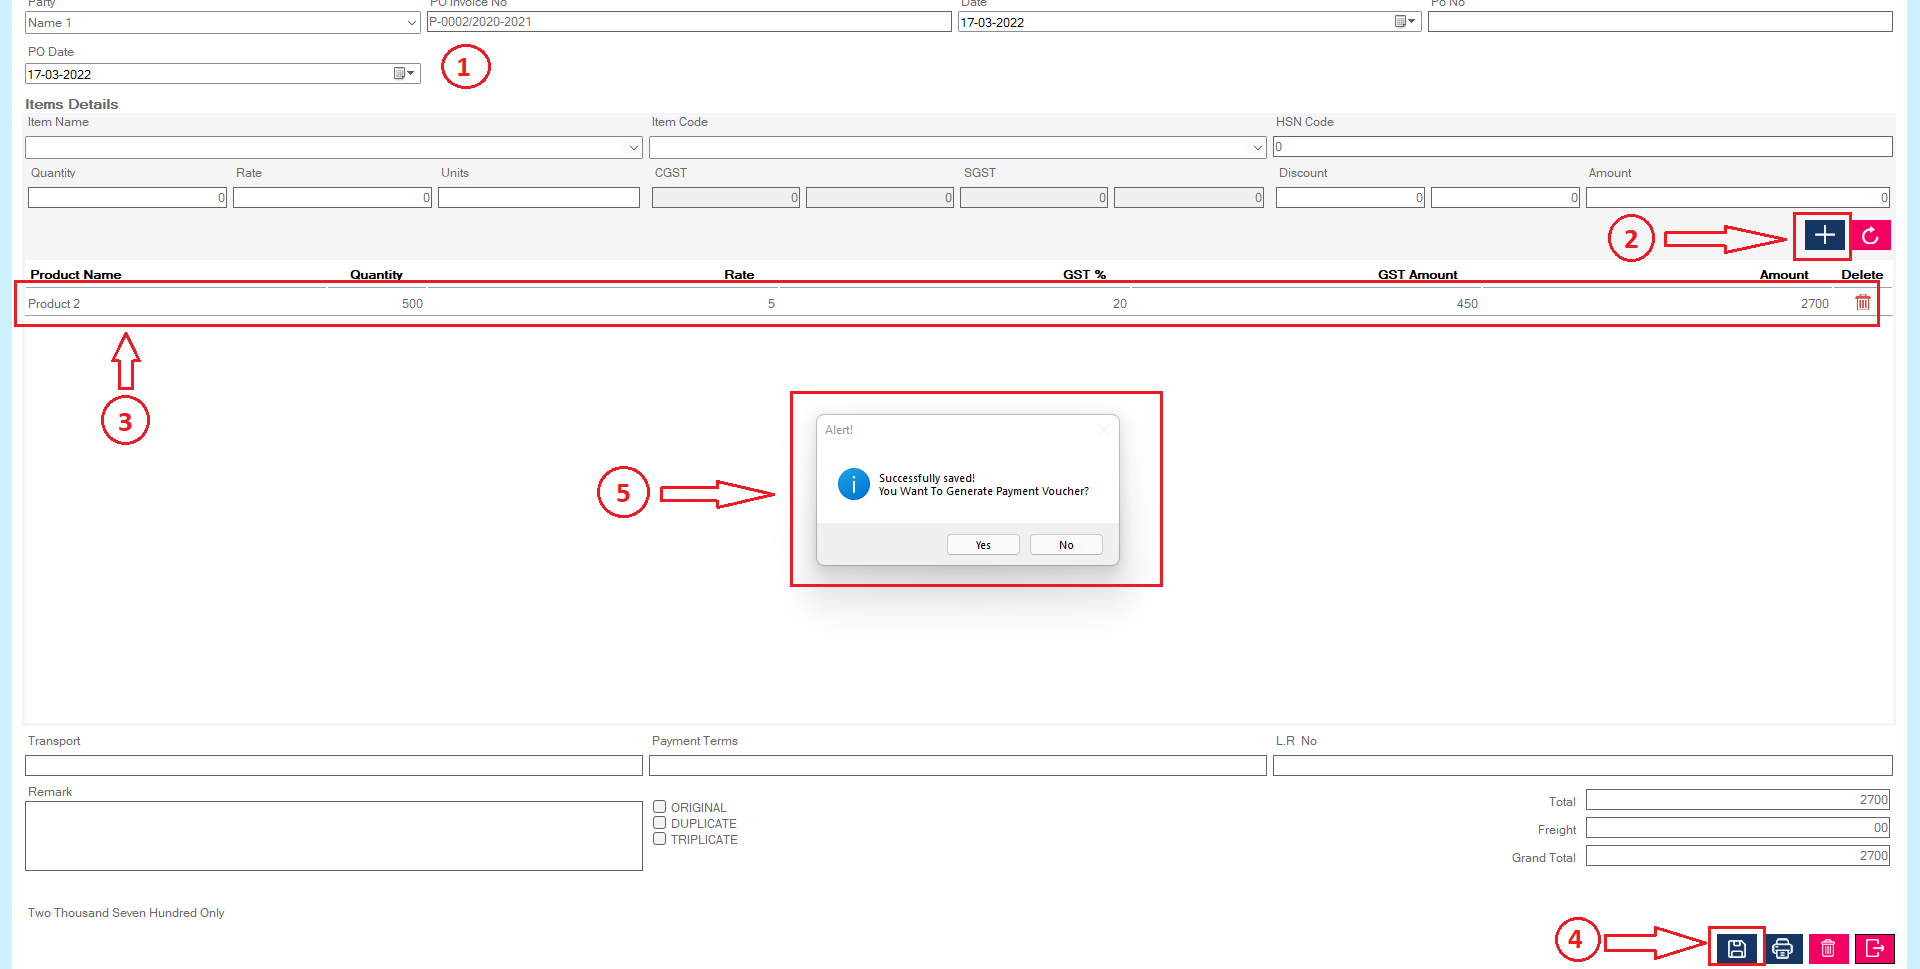
Step 2: Fill all details & submit > Click on save button, you will get the message “Do you want to generate payment voucher?”
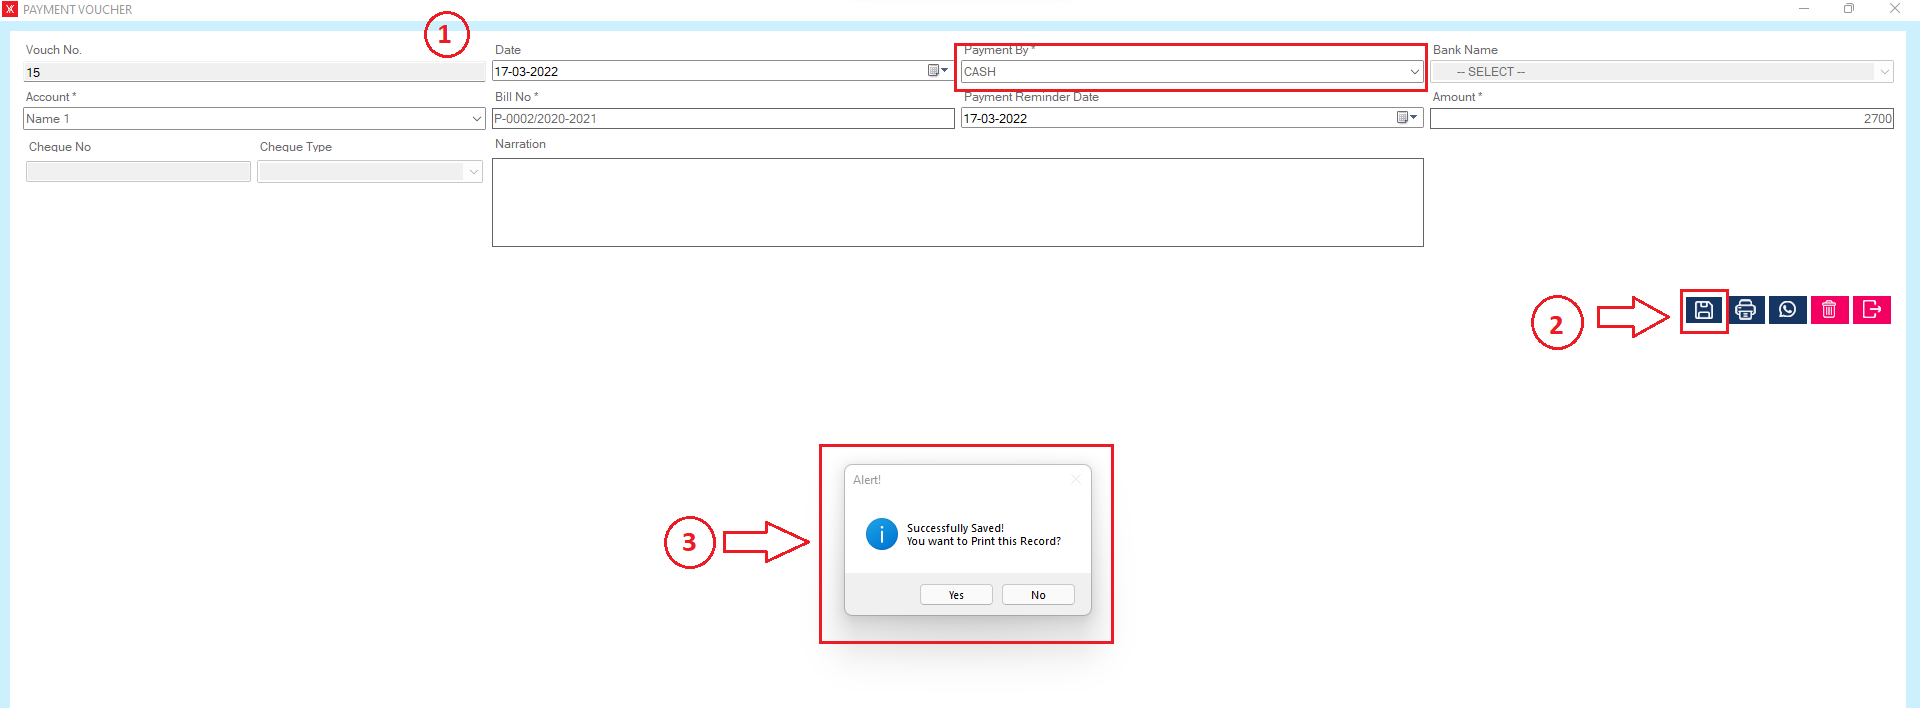
Step 3: After clicking on yes > fill all details > click n save button > you will get the message “successfully saved”
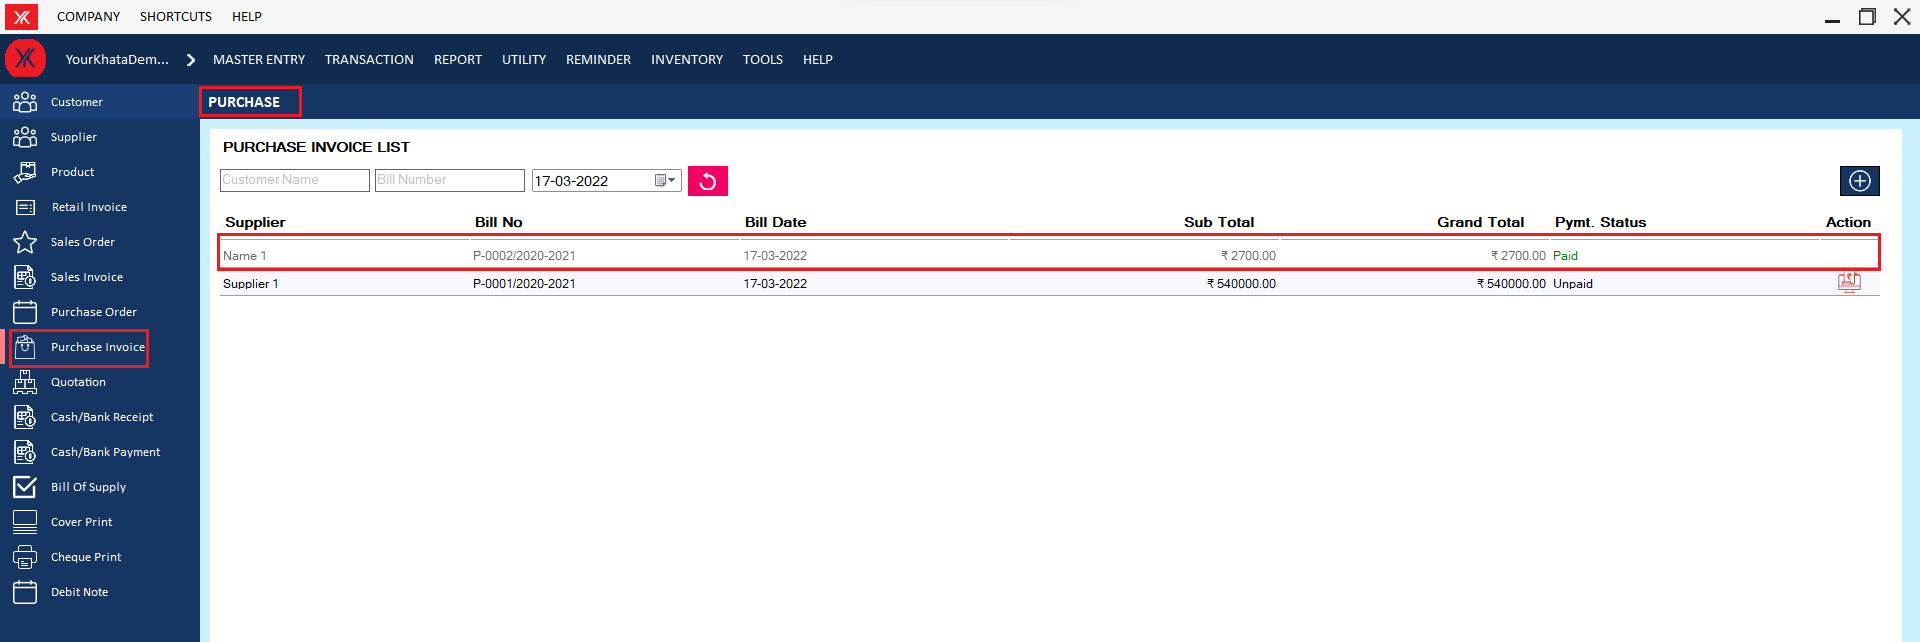
Step 4:New record will be display on purchase invoice list
- How to add Payment voucher for Yourkhata accounting and billing software?
Step 1: Go to payment voucher in transaction
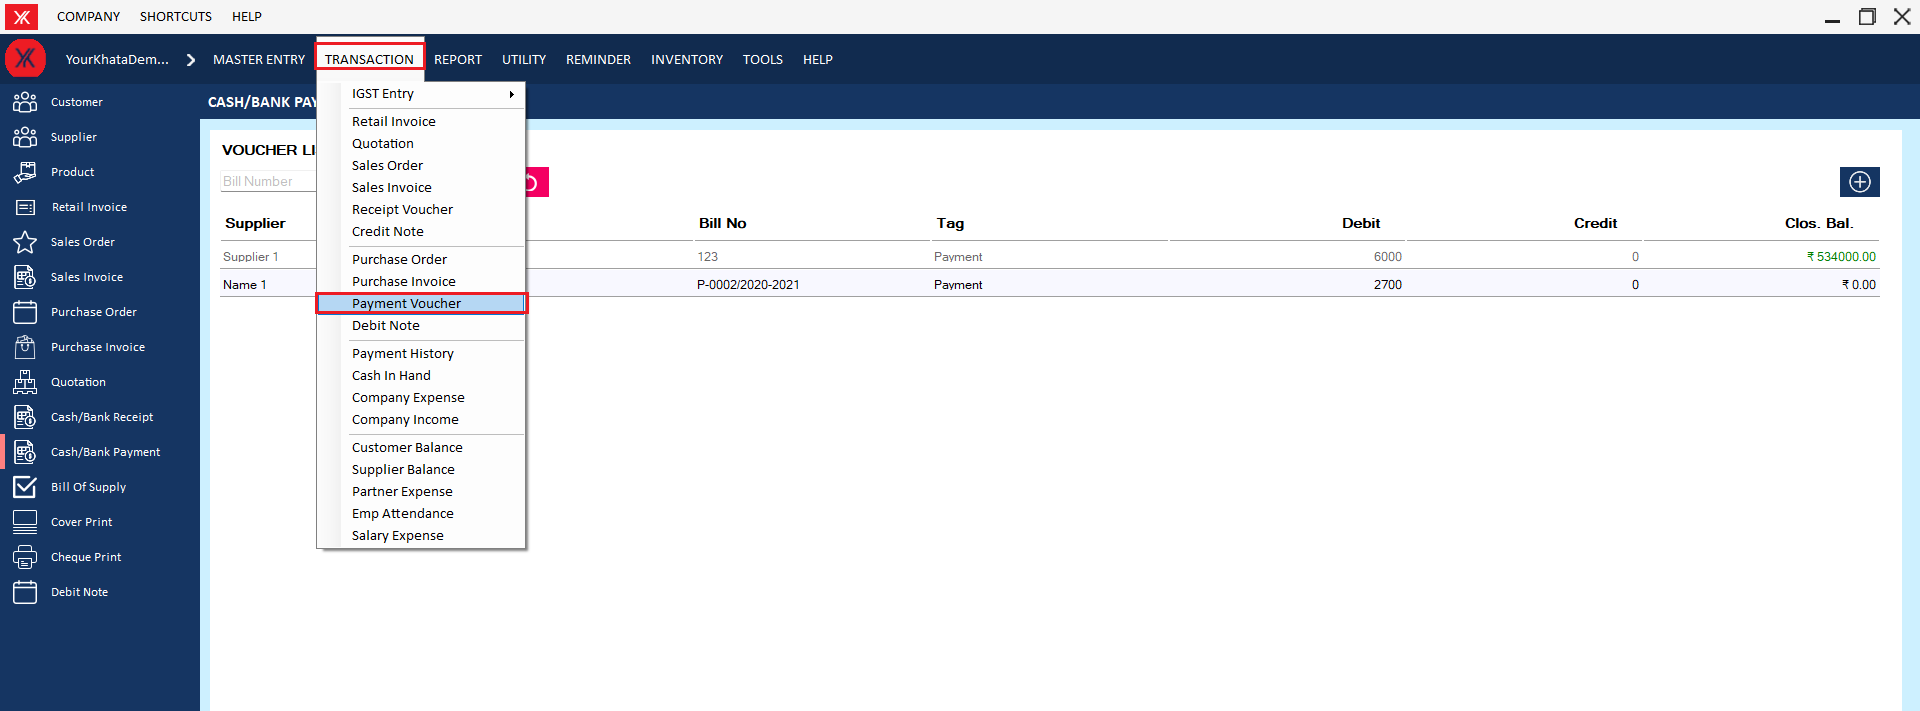
Step 2: Click on “+”

Step 2: Select cash & Fill all details > submit , You will get the message that “Successfully saved! You want to print this record?”

Step 3: New record will be display on Cash payment screen
How to use Sales Transaction
- How to add Retail invoice for Yourkhata accounting and billing software?
Step 1: Go to retail invoice & click on“+”
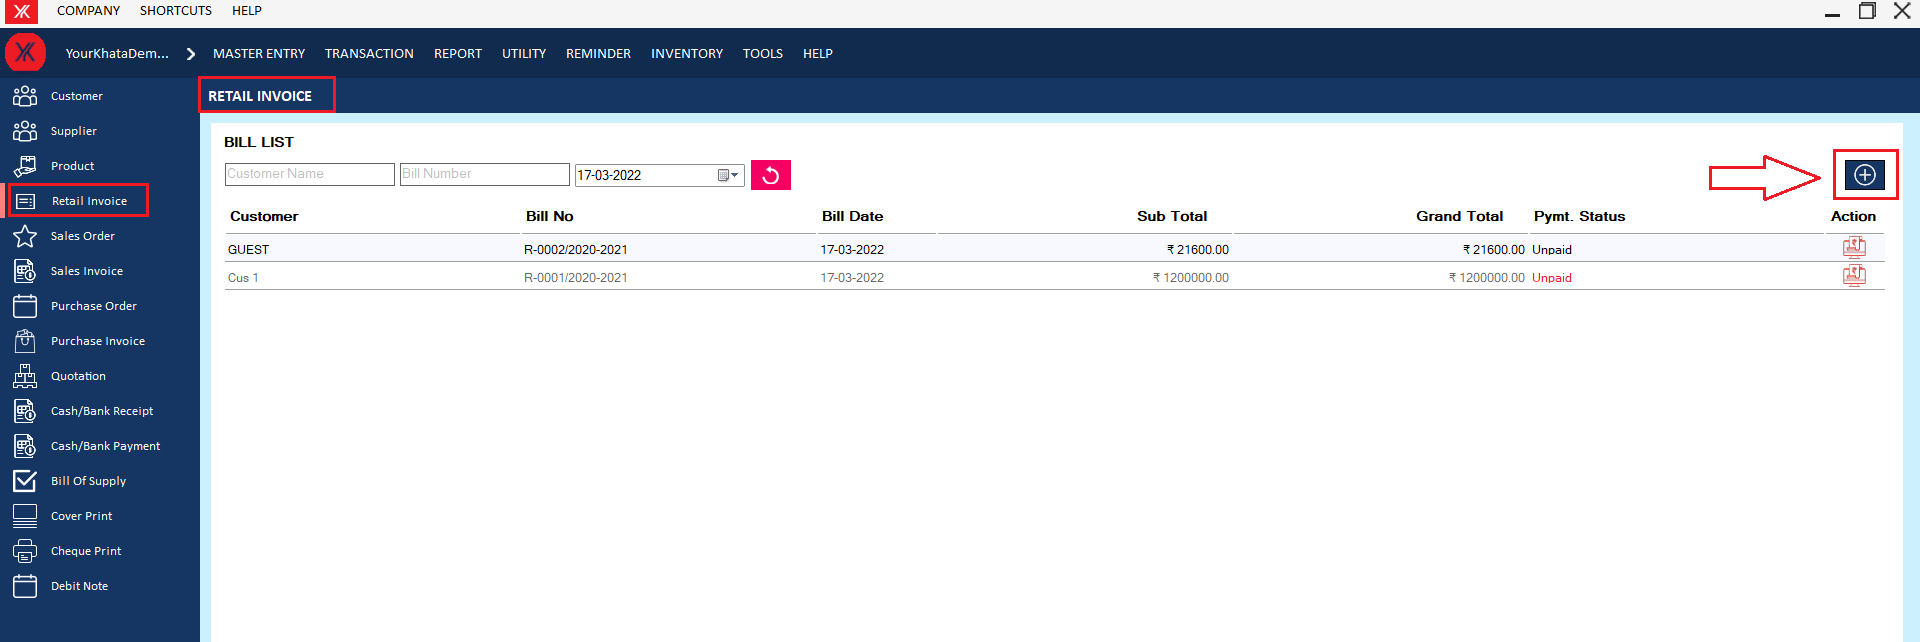
Step 2: Fill all the details & submit, You will get a message “Successfully saved”

Step 3: New record will be display on retail invoice screen

- How to add Bill of supply for Yourkhata accounting and billing software?
Step 1: Go to bill of supply > click on “+”
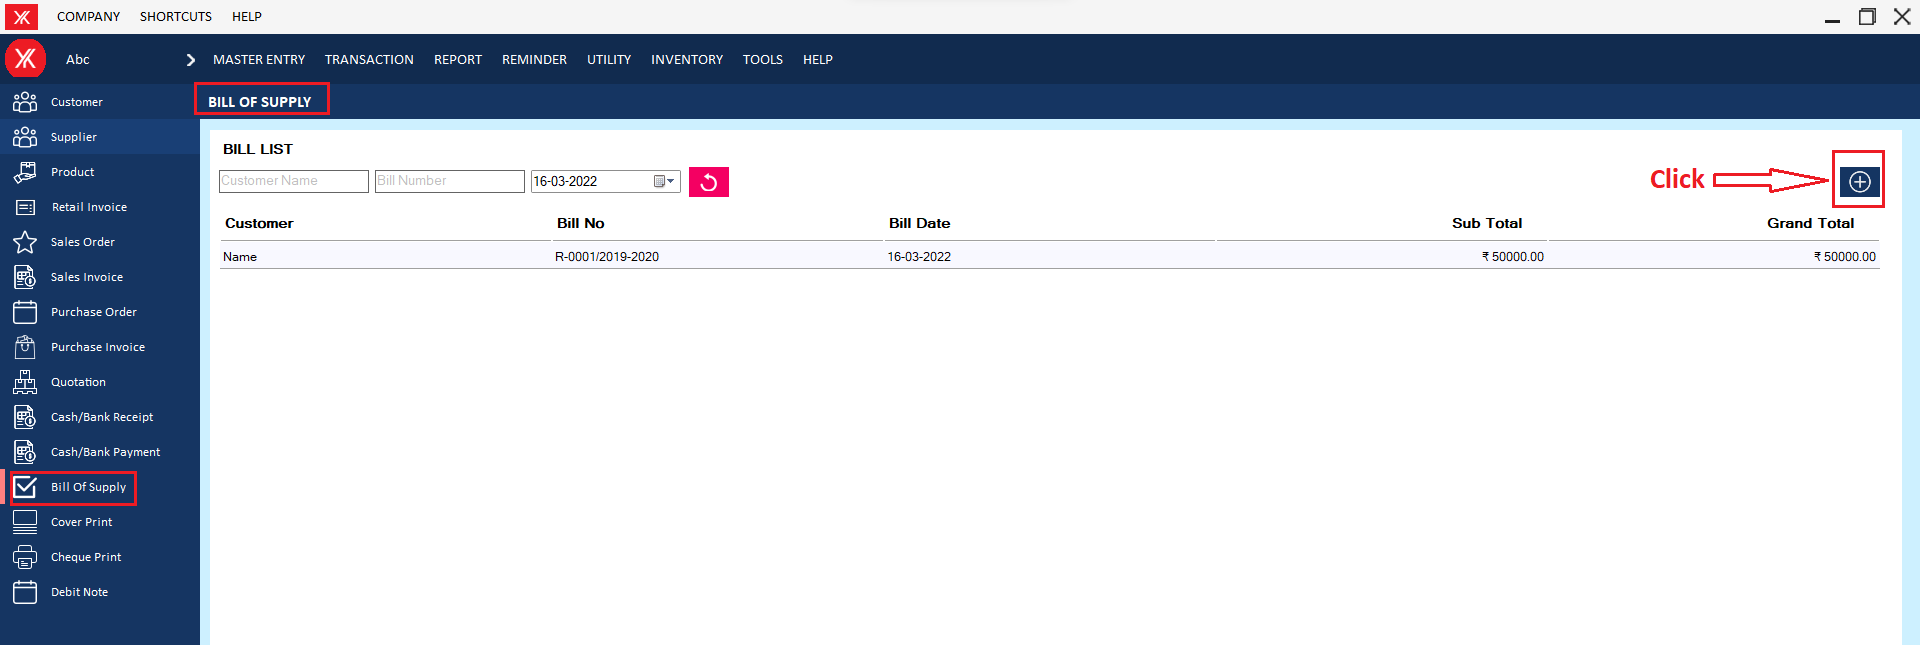
Step 2: Fill all details & submit > Click on save icon >you will get a message that “successfully saved” You want to print this record!

Step 3: New Entry will be display on bill of supply screen.

- How to add Quotation for Yourkhata accounting and billing software?
Step 1: Go to quotation & click on “+”
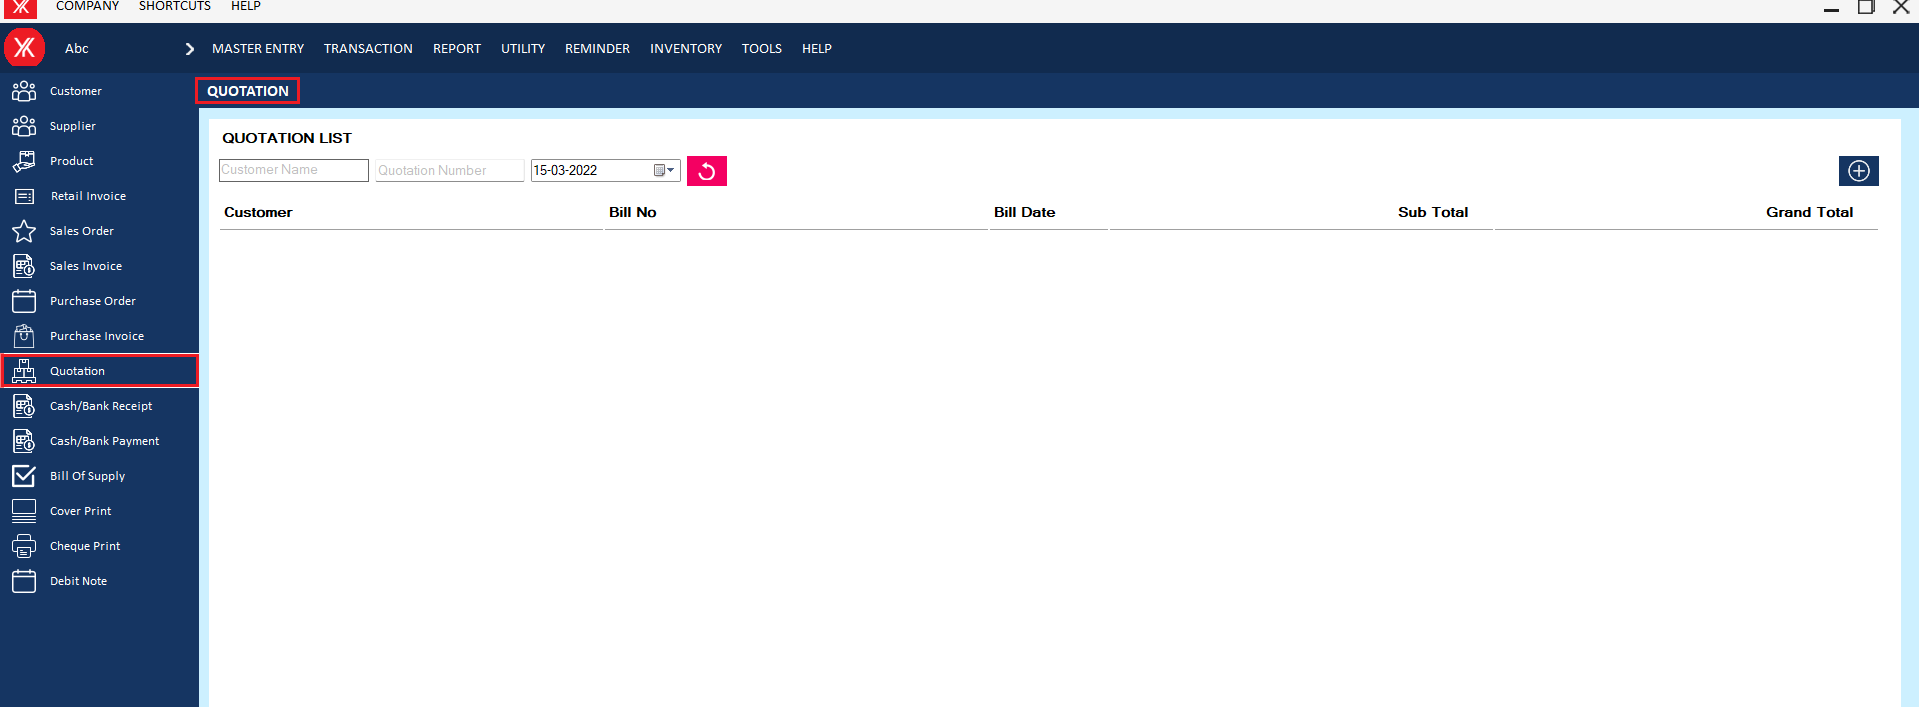
Step 2: Fill all details & click on “+”
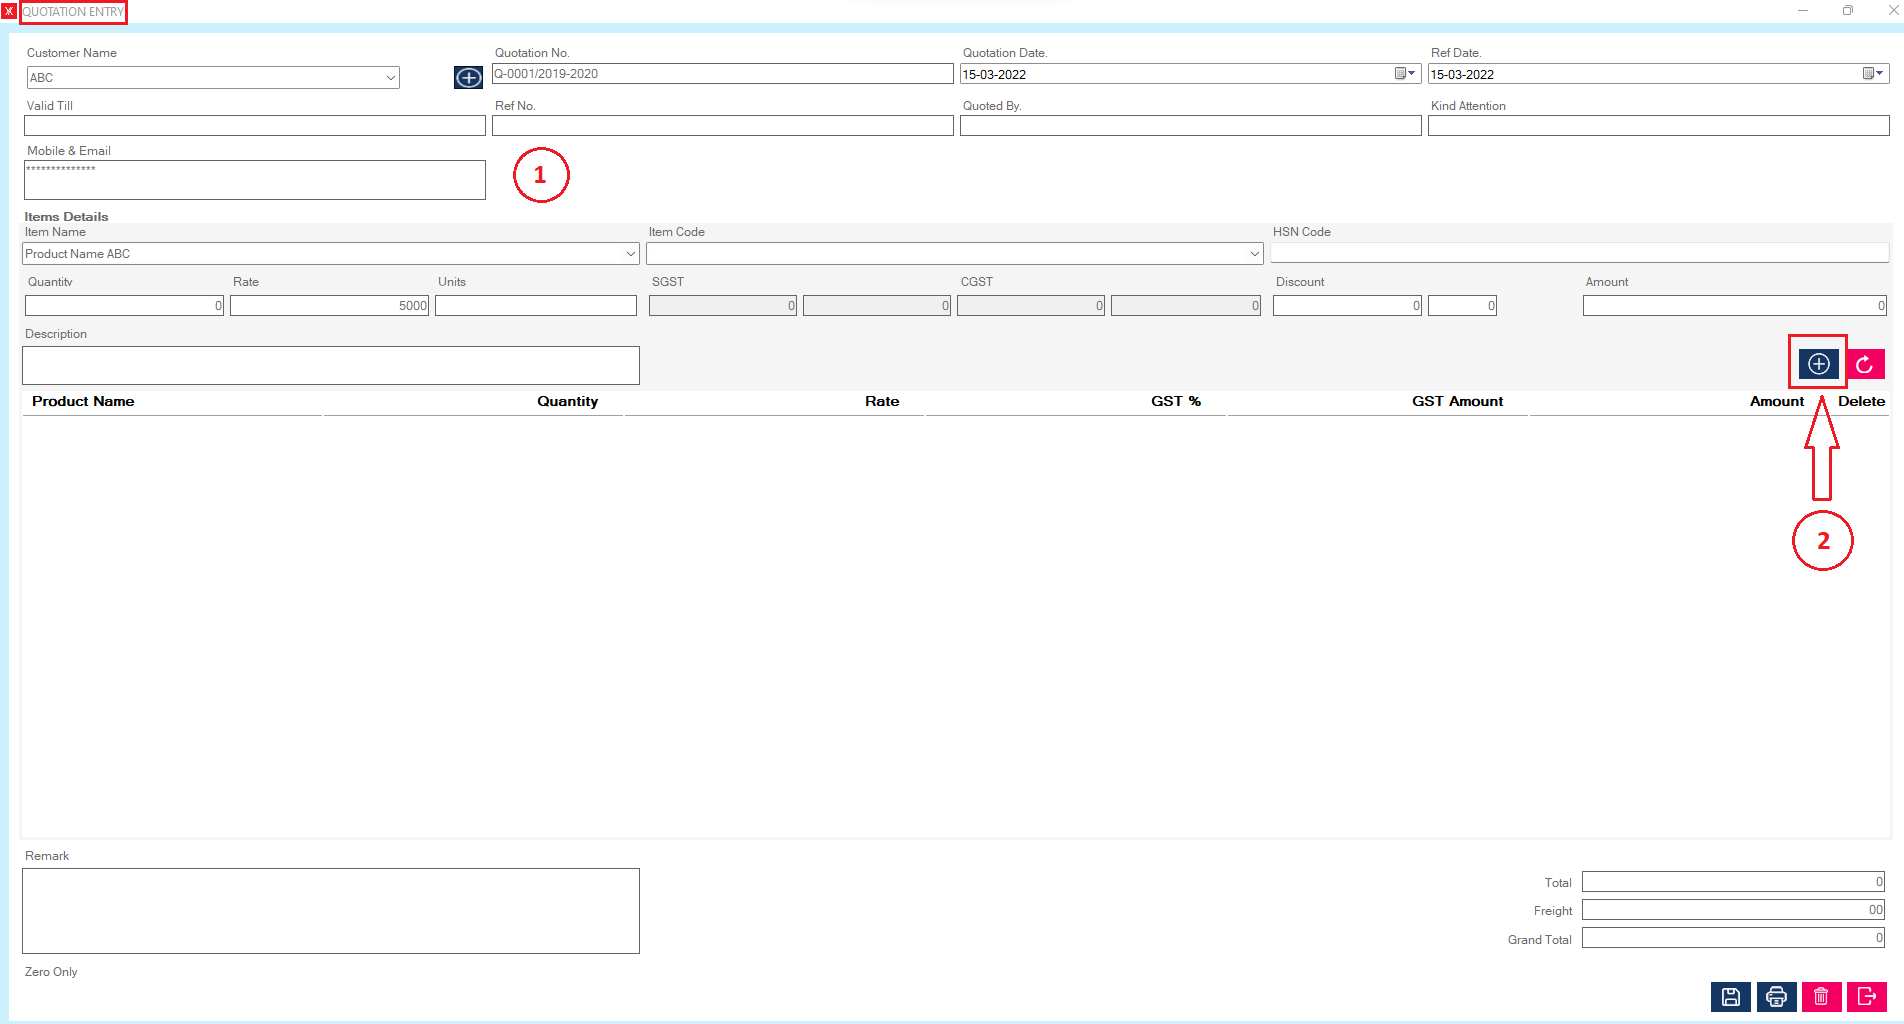
Step 3: Product Details will be save there
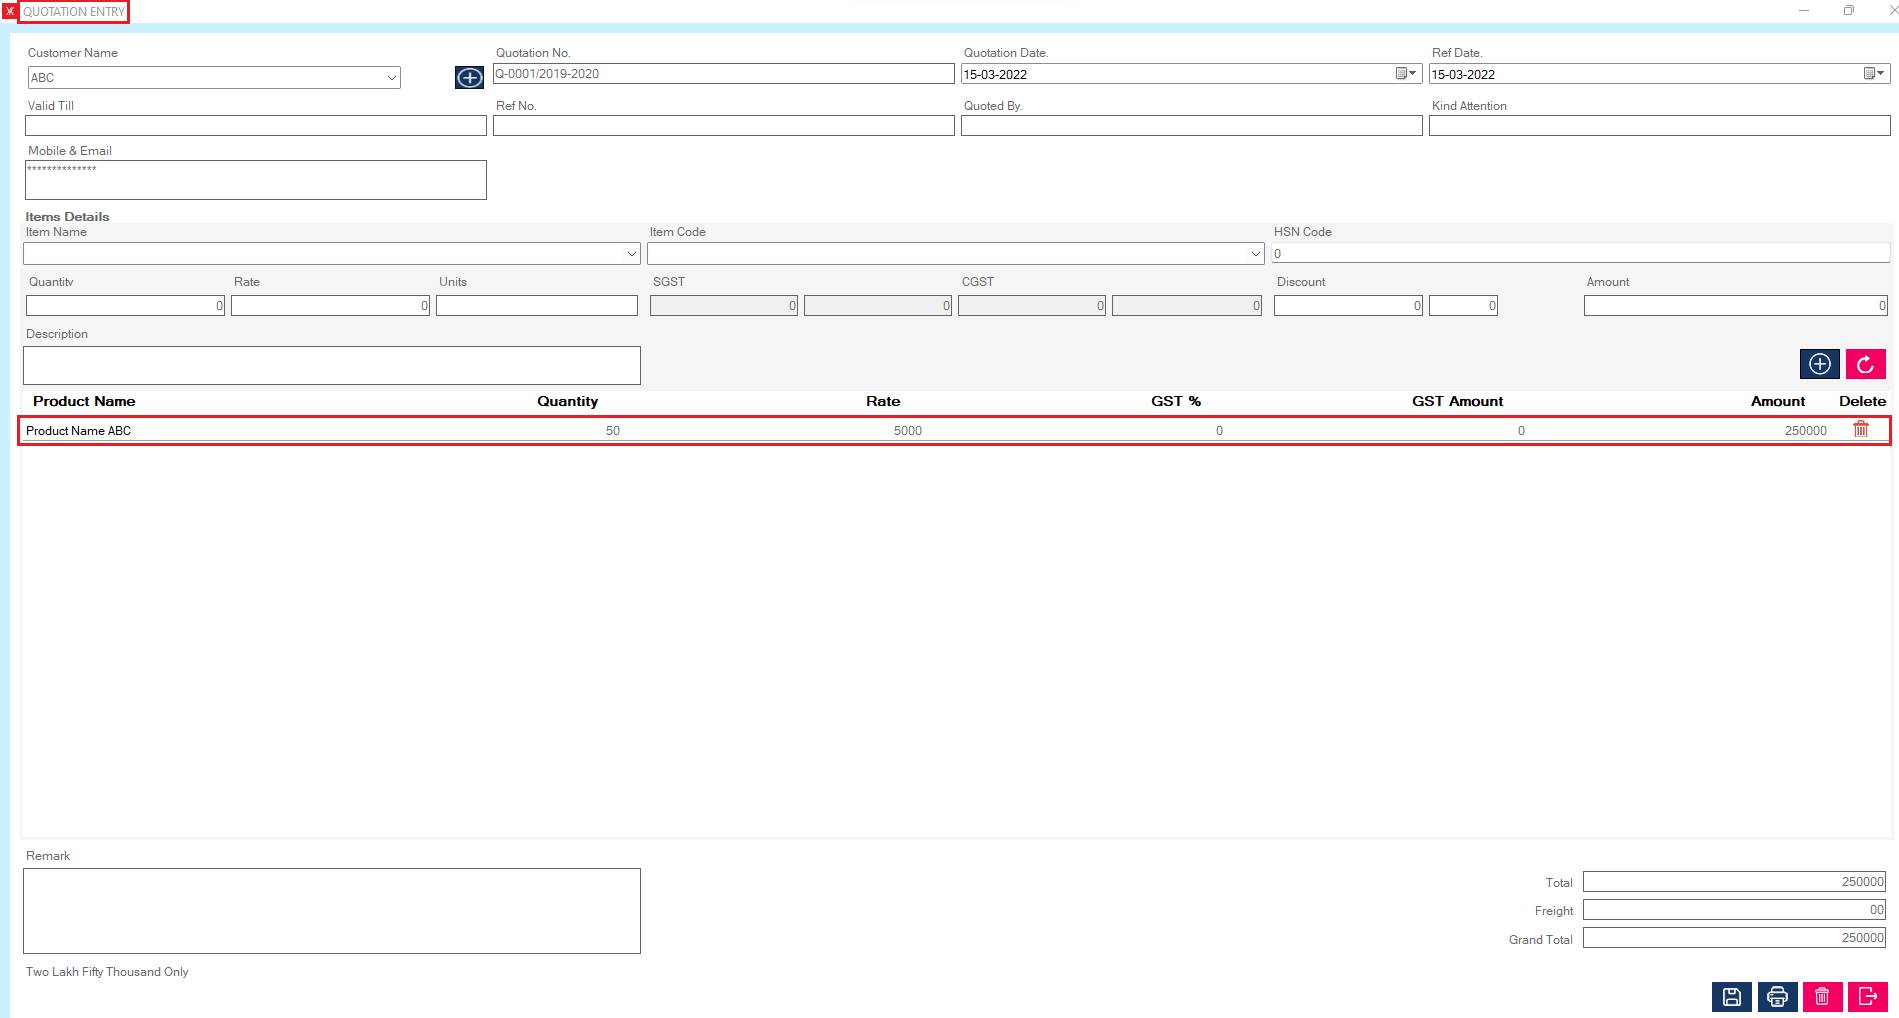
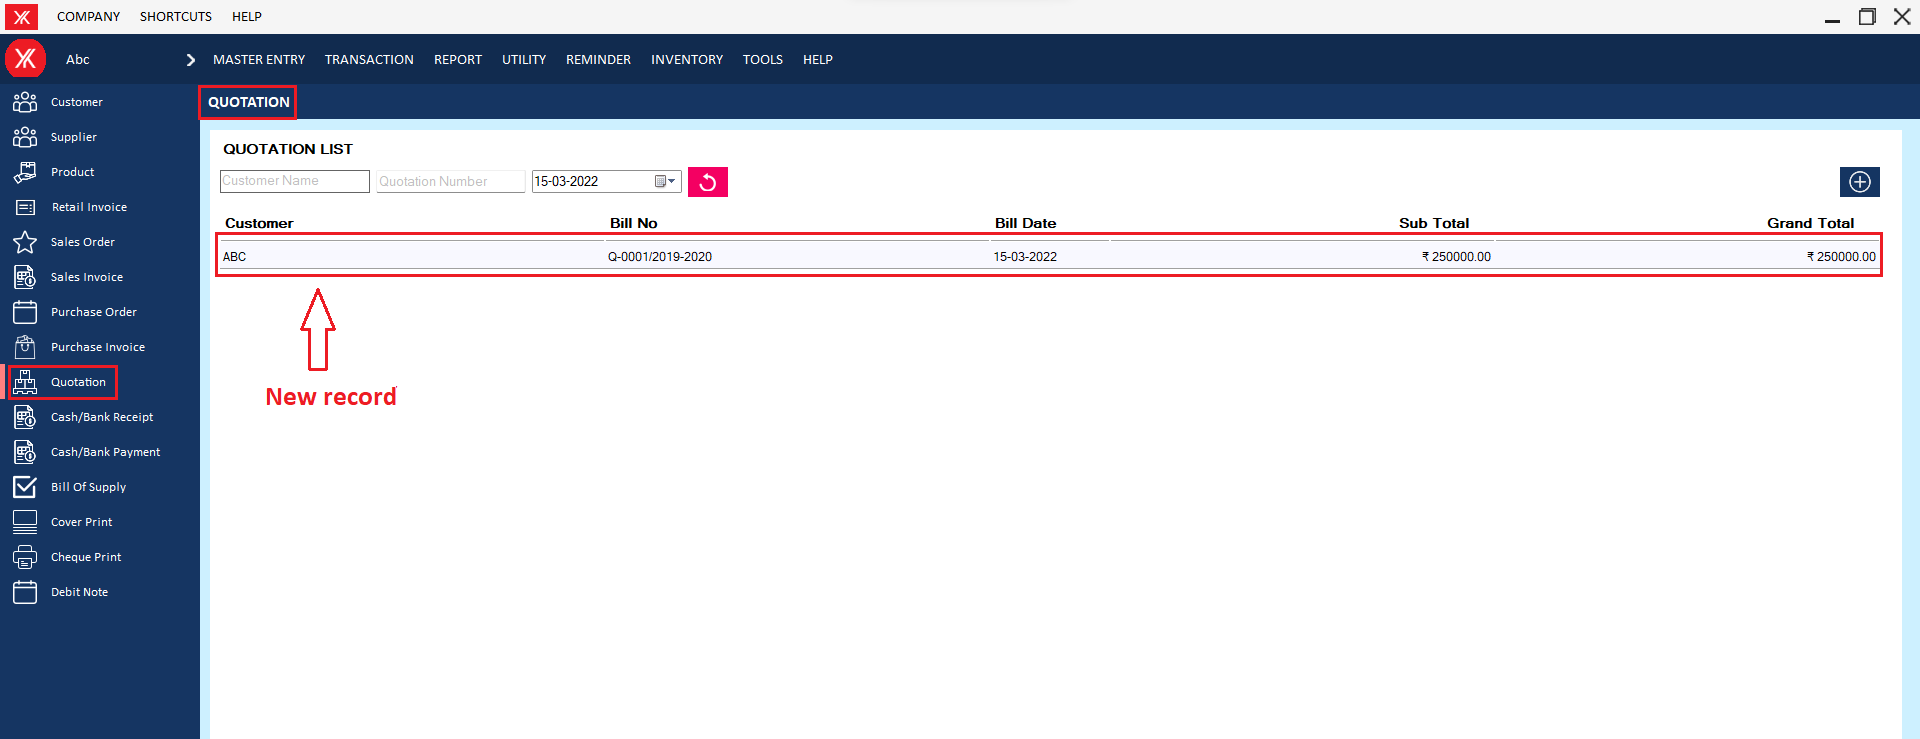
Step 4: New record of quotation will be display on quotation screen.
- How to add Sales order for Yourkhata accounting and billing software?
Step 1: Go to sales order & click on “+”
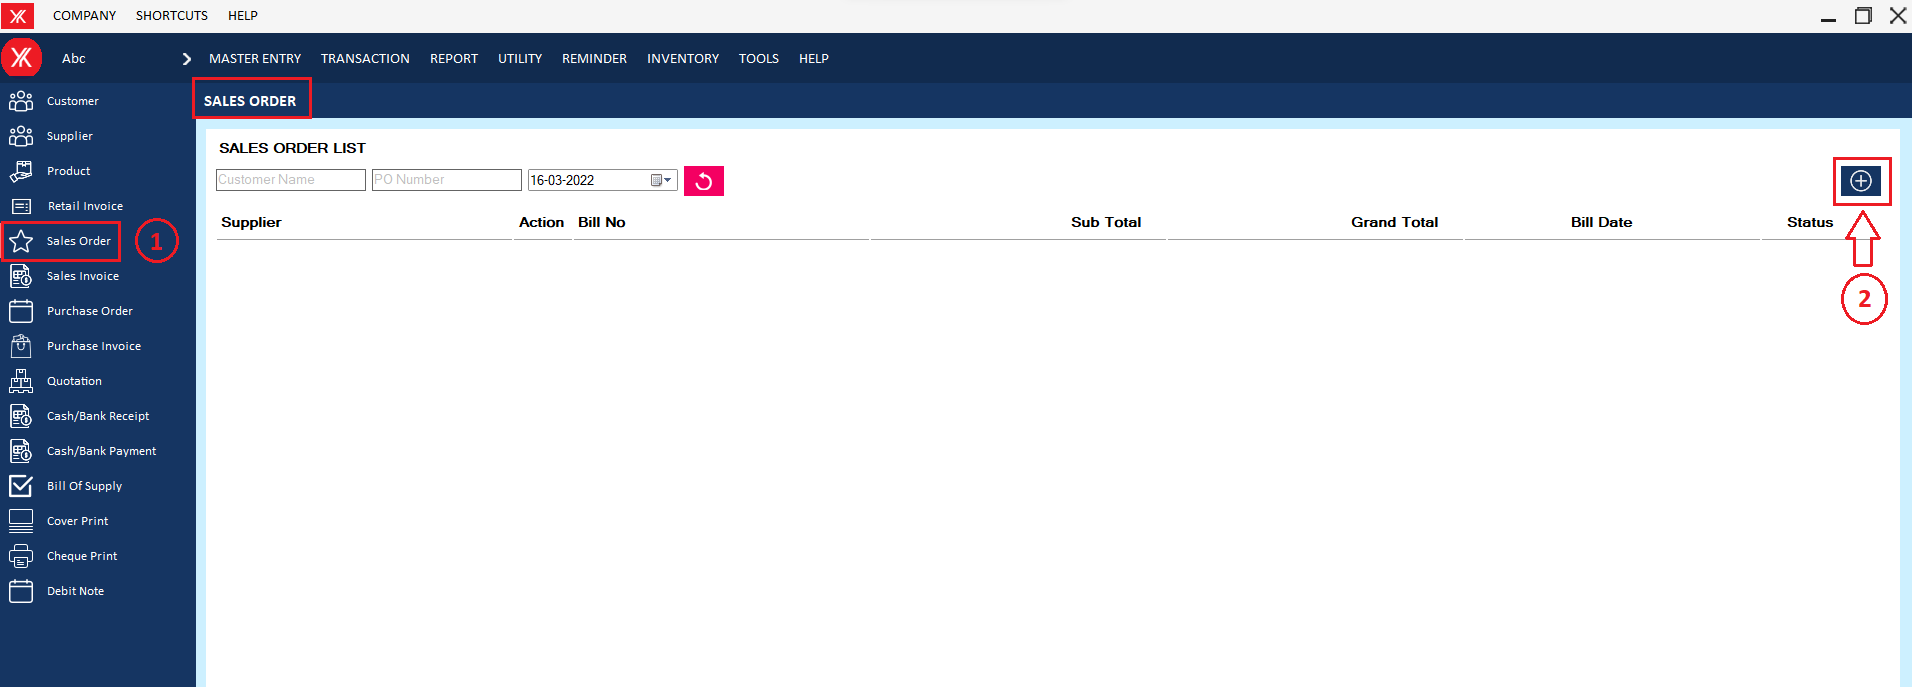
Step 2: Fill all details & submit
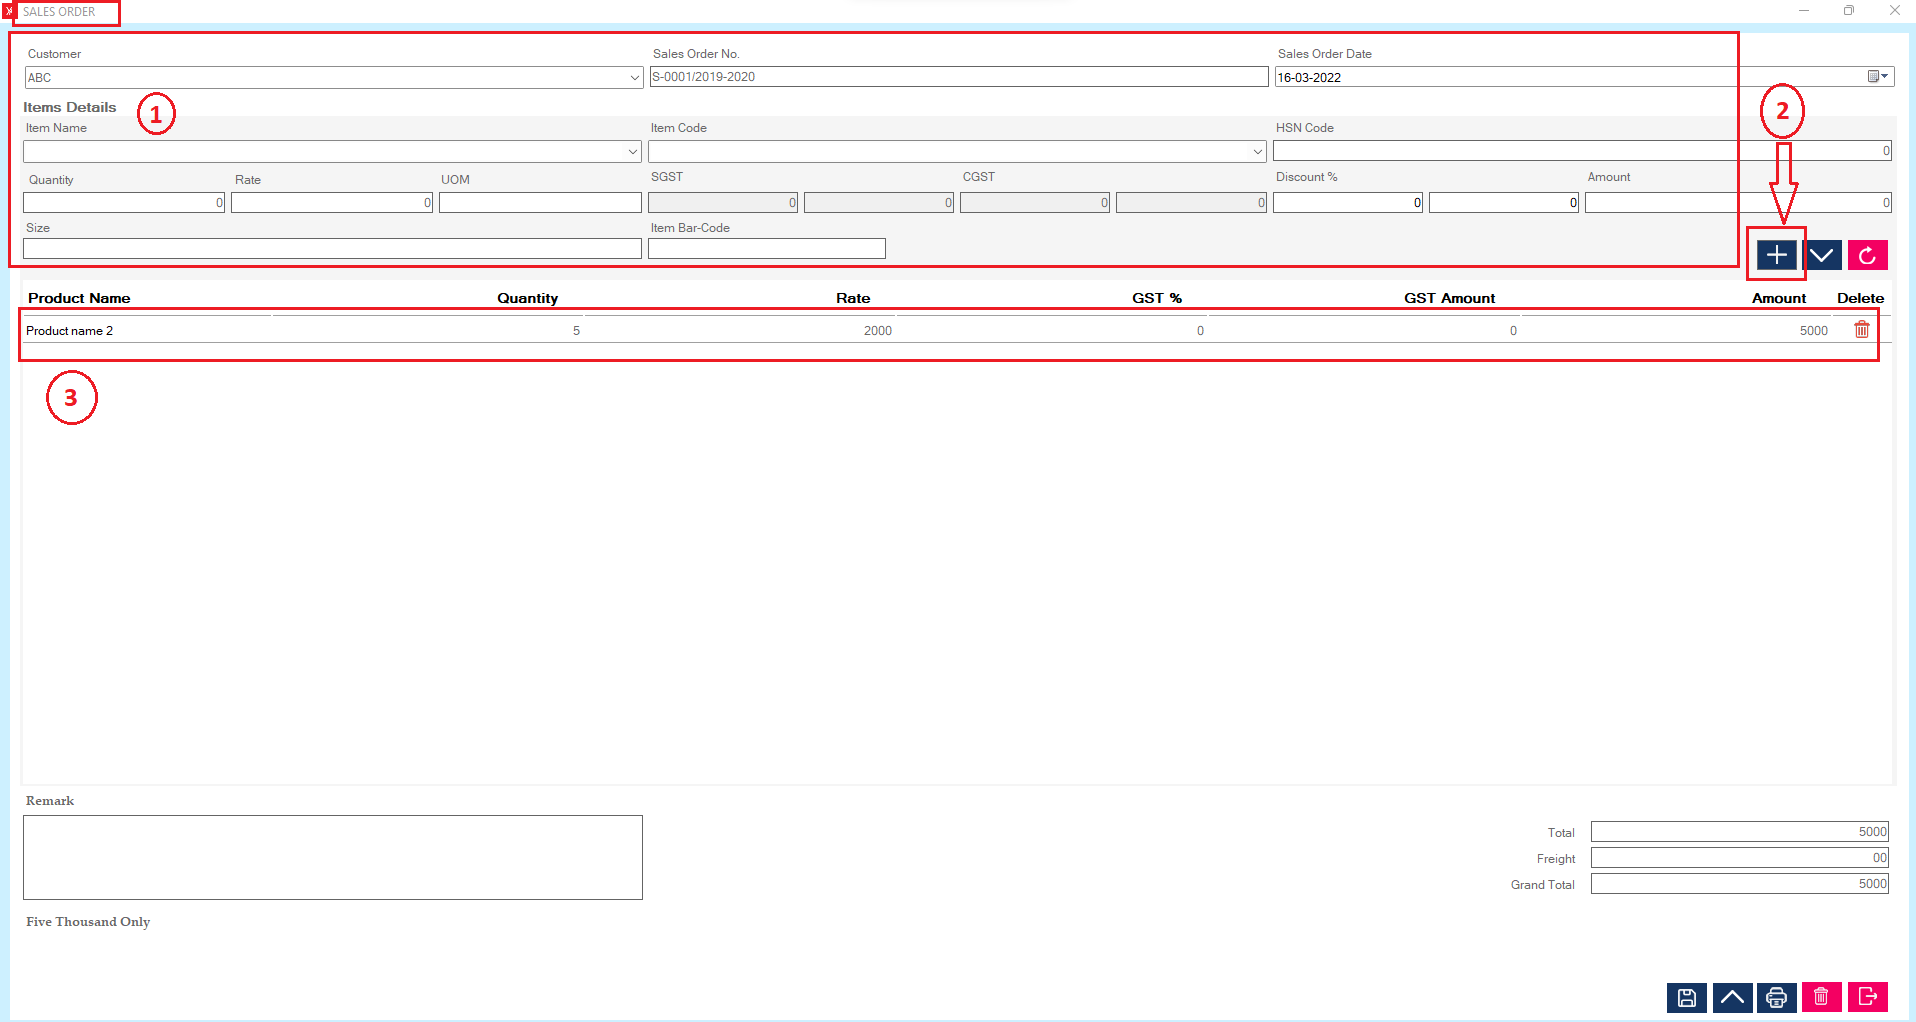
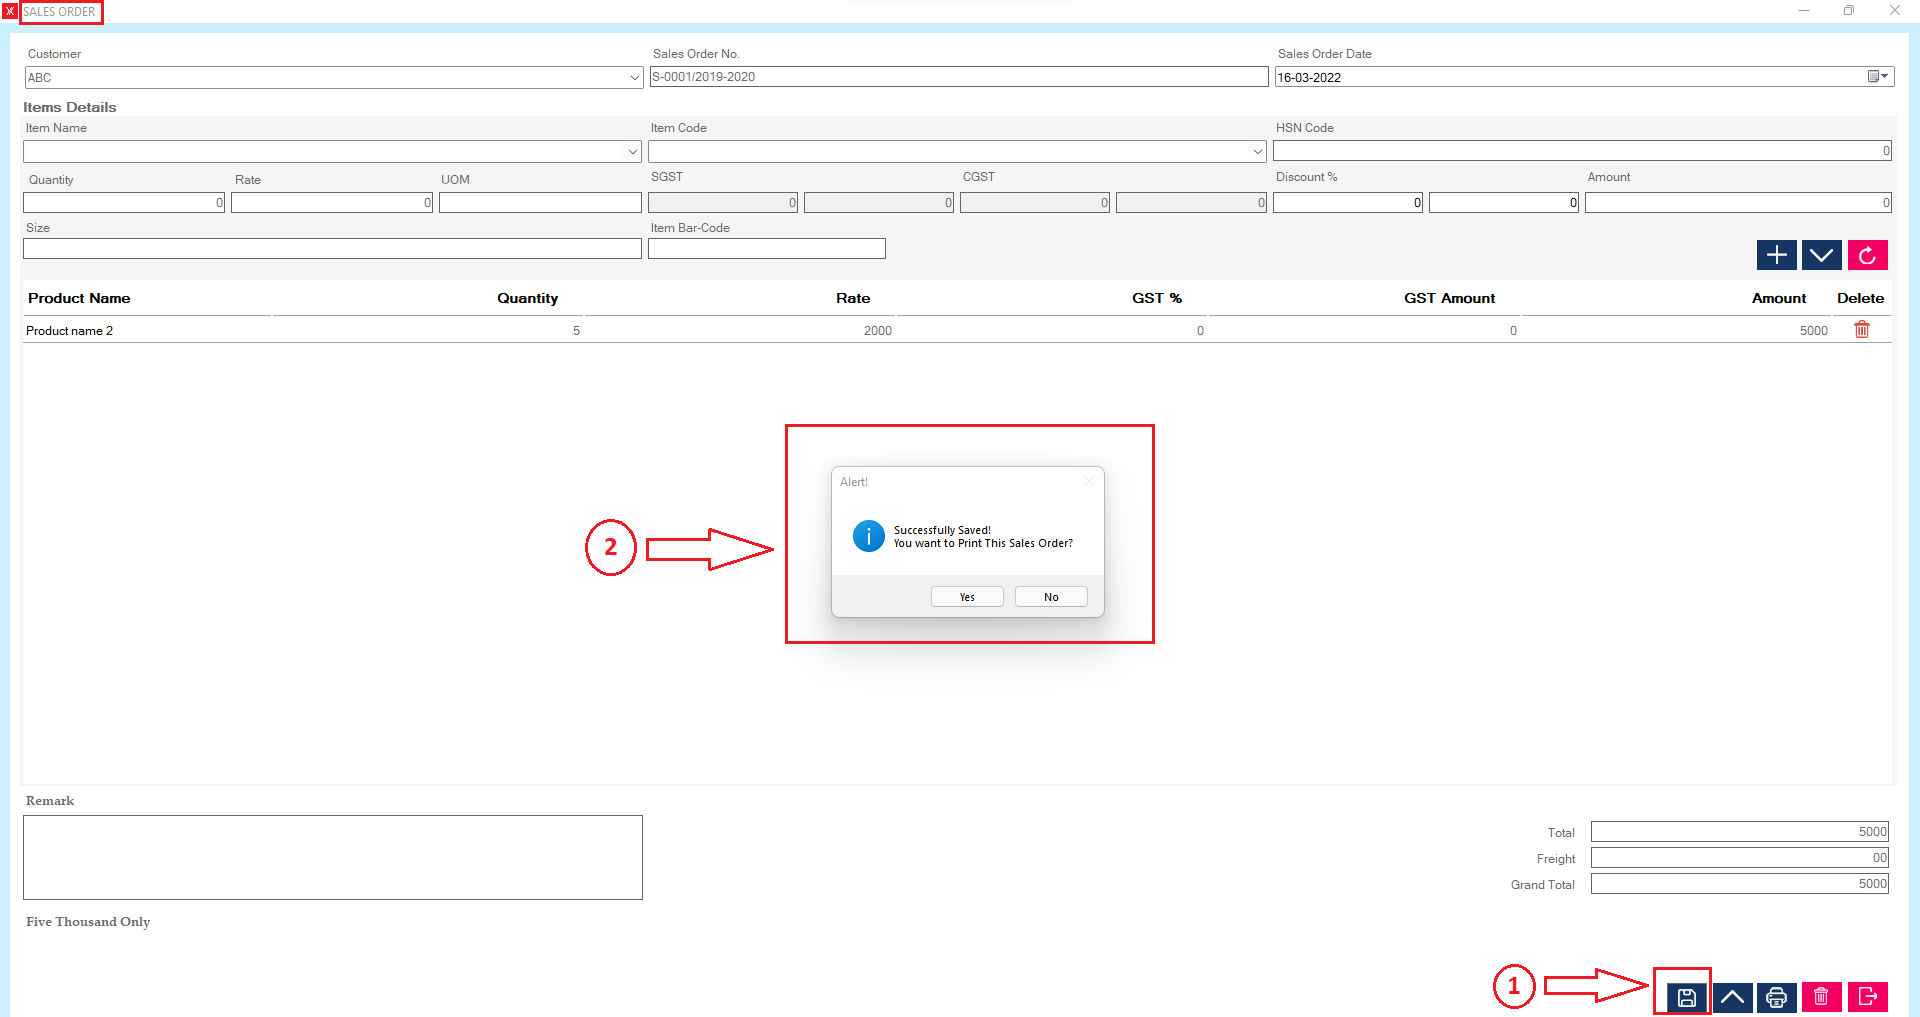
Step 3:Click on save button, you will get the message “Successfully saved. Do you want to print this sales order?”
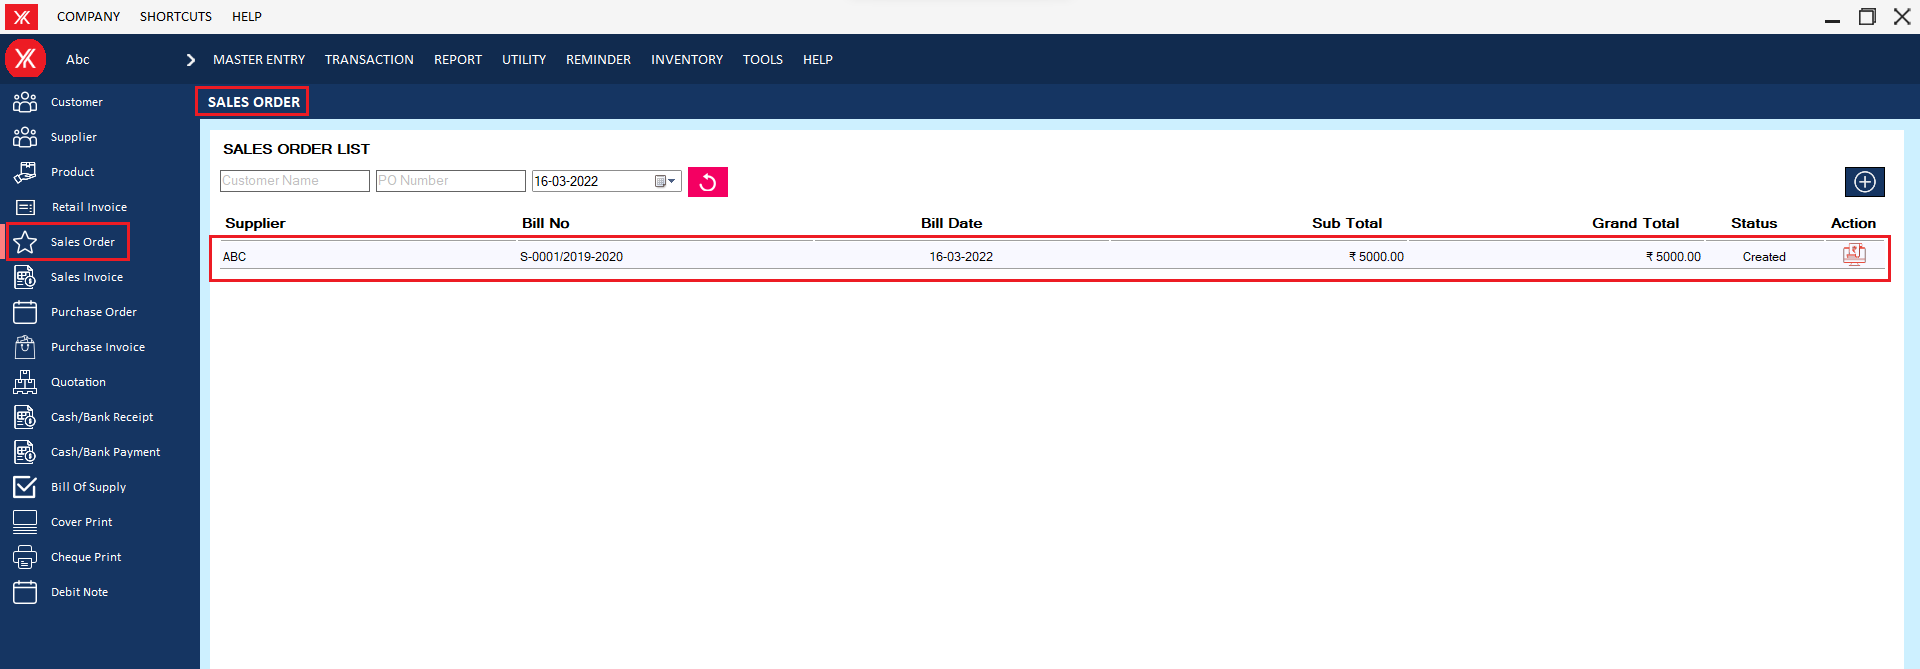
Step 4: New record will be display on sales oreder screen
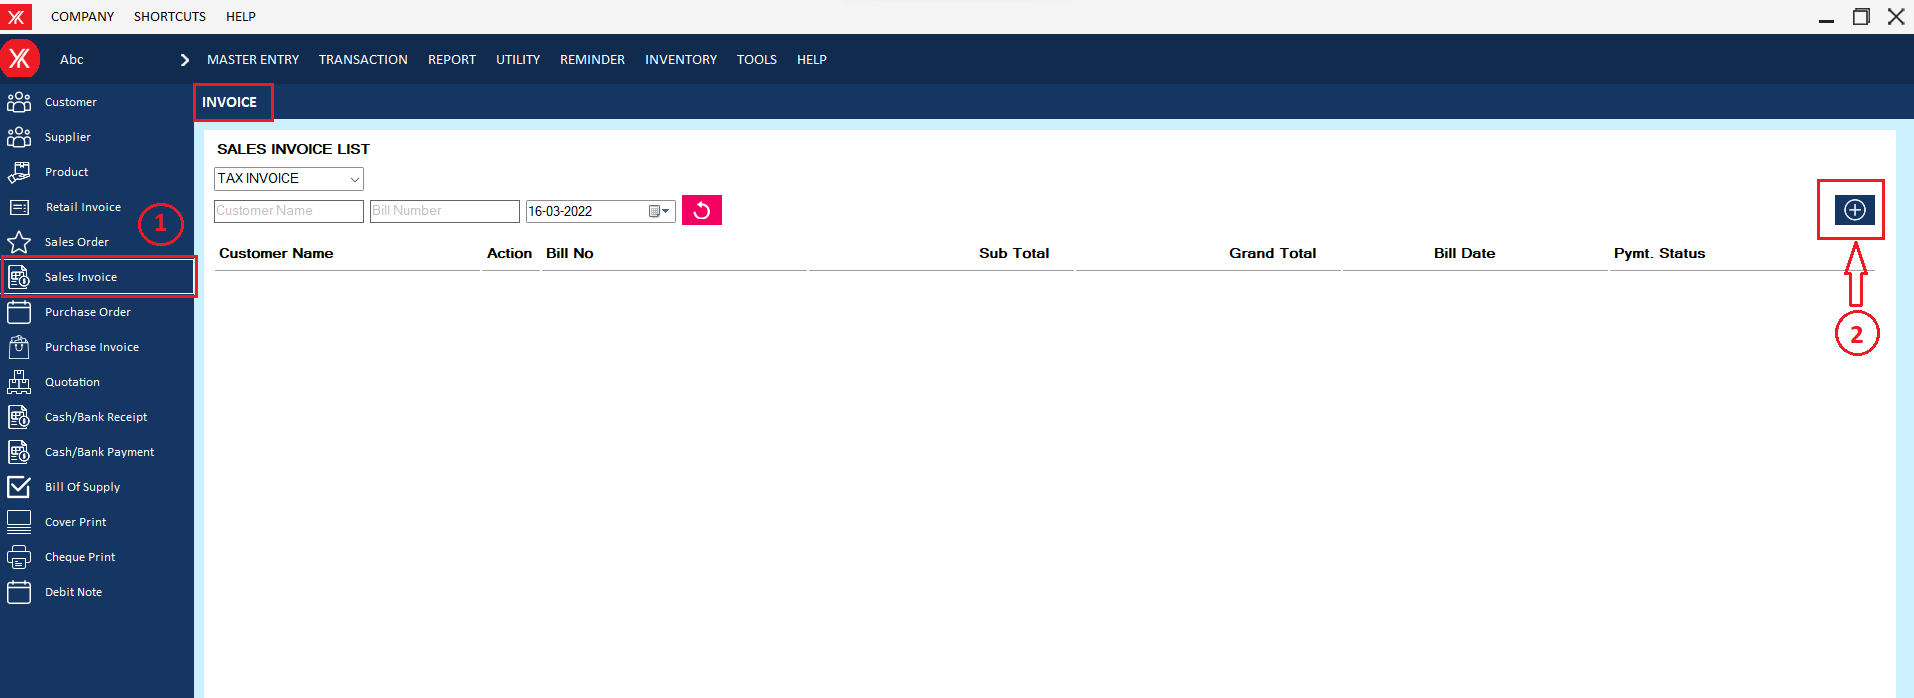
- How to add Sales invoice for Yourkhata accounting and billing software?
Step 1: Go to sales invoice & click on “+”
Step 2: Fill all details & submit > you will get a message “you want to generate payment voucher?”
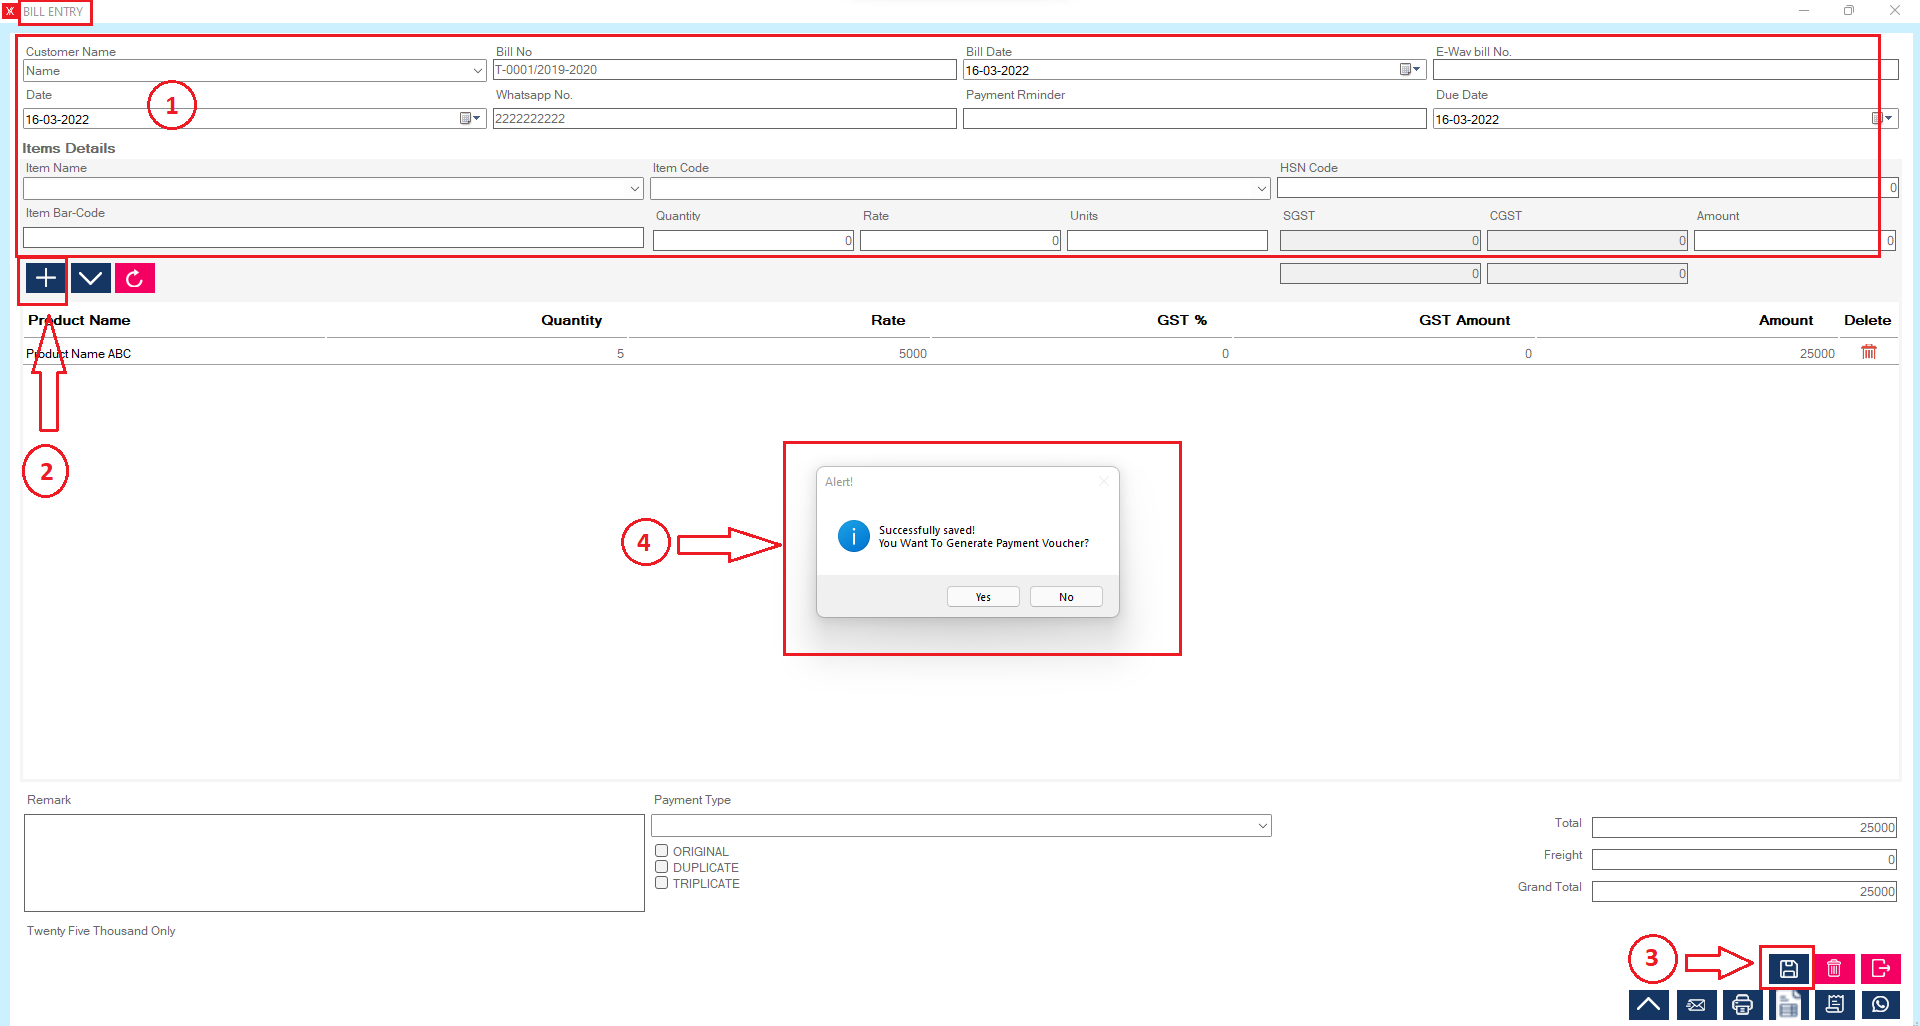
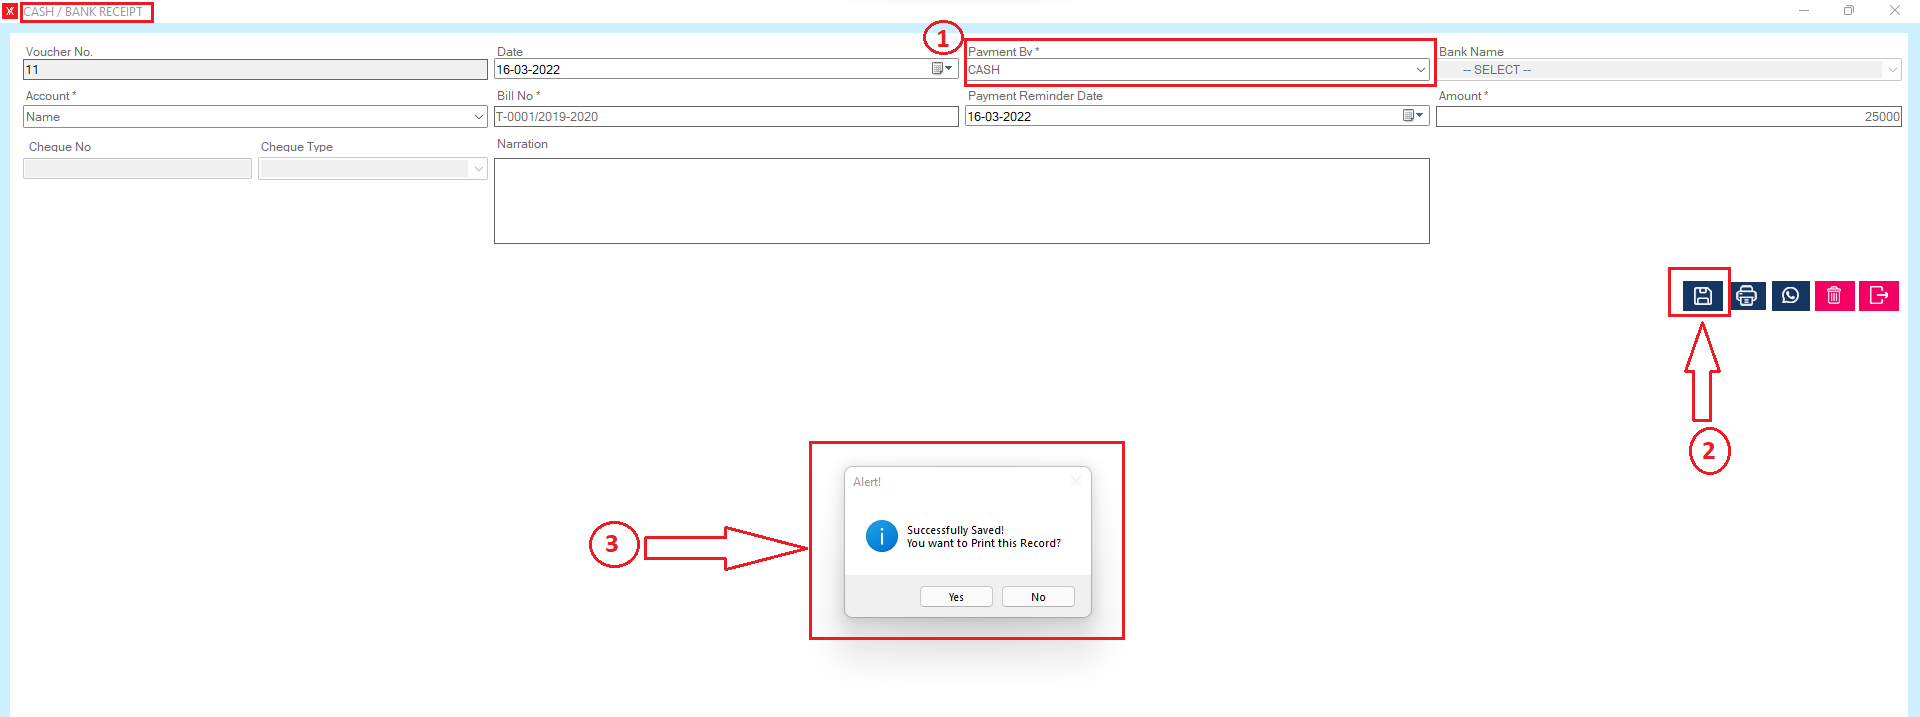
Step 3: If you click yes, Cash/receipt form will get open > Select payment by > fill all details > click on save > you will get a message “Successfully saves” > you want to print this record?
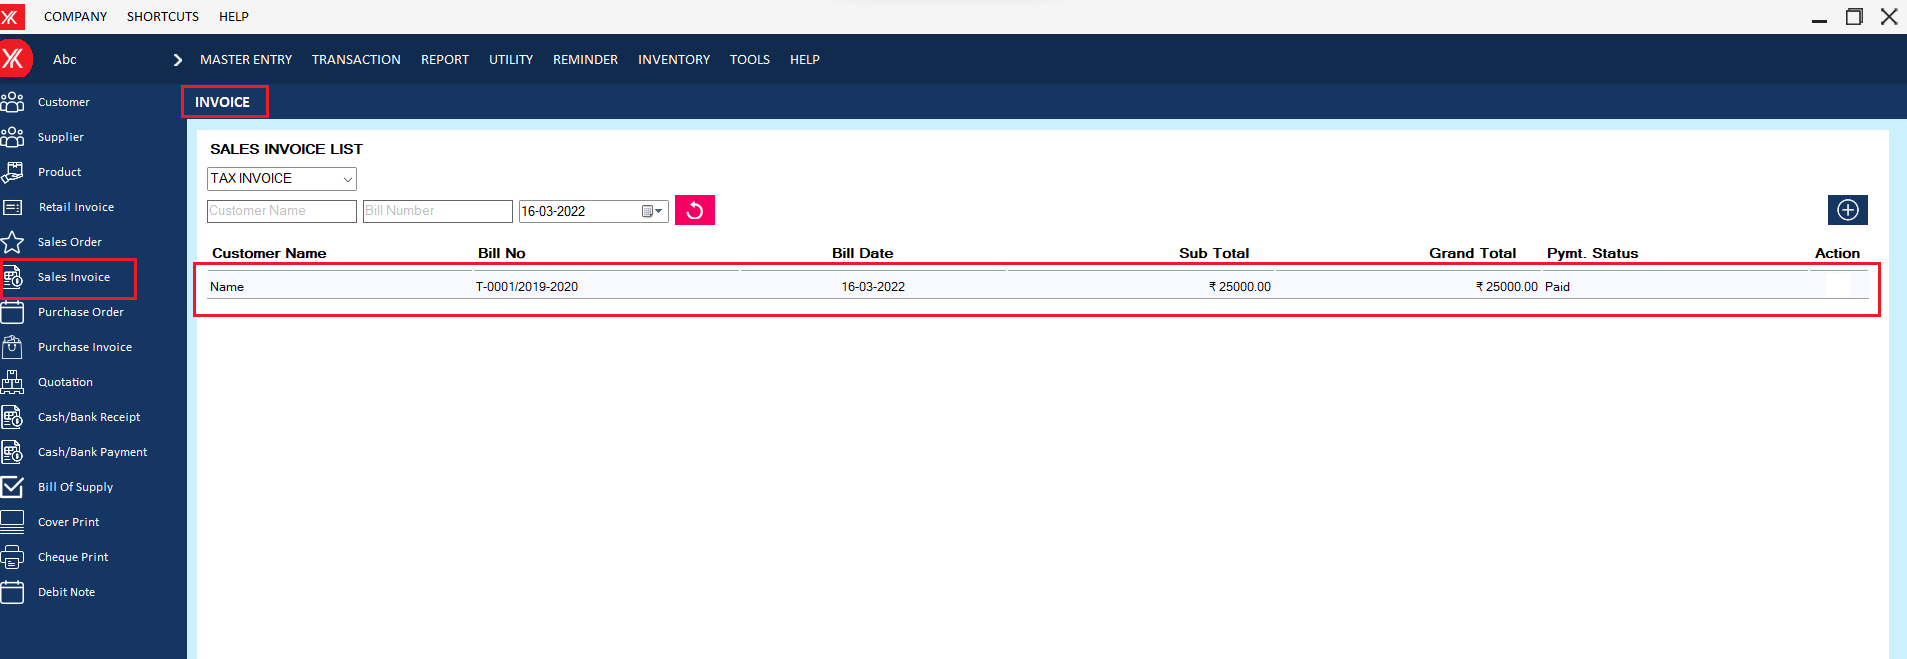
Step 4: After clicking on yes, New record will be display on sales order screen
- How to add Cash/bank receipt for Yourkhata accounting and billing software?
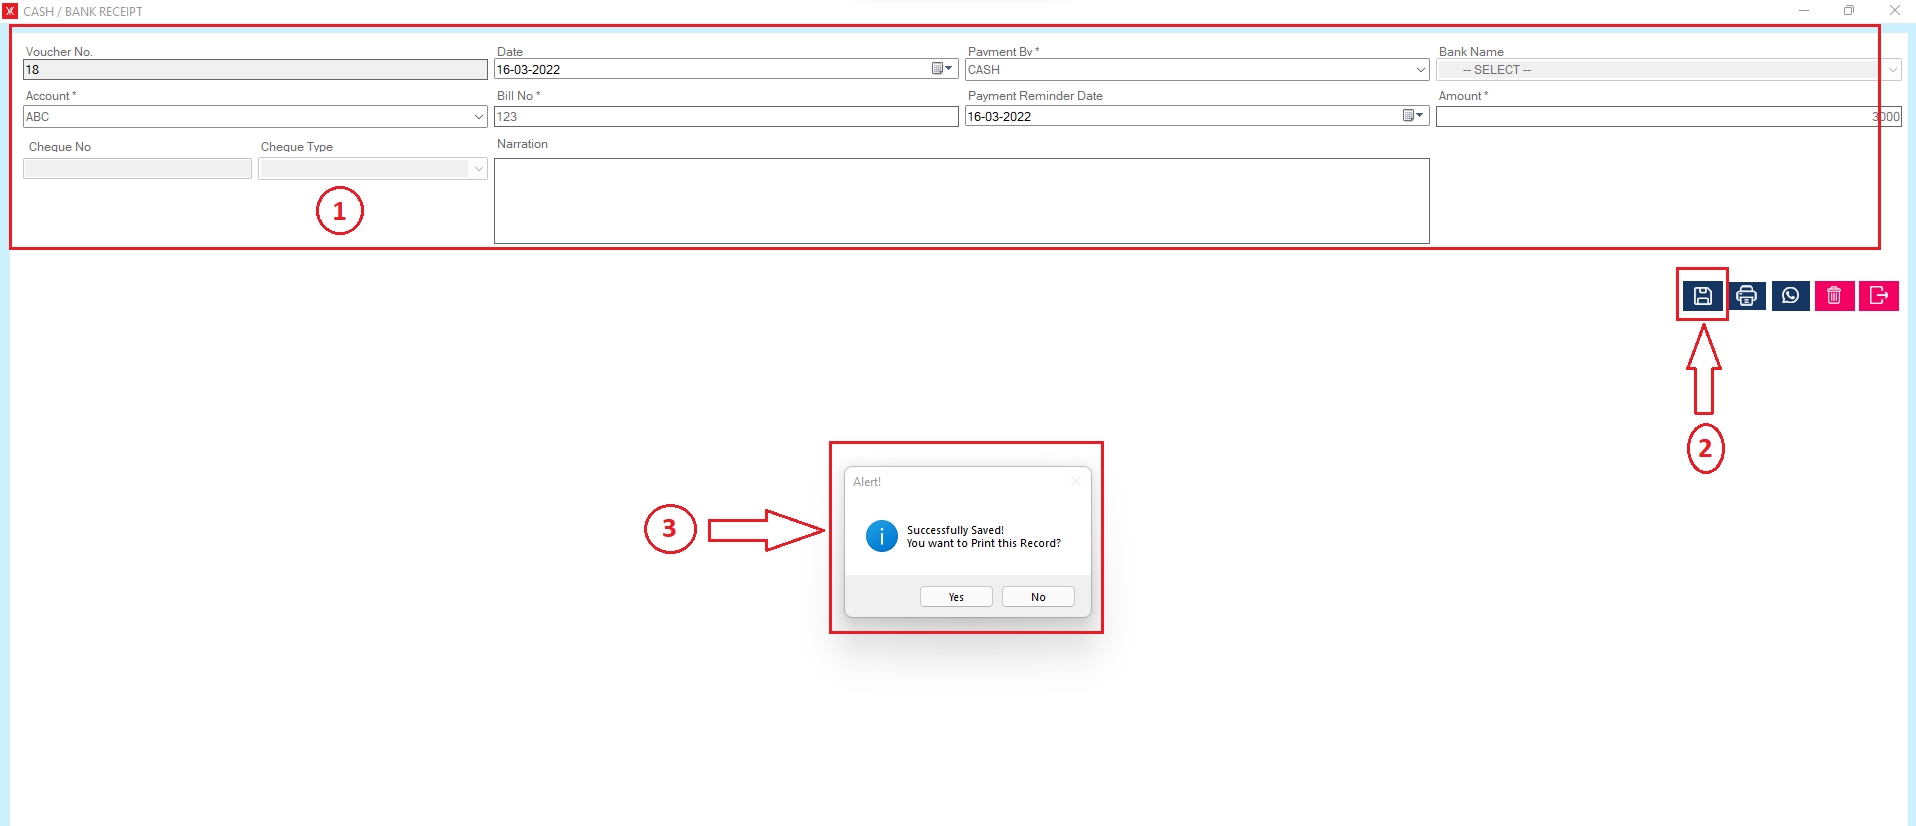
Step 1: Go to cash/bank receipt > click on “+”.
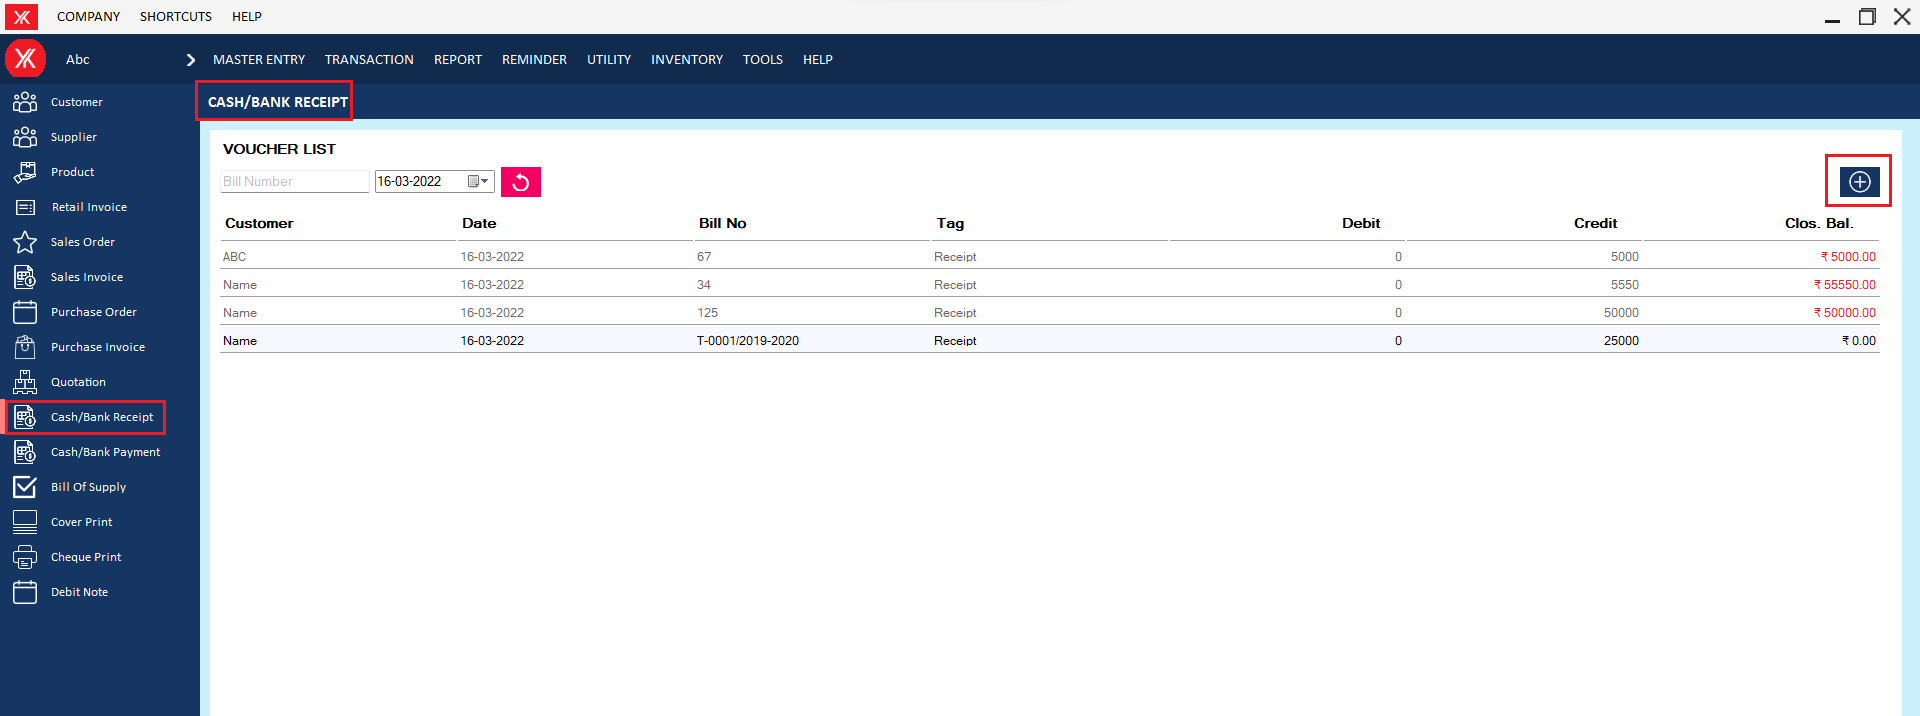
Step 2: Fill all details & submit , You will get the message that “Successfully saved” You want to print this record!
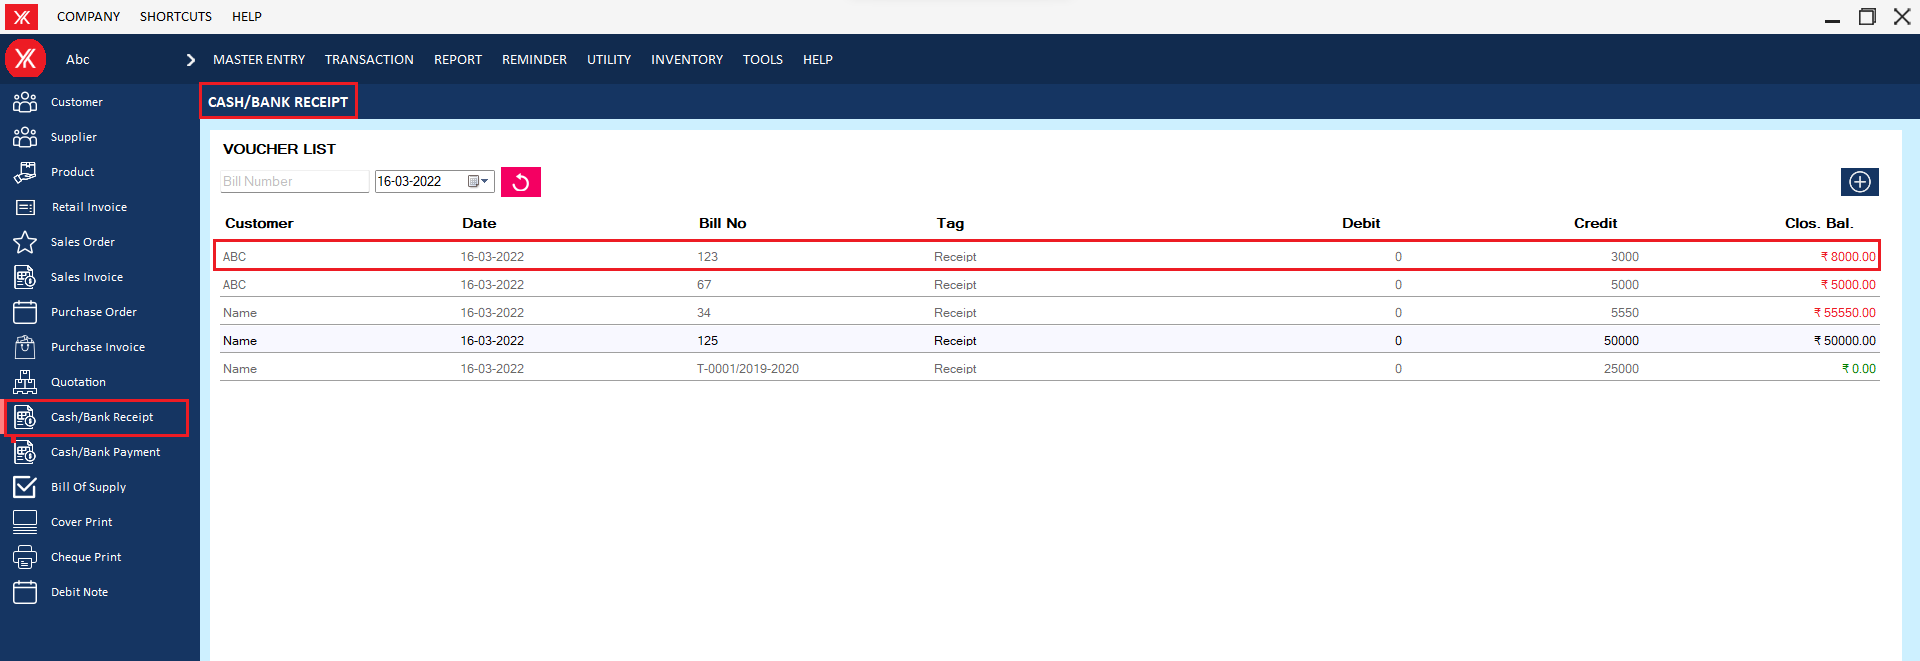
Step 3:After clicking on yes , New record will be display on Cash/bank receipt screen
Others
- How to add Credit note for Yourkhata accounting and billing software?
Step 1: Go to credit note in transaction
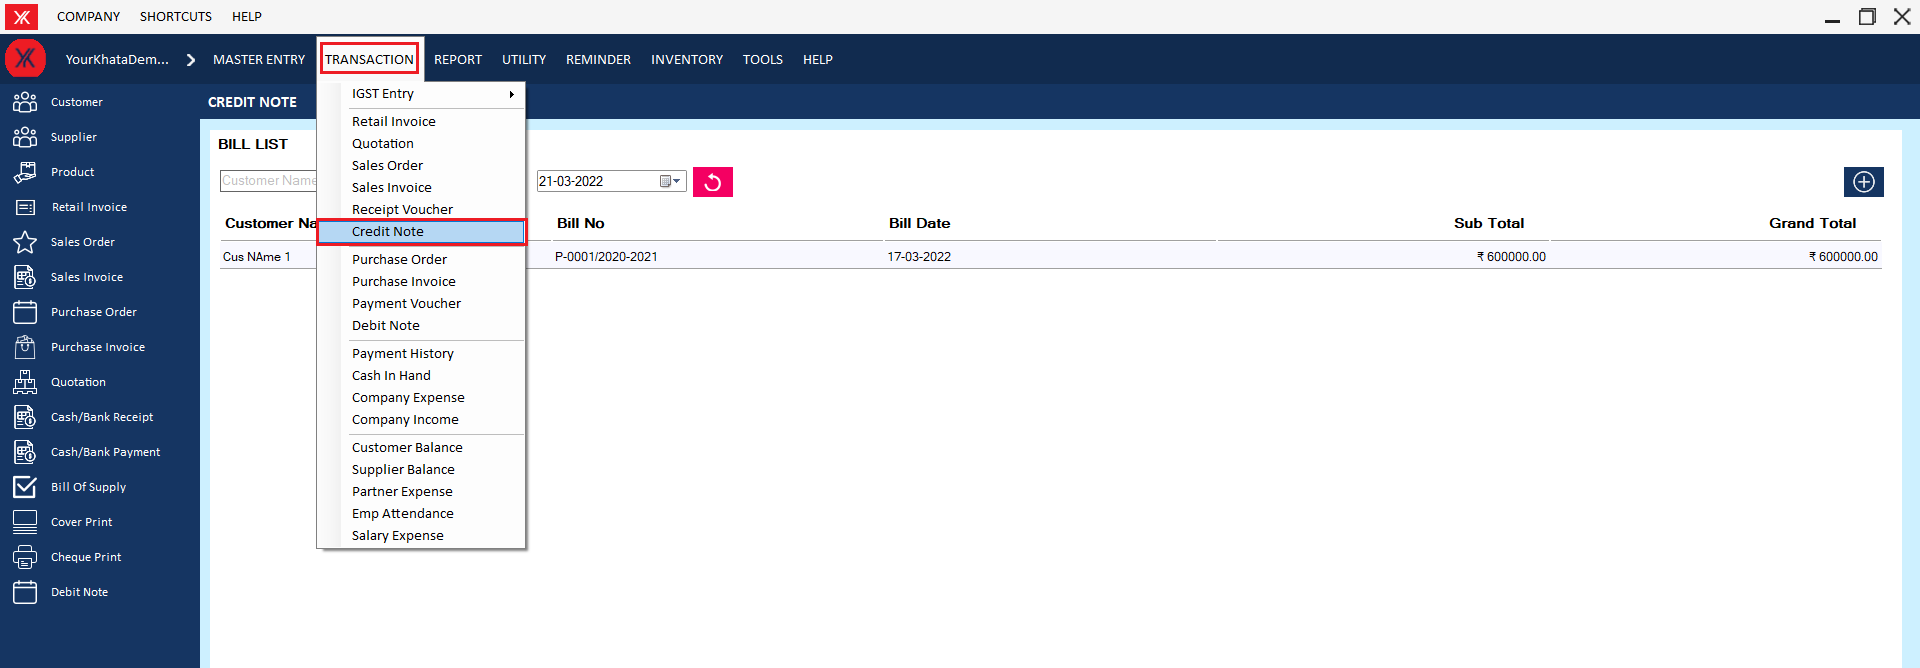
Step 2: Click on “+””

Step 3: Fill all details & submit, You will get the message that “Successfully saved! You want to print this record?”
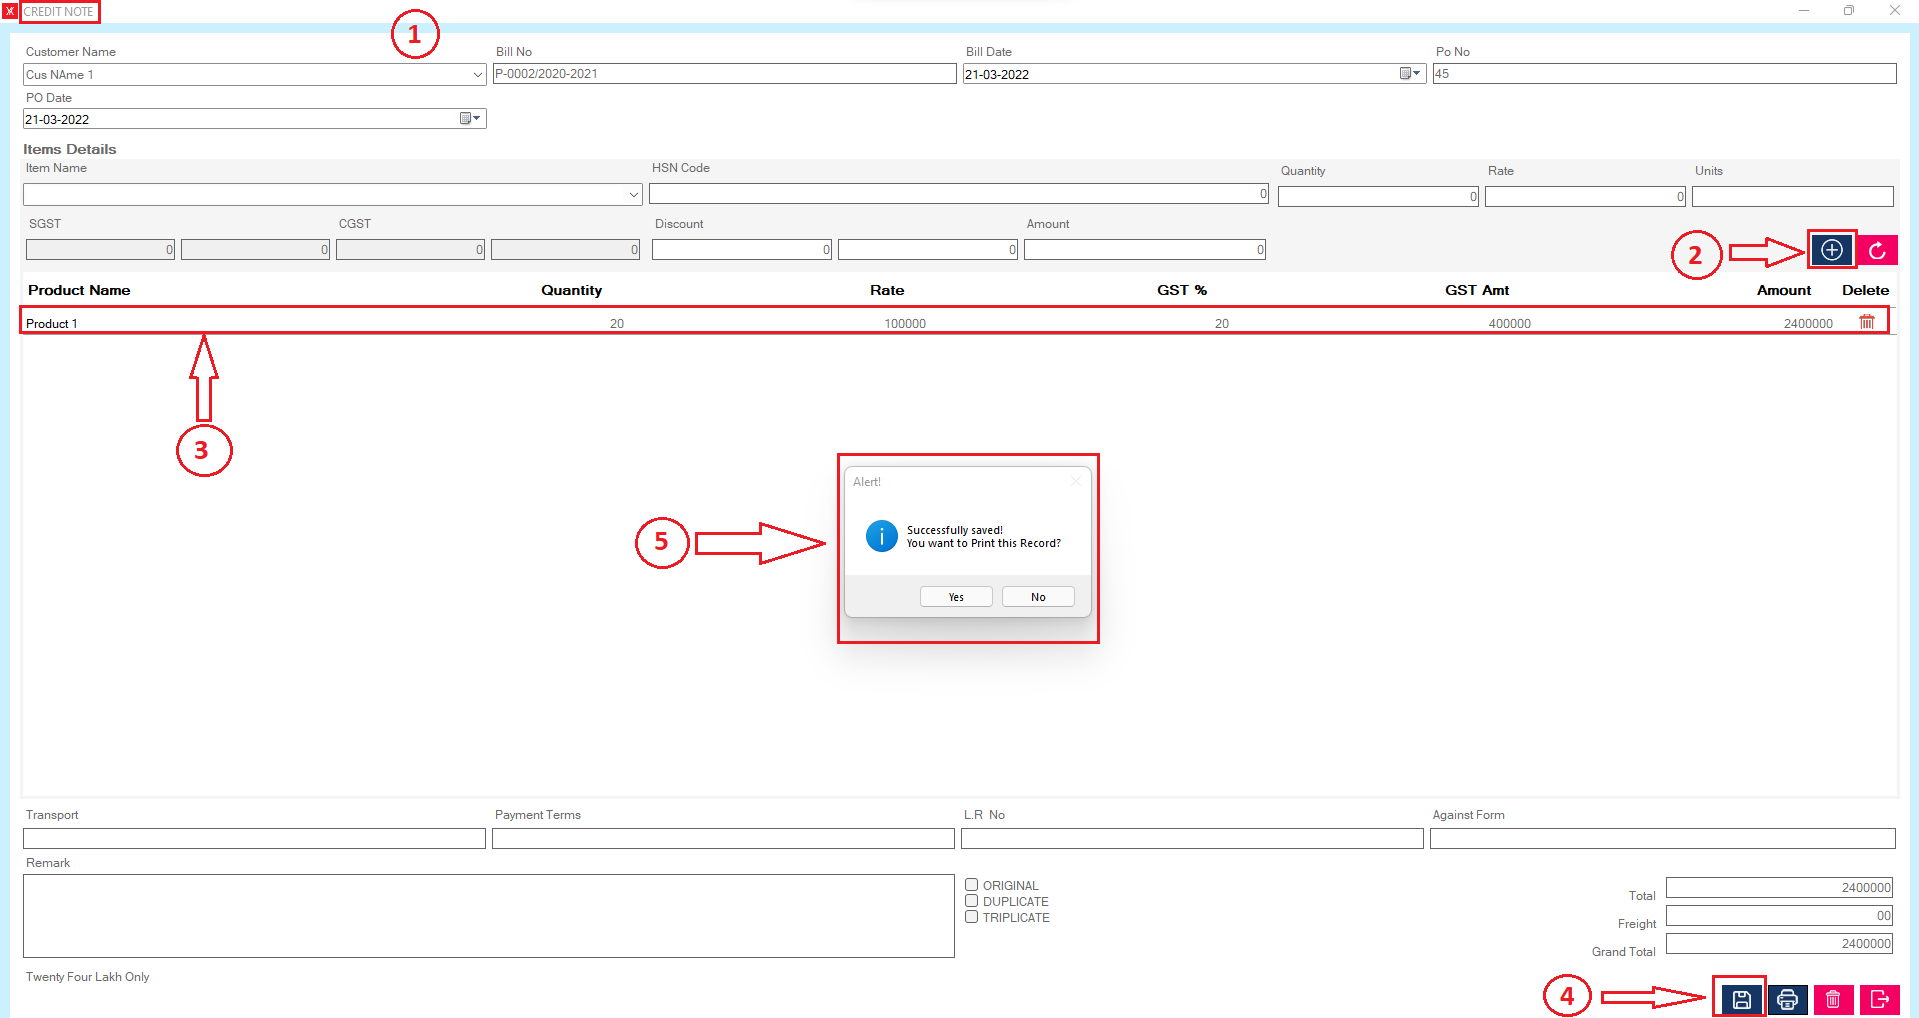
Step 3: After clicking on yes, new record will be display on the credit note screen

- How to add Debit note for Yourkhata accounting and billing software?
Step 1: Go to debit note & Click on “+”
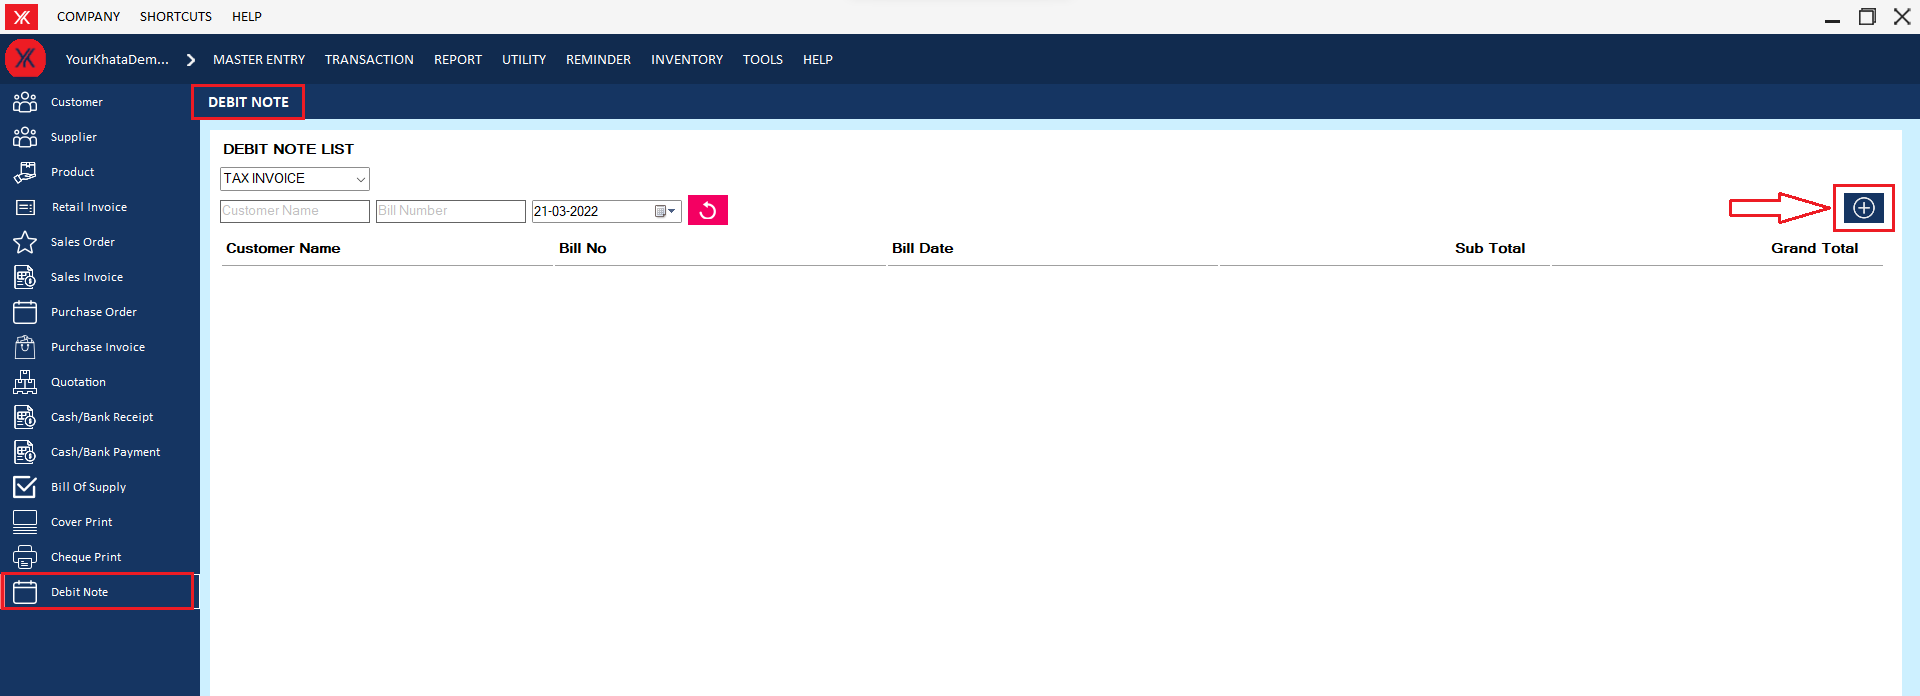
Step 2: Fill all details & submit you will get the message that “Successfully saved! you want to print this record?”
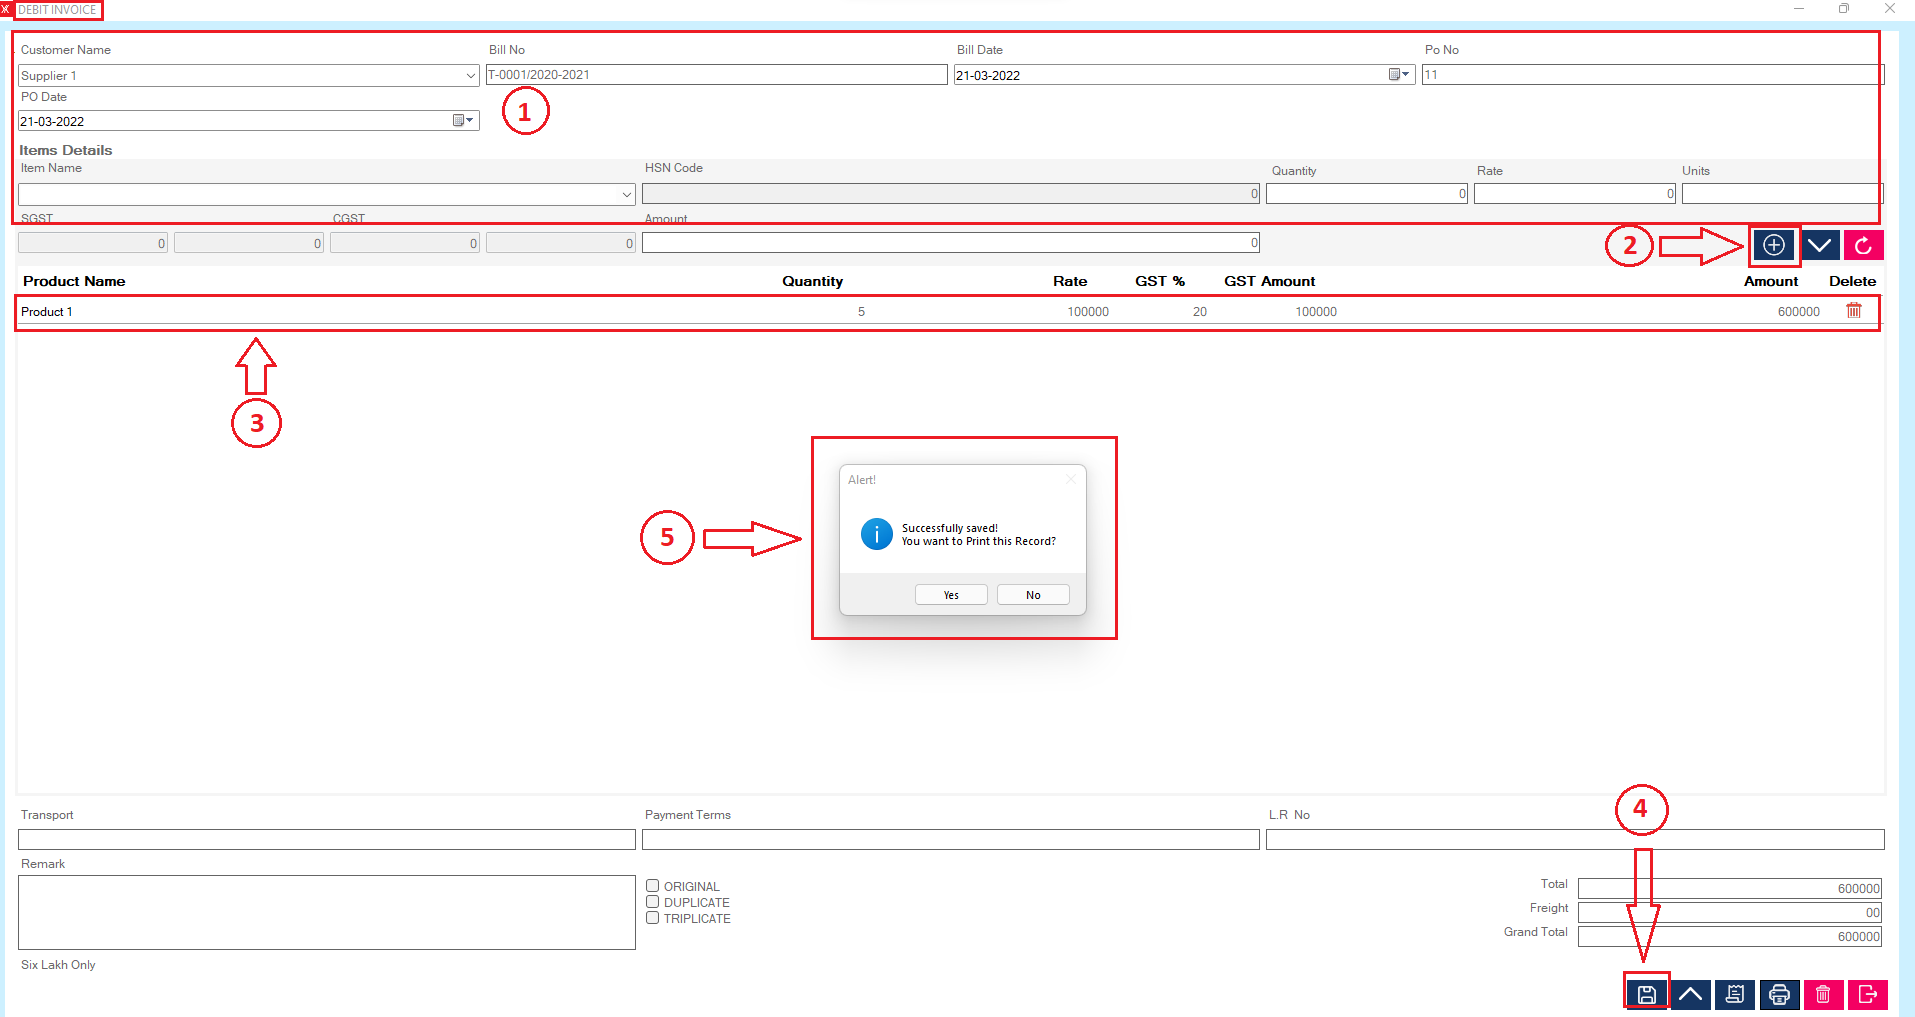
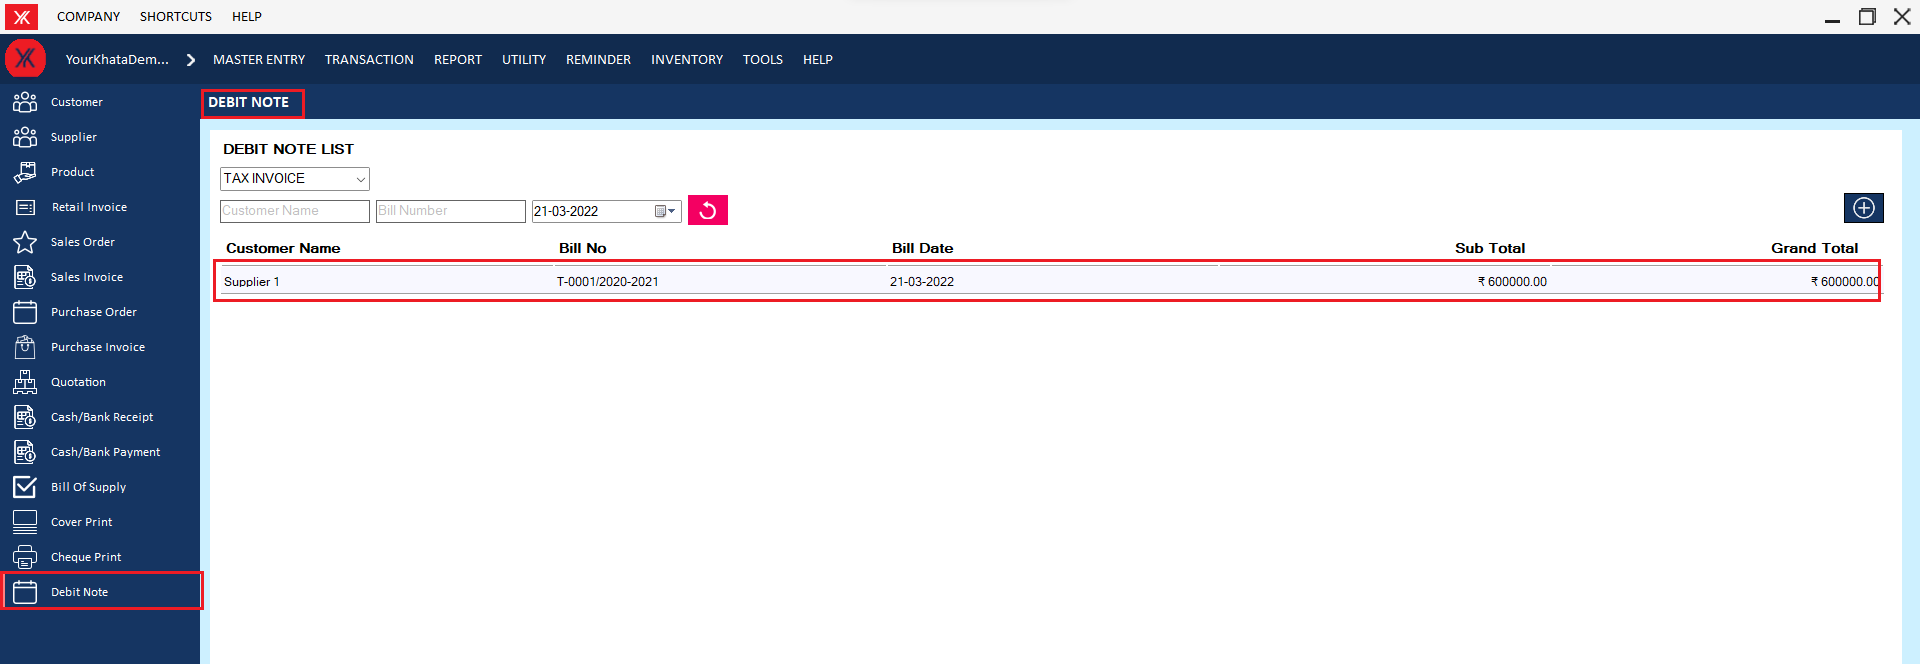
Step 3: After clicking on yes, New record will be display on the debit note screen
- How to add IGST Quotation for Yourkhata accounting and billing software?
Step 1: Go transaction > IGST entry > quotation entry >
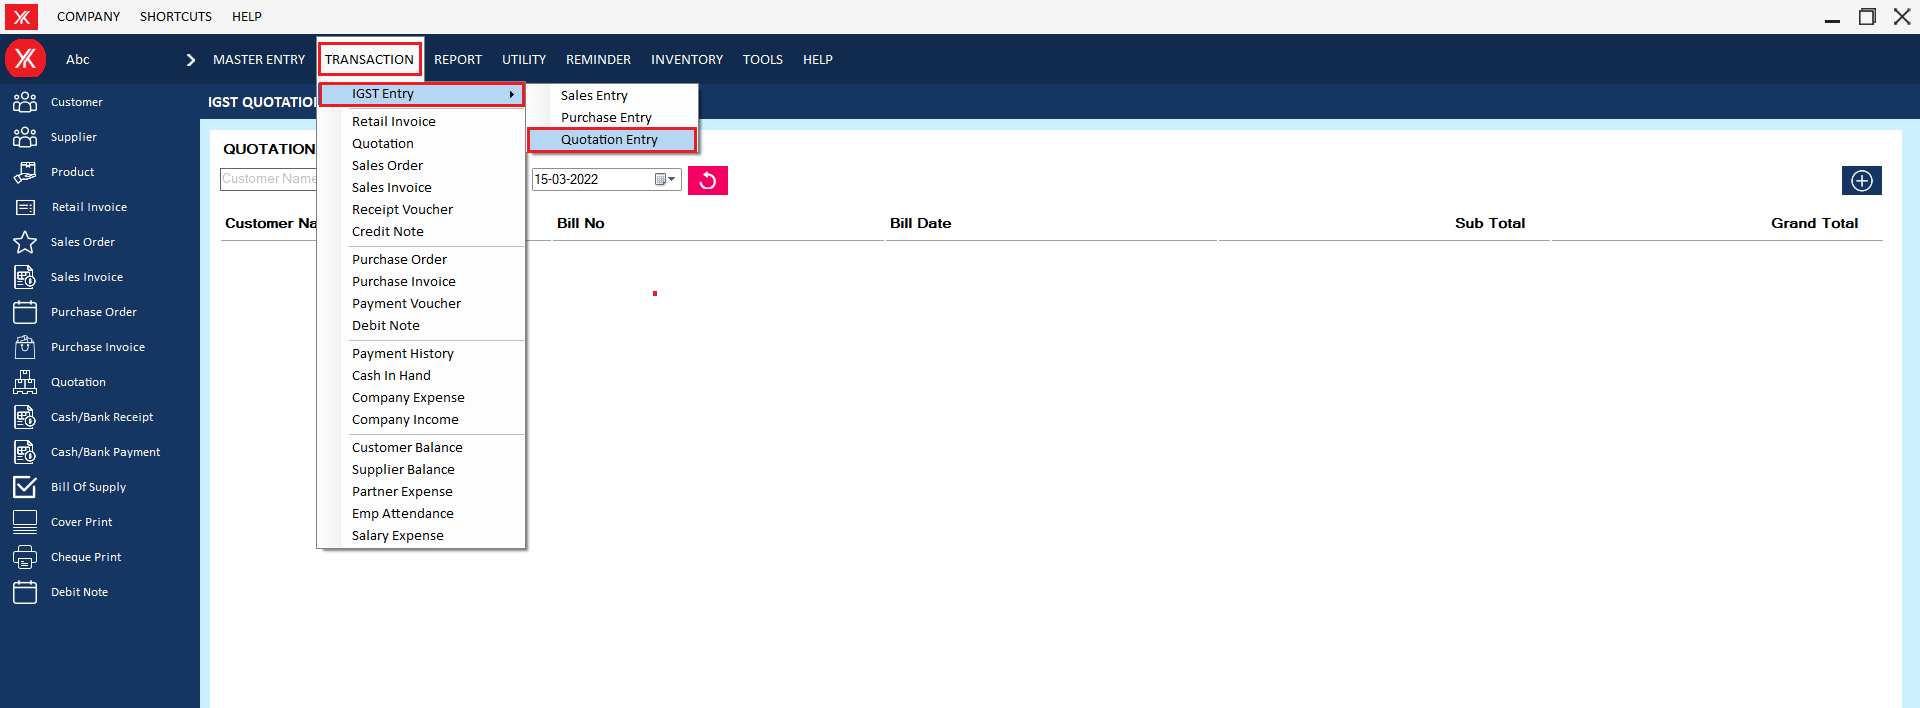
Step 2: Click on “+”
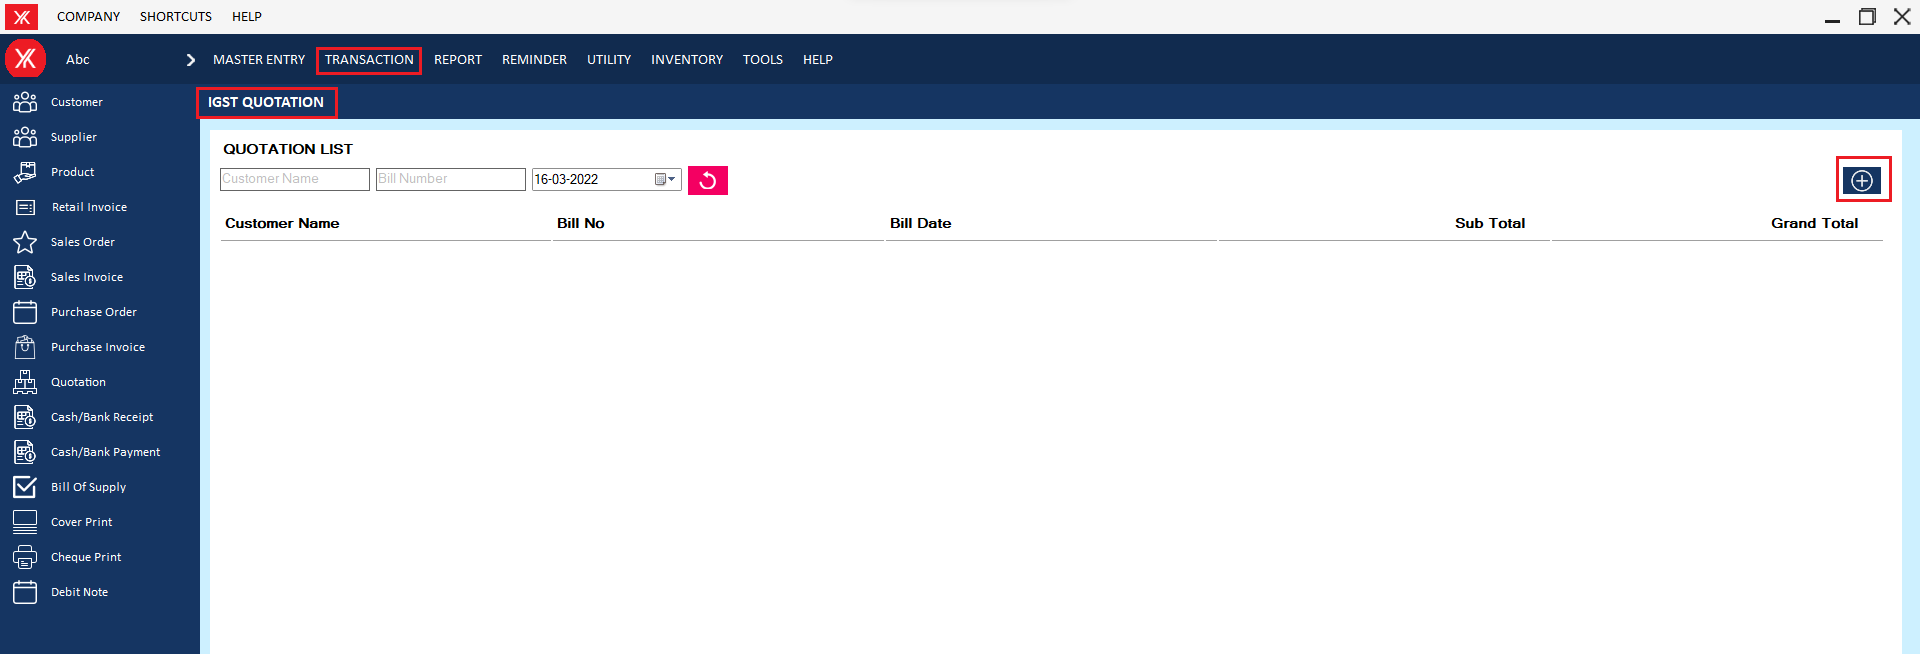
Step 3: Fill all details > click on “+” >click on save > You will get a message that “Successfully saved!” Do you want to print this record
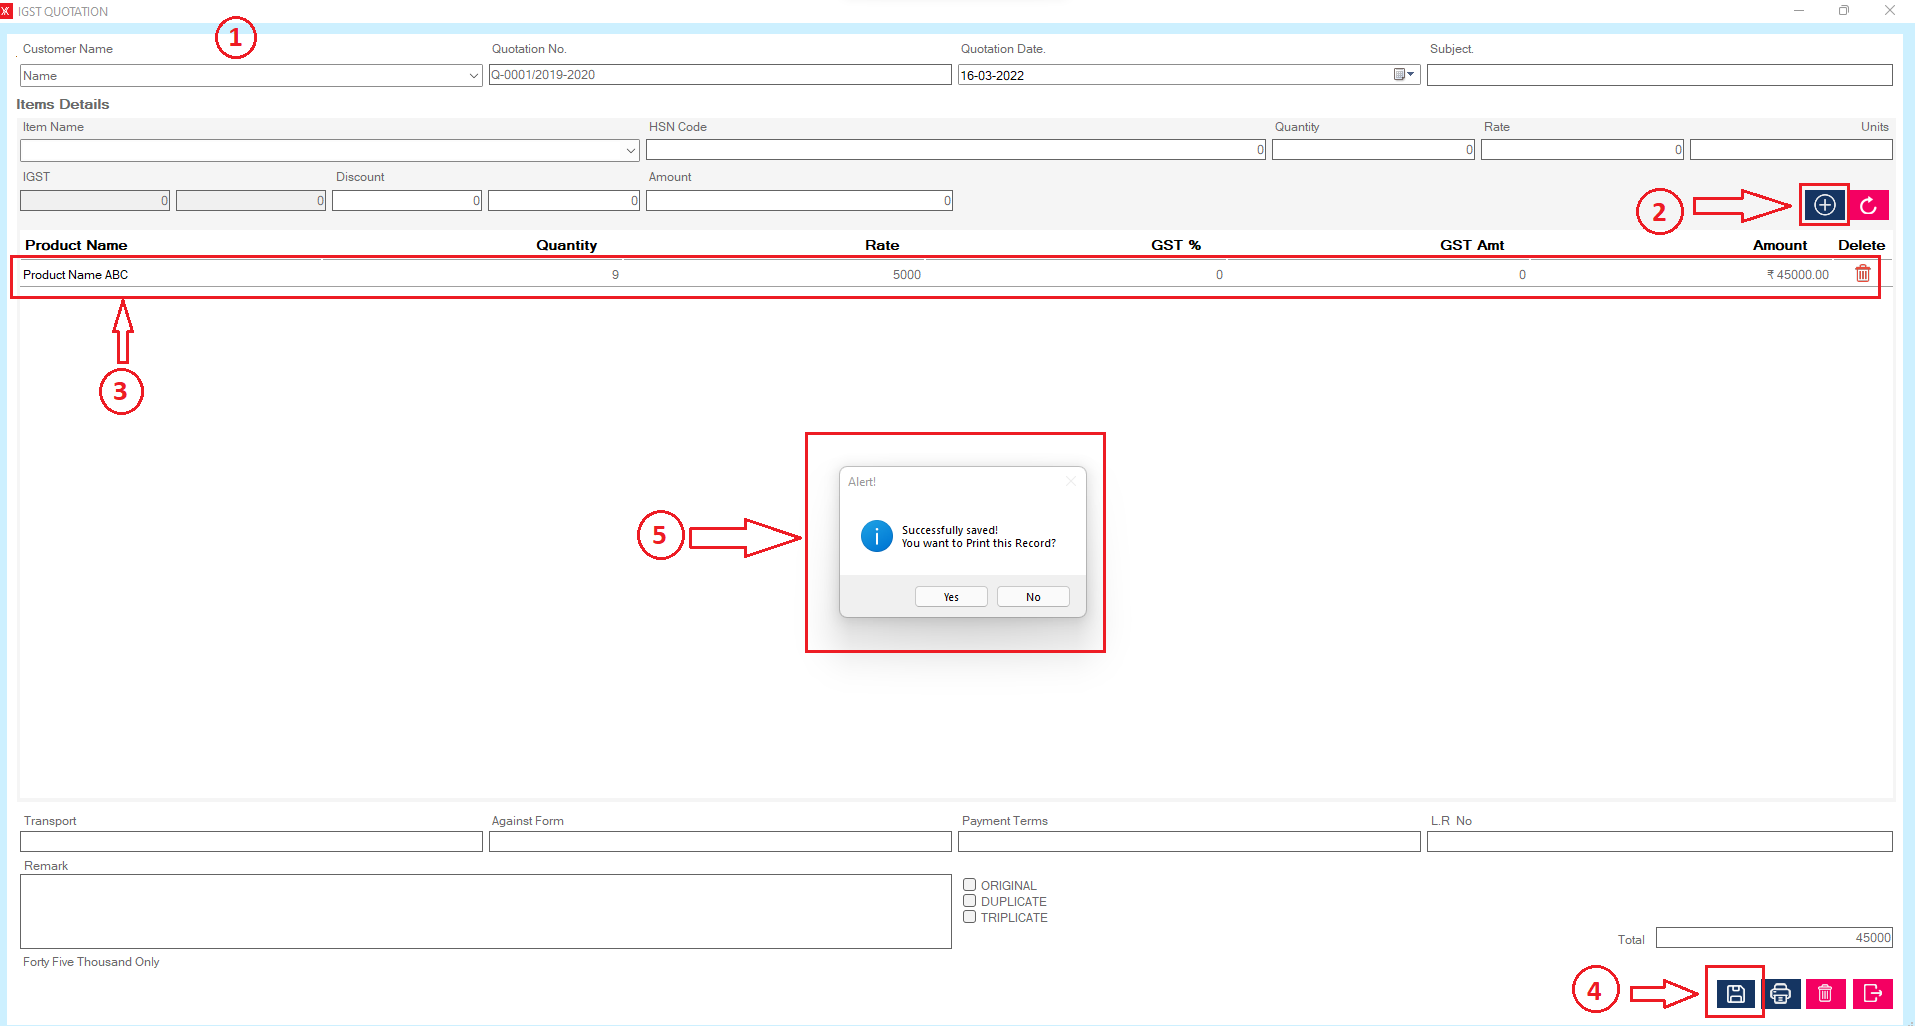
Step 4: After clicking on yes, new record will be display on IGST quotation list

- How to add IGST Sales for Yourkhata accounting and billing software?
Step 1: Go transaction > IGST entry > sales entry >
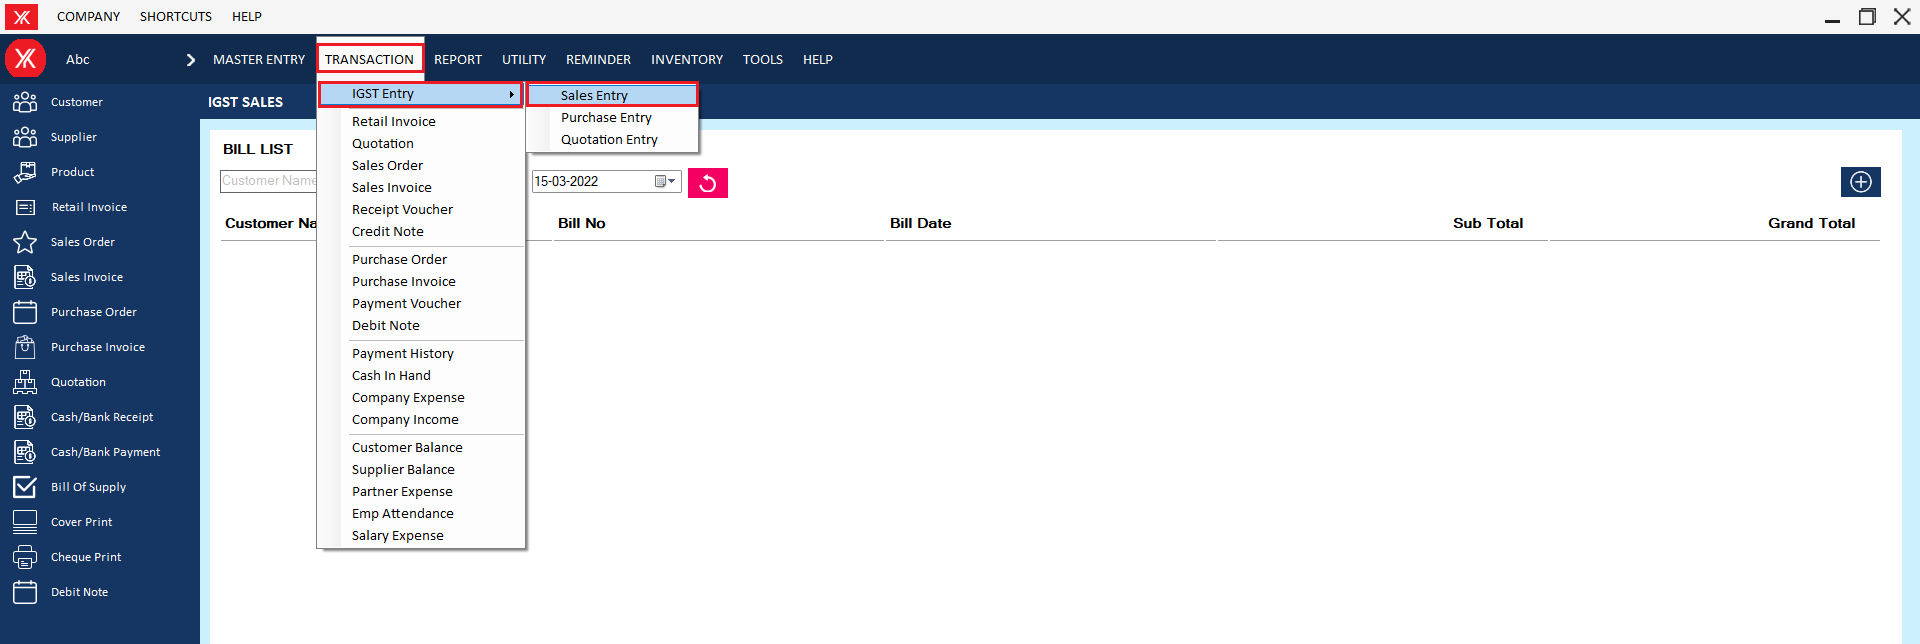
Step 2: Click on “+”

Step 3: Fill all details > click on “+” >click on save > You will get a message that “Successfully saved!” Do you want to print this record

Step 4: After clicking on yes, new record will be display on IGST sales list

- How to add Cheque print for Yourkhata accounting and billing software?
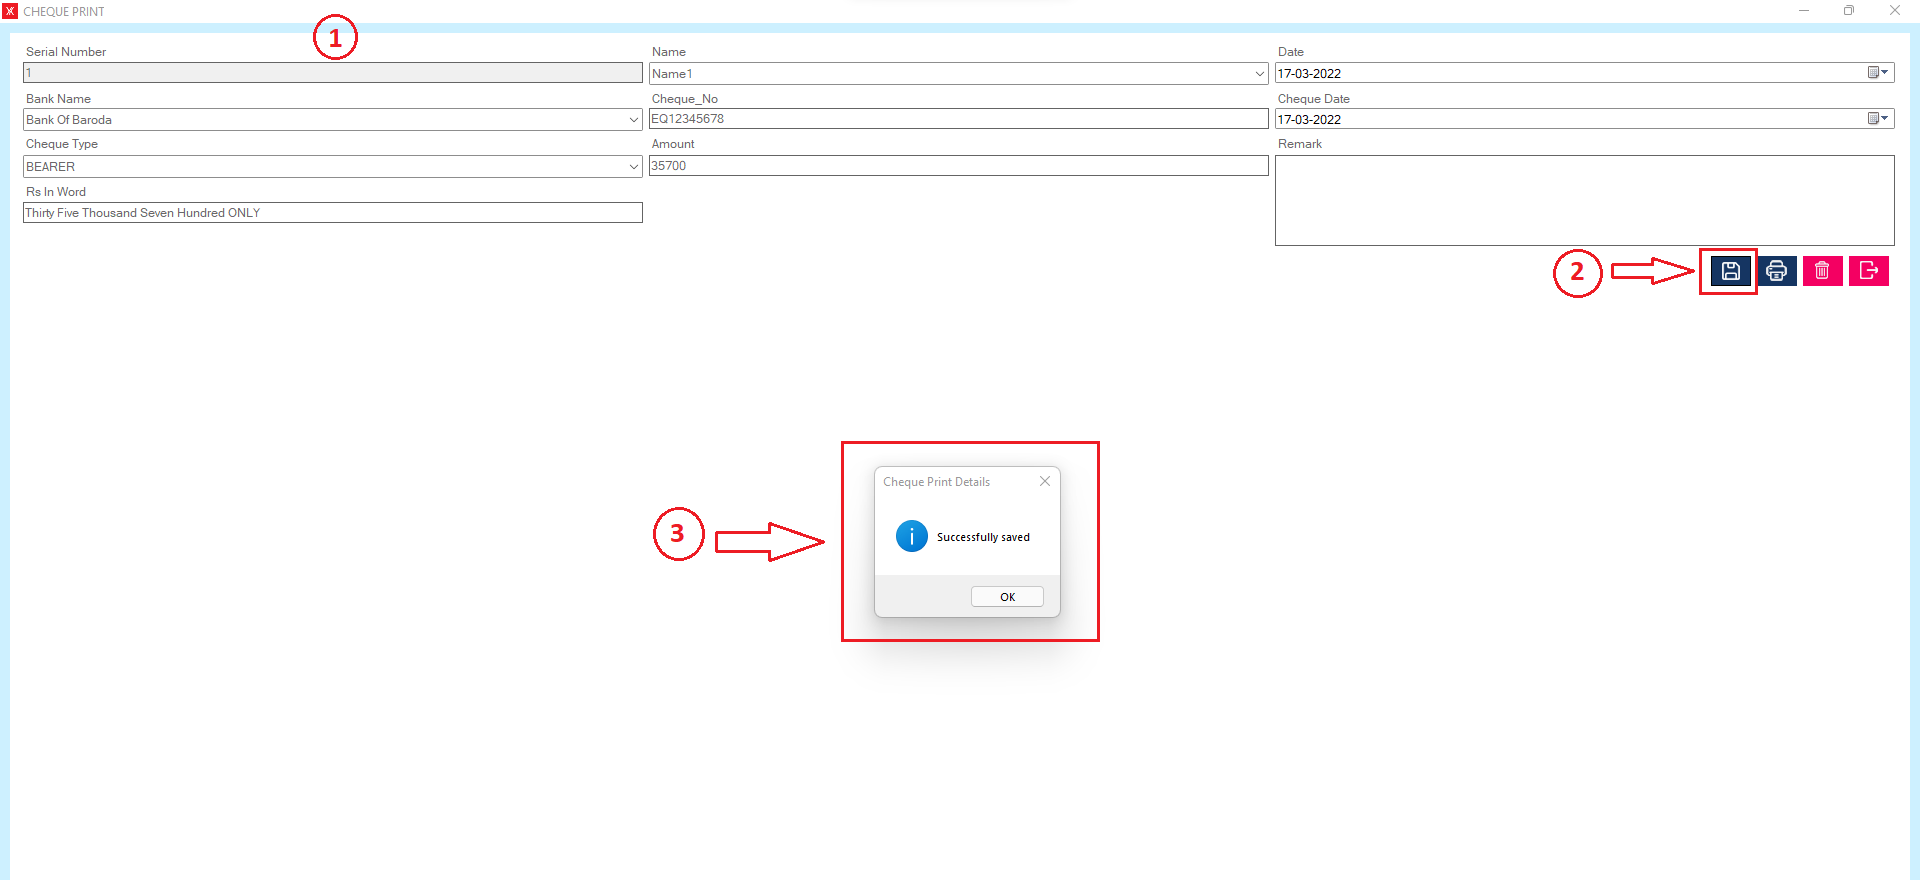
Step 1: Go to cheque print & click on “+”
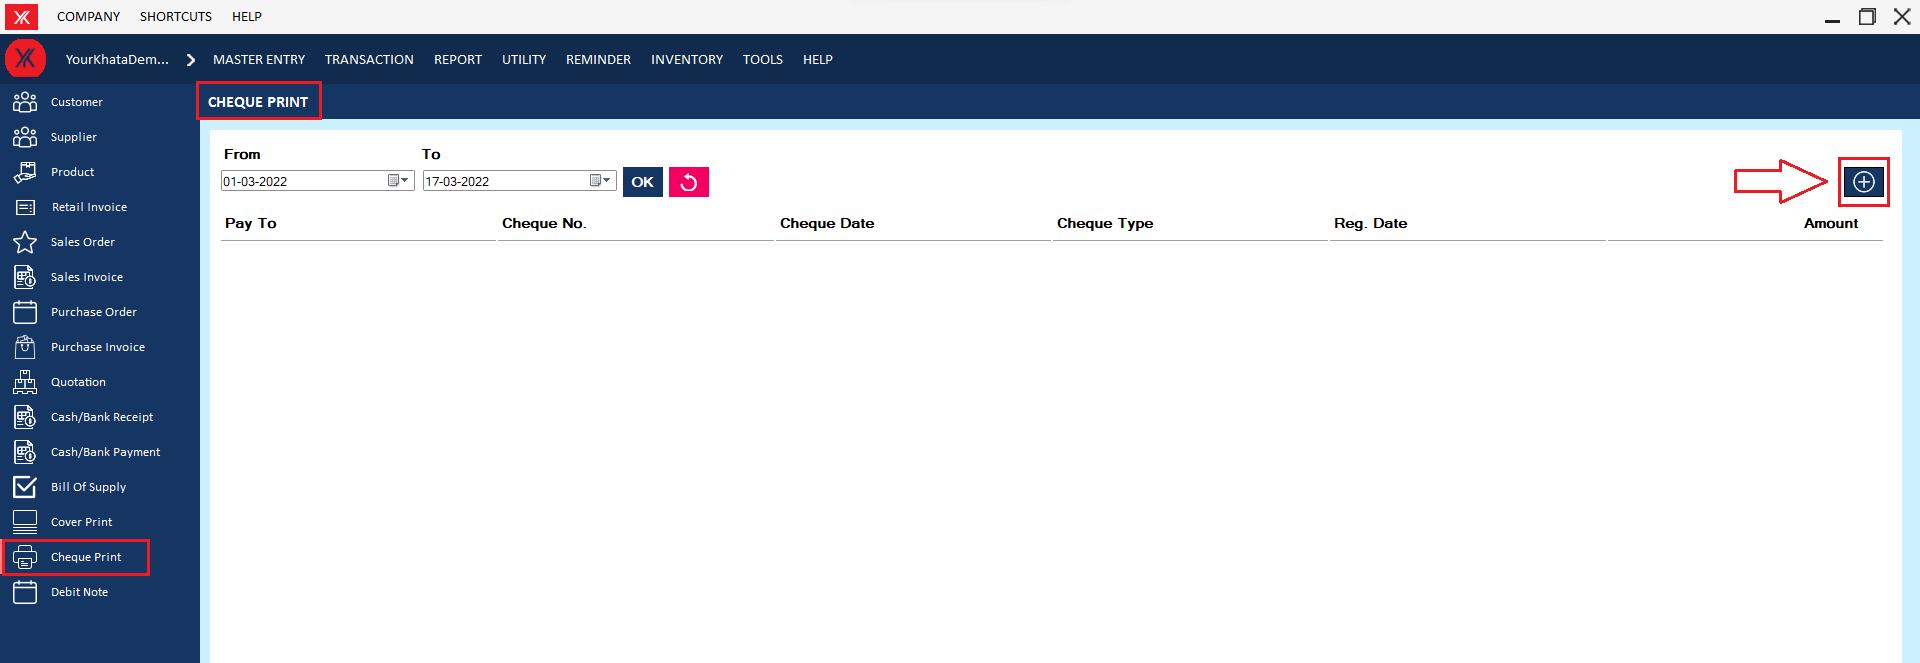
Step 2: Fill all details & submit > Click on save button, you will get the message “successfully saved “
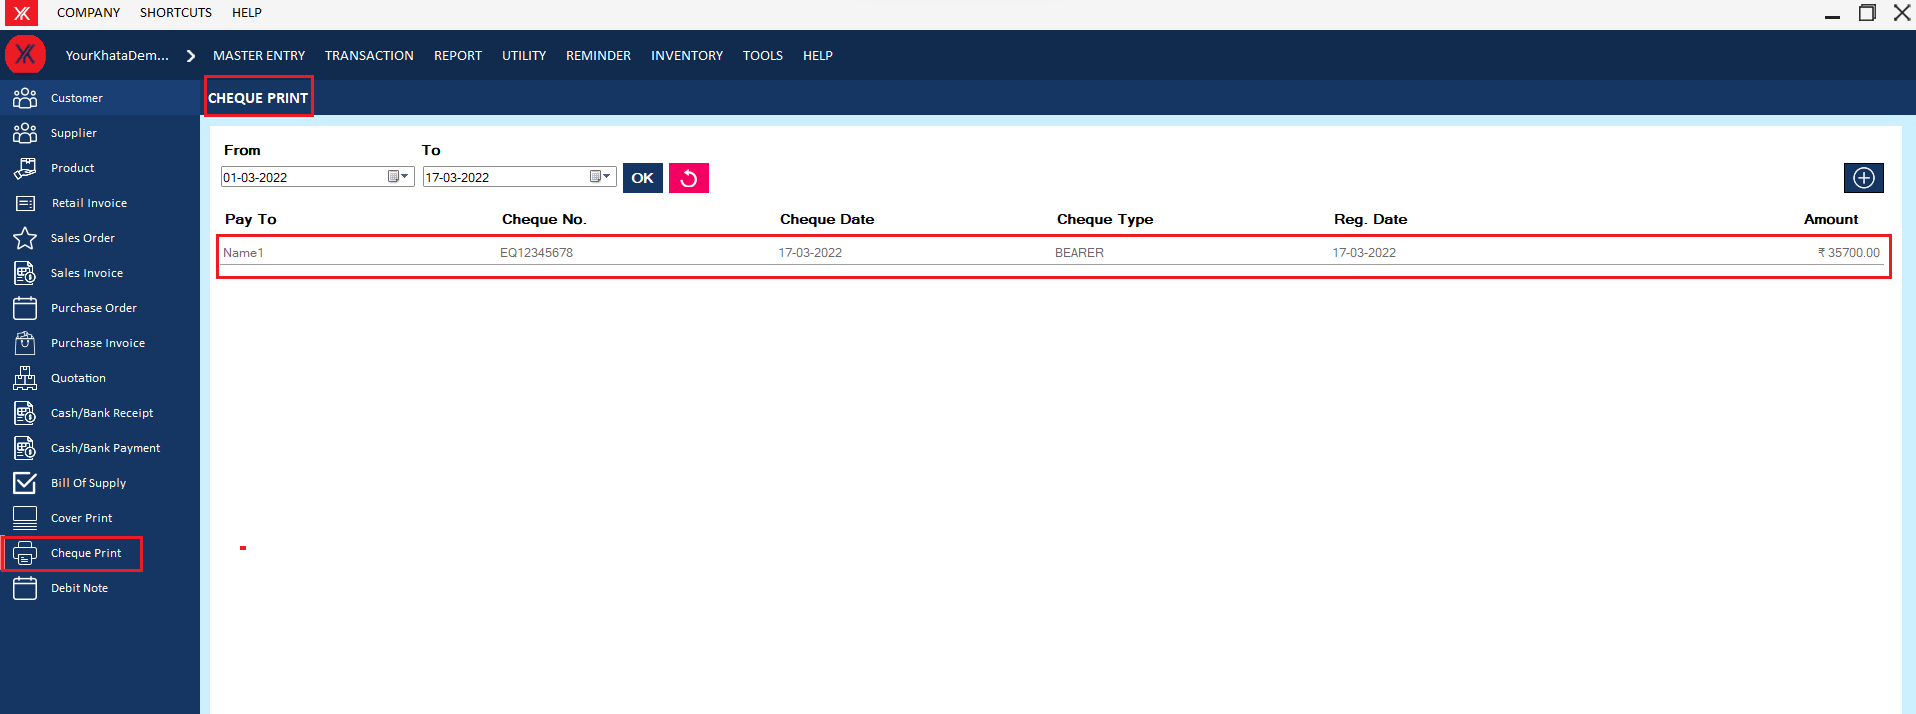
Step 3: New record will be display on cheque print list
- How to add Company expense for Yourkhata accounting and billing software?
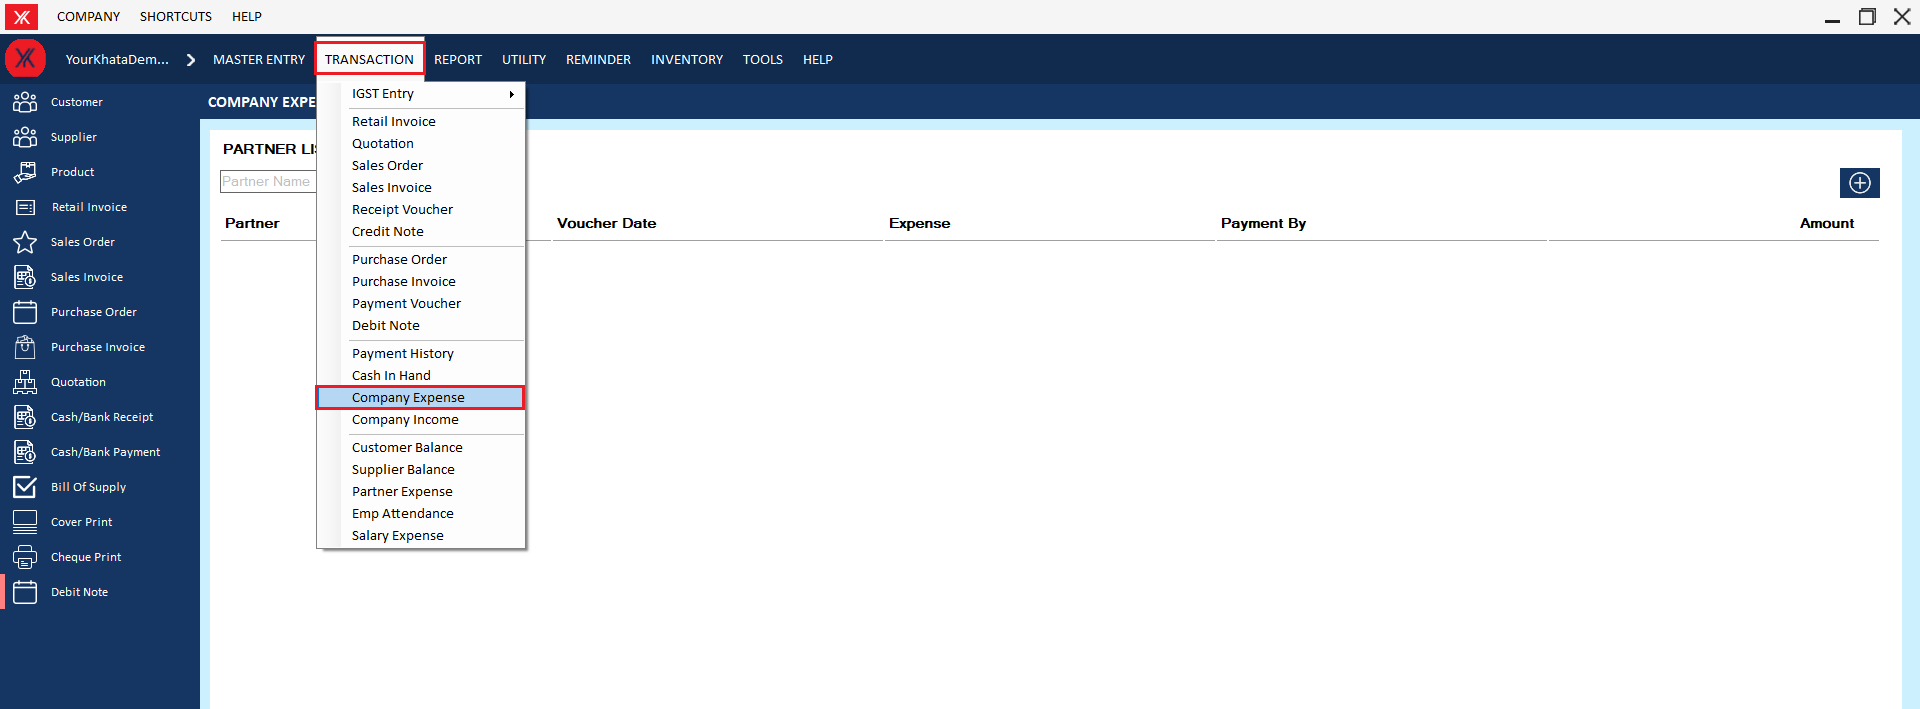
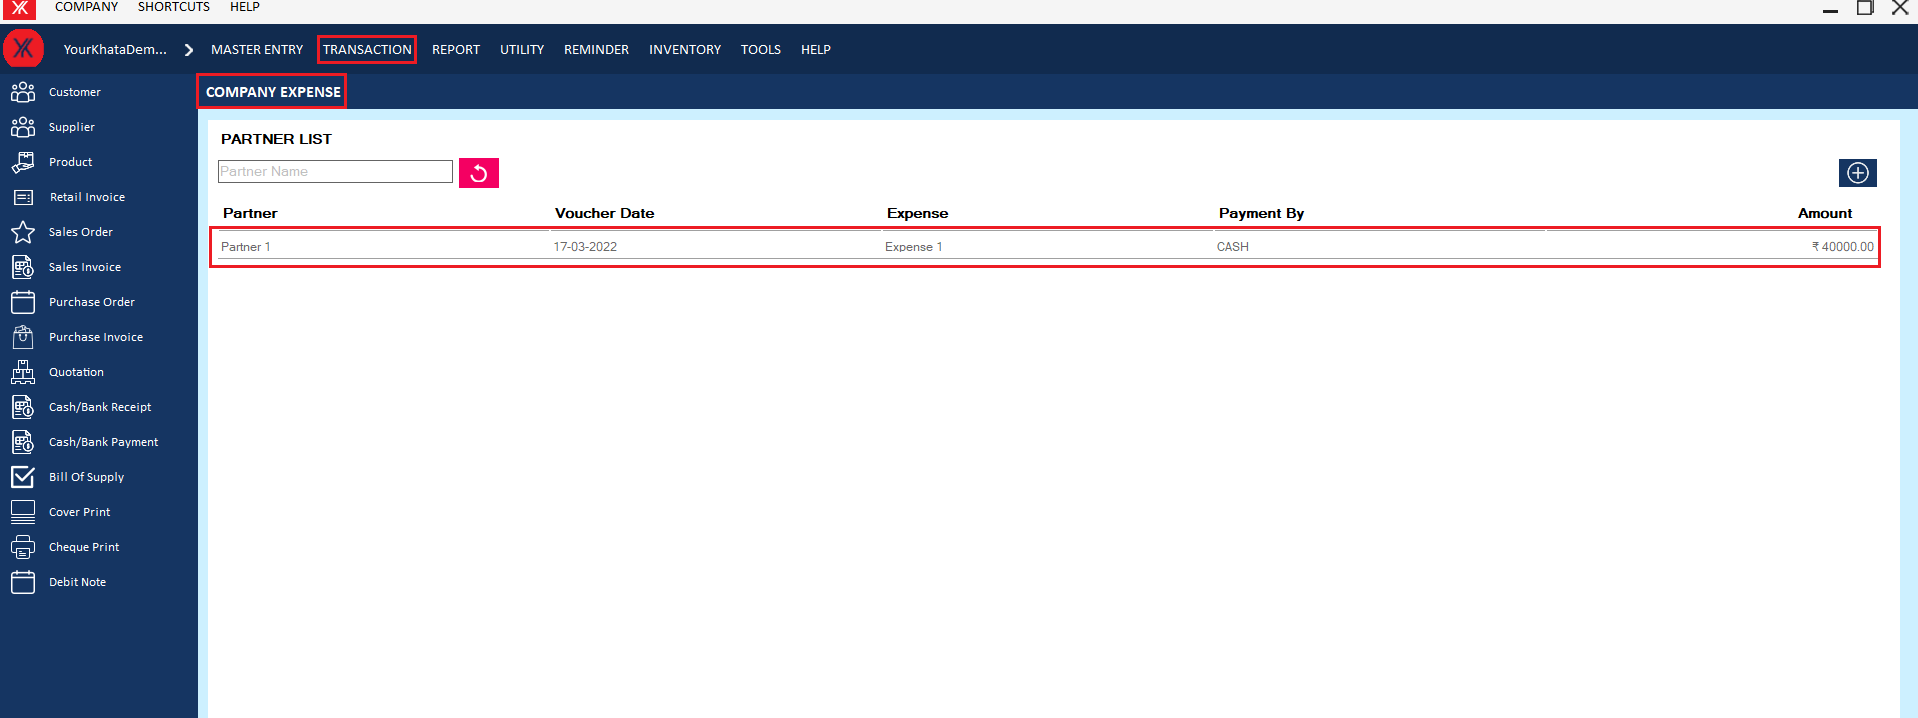
Step 1: Go to company expense in transaction
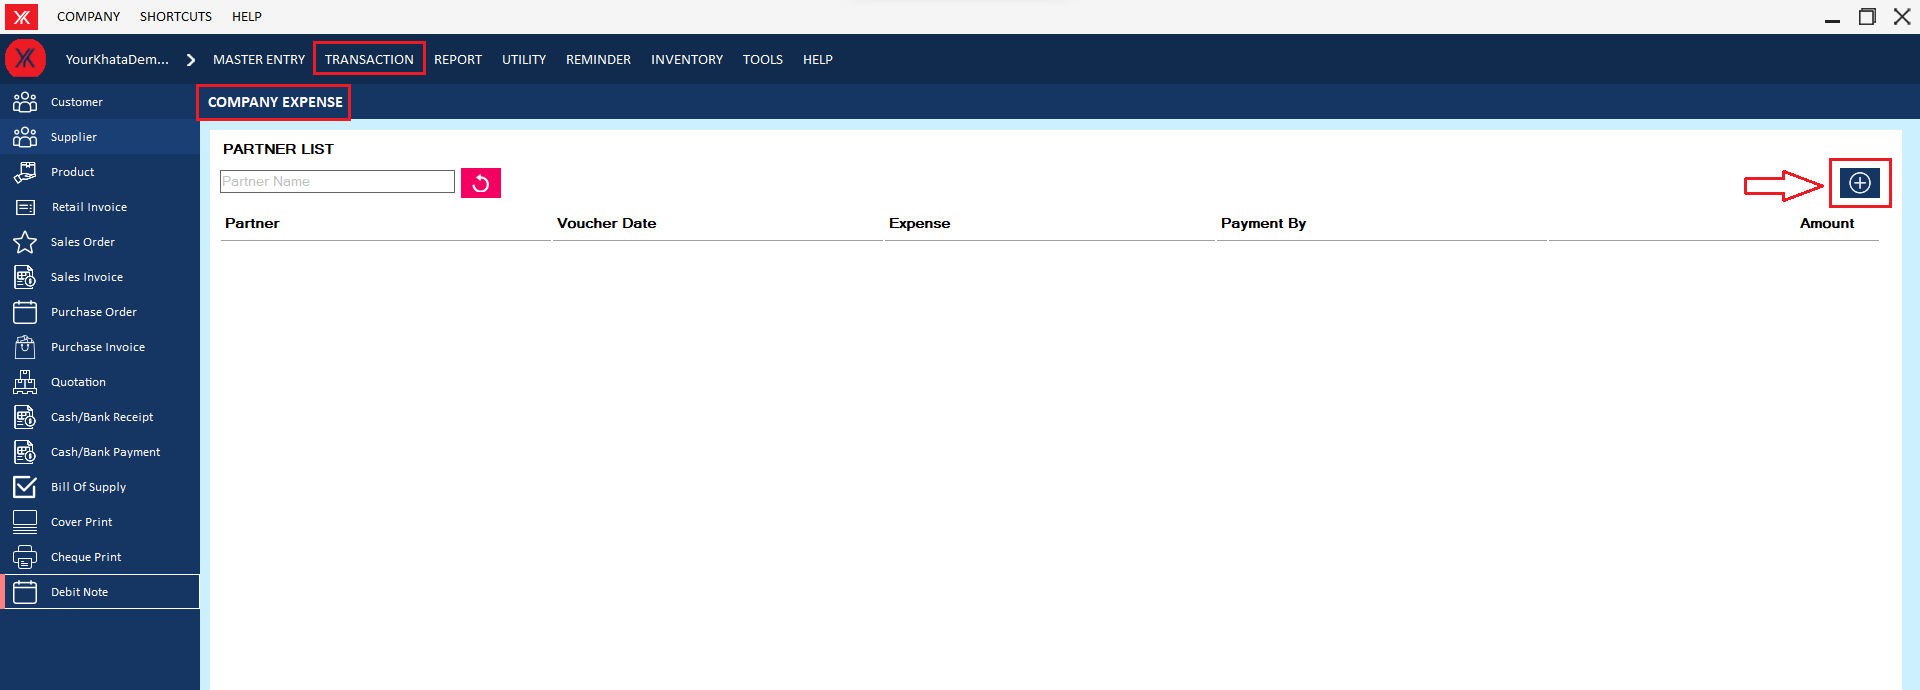
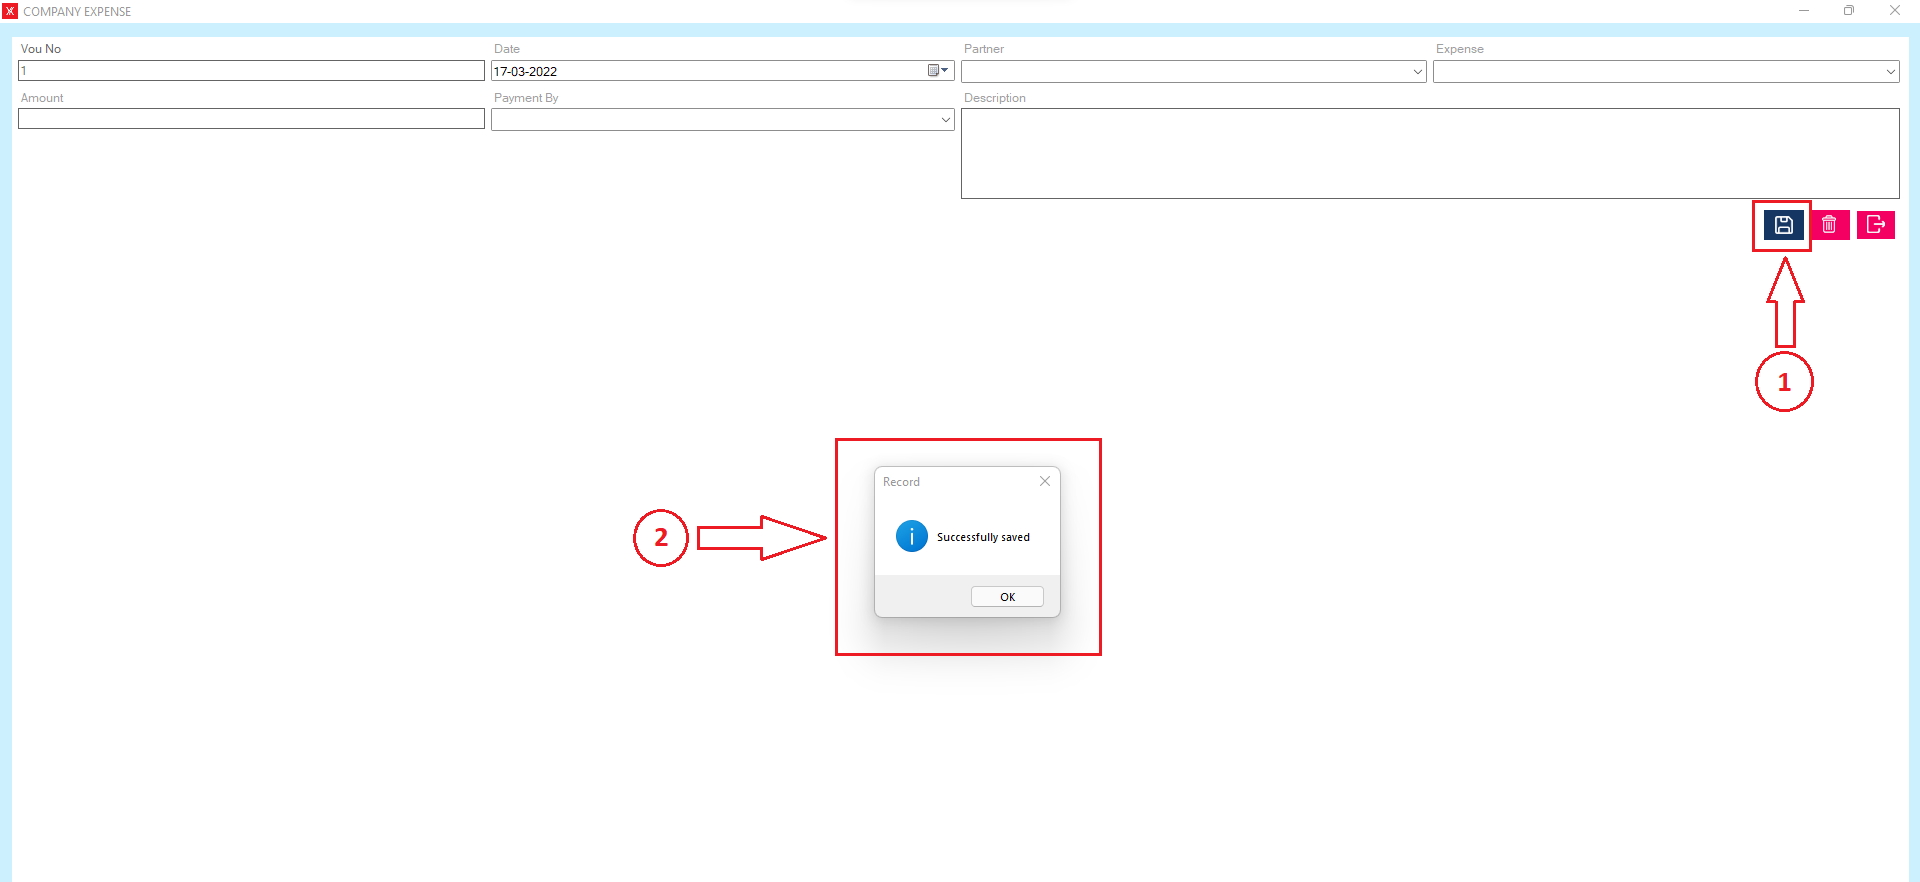
Step 2: Click on “+”
Step 3: Fill all details & submit > Click on save button , you will get the message “Successfully saved. Do you want to print this sales order?”
Step 4: New record will be display on company expense screen
- How to add Company income for Yourkhata accounting and billing software?
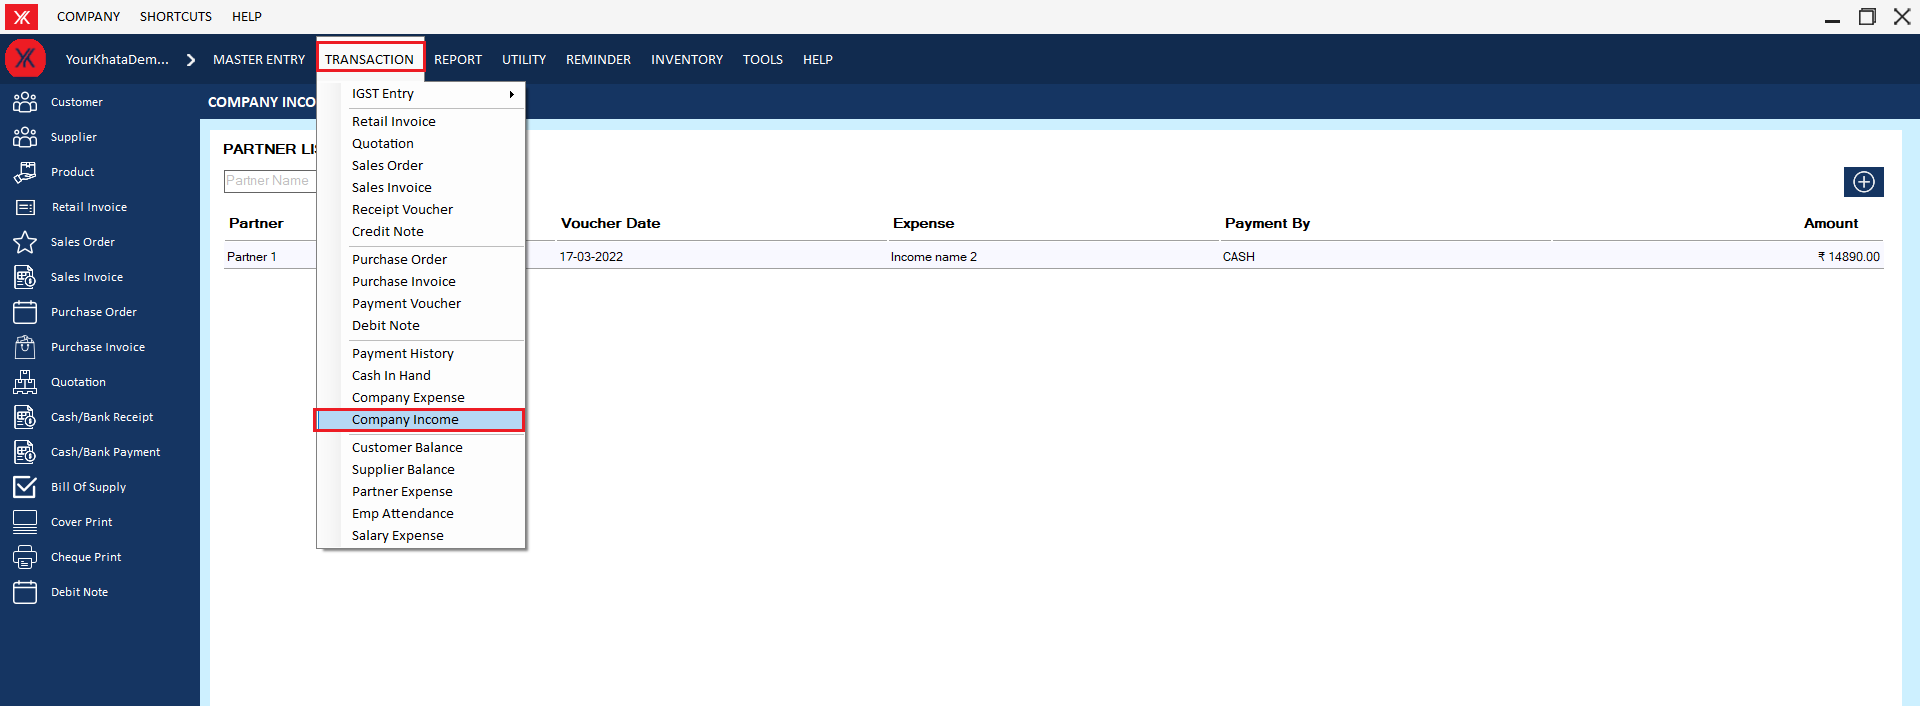
Step 1: Go to company income in transaction
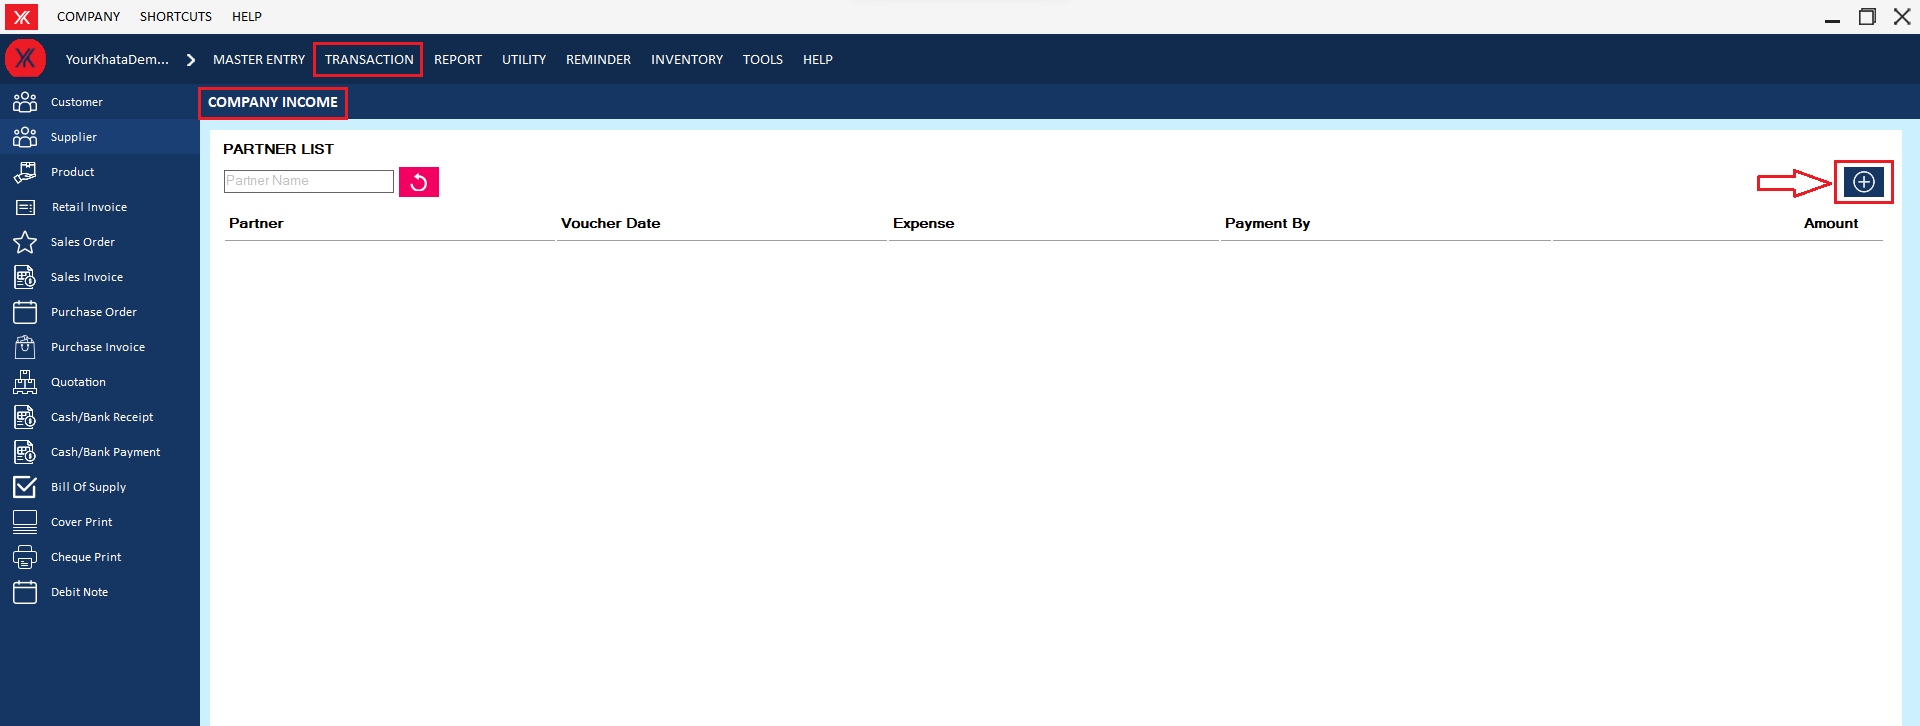
Step 2: Click on “+”
Step 3: Fill all details & submit > Click on save button; you will get the message “Successfully saved. Do you want to print this sales order?”

Step 4: New record will be display on company income screen
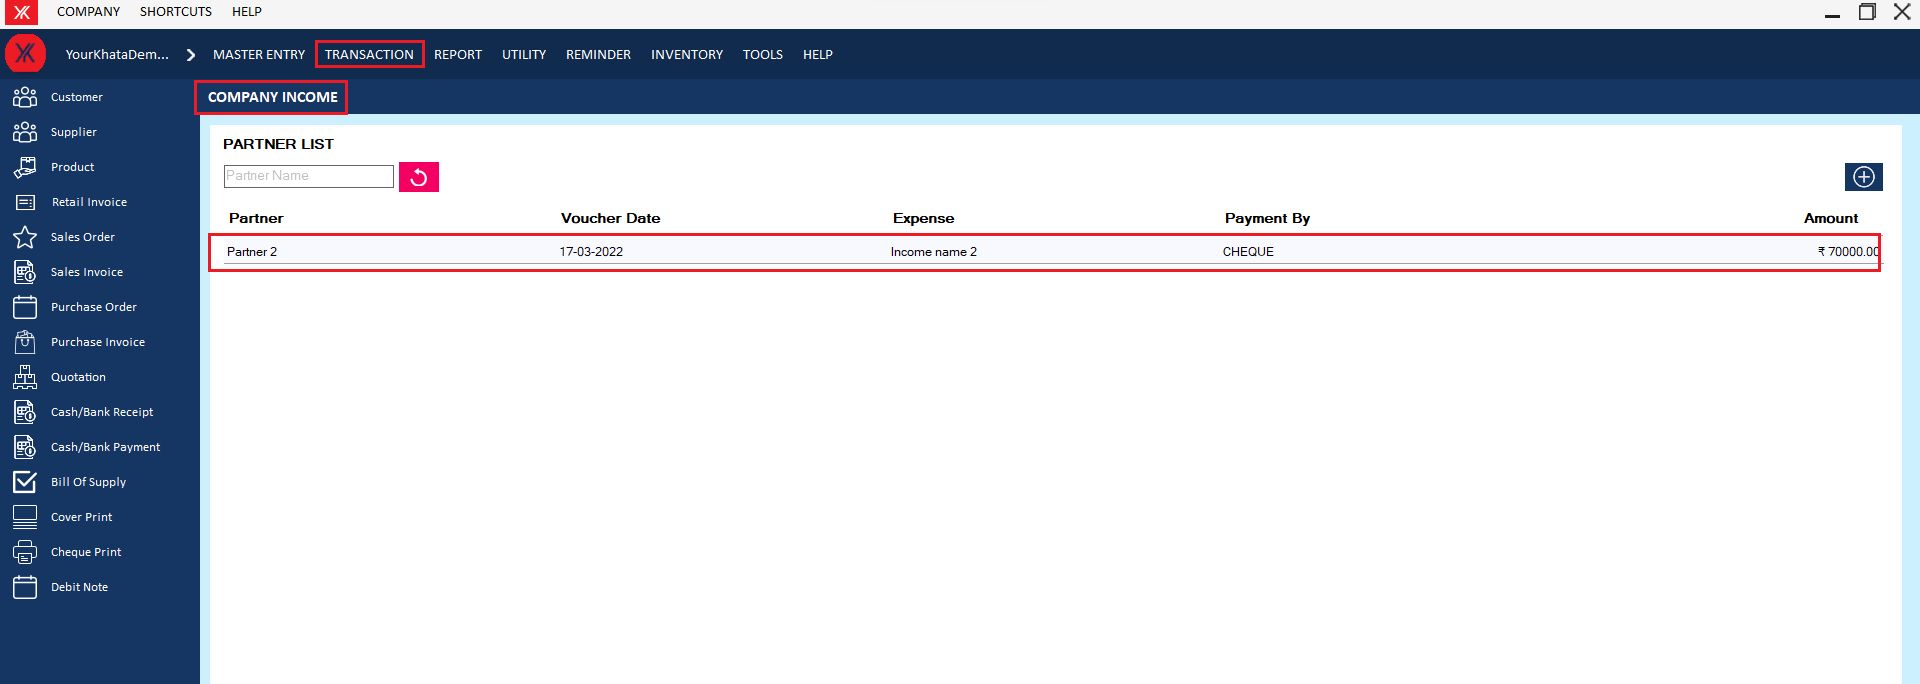
- How to add Partner expense for Yourkhata accounting and billing software?
Step 1: Go to partner expense in transaction
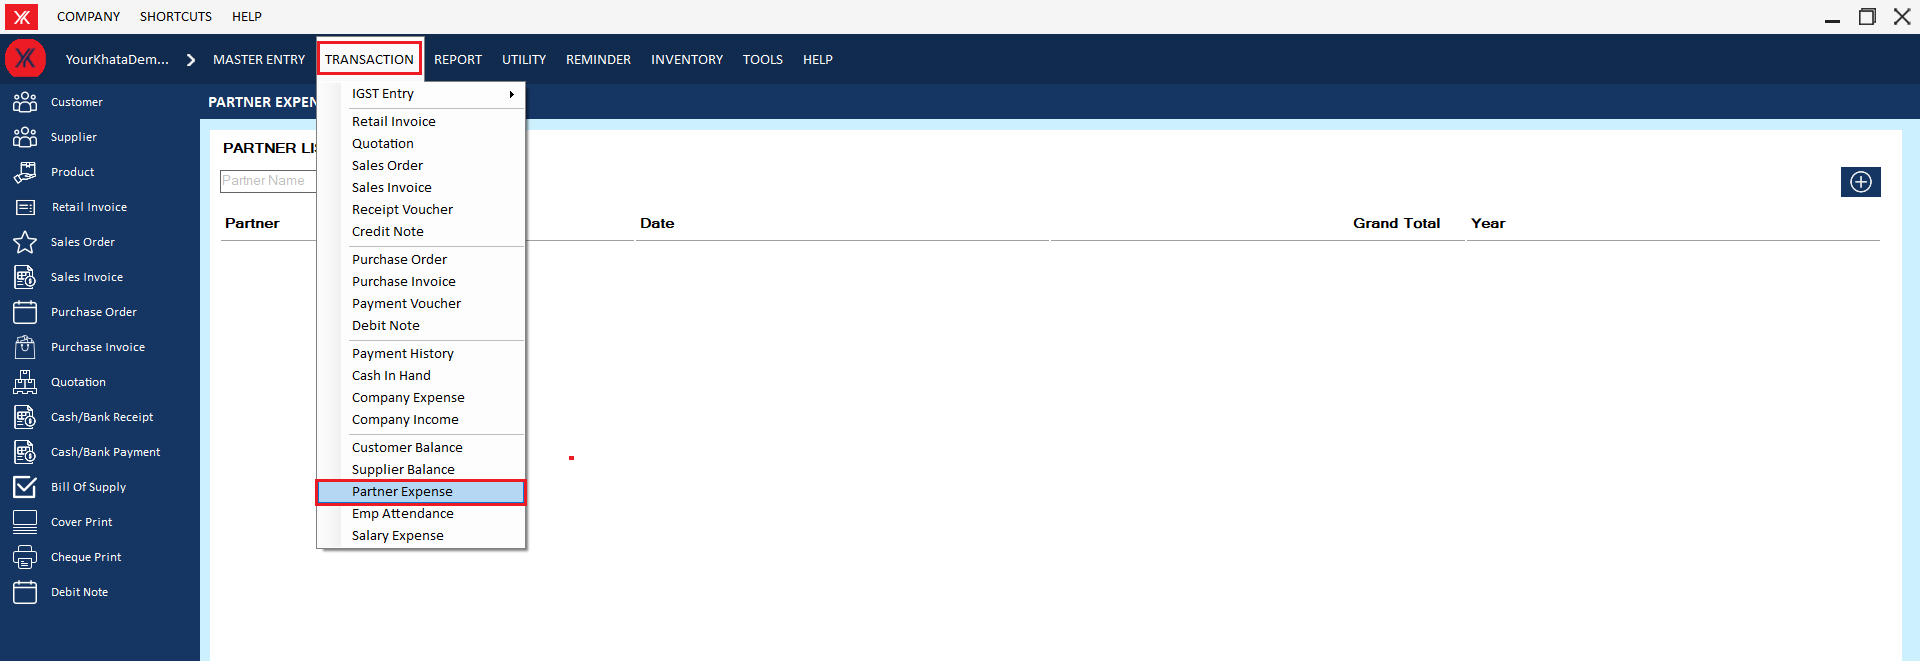
Step 2: Click on “+”
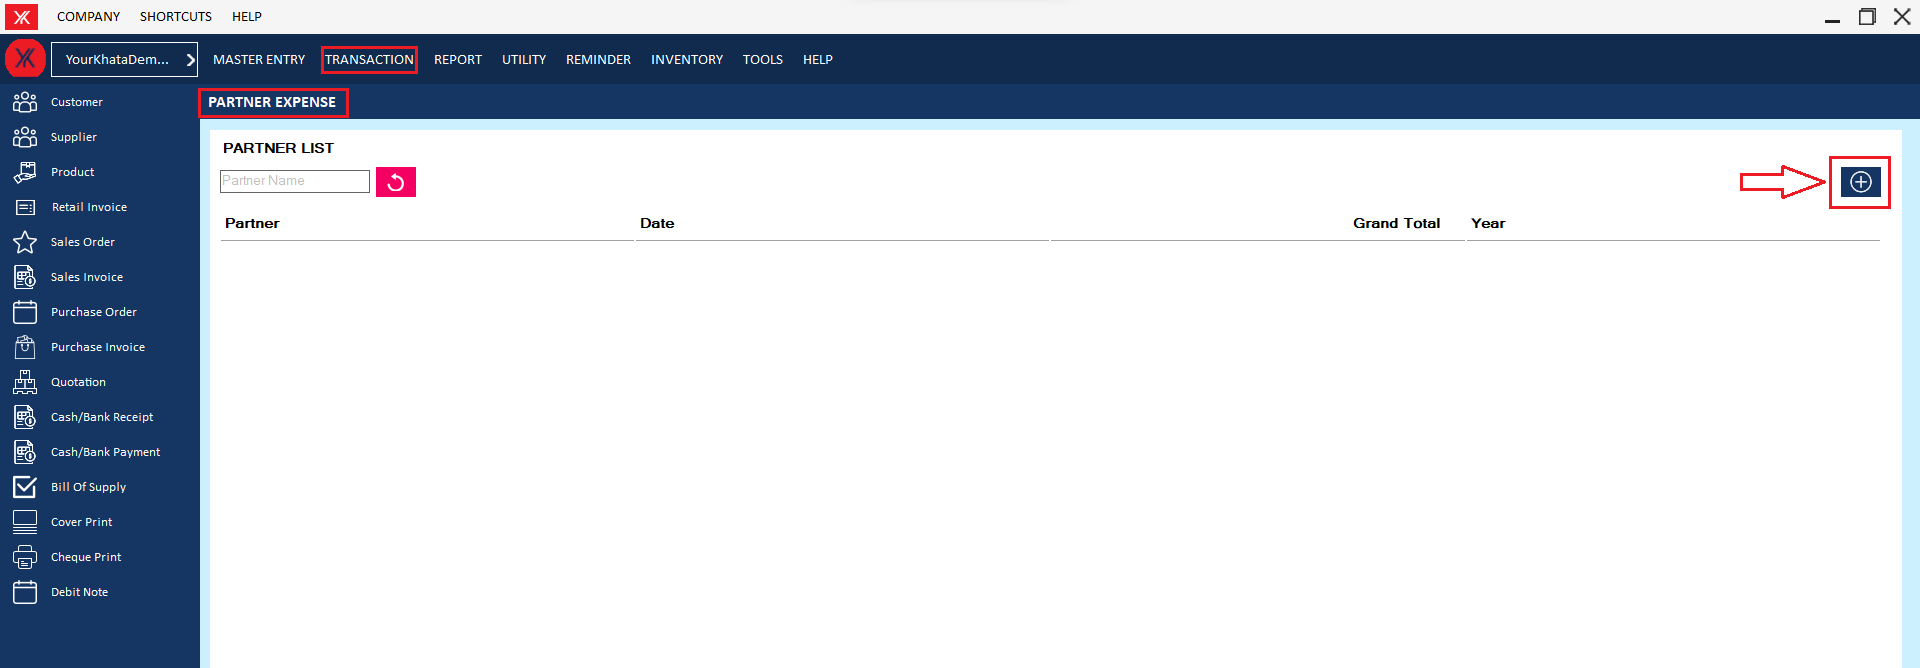
Step 3: Fill all details & submit > Click on save button; you will get the message “Successfully saved. Do you want to print this sales order?”

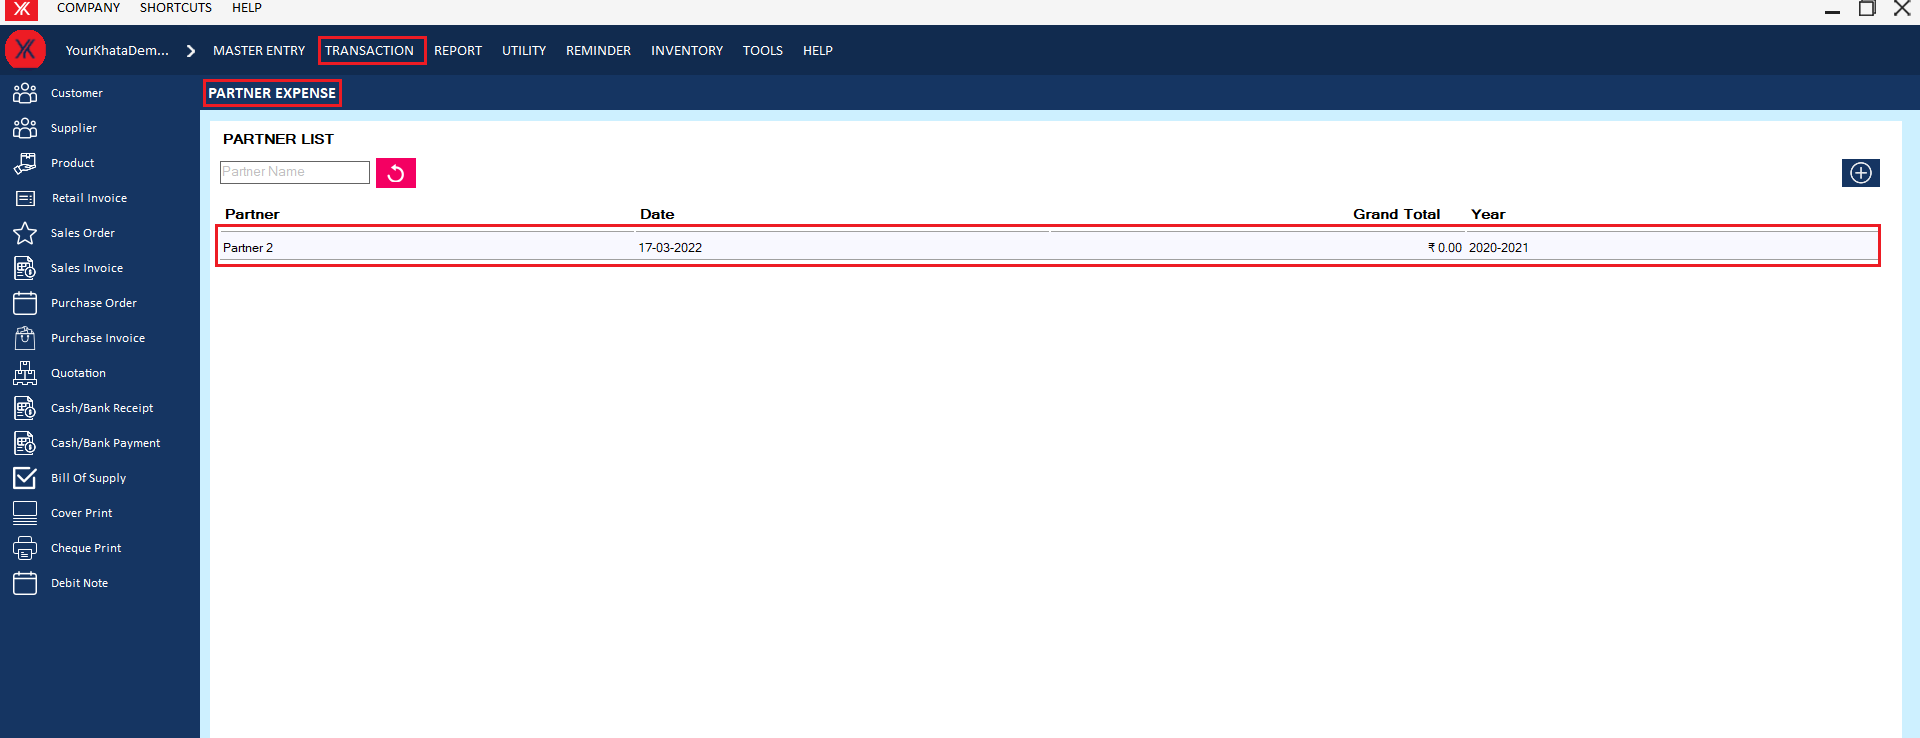
Step 4: New record will be display on partner expense screen
- How to add Employee attendance for Yourkhata accounting and billing software?
Step 1: Go to employee attendance in transaction

Step 2: Click on “+”

Step 3: Fill all details & submit > Click on save button; you will get the message “Successfully saved”

Step 4: New record will be display on employee attendance screen

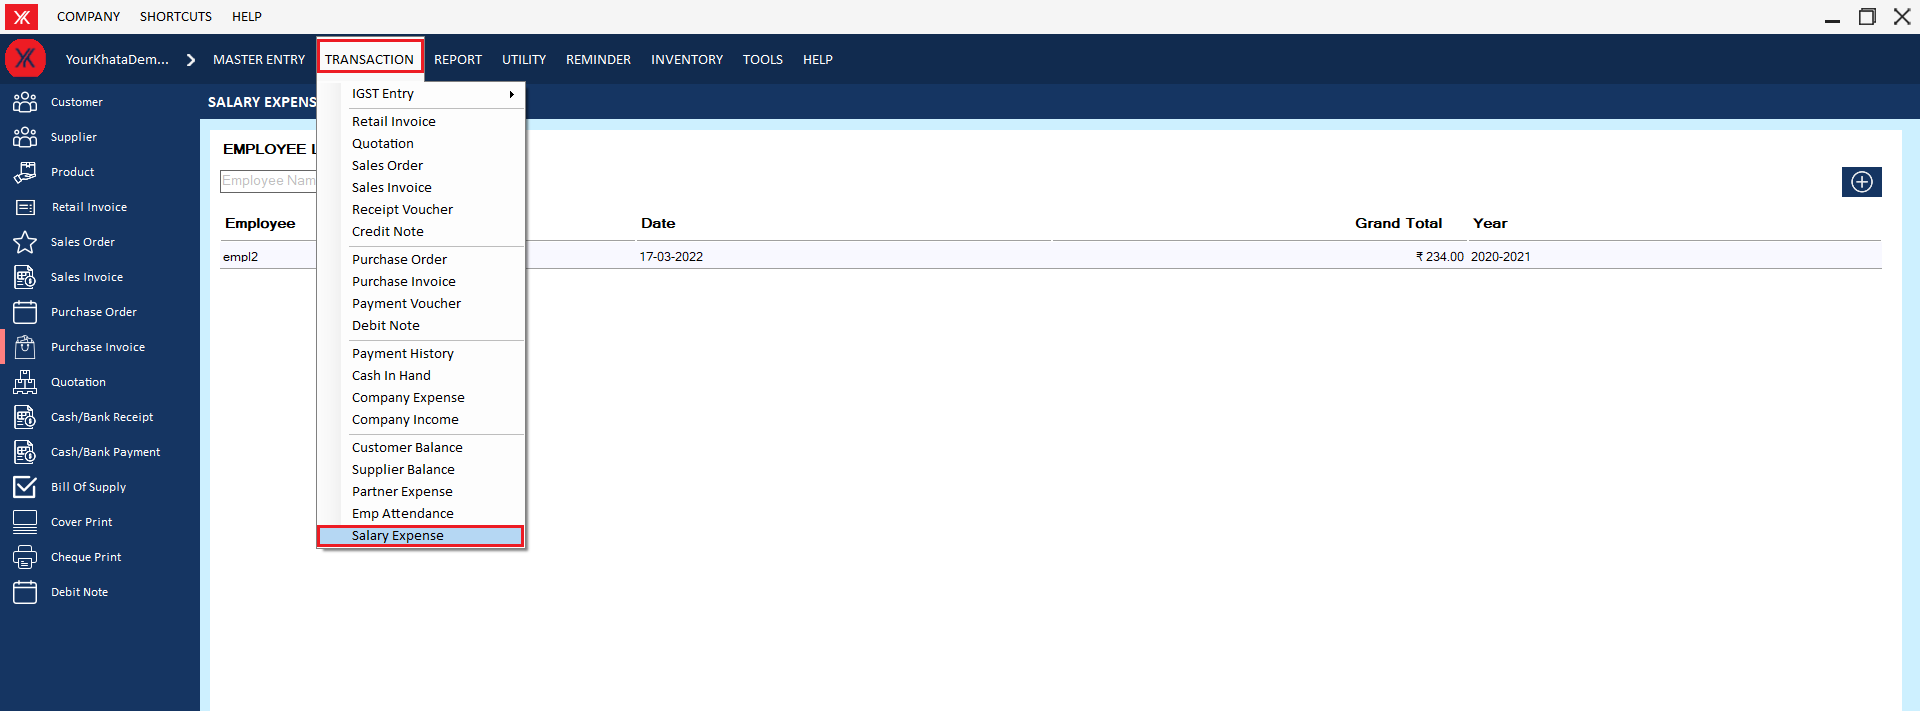
- How to add Salary expense for Yourkhata accounting and billing software?
Step 1: Go to salary expense in transaction
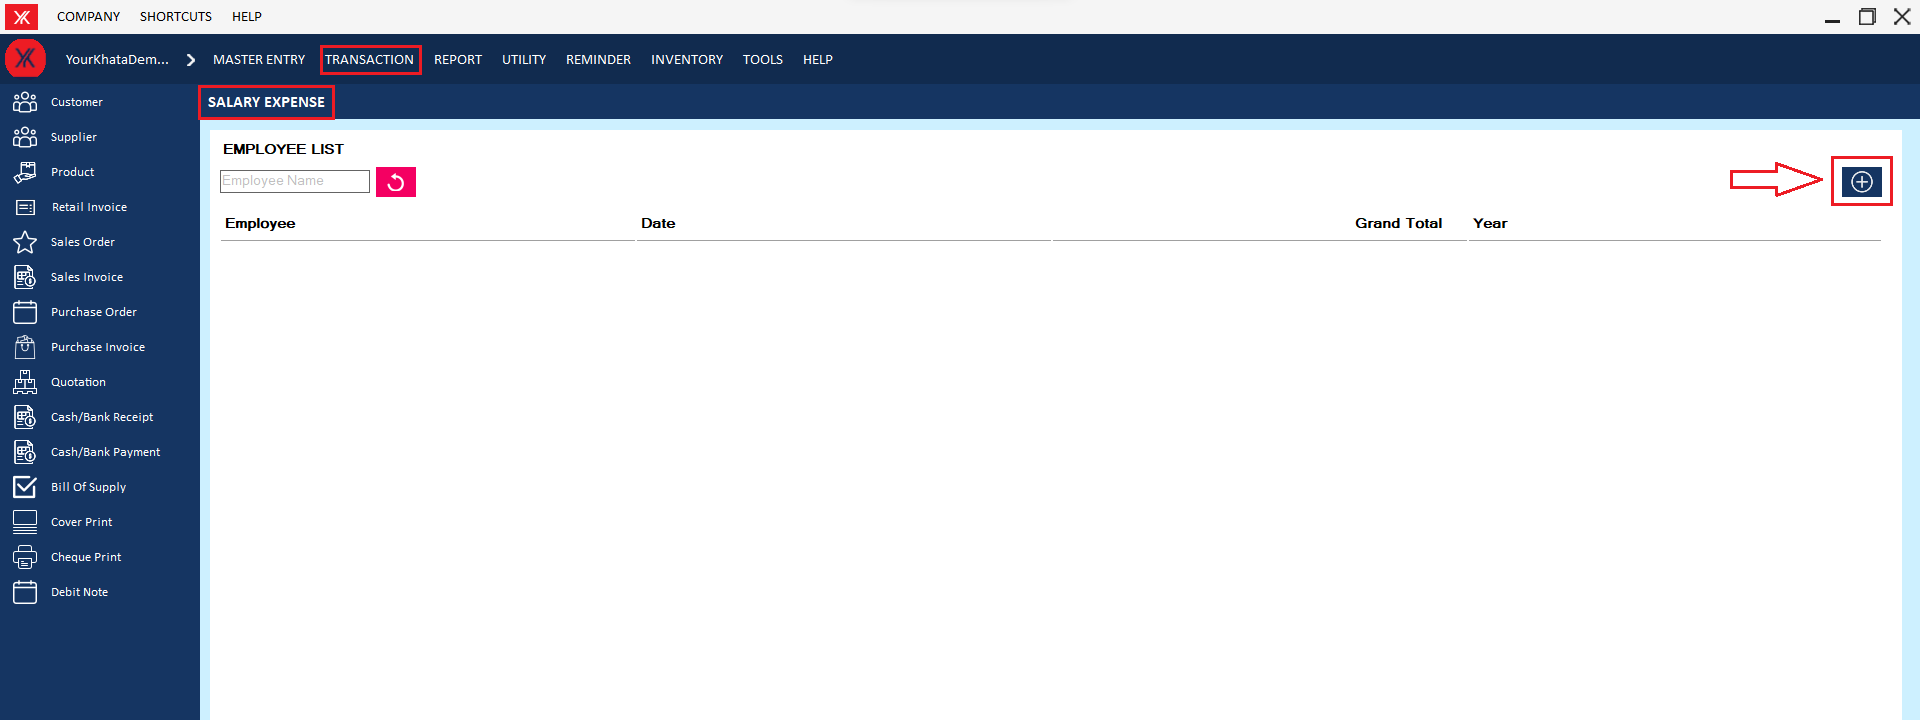
Step 2: Click on “+”
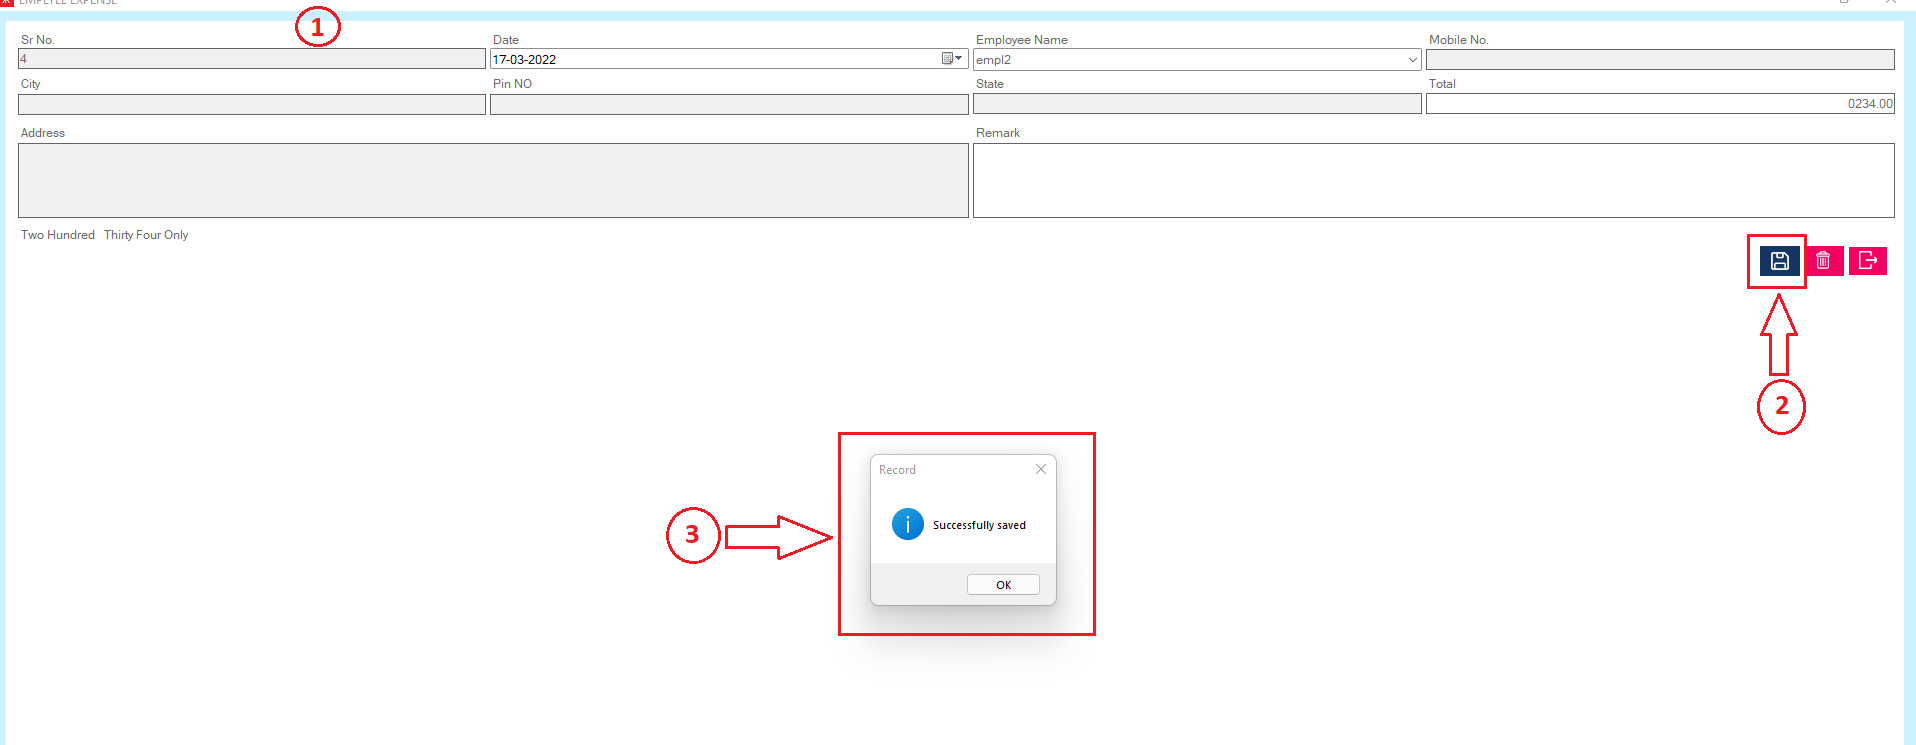
Step 3: Fill all details & submit > Click on save button; you will get the message “Successfully saved. Do you want to print this sales order?”
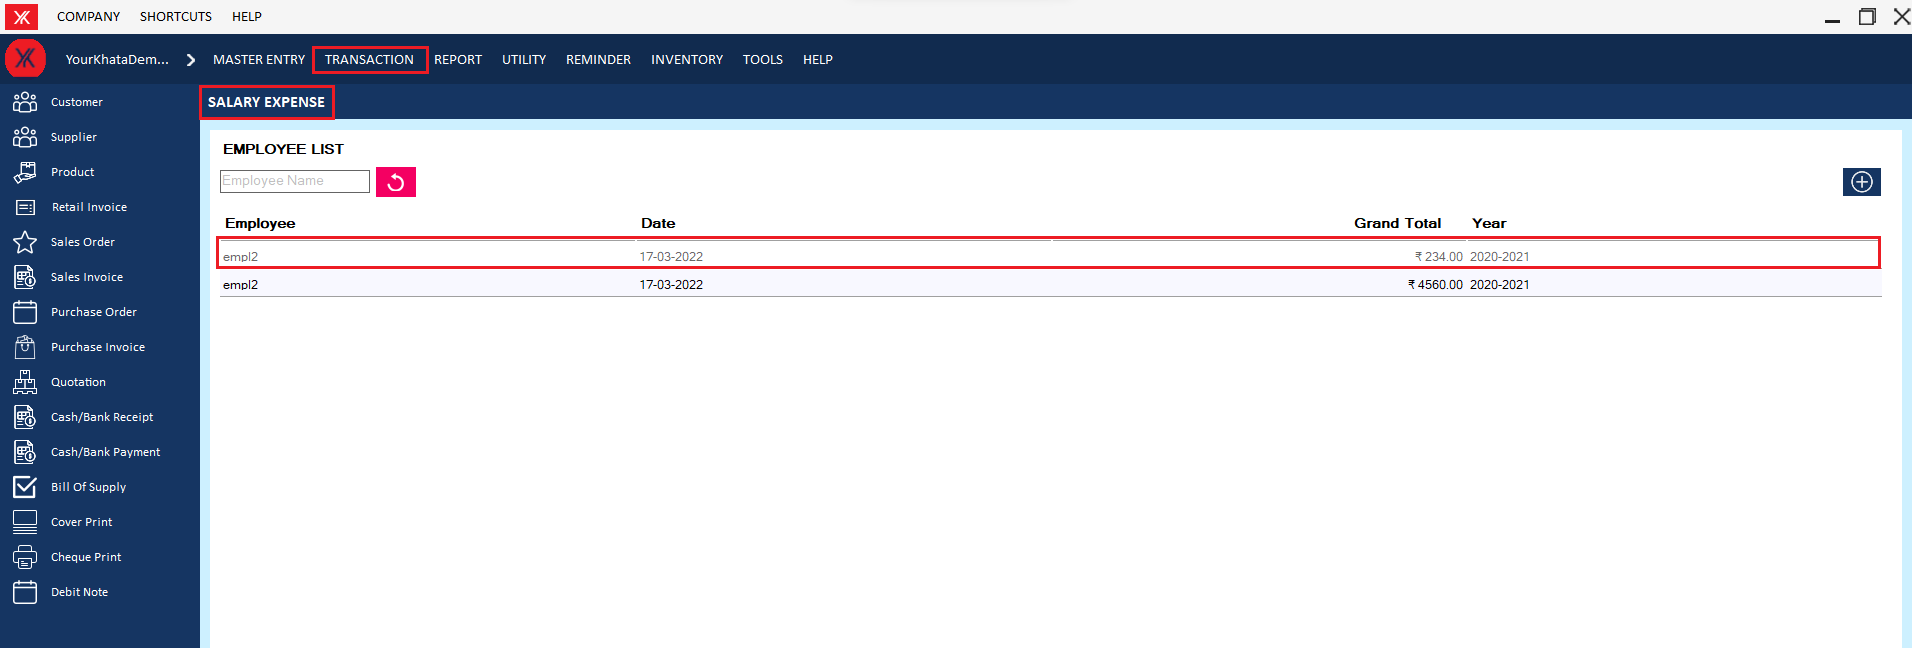
Step 4: New record will be display on salary expense screen
Delete Process
- How to delete User from Yourkhata accounting and billing software?
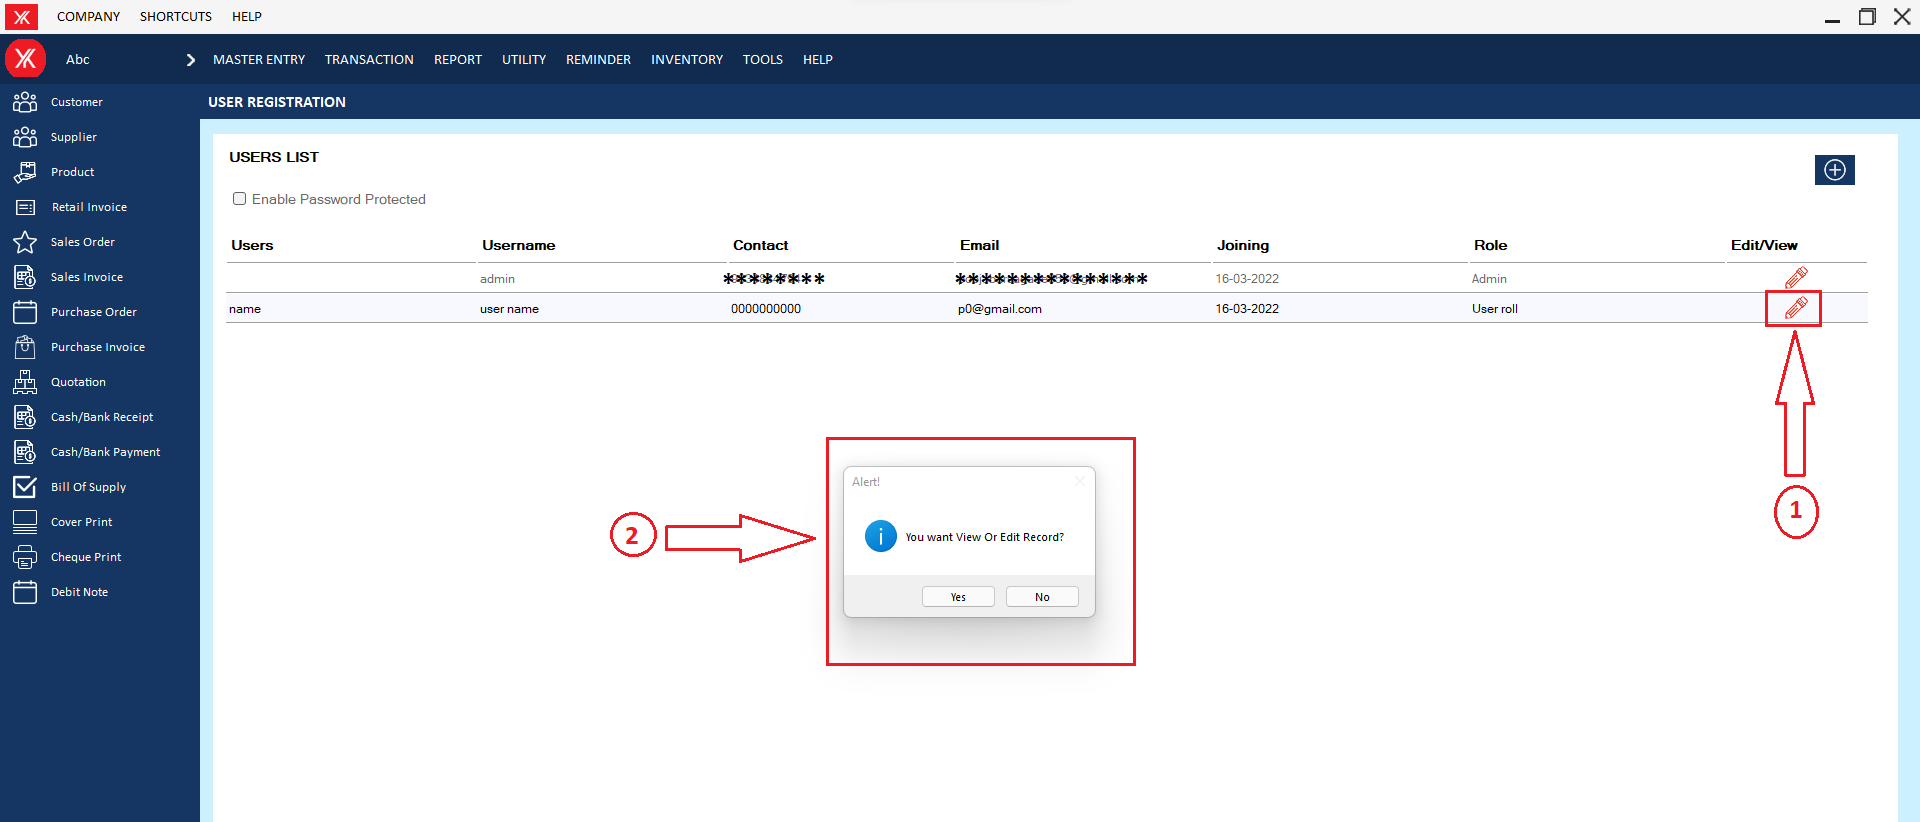
Step 1: Go to user registration in utility, Previously created user details will be listed > click on edit icon > You will get a message “you want to edit or view record?”

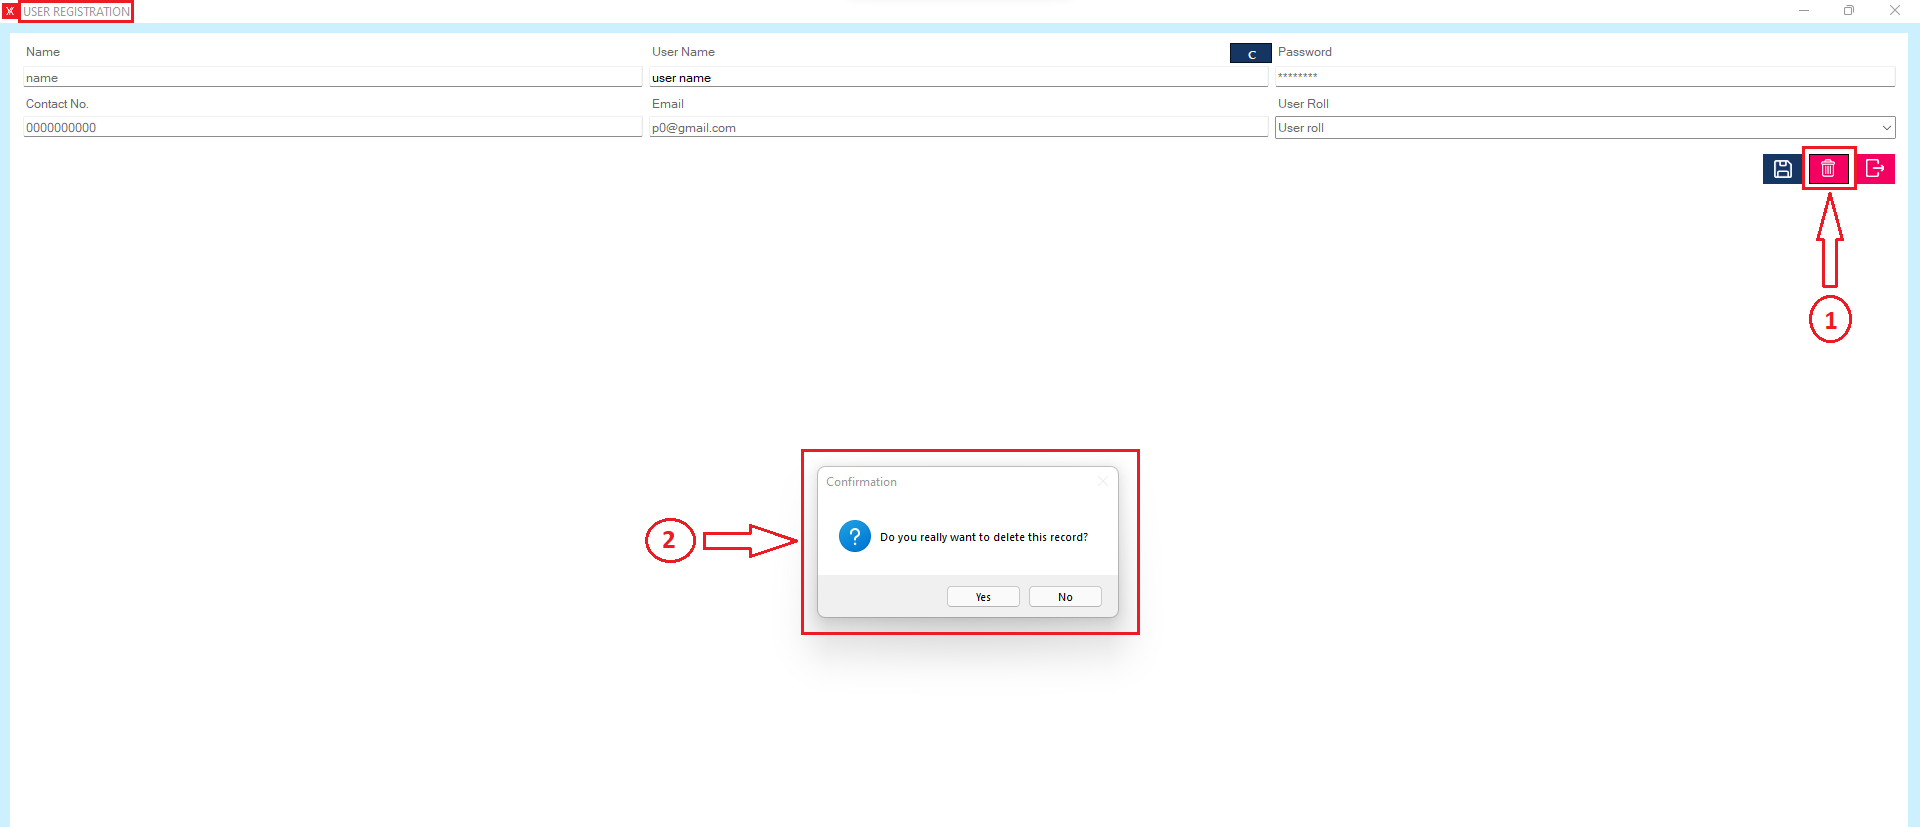
Step 2: Click on delete > you will get a message that “Do you really want to delete this record?”
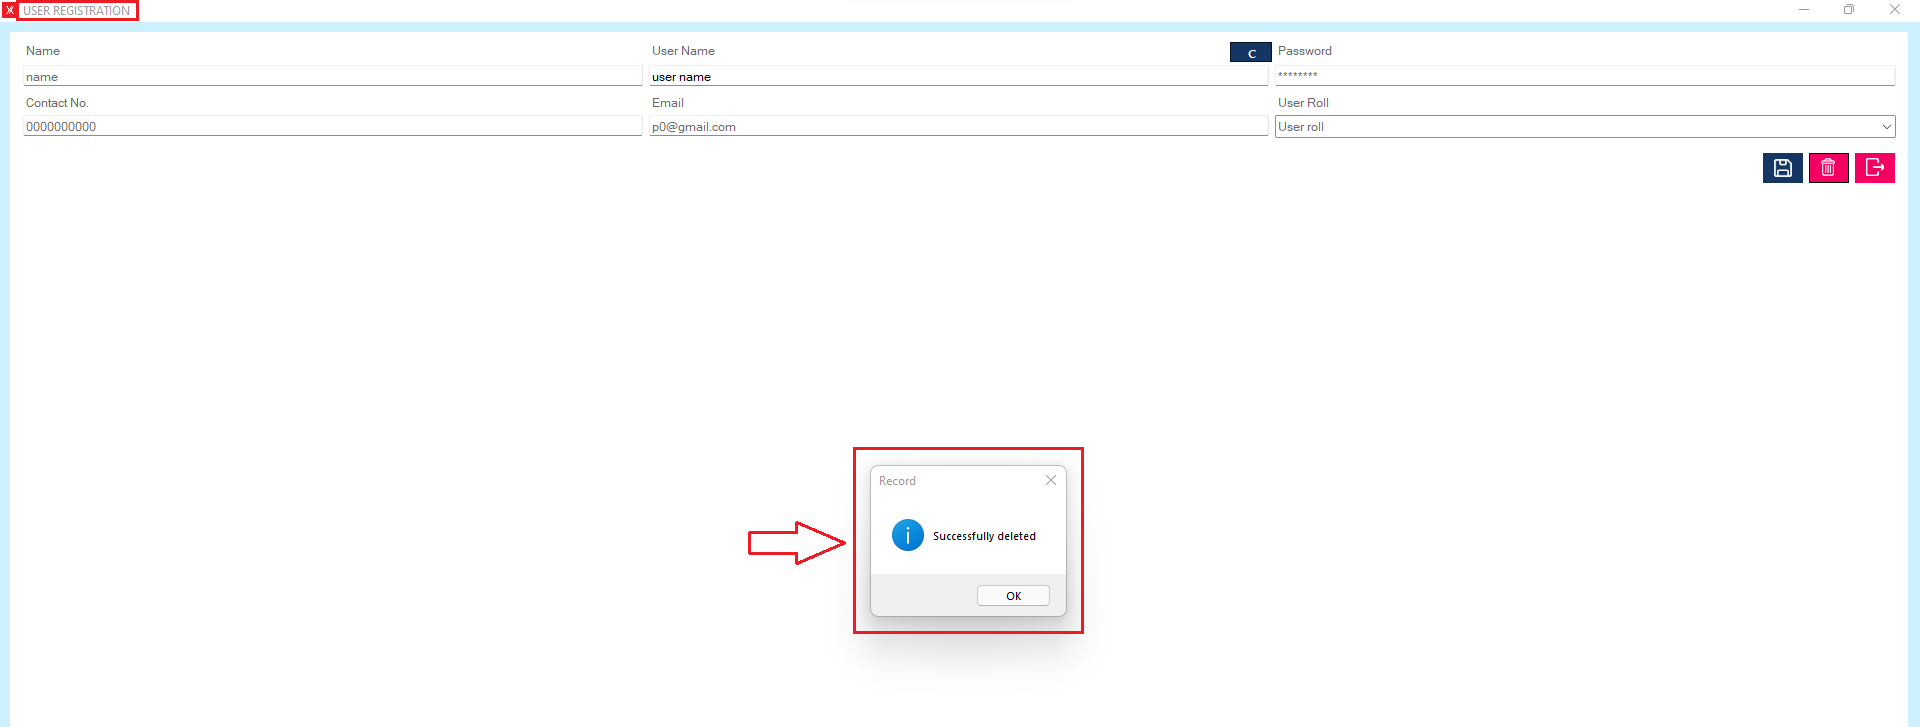
Step 3: After clicking on yes, you will get a message that “successfully deleted”
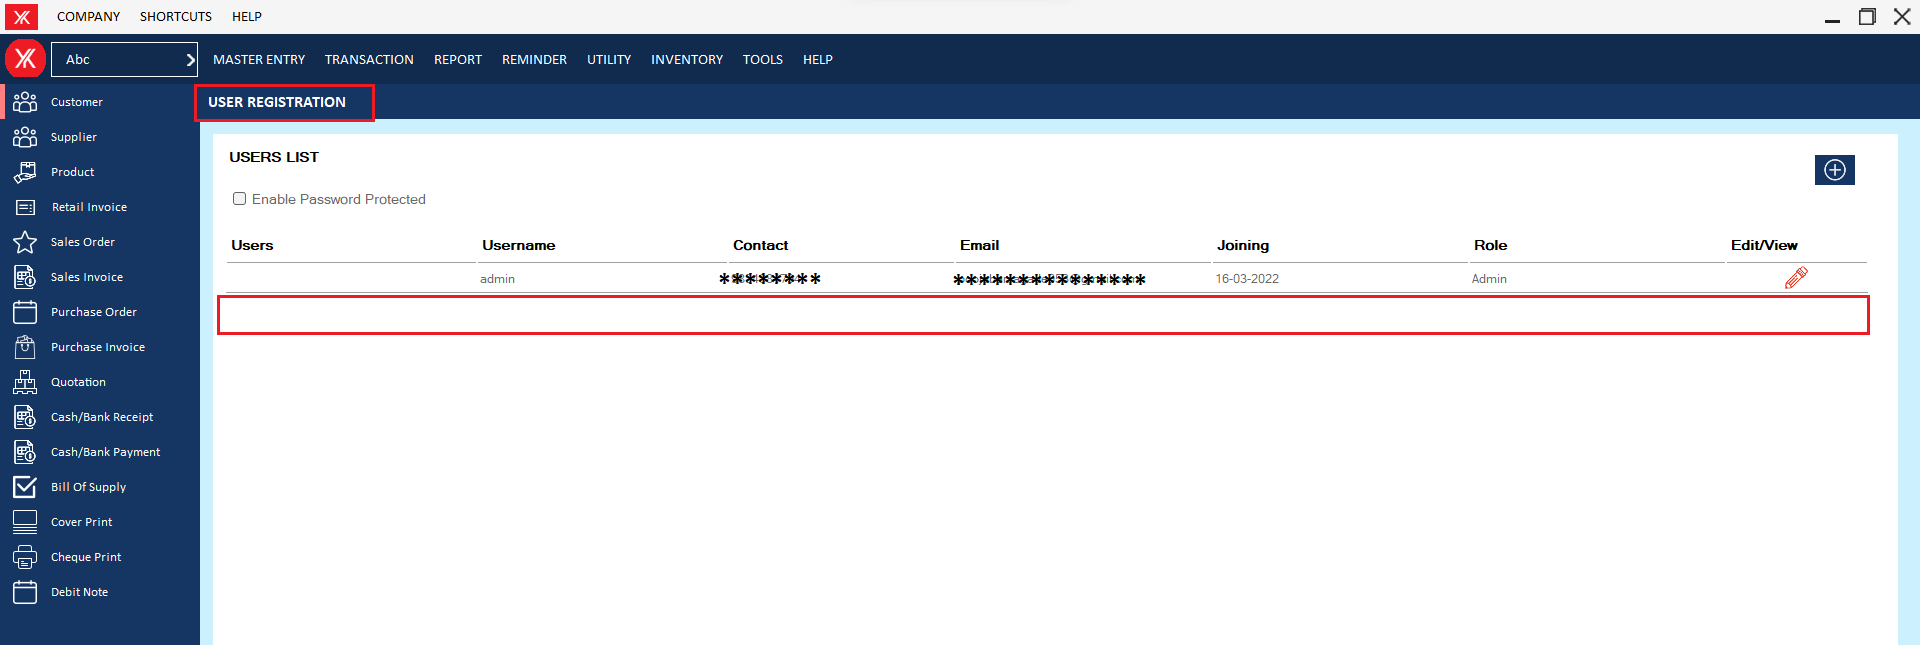
Step 6: The user will be delete from the list
- How to delete Customer for Yourkhata accounting and billing software?
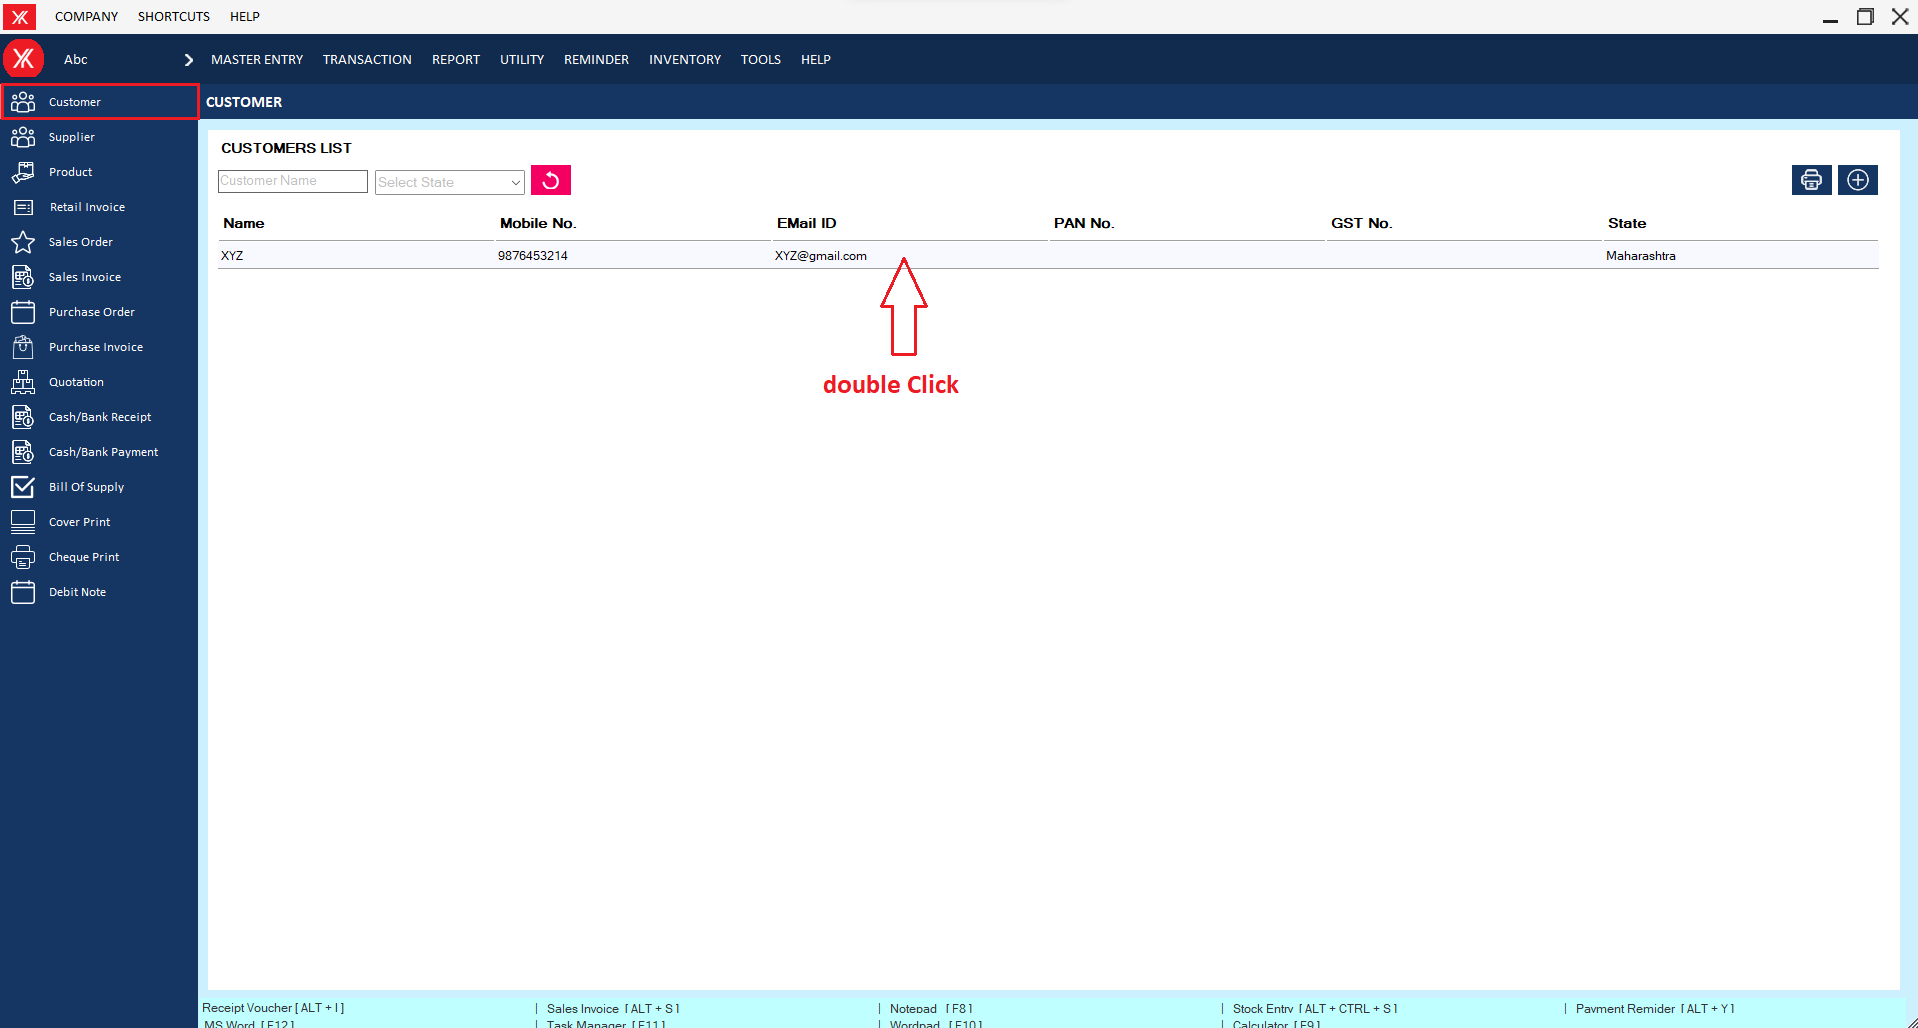
Step 1: Go to Customer > Previously created customer details will be listed & double click on customer details.
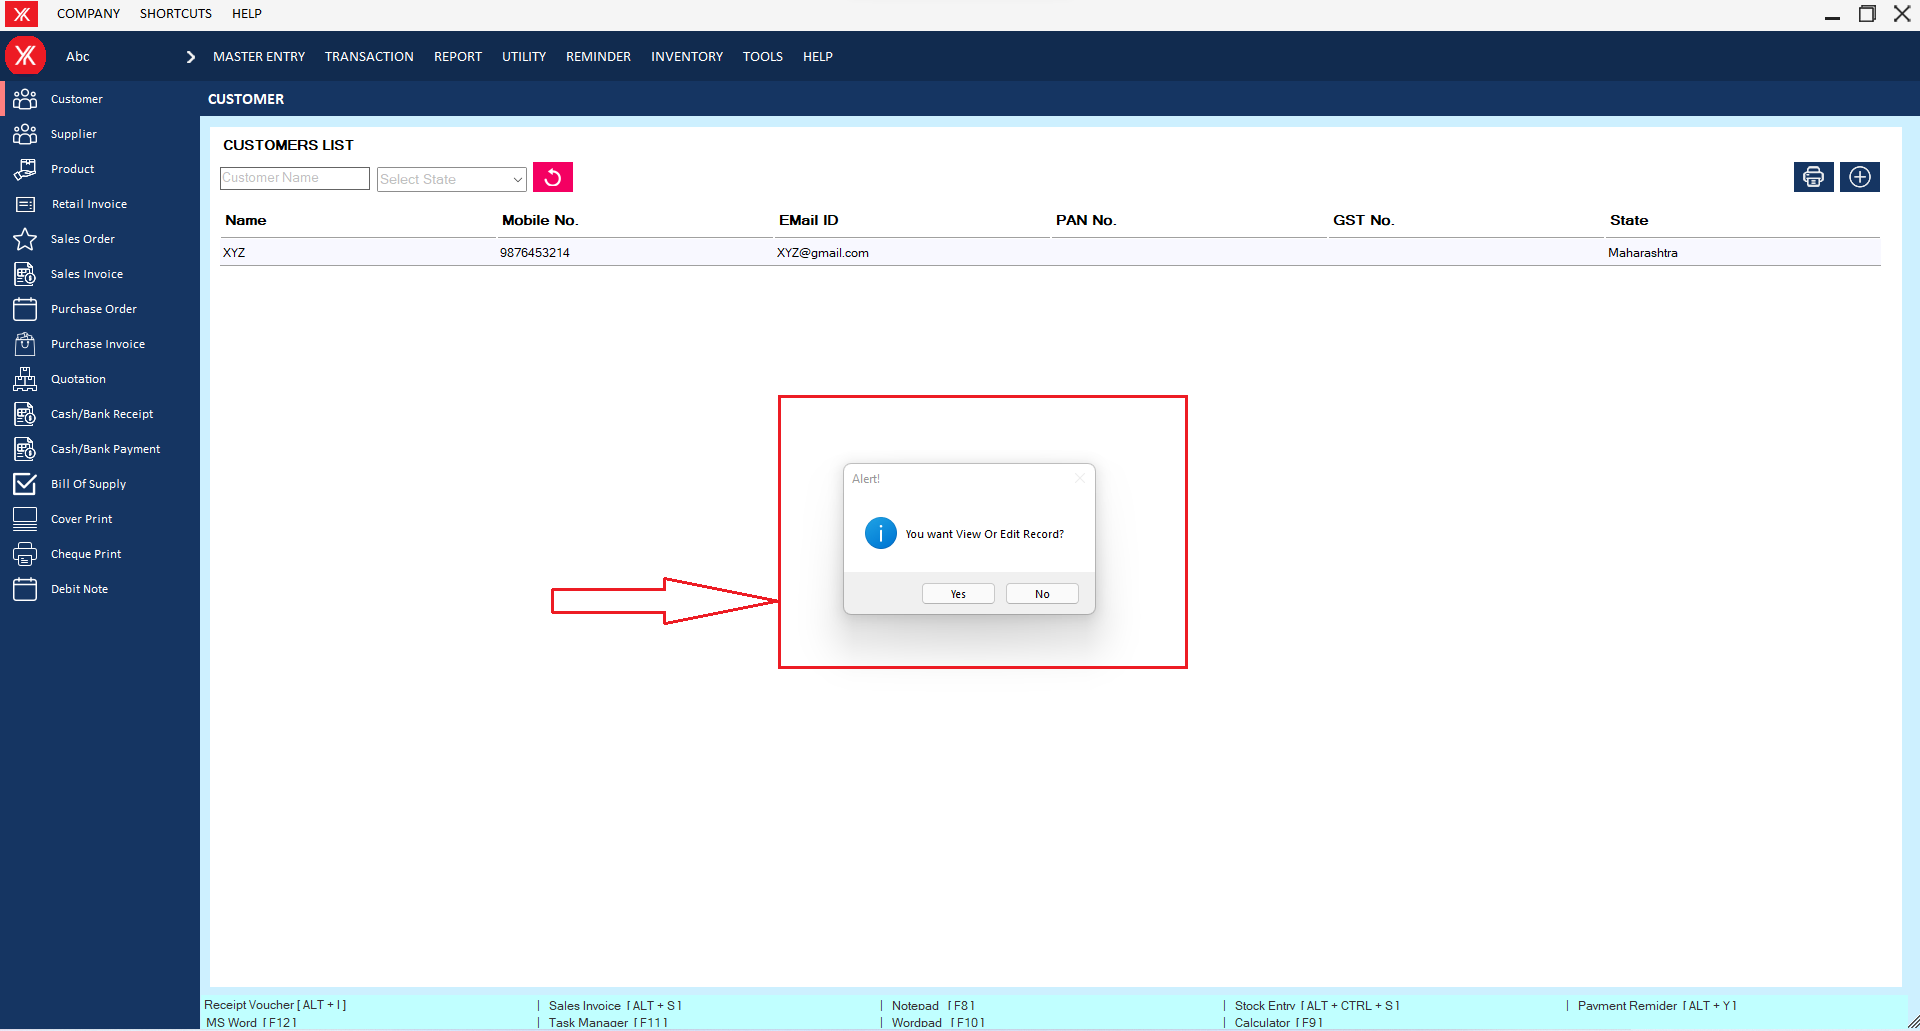
Step 2: You will get a message “You want to view to edit record?”
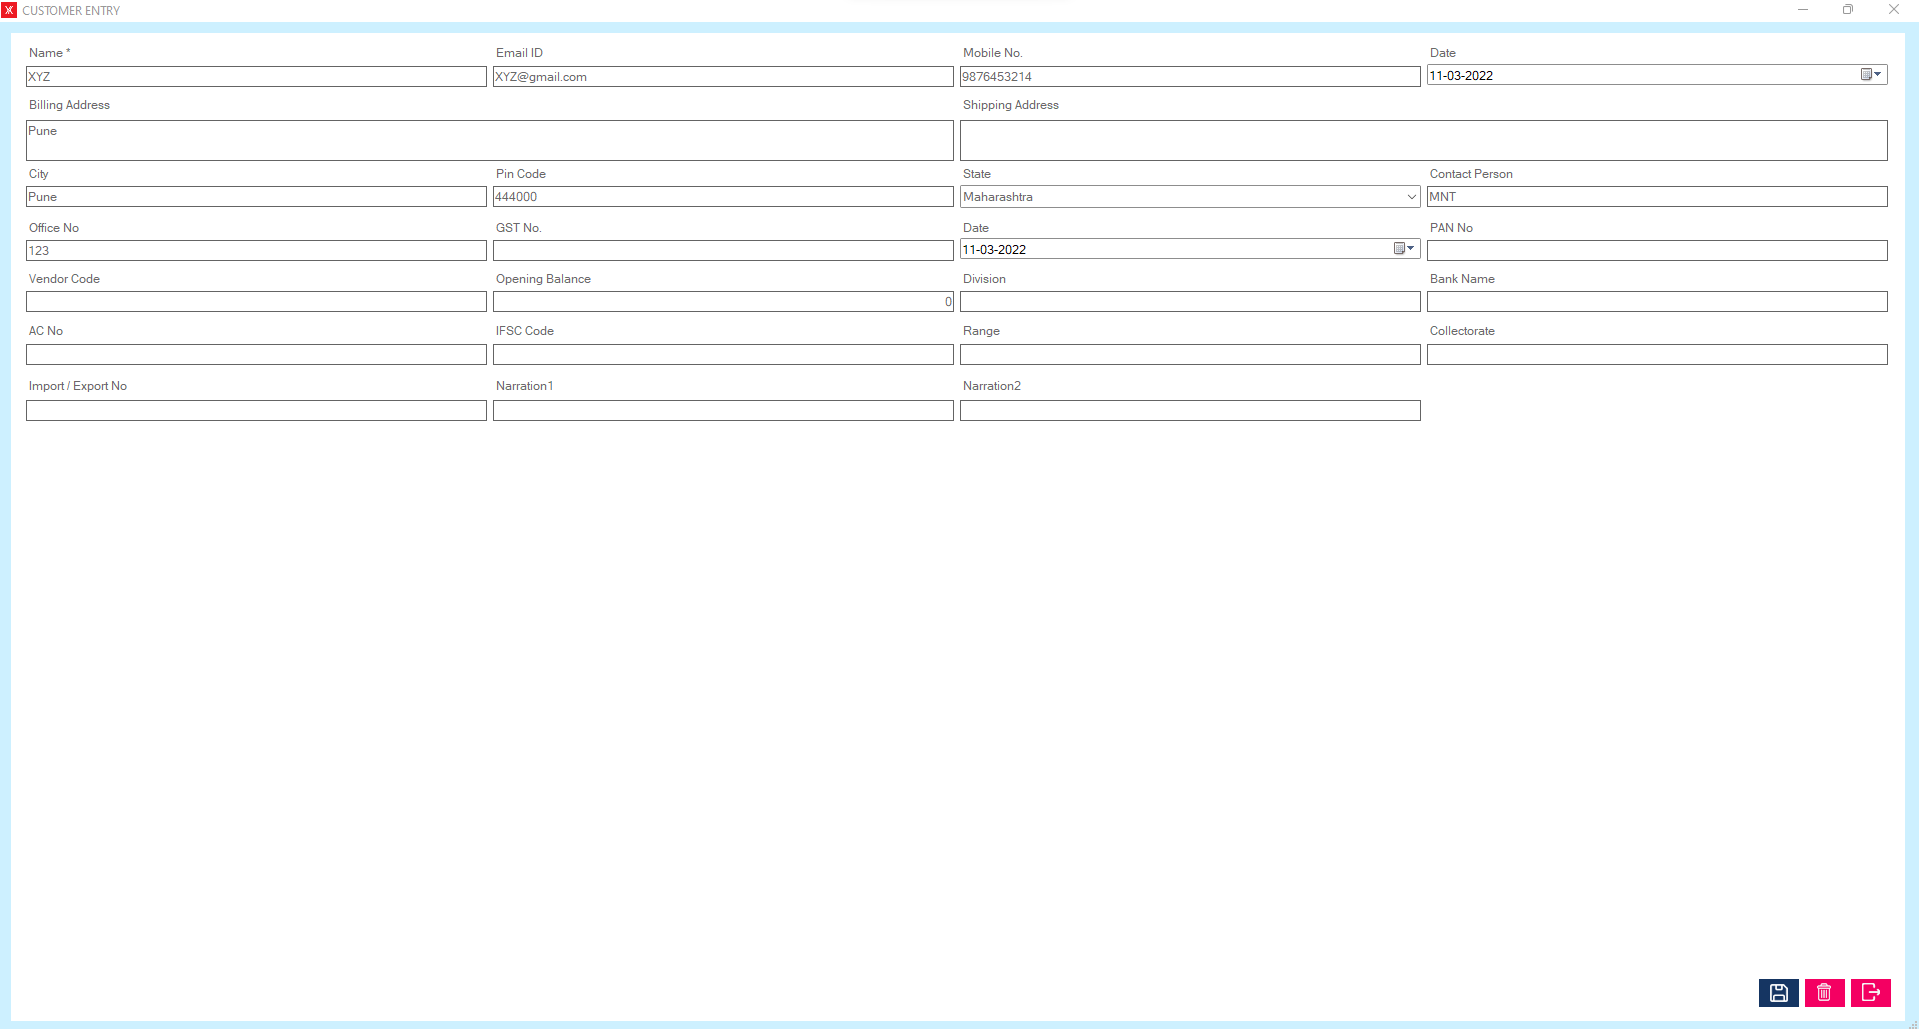
Step 3: Go to Action > Delete
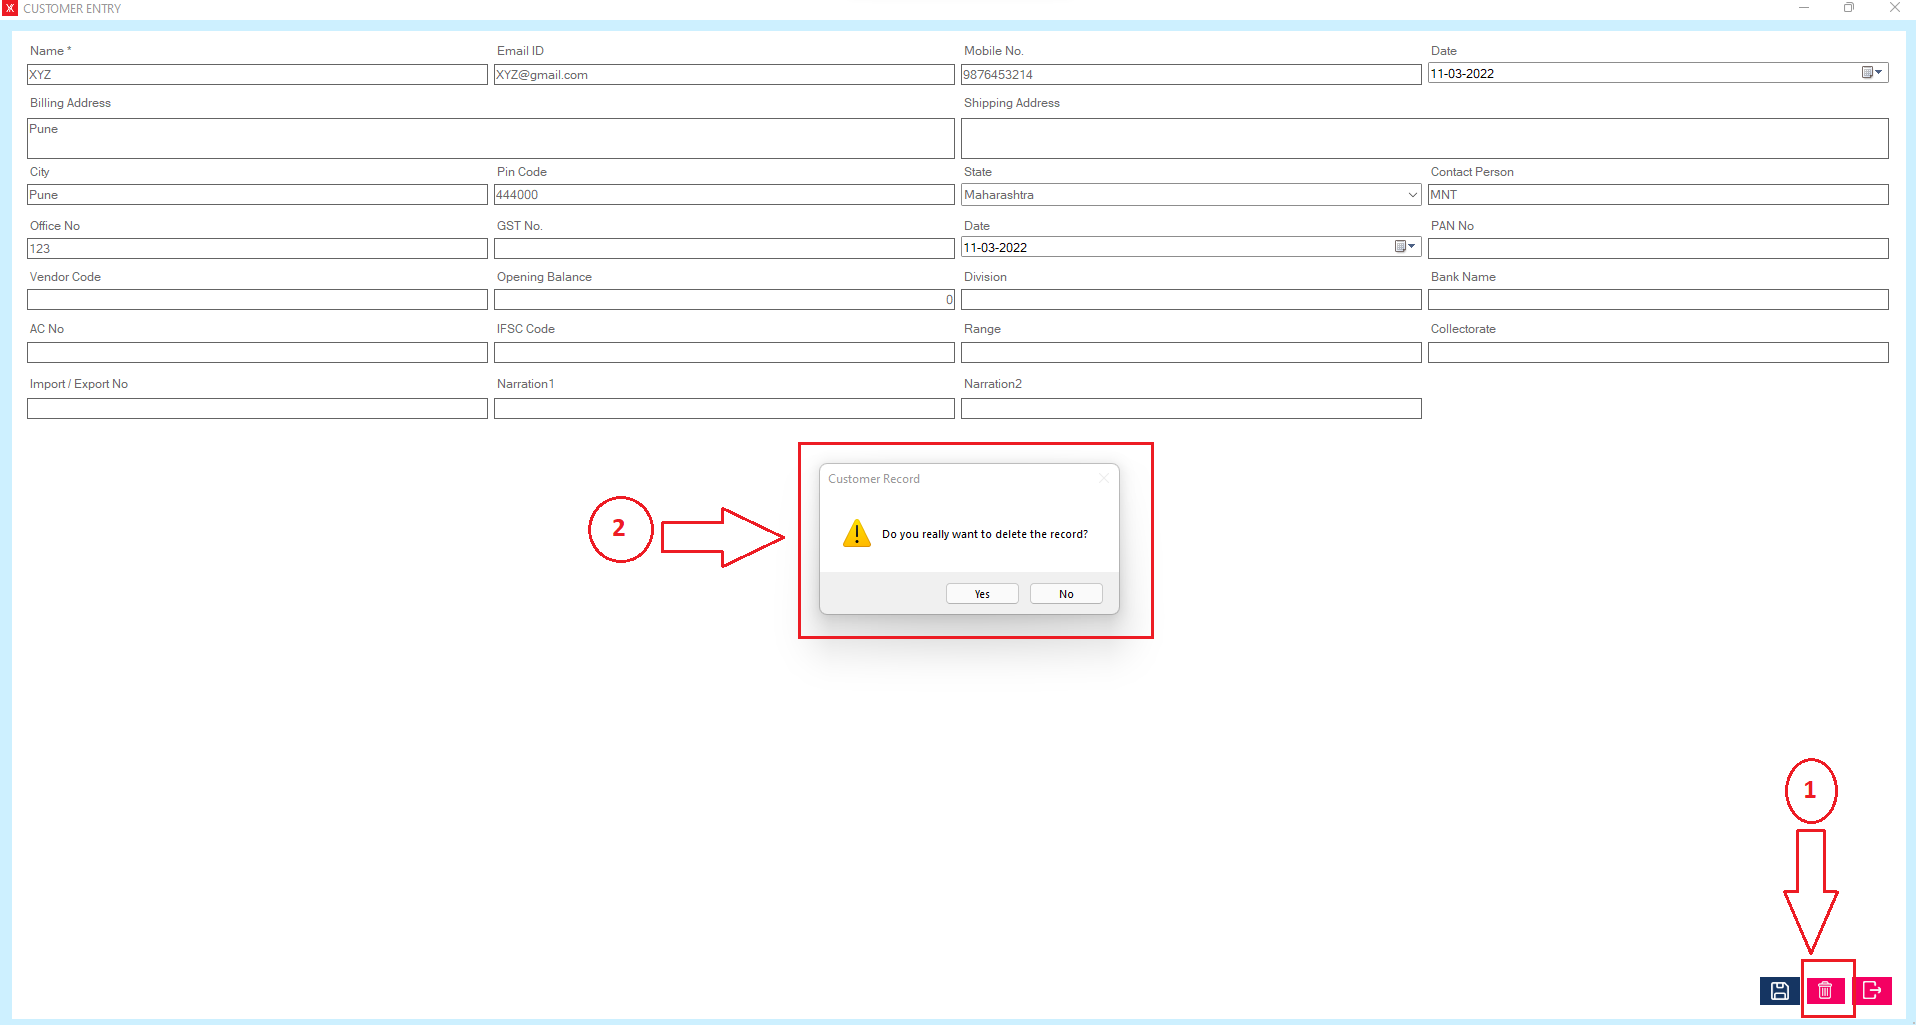
Step 4: You will get a message – “Do you really want to delete the record?”
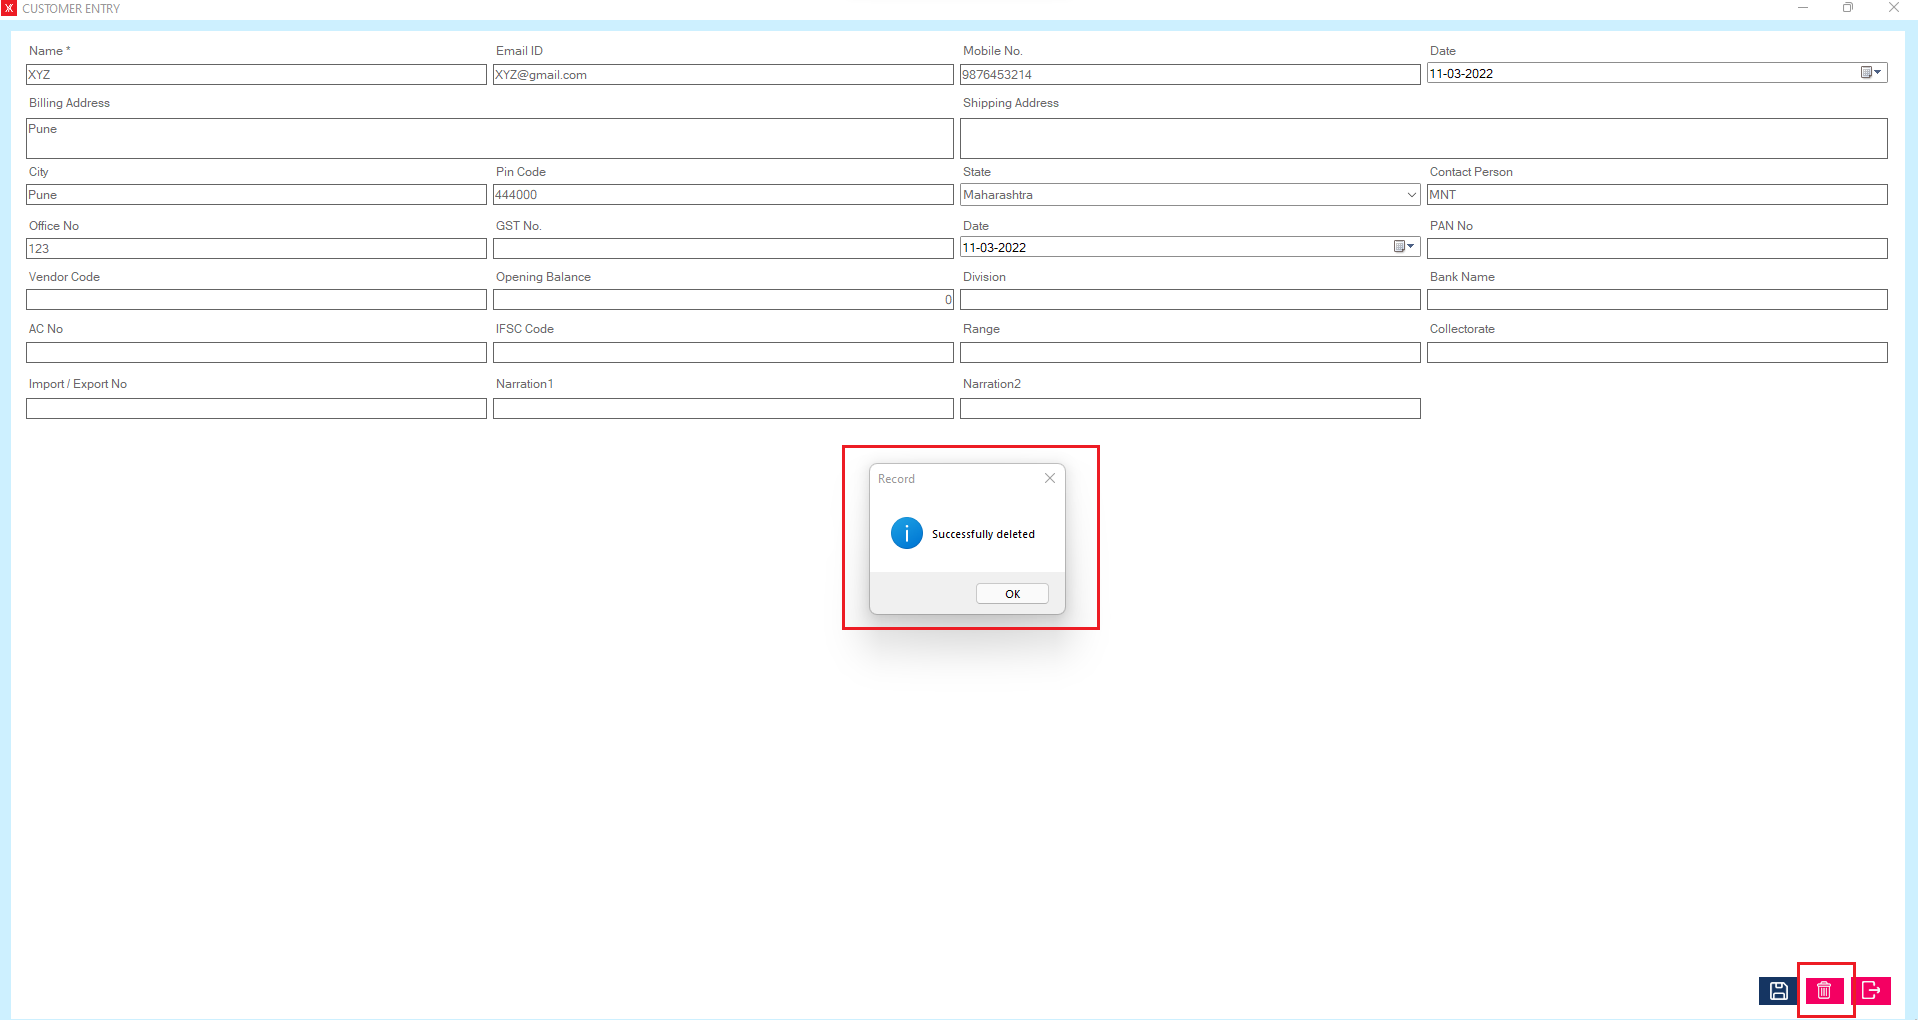
Step 5:If you click on Yes, you will get a confirmation message “successfully deleted”.
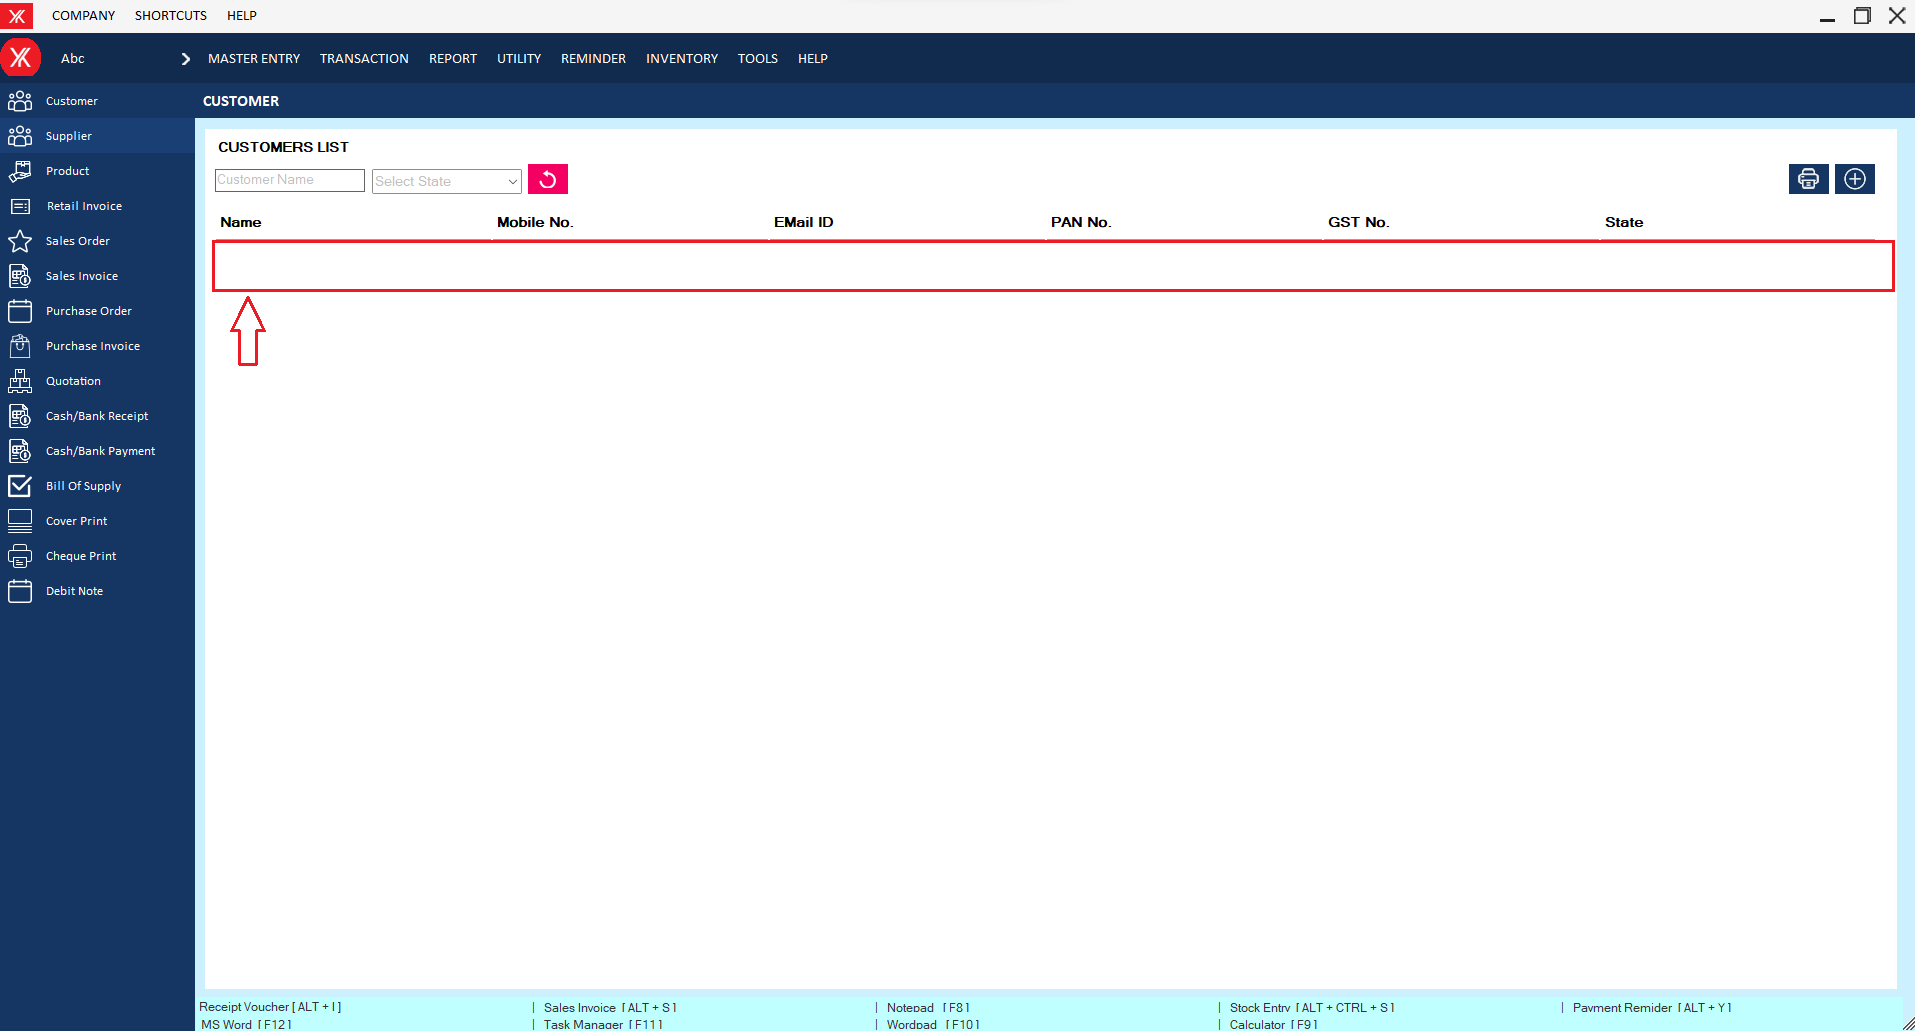
Step 6: The selected customer will remove from the list
- How to delete Tax master for Yourkhata accounting and billing software?
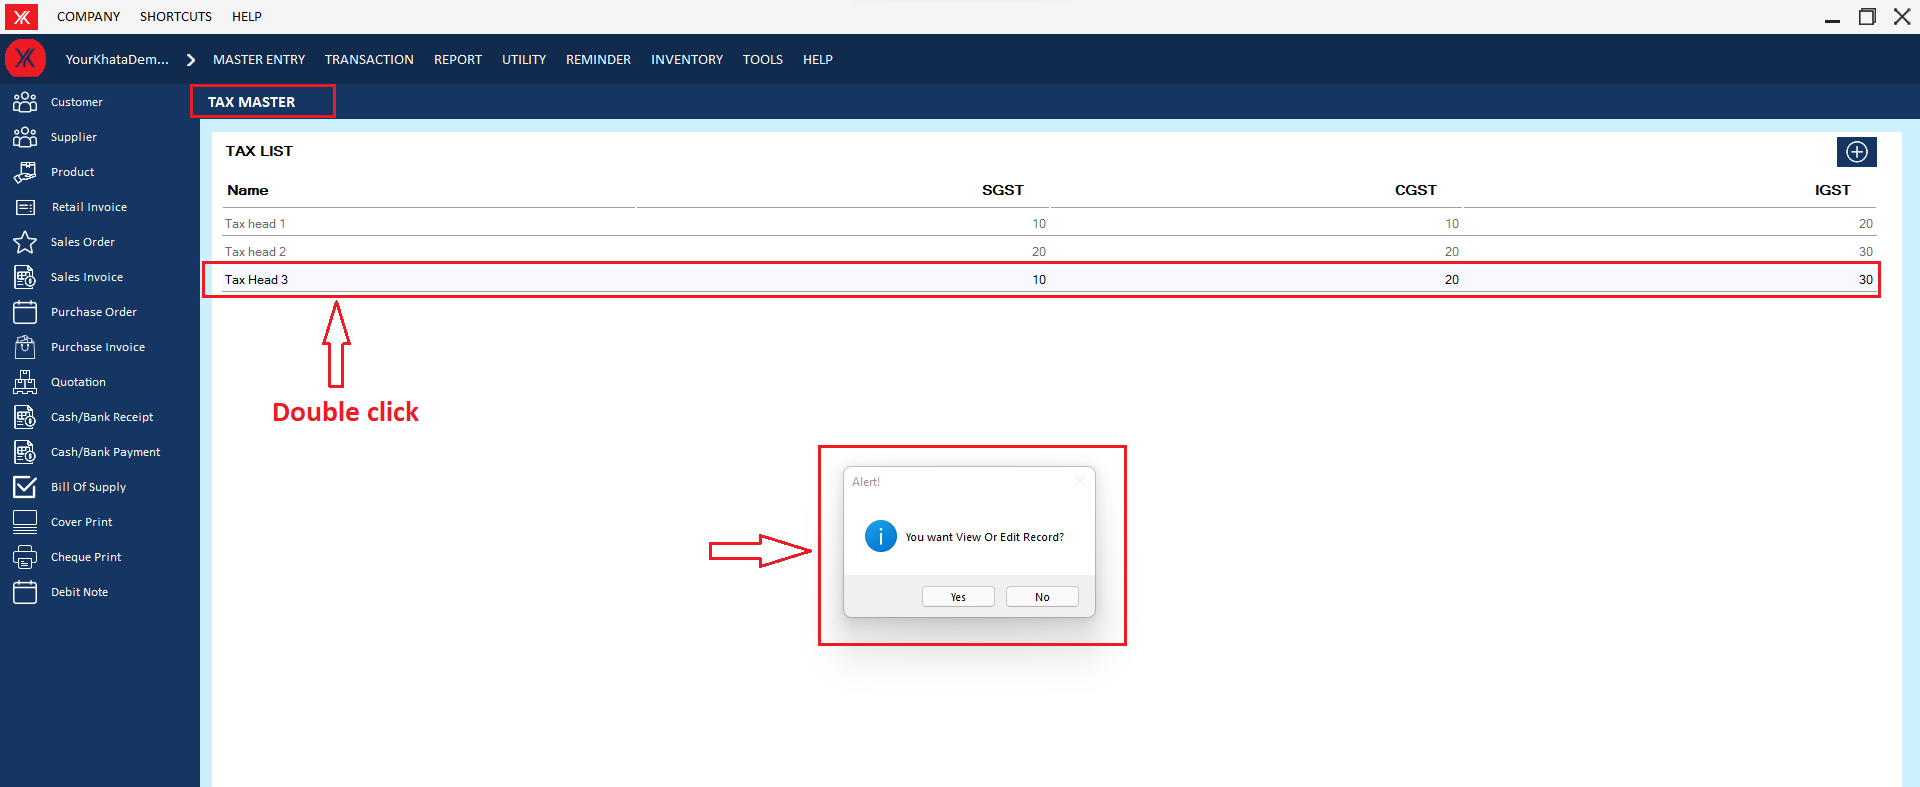
Step 1: Go to tax master, Previously created tax master details will be listed & double click on record & you will get a message, you want to view or edit record?
Step 2: click on delete & you will get the message “ Do you really want to delete this record?”

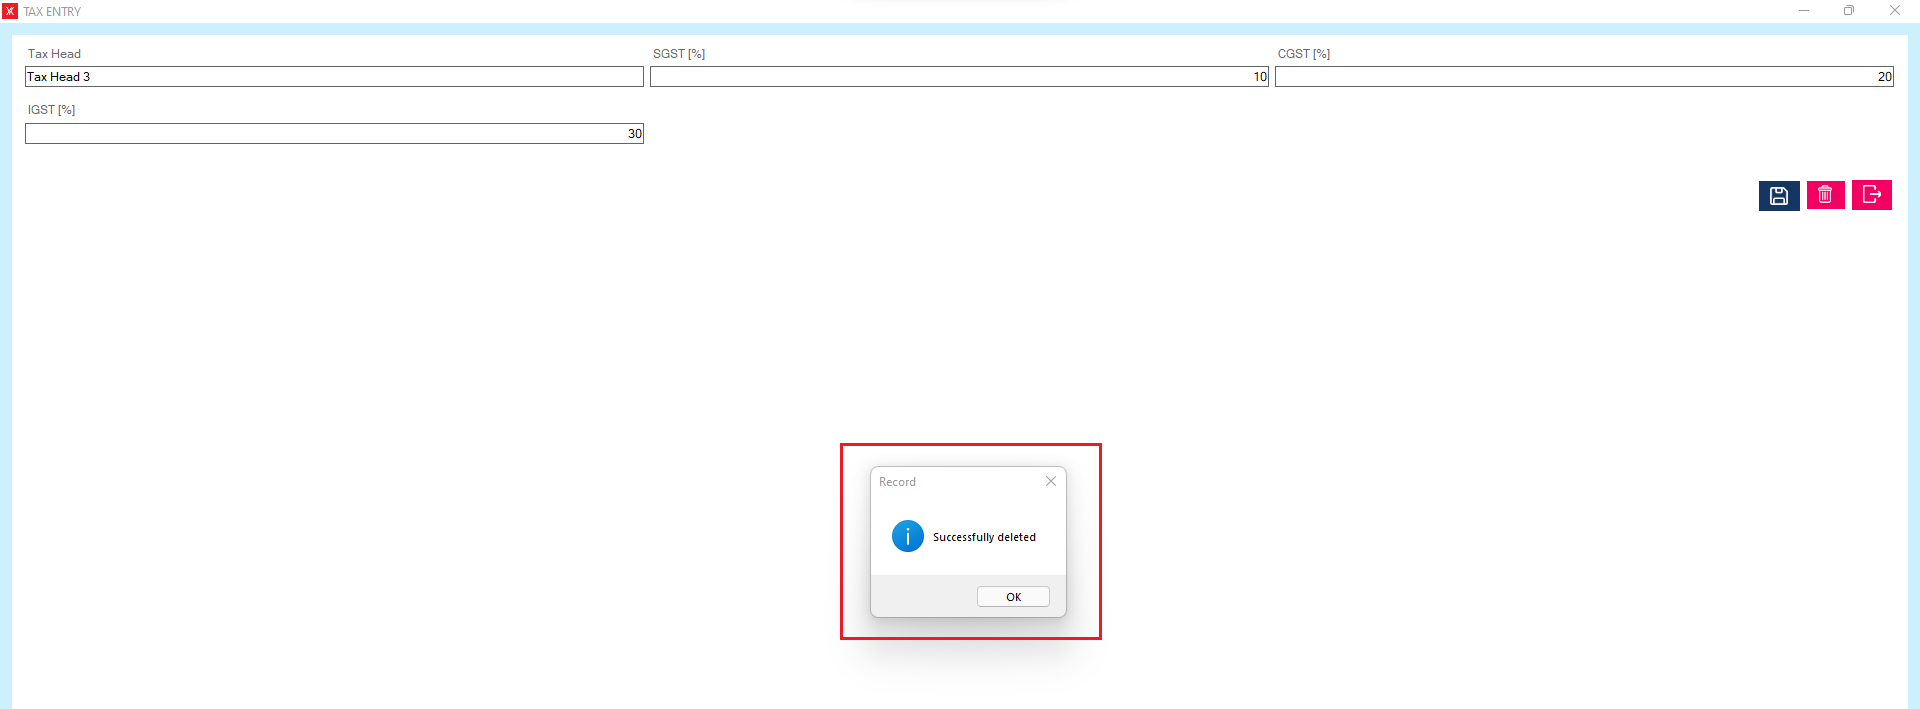
Step 3: If you click on Yes, you will get a confirmation message “successfully deleted”.
Step 4: The selected tax master will be delete from the list
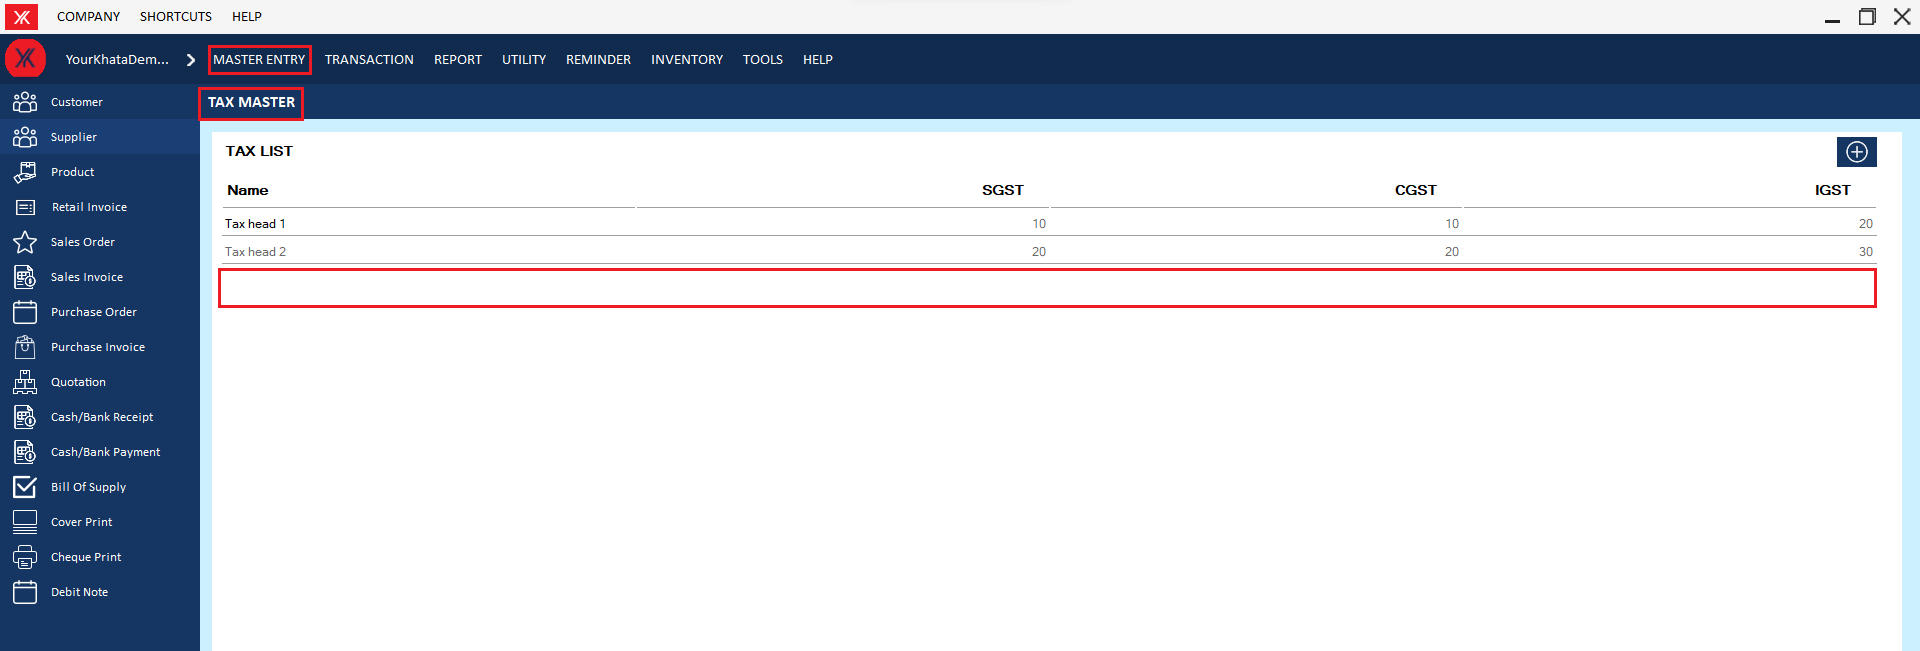
- How to delete Product category for Yourkhata accounting and billing software?
Step 1: Go to Product category, Previously created product details will be listed.
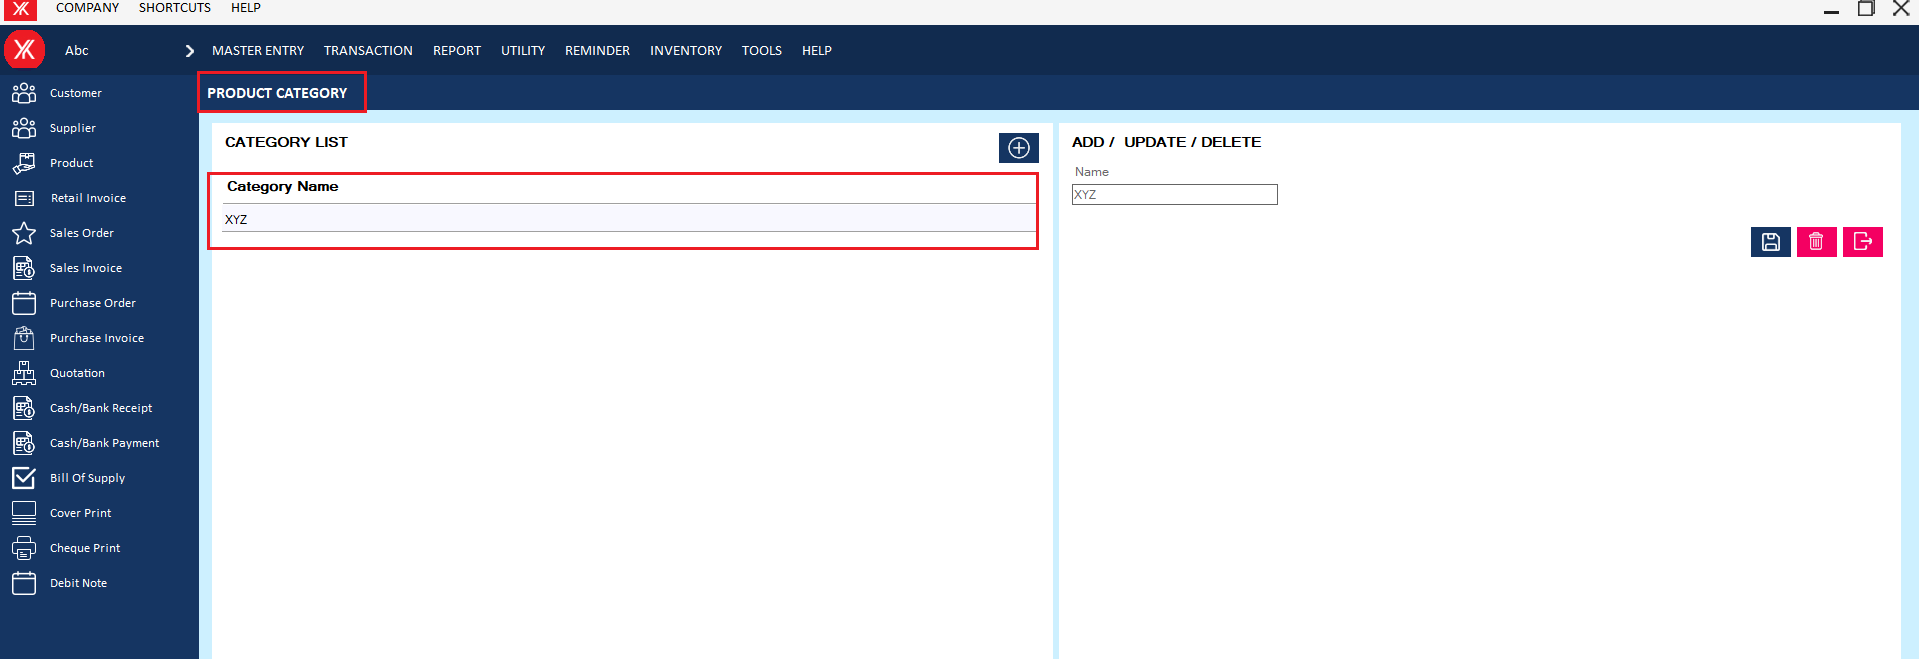
Step 2: Select & double click on product category. You will get a message – “Do you really want to delete the record?”
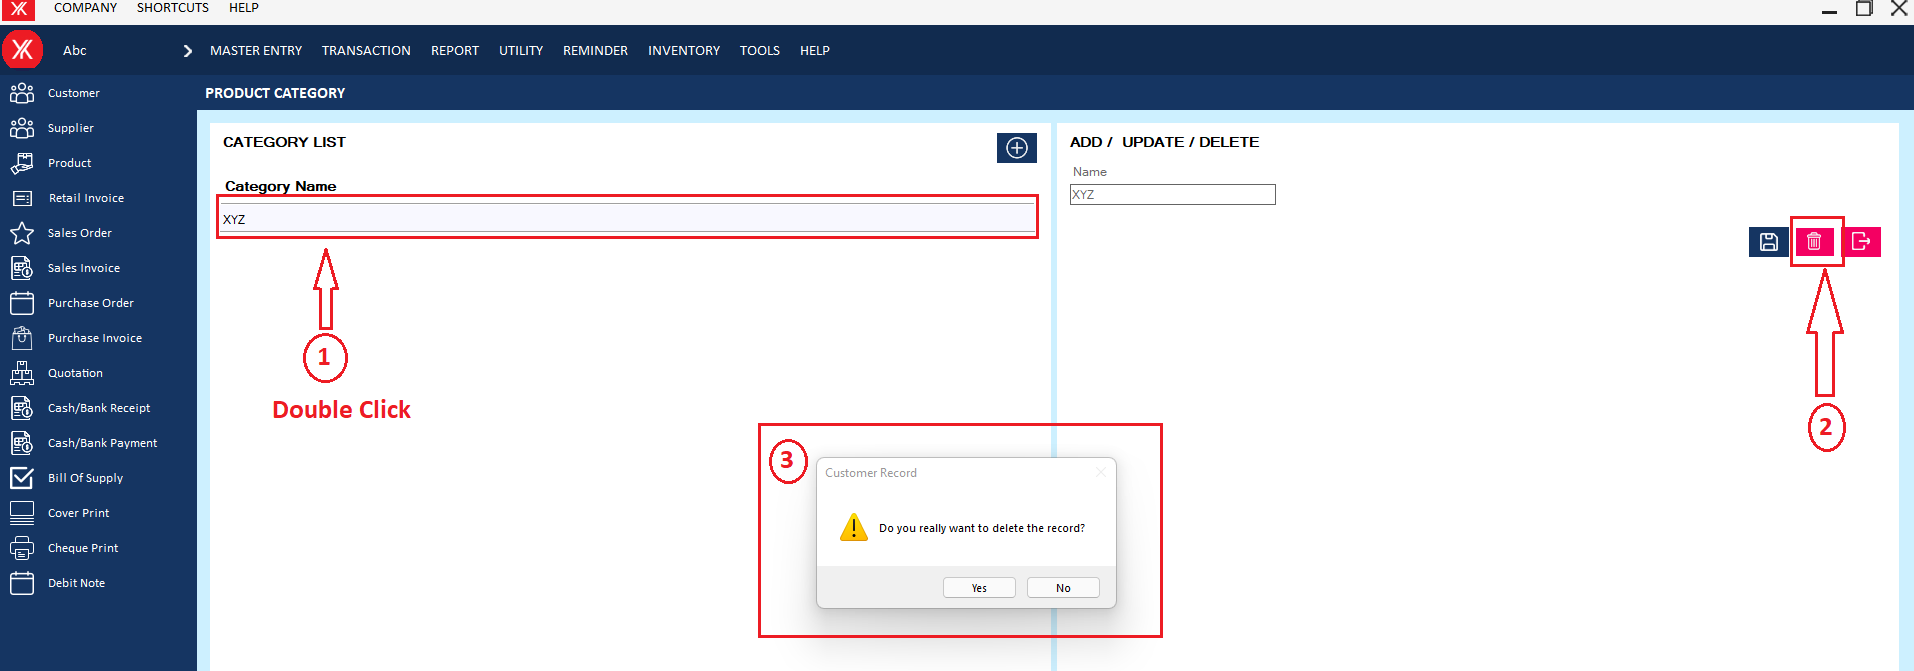
Step 3: If you click on Yes, you will get a confirmation message “successfully deleted”.
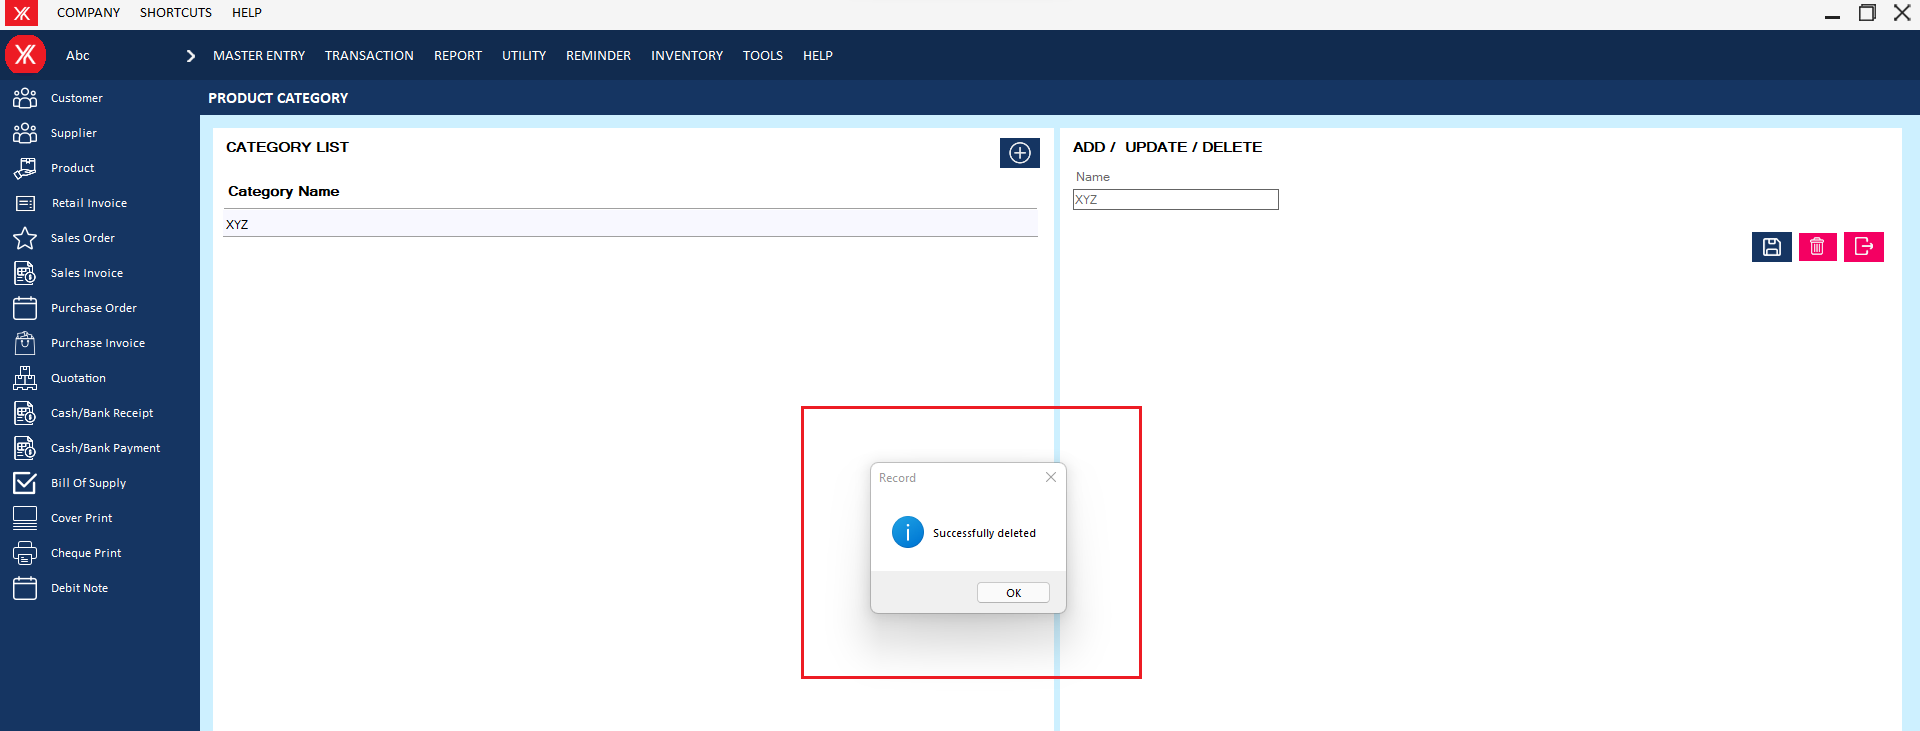
Step 6: The selected product category will be remove from the list
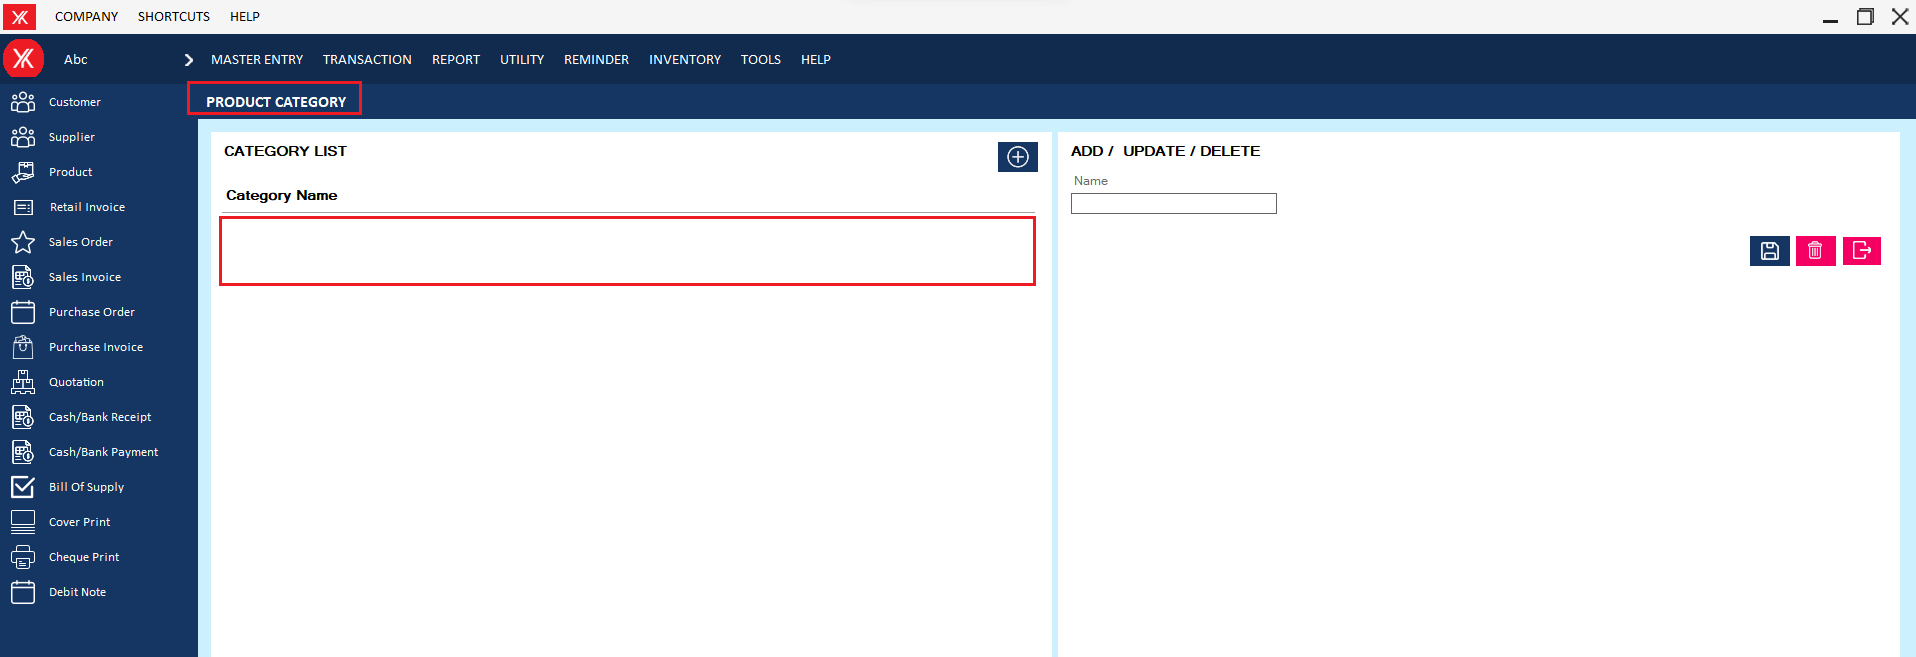
- How to delete Product group for Yourkhata accounting and billing software?
Step 1: Go to Product group, Previously created product details will be listed.
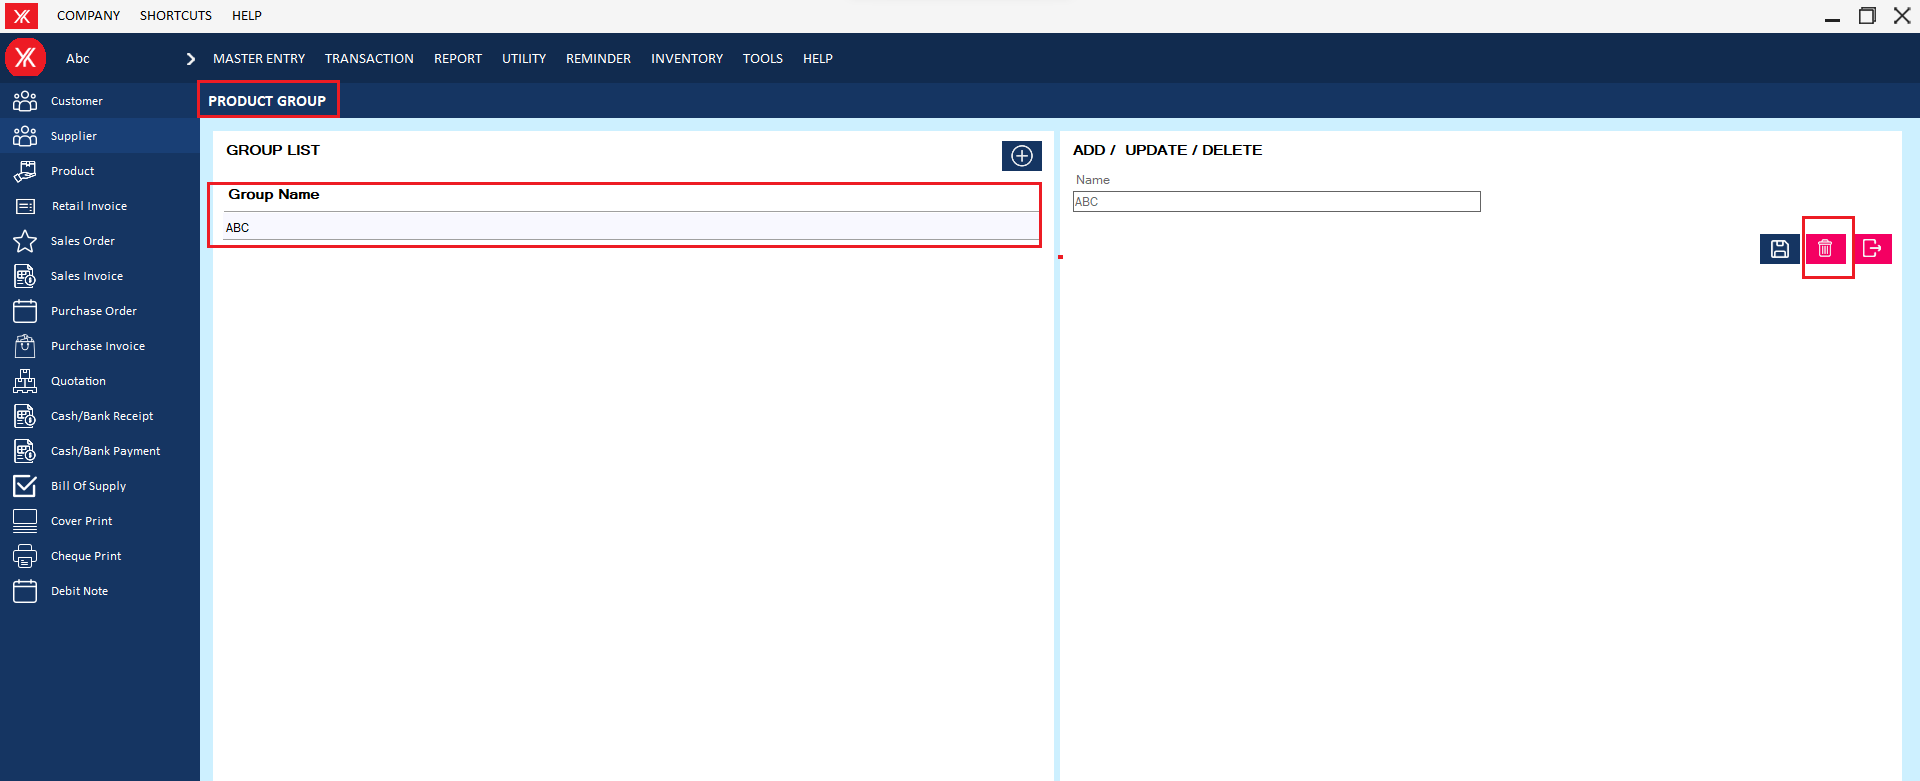
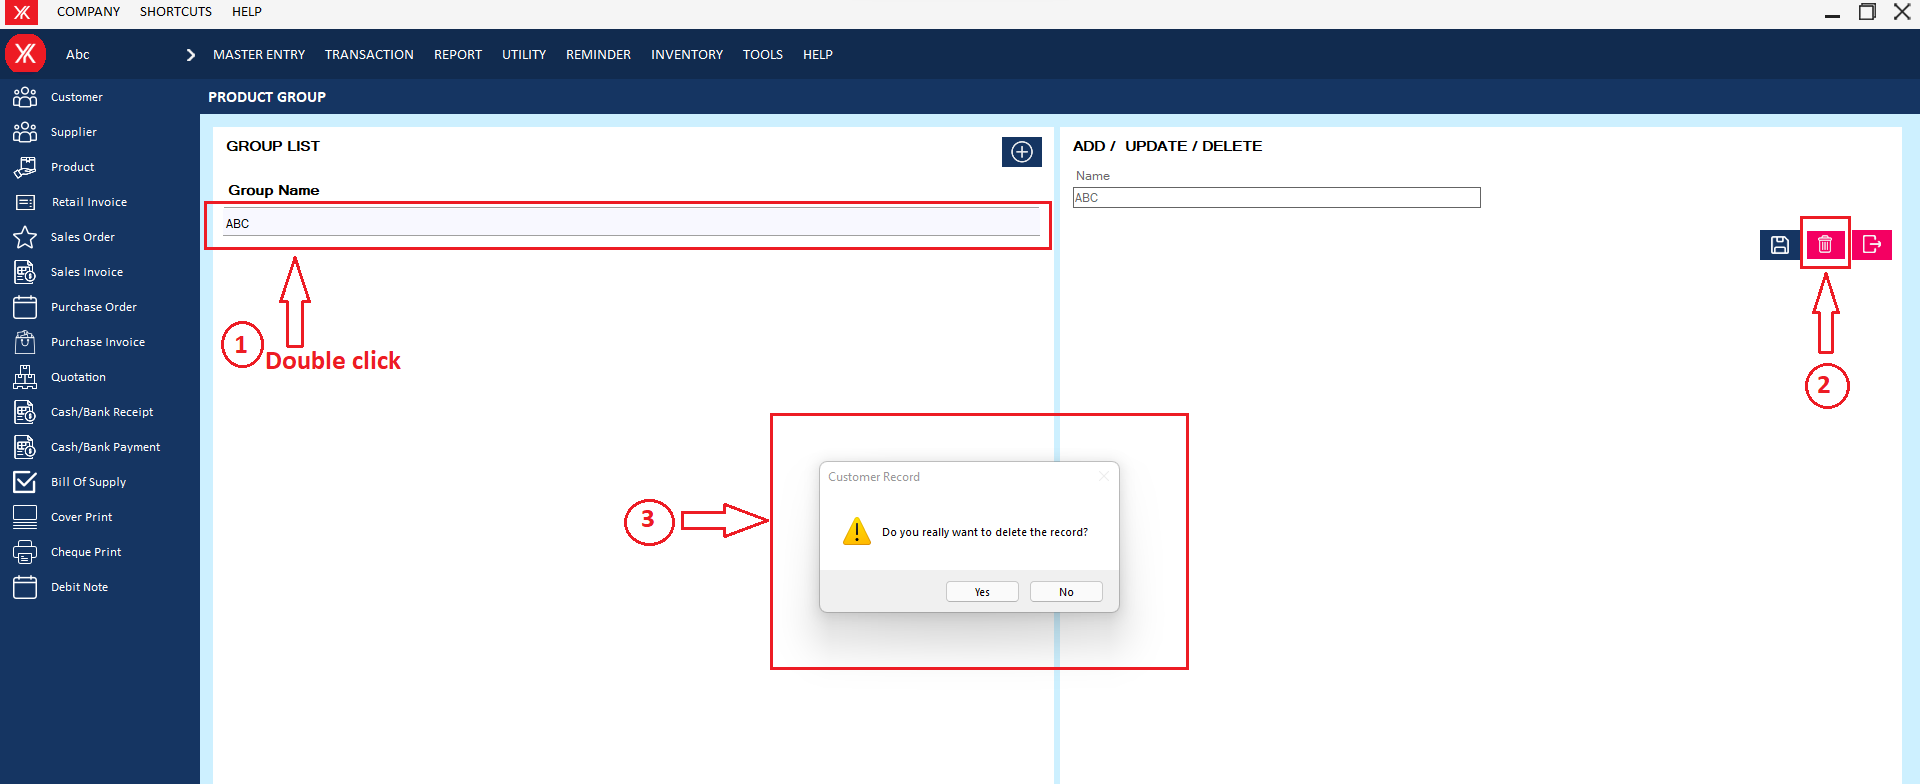
Step 2: Select & double click on product group, You will get a message – “Do you really want to delete the record?”
Step 3: If you click on Yes, you will get a confirmation message “successfully deleted”.
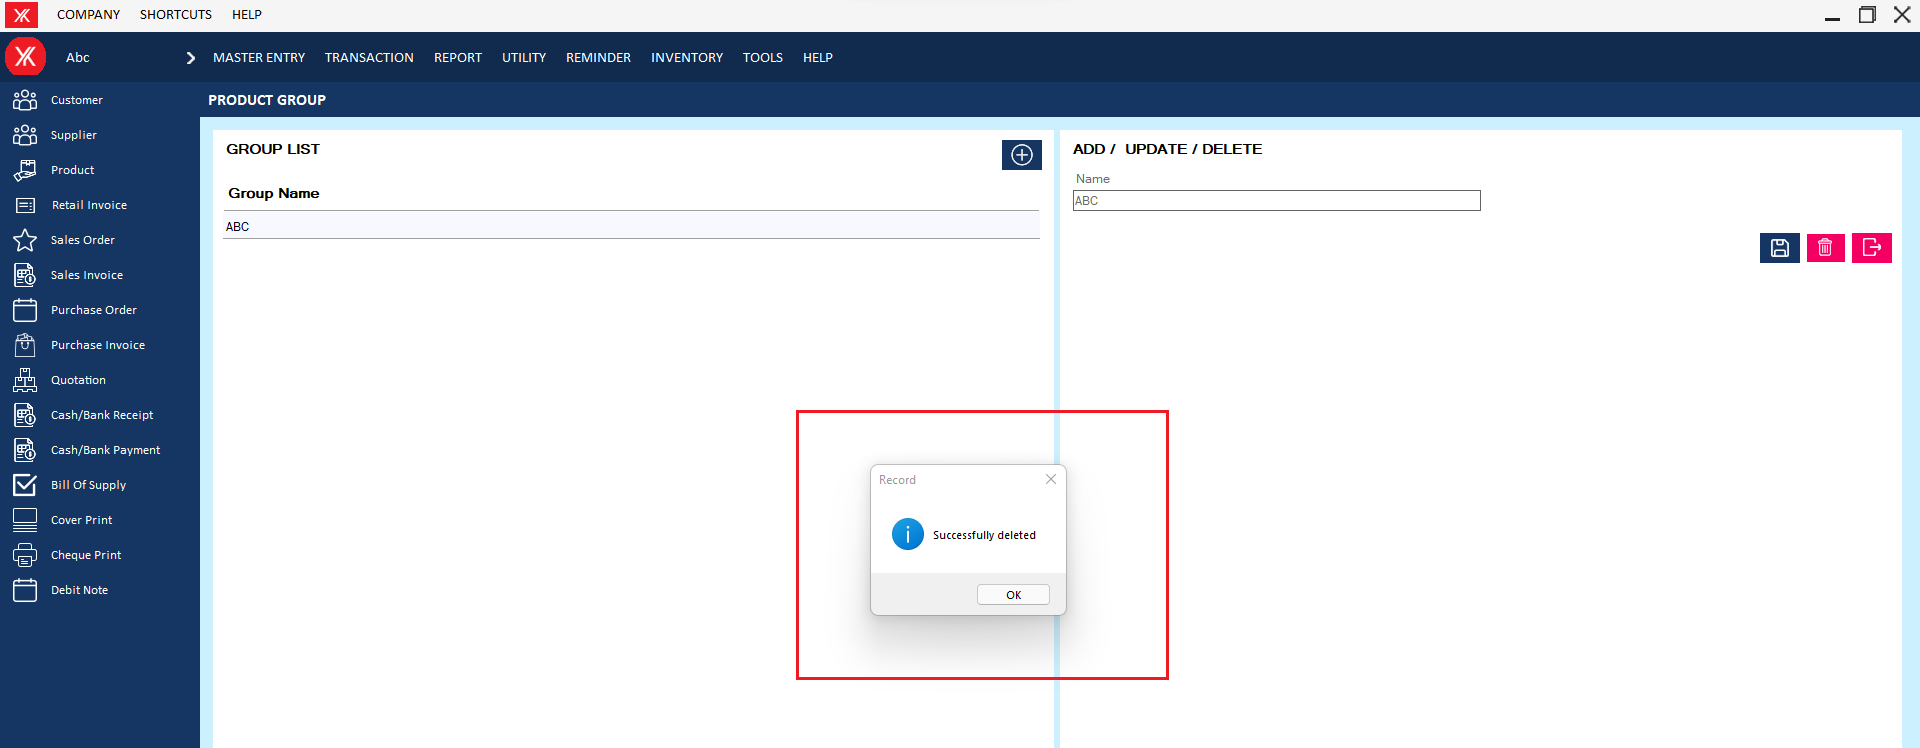
Step 6: The selected product group will be remove from the list
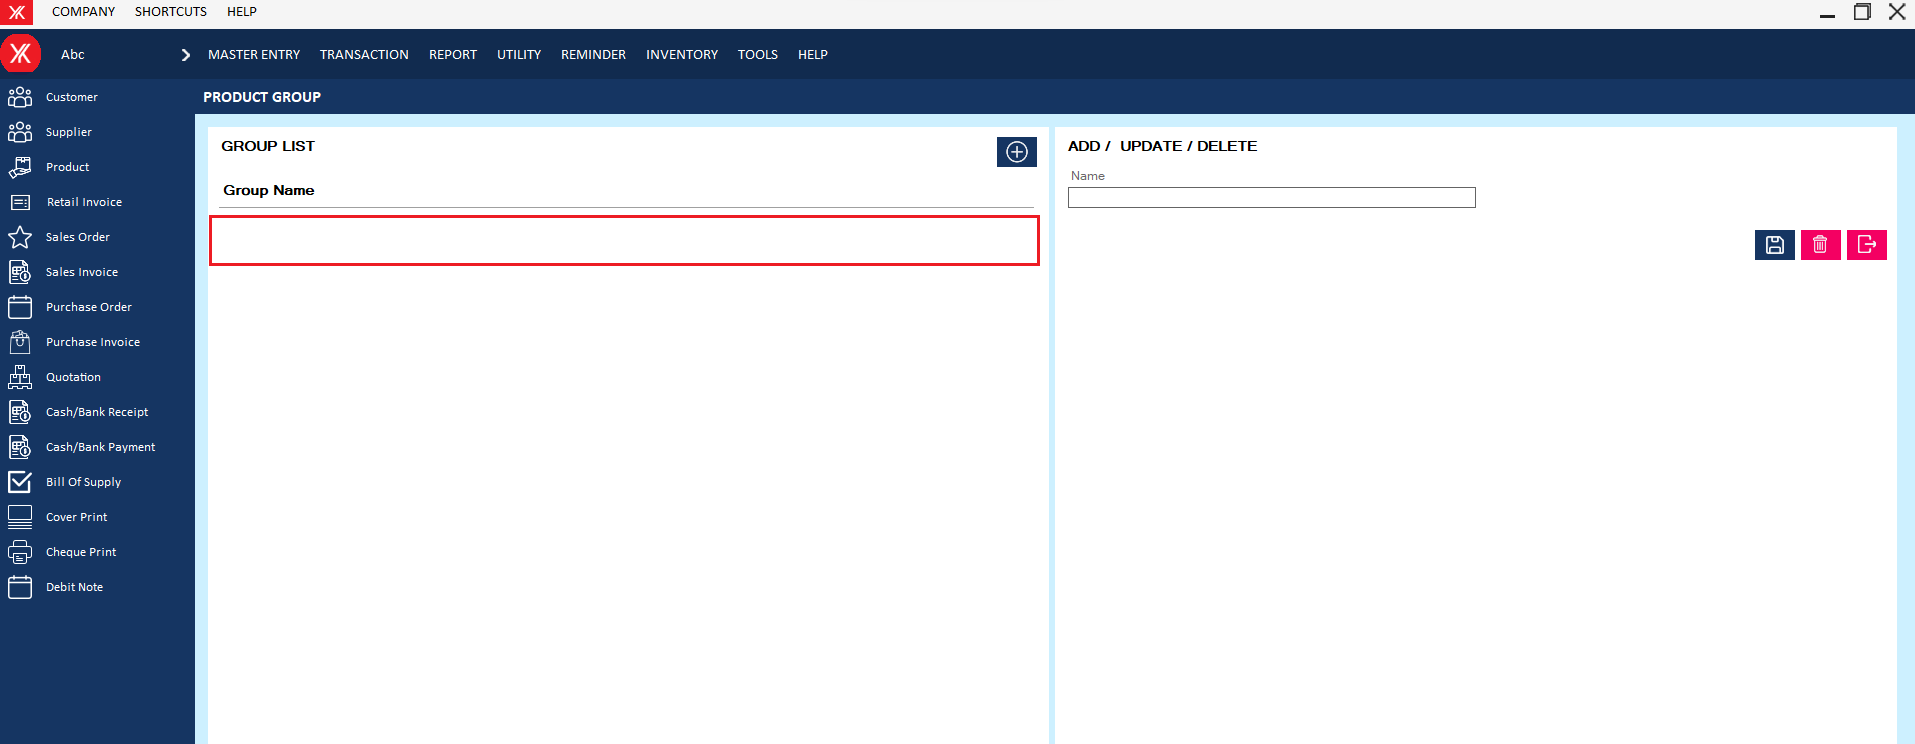
- How to delete Product for Yourkhata accounting and billing software?
Step 1: Go to Product > Previously created product details will be listed & double click on product details.
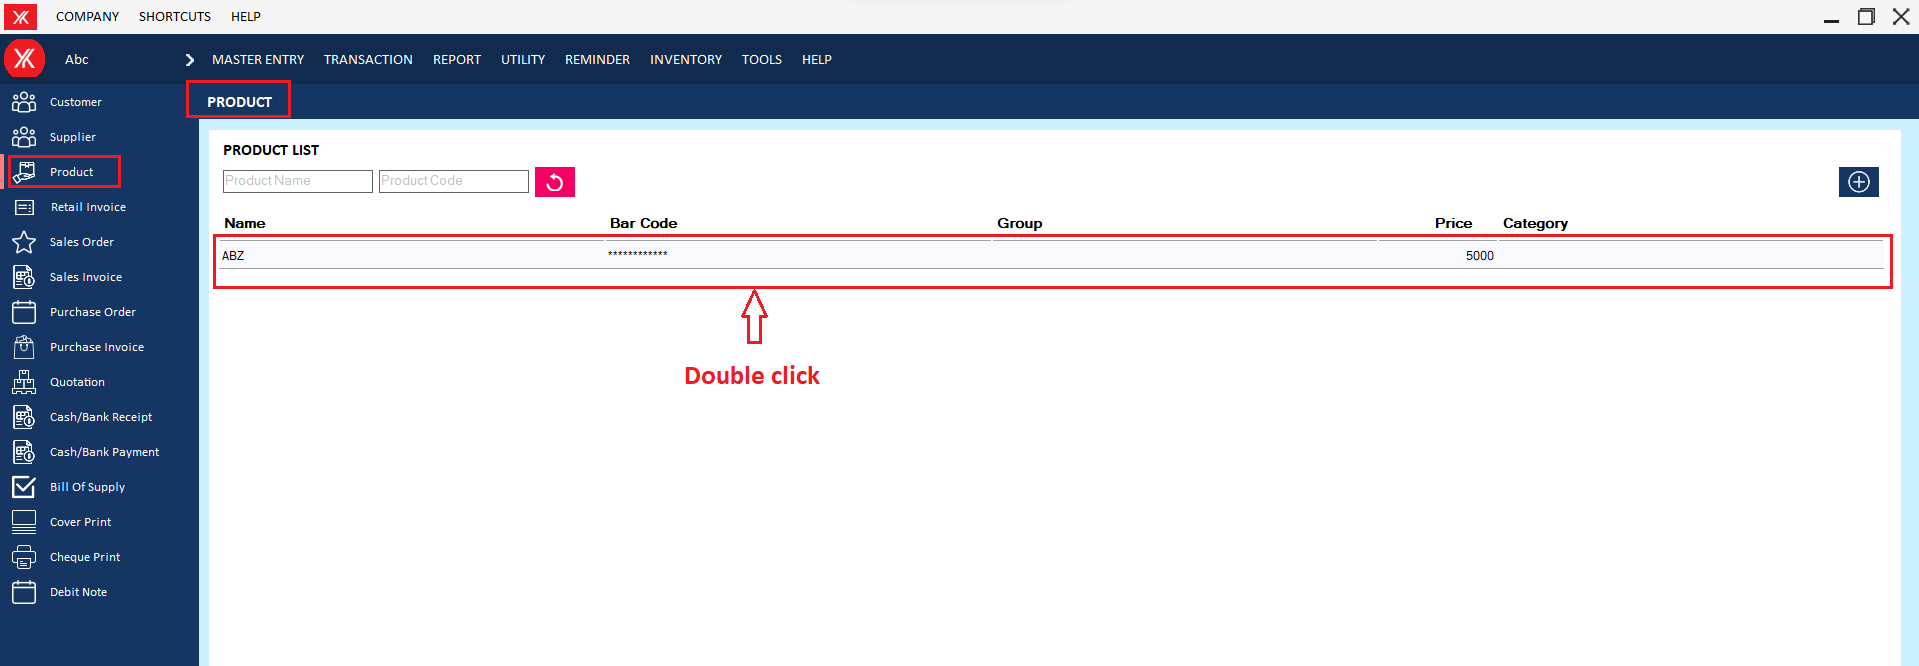
Step 2: You will get a message “You want to view to edit record?”

Step 3: Go to Action > Delete
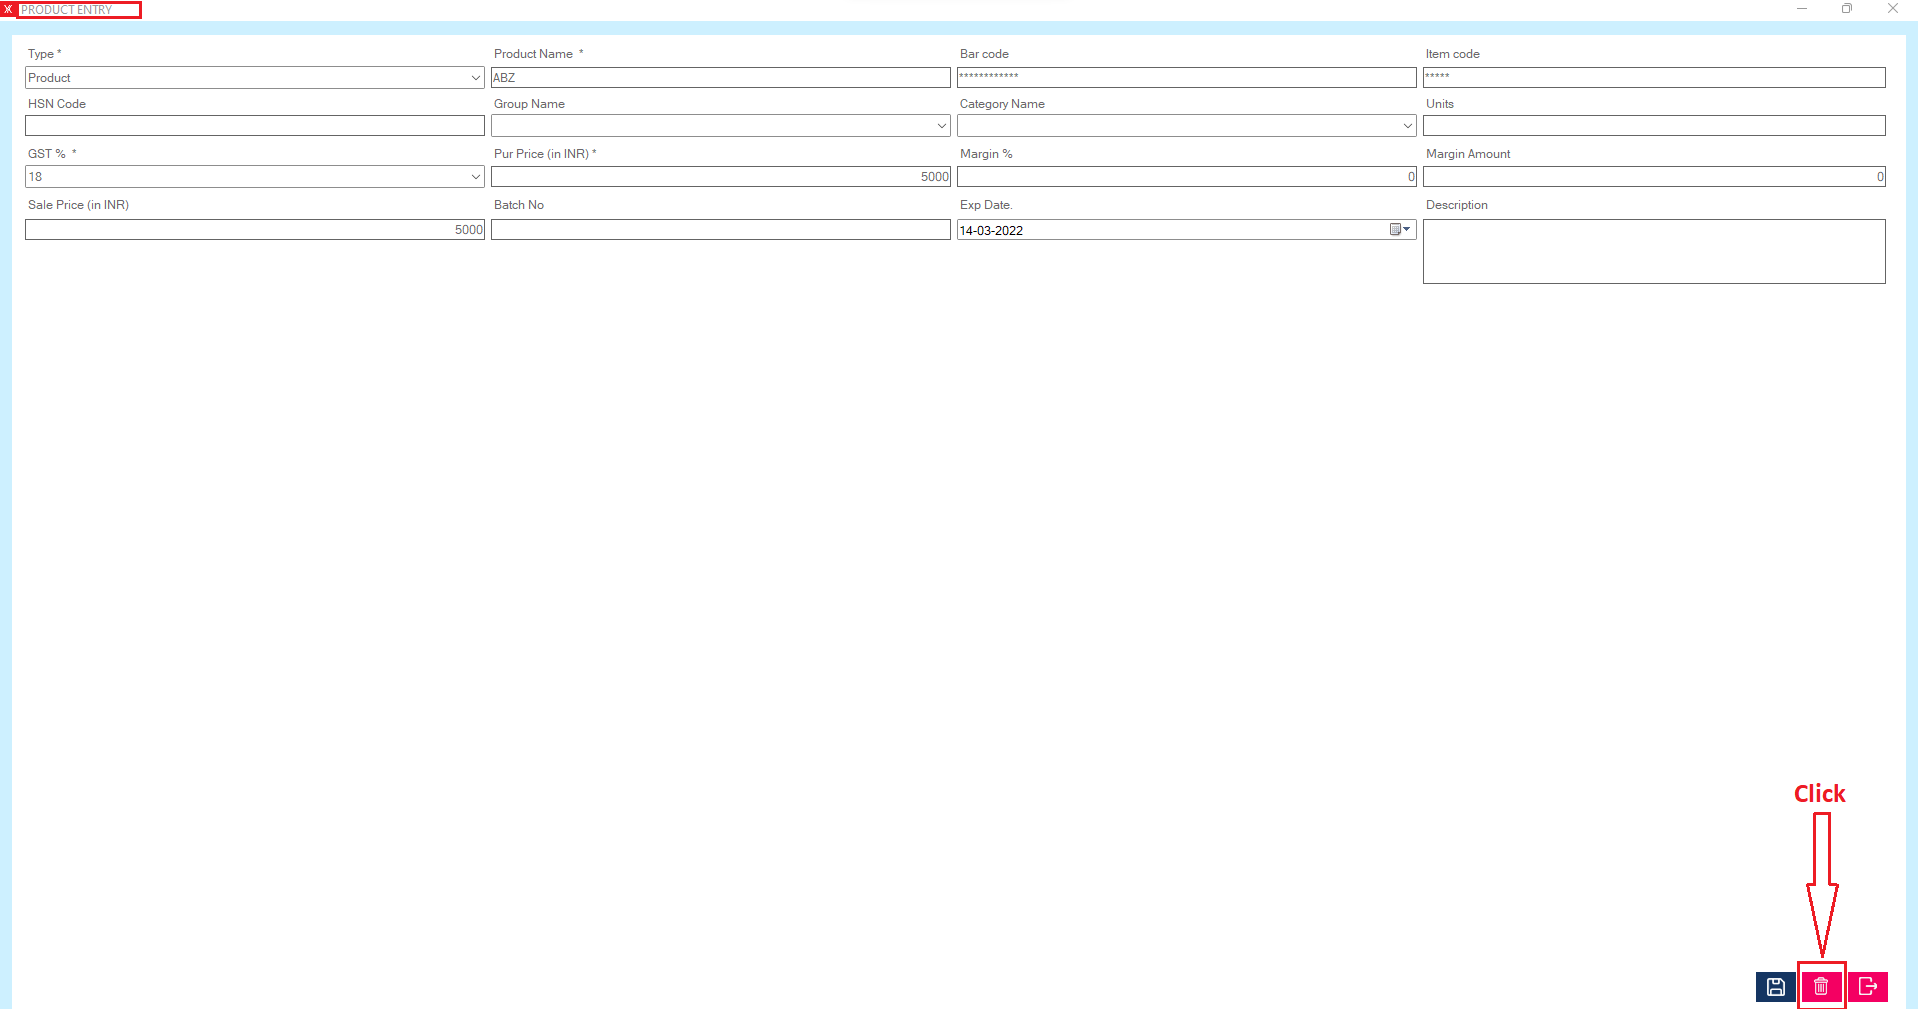
Step 4: You will get a message – “Do you really want to delete the record?”
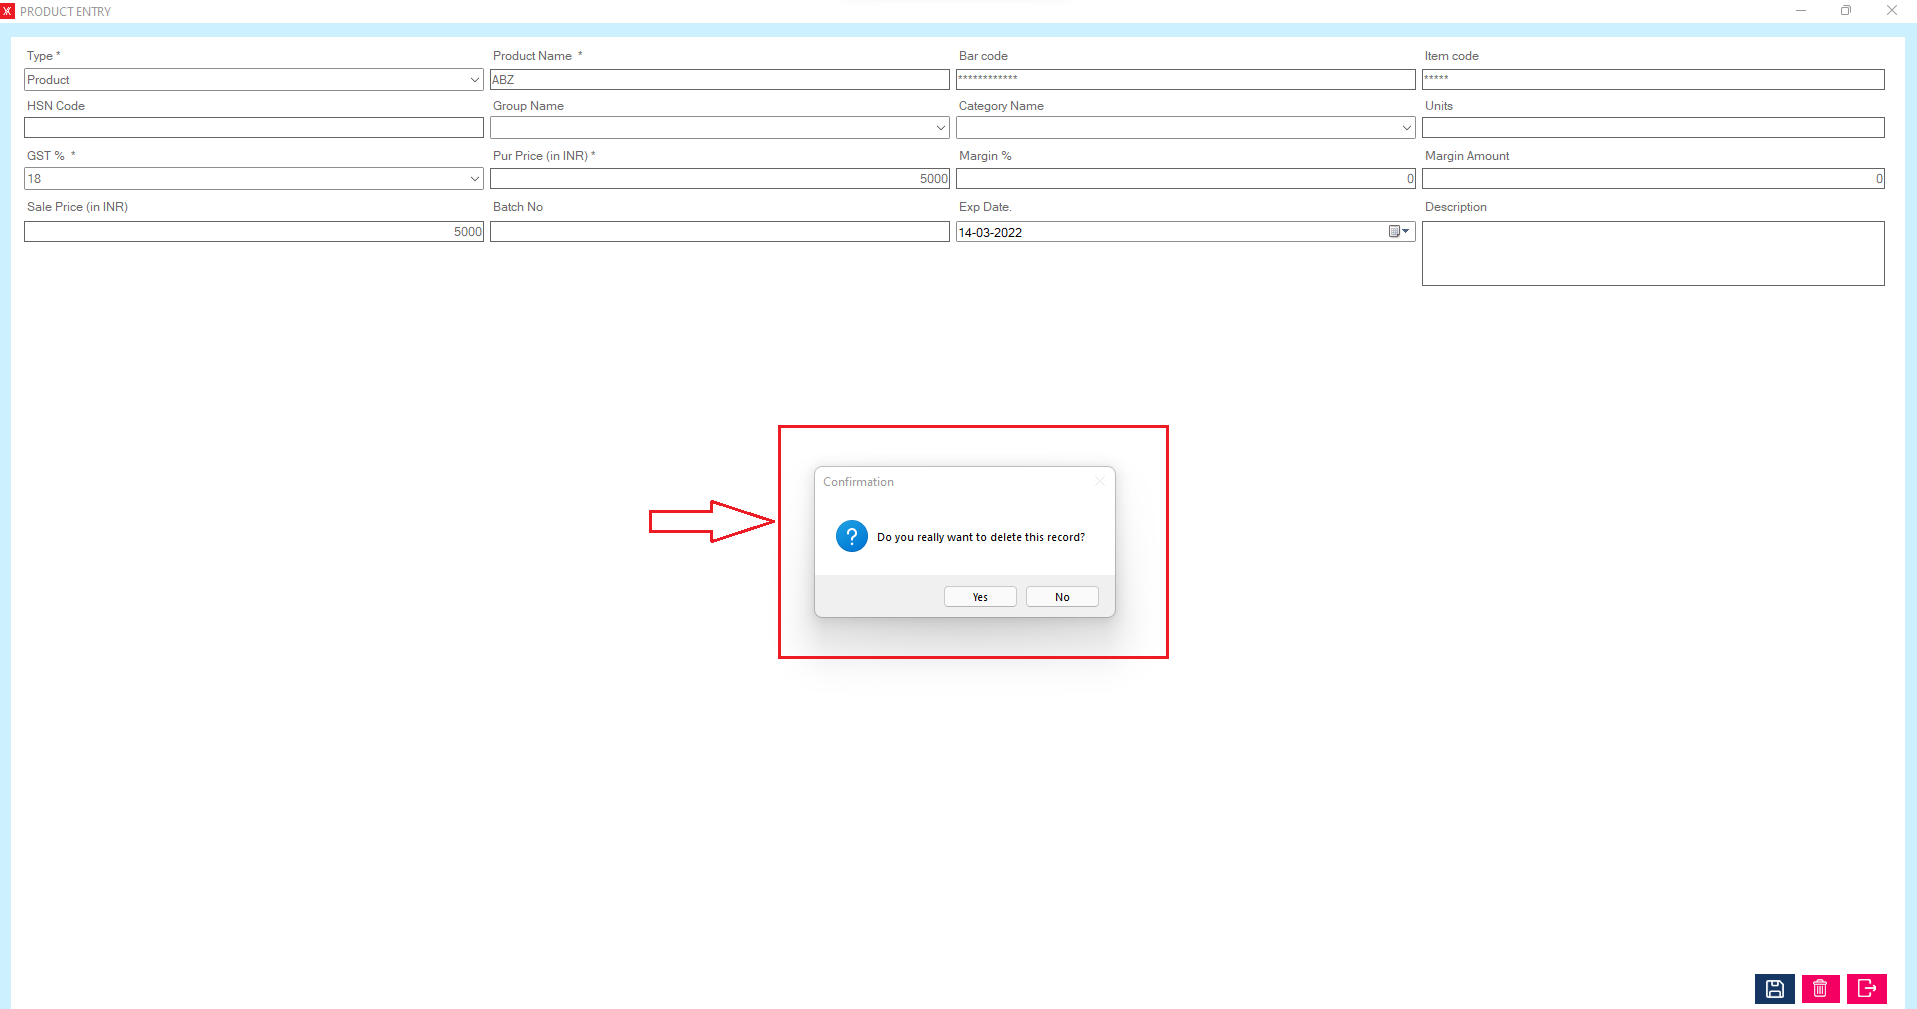
Step 5:If you click on Yes, you will get a confirmation message “successfully deleted”.
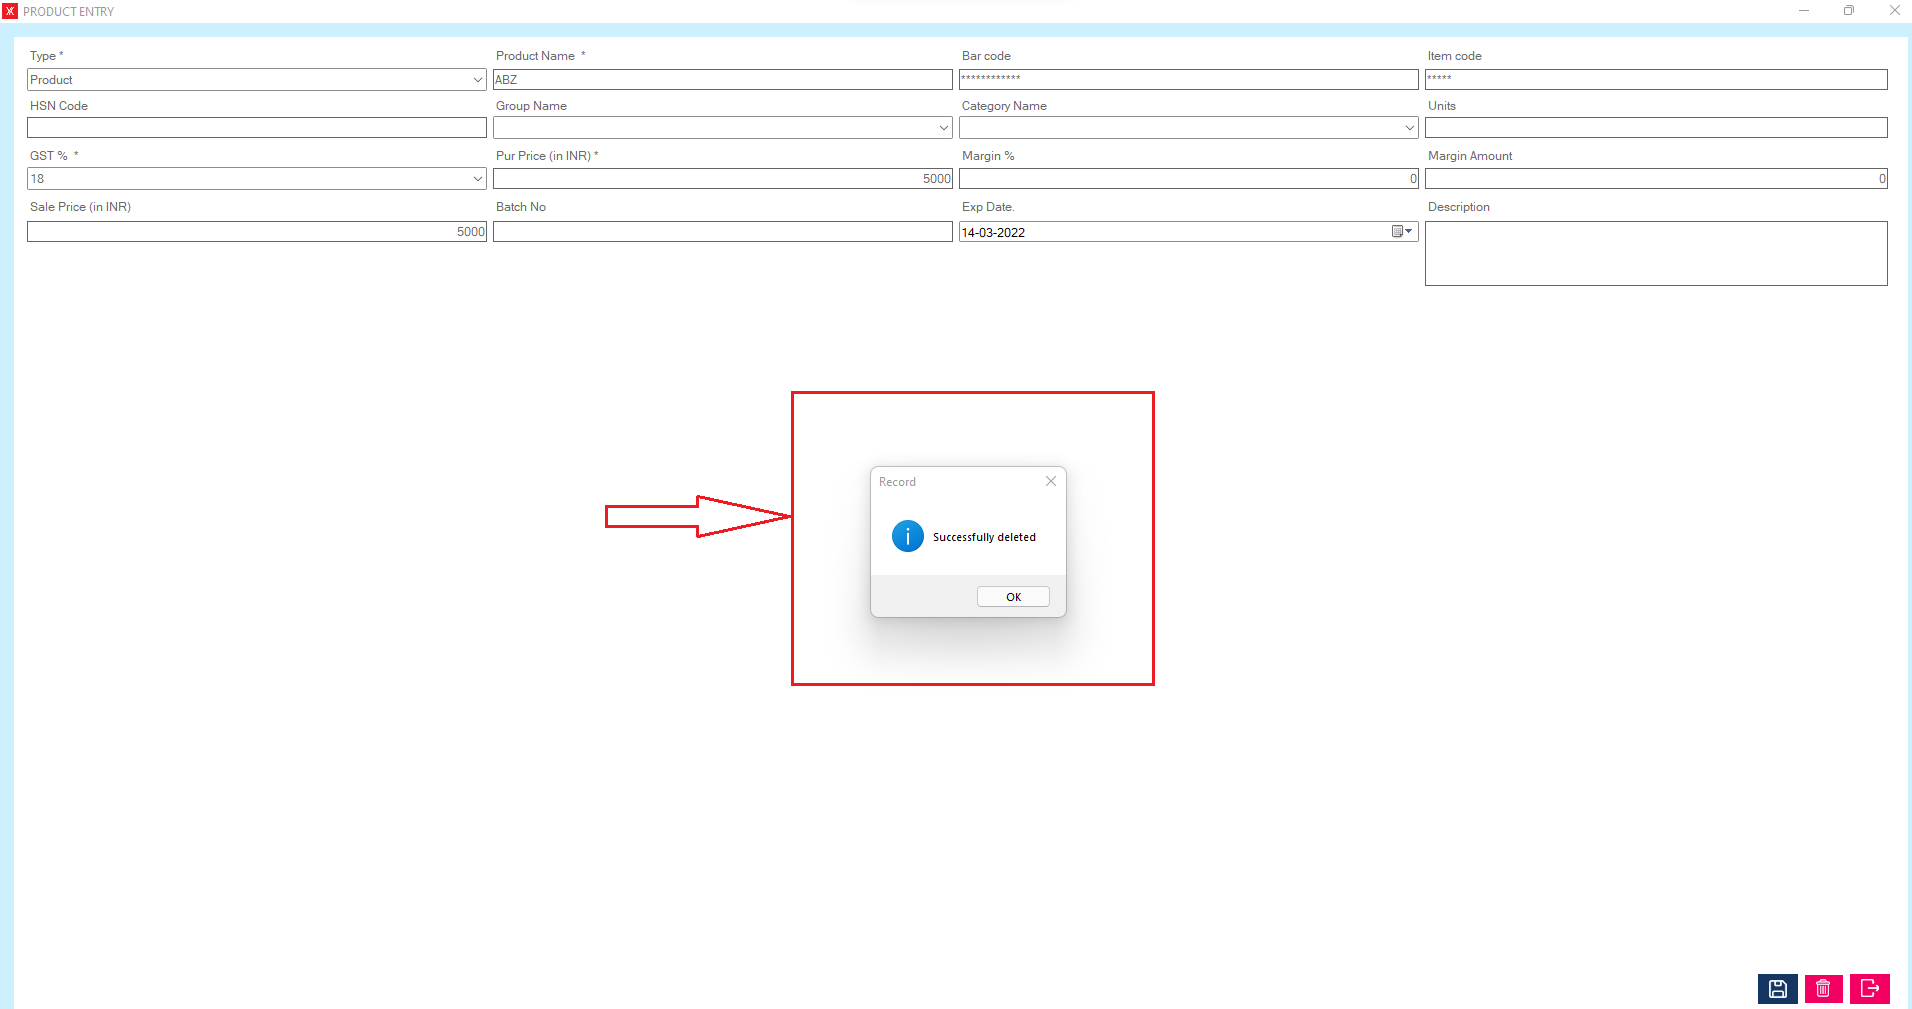
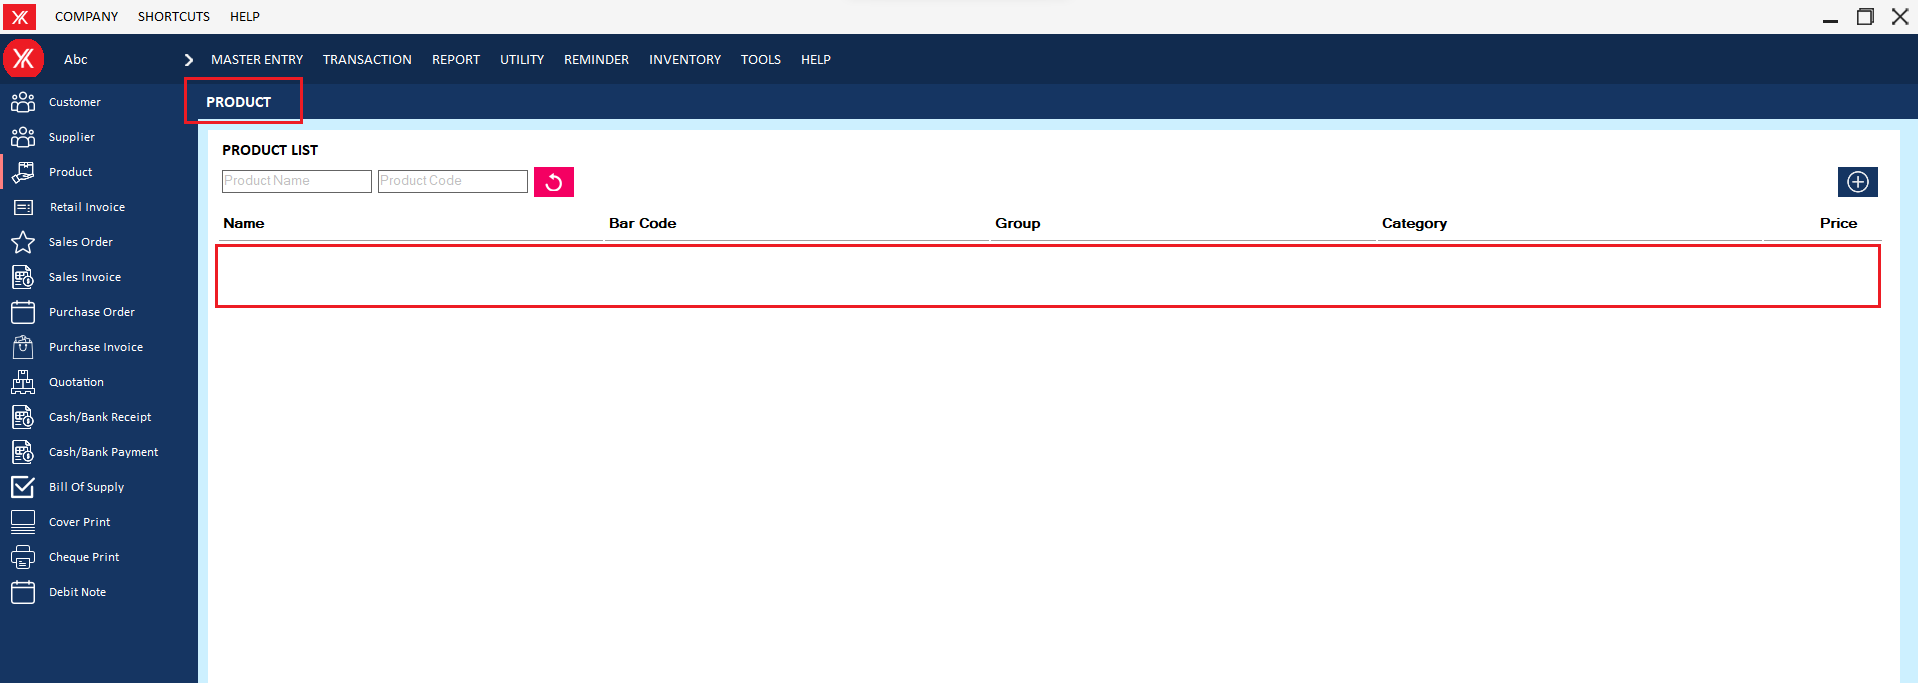
Step 6: The selected product will remove from the list
- How to delete Sales order for Yourkhata accounting and billing software?
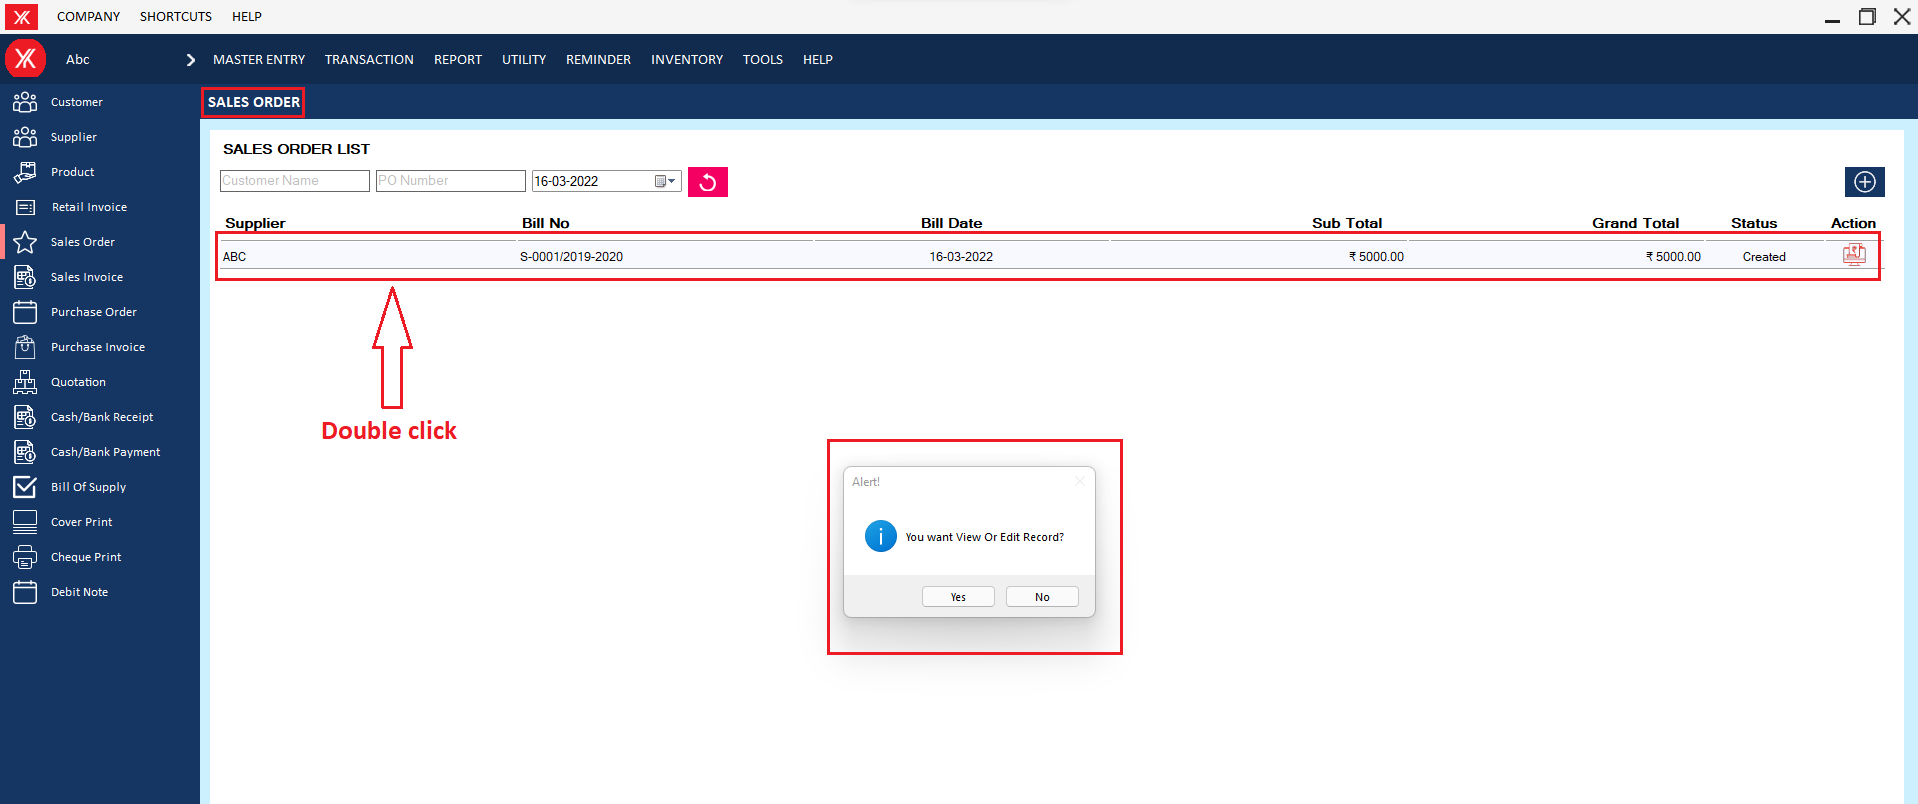
Step 1: Go to sales order, Previously created product details will be listed > double click on record > you will get a message , you want to view or edit record?
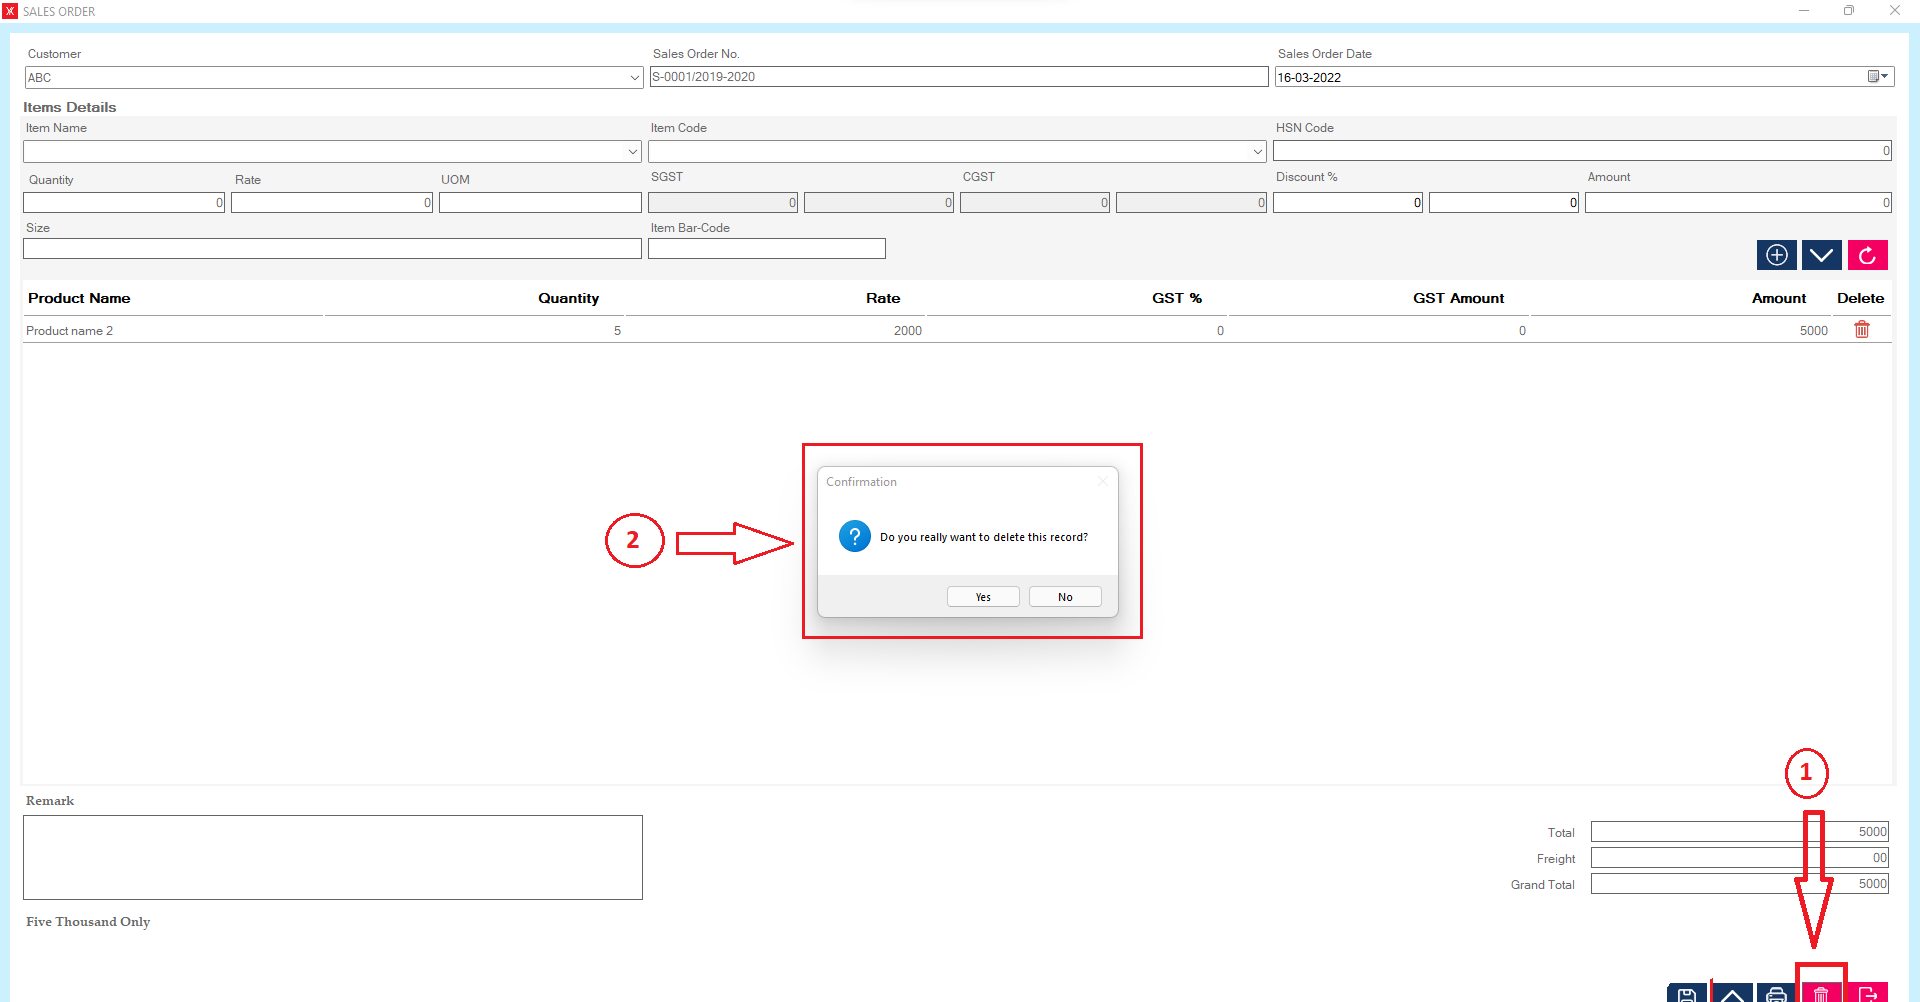
Step 2: click on delete > you will get the message “ Do you really want to delete this record?”
Step 3: If you click on Yes, you will get a confirmation message “successfully deleted”.
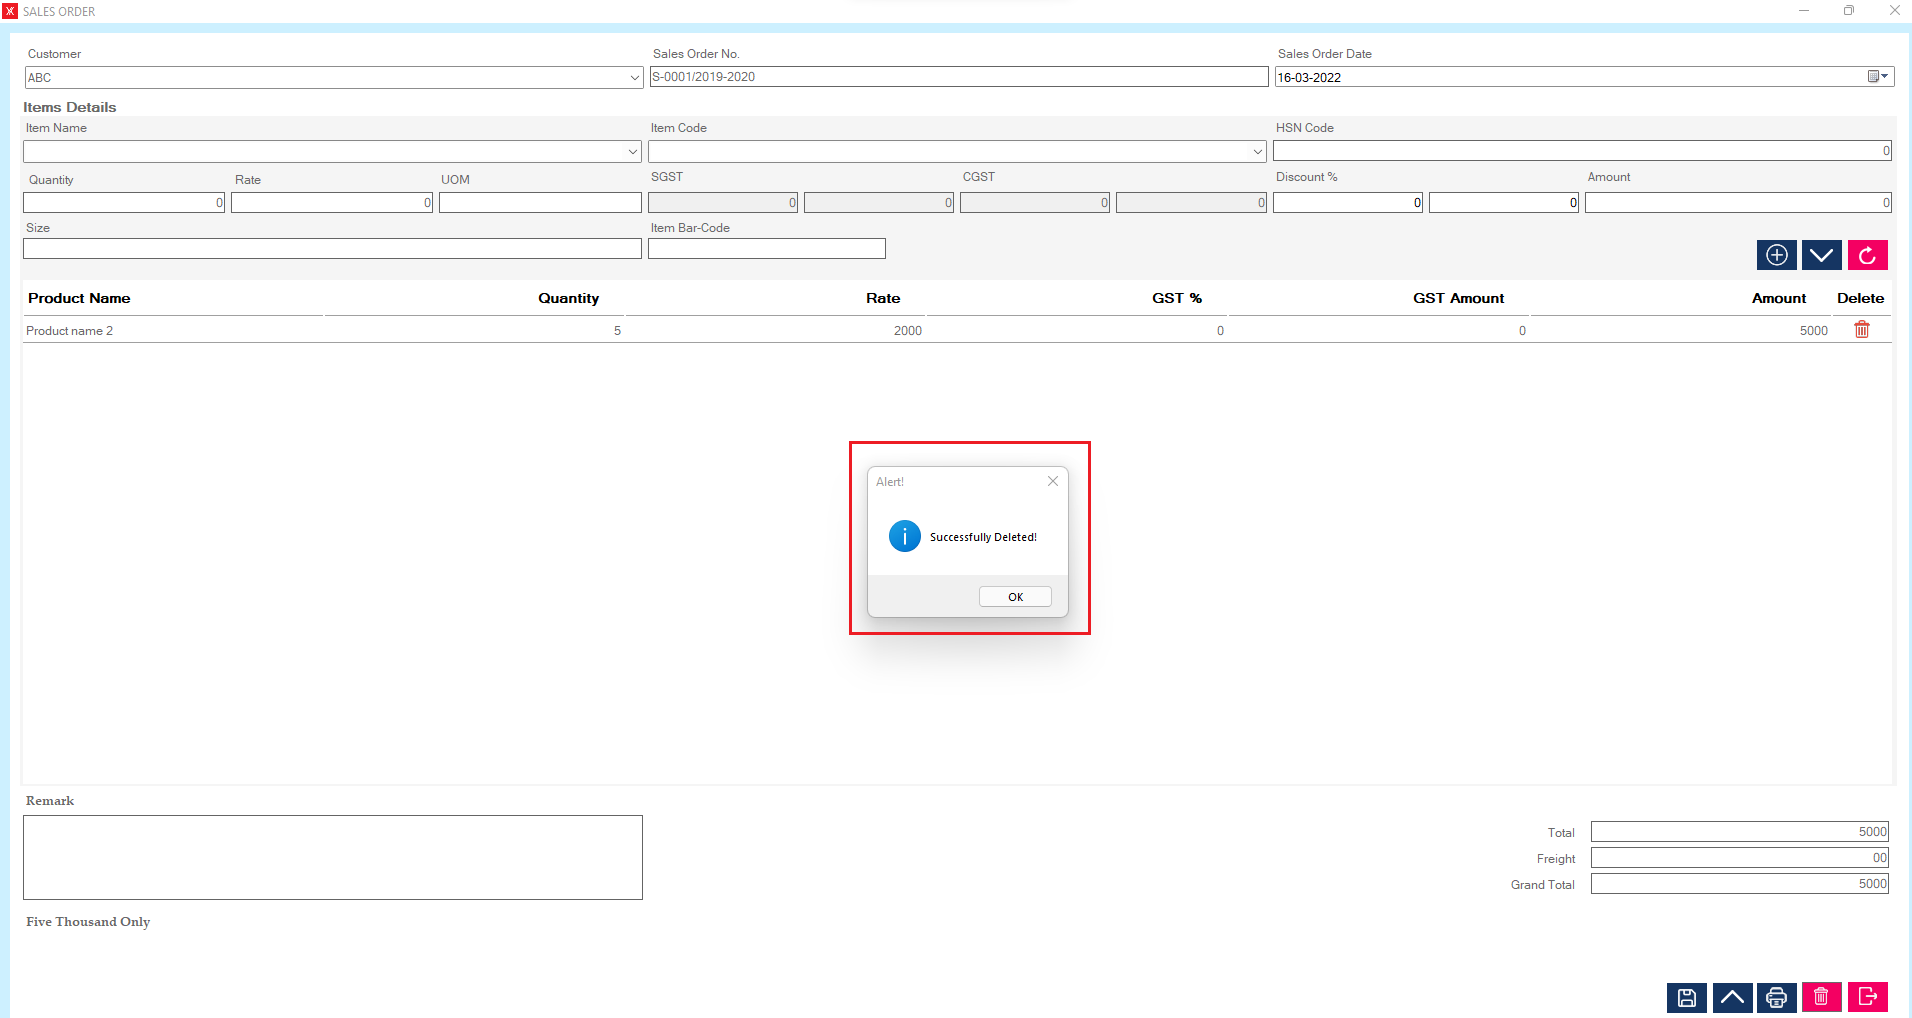
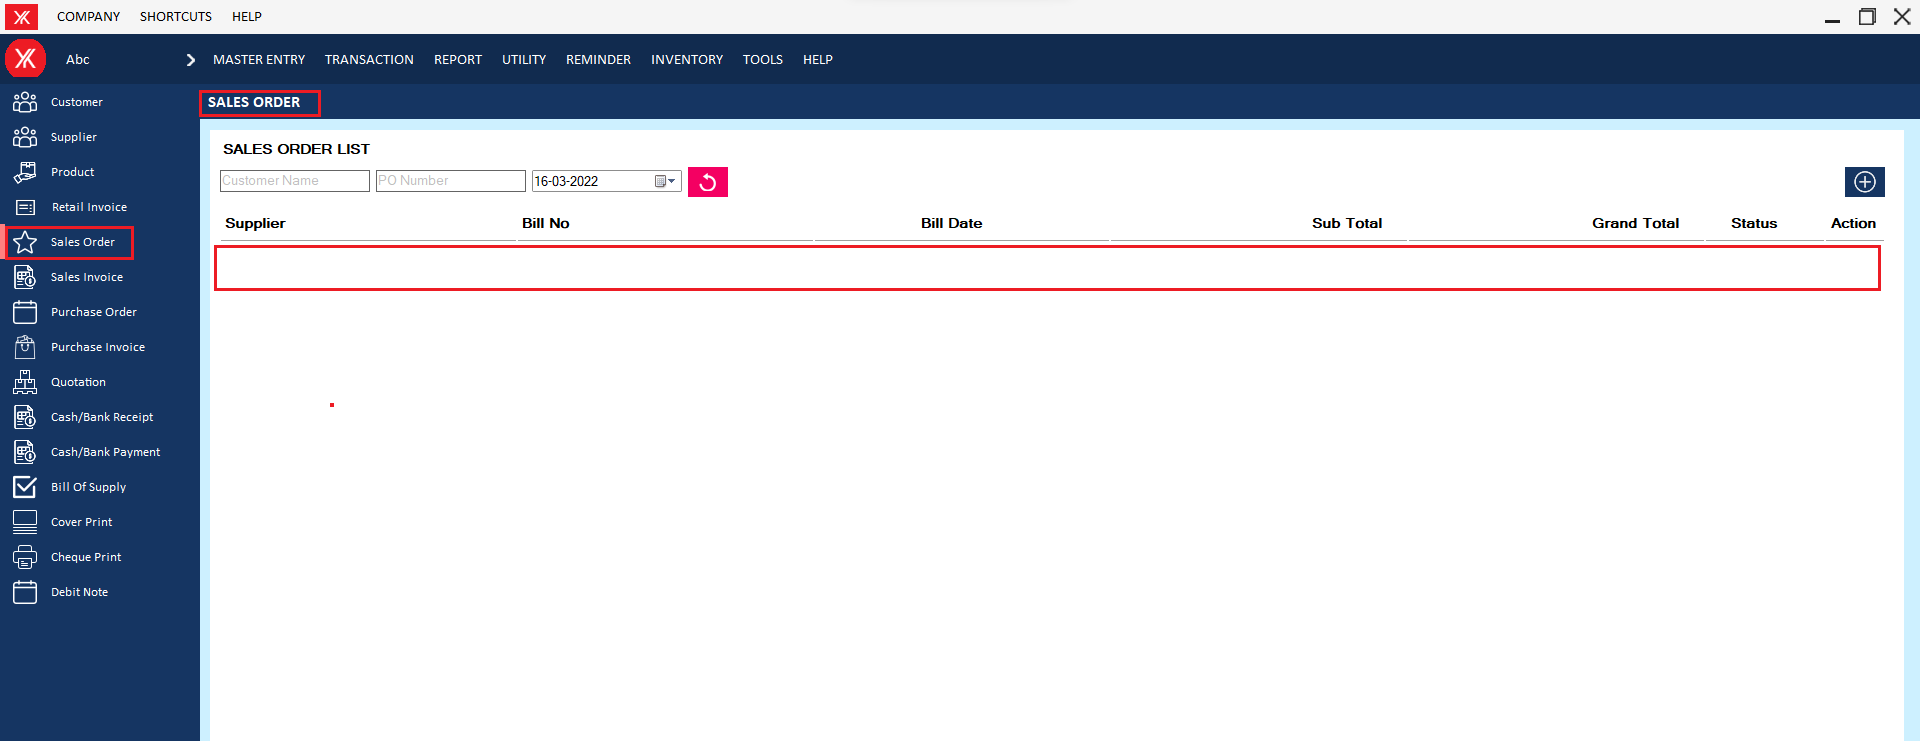
Step 6: The selected sales order will be delete from the list
- How to delete Supplier for Yourkhata accounting and billing software?
Step 1: Go to supplier & Previously created supplier details will be listed & double click on product details.

Step 2: You will get a message “You want to view to edit record?”
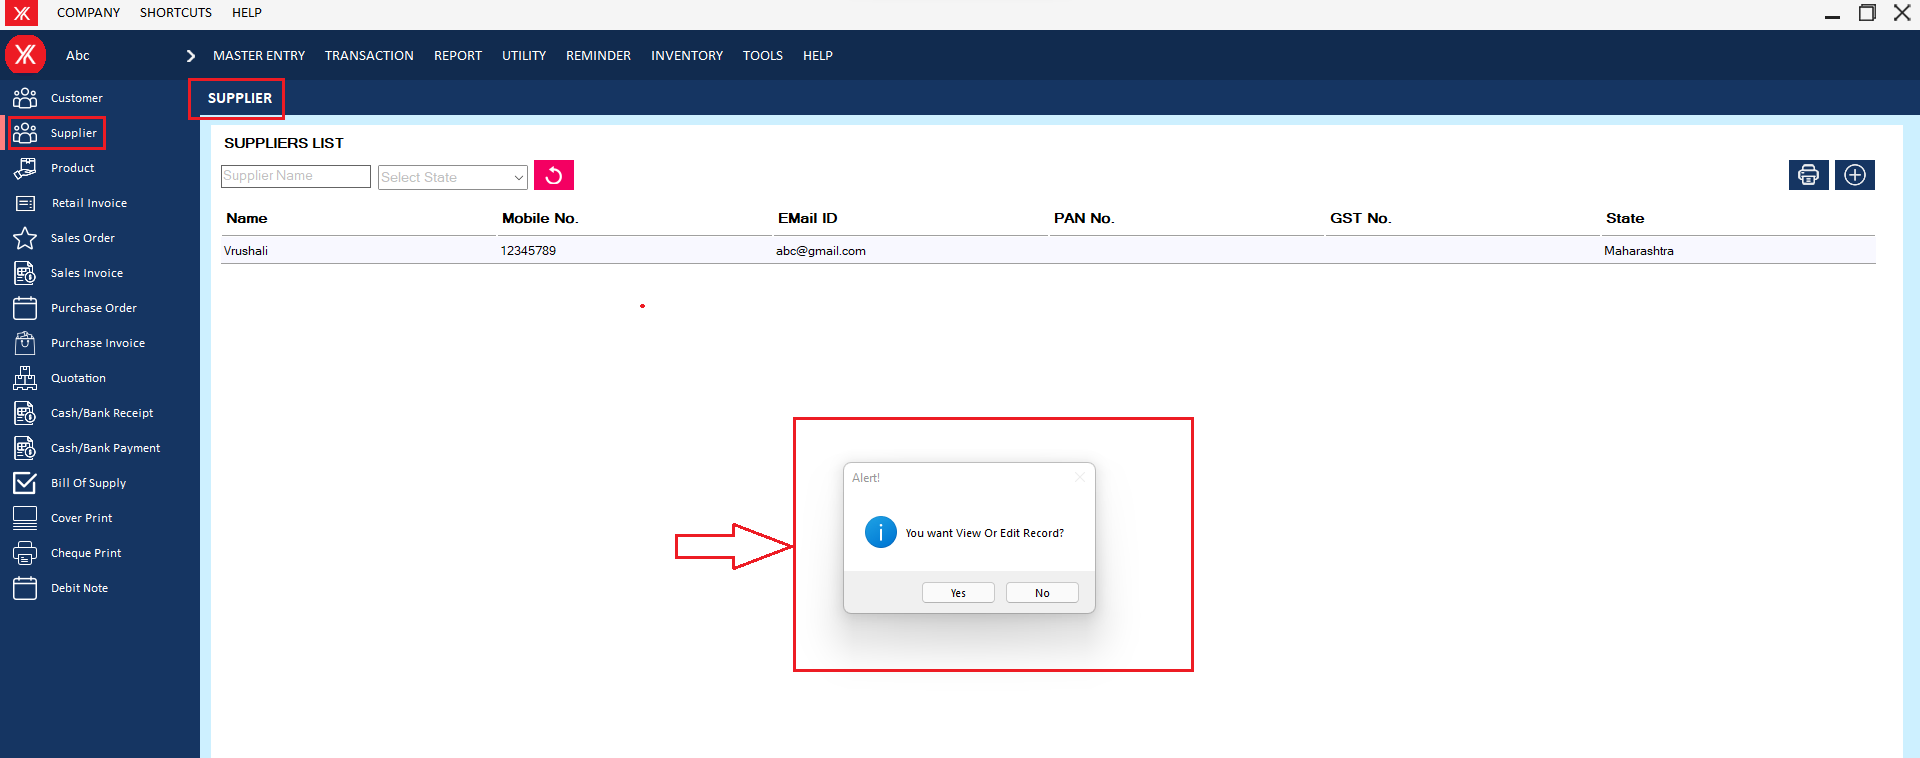
Step 3: Go to Action > Delete
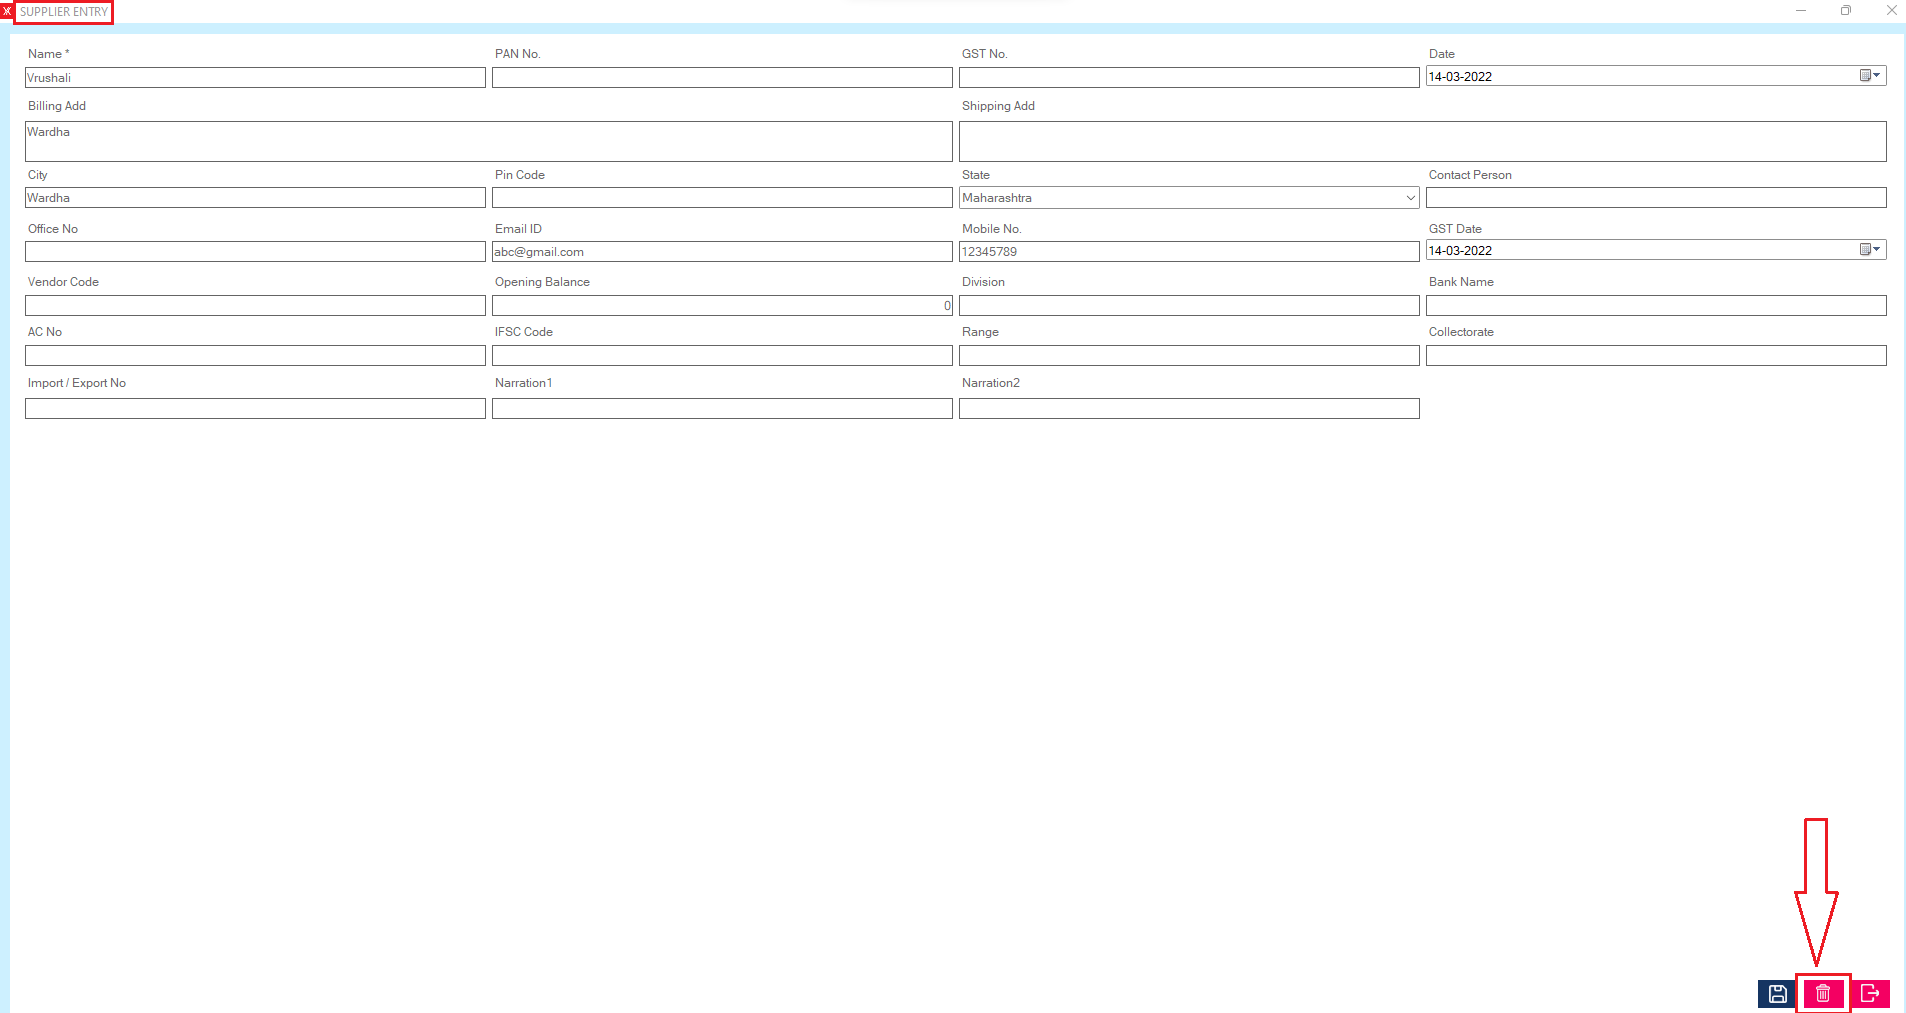
Step 4: You will get a message – “Do you really want to delete the record?”
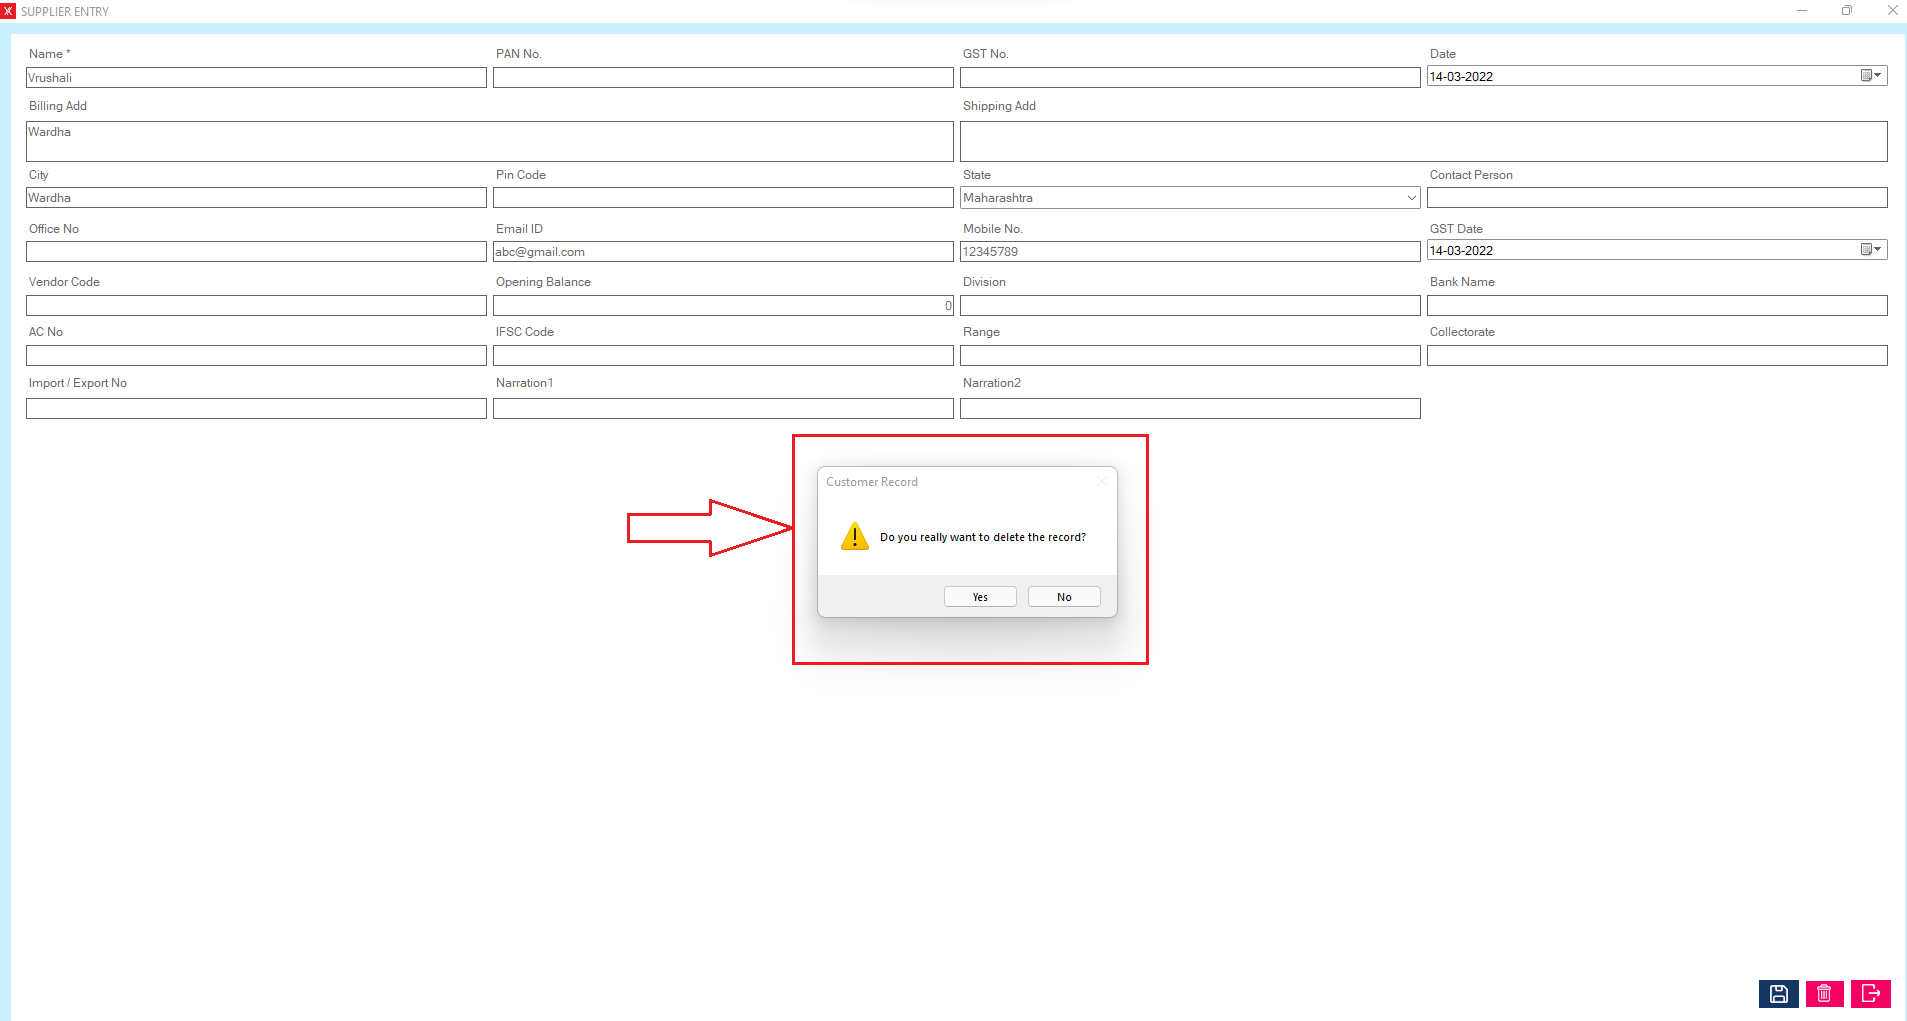
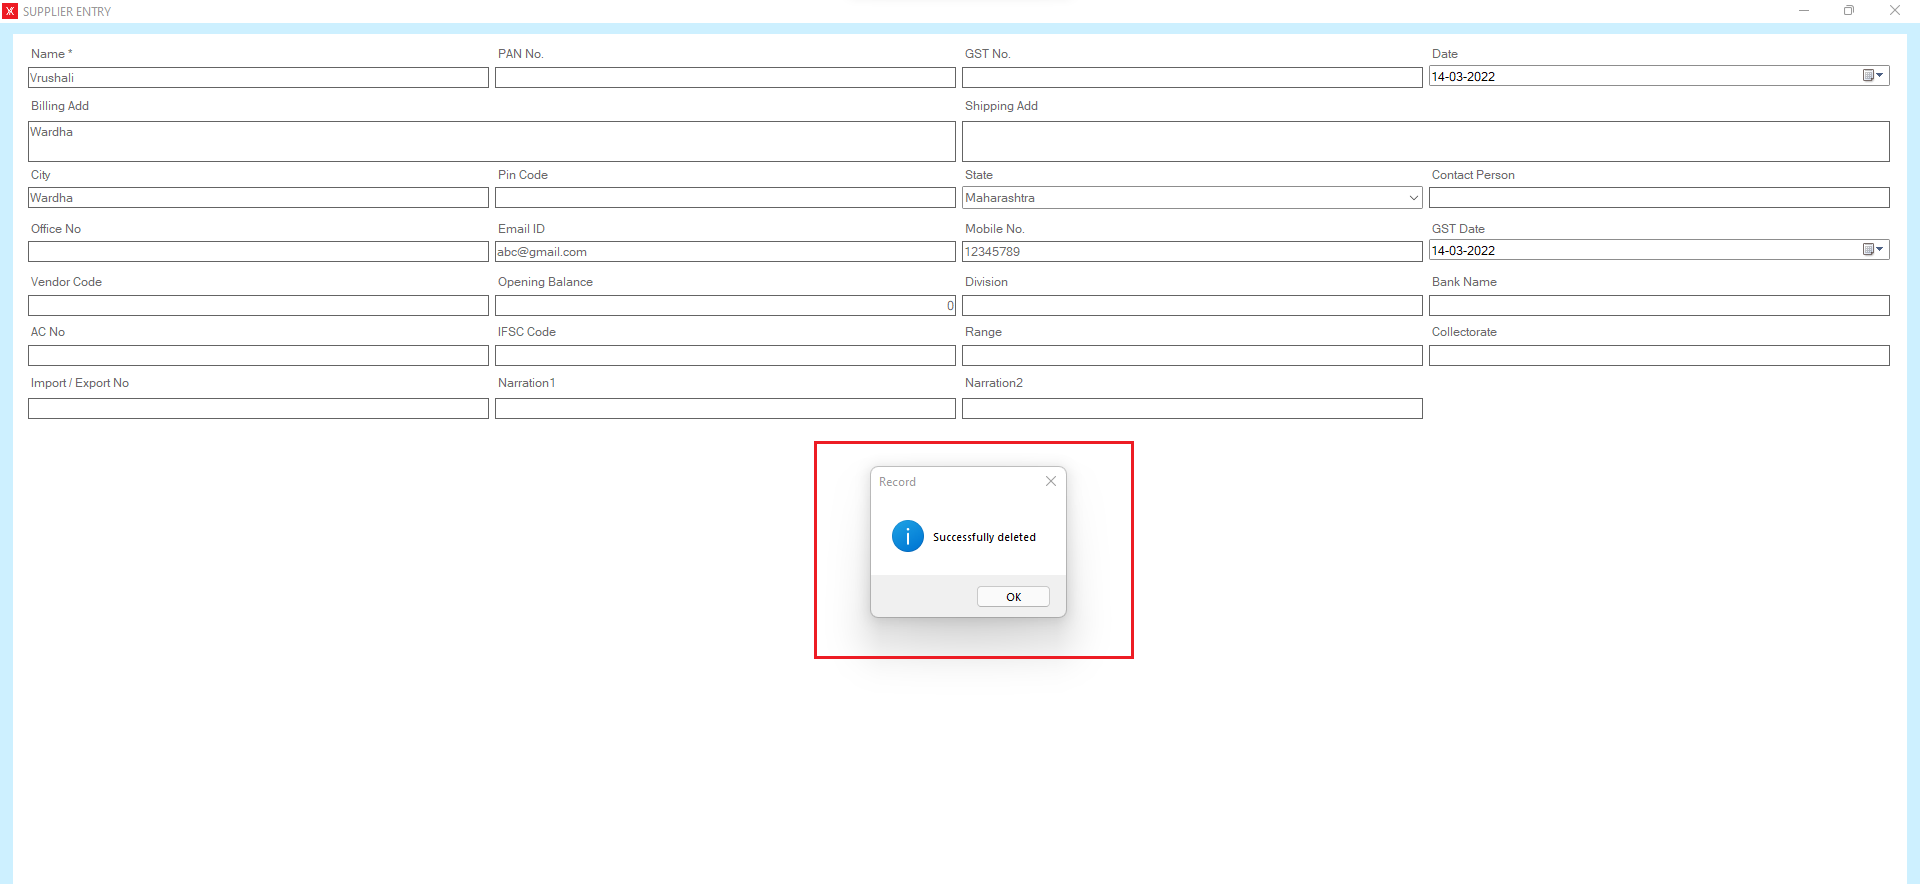
Step 5:If you click on Yes, you will get a confirmation message “successfully deleted”.
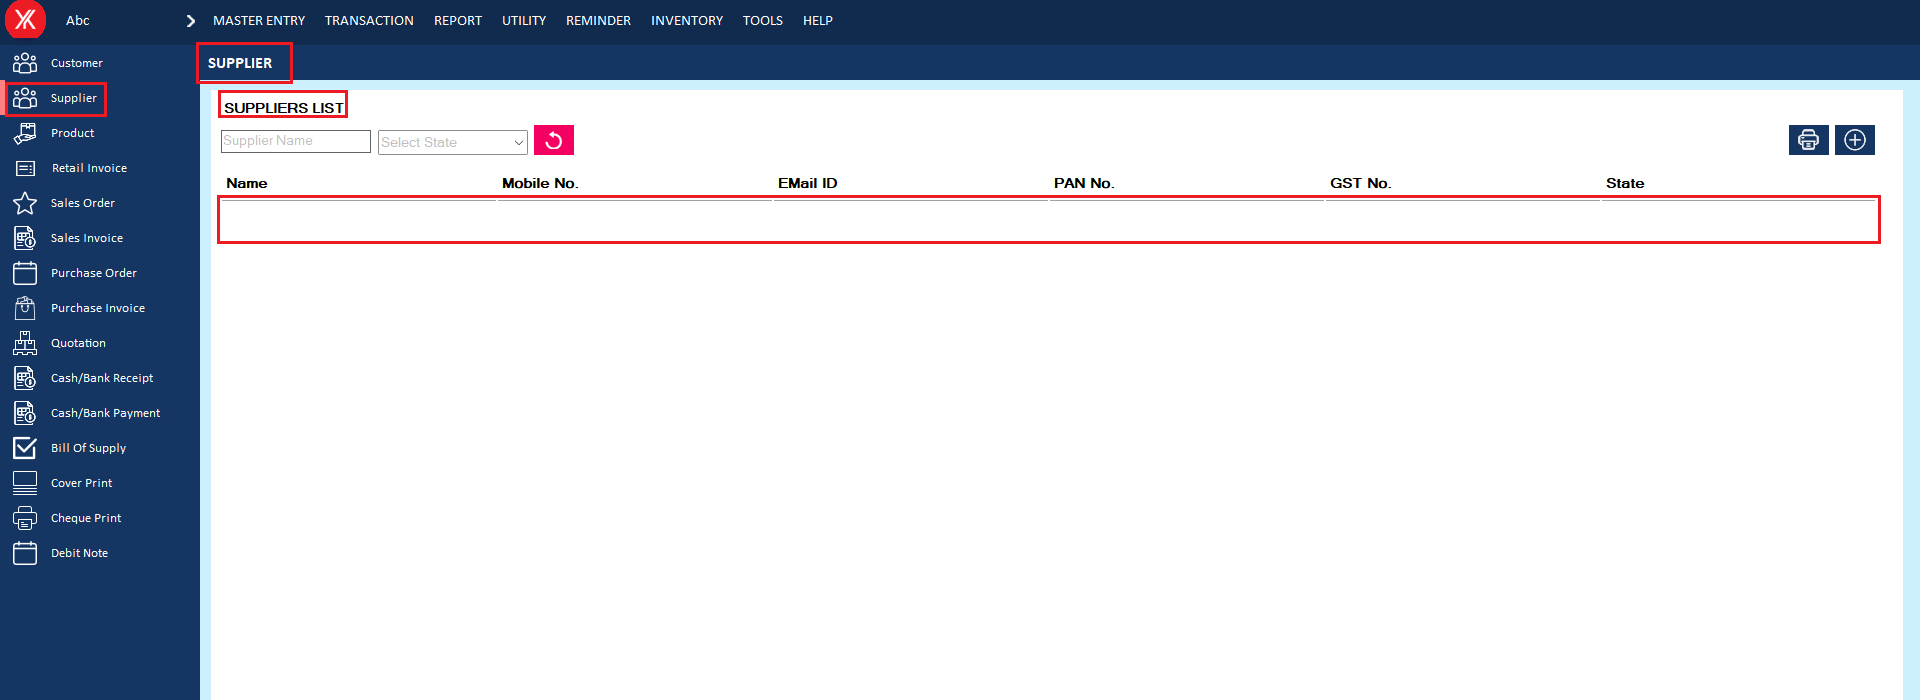
Step 6: The selected supplier will remove from the list
- How to delete Quotation for Yourkhata accounting and billing software?
Step 1: Go to quotation ,Previously created quotation details will be listed & double click on quotation details.
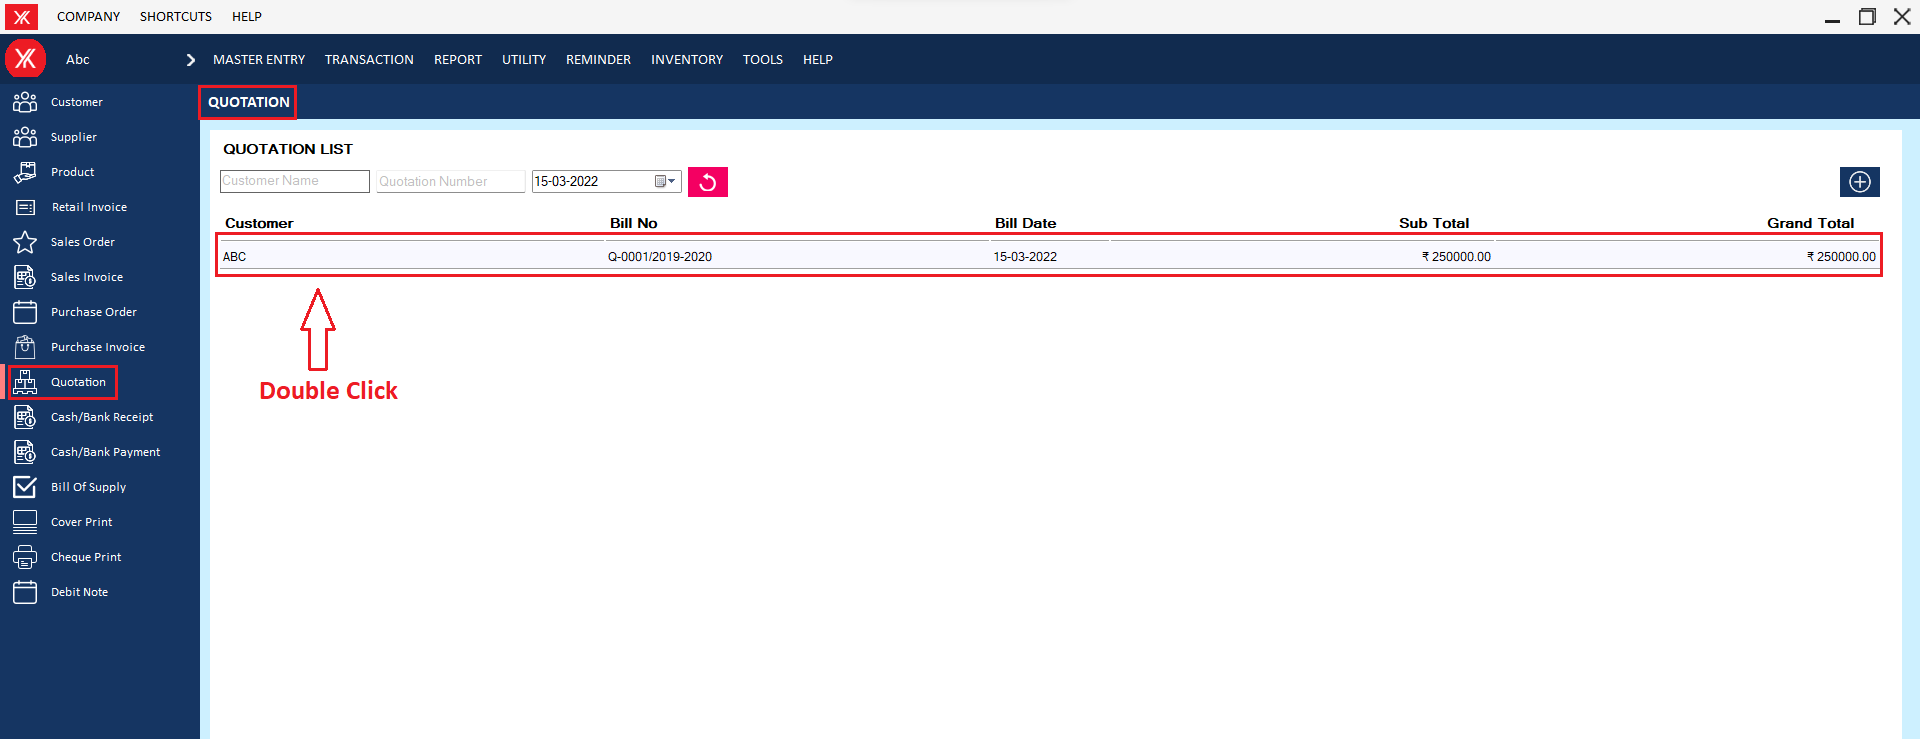
Step 2: You will get a message “You want to view or edit record?”
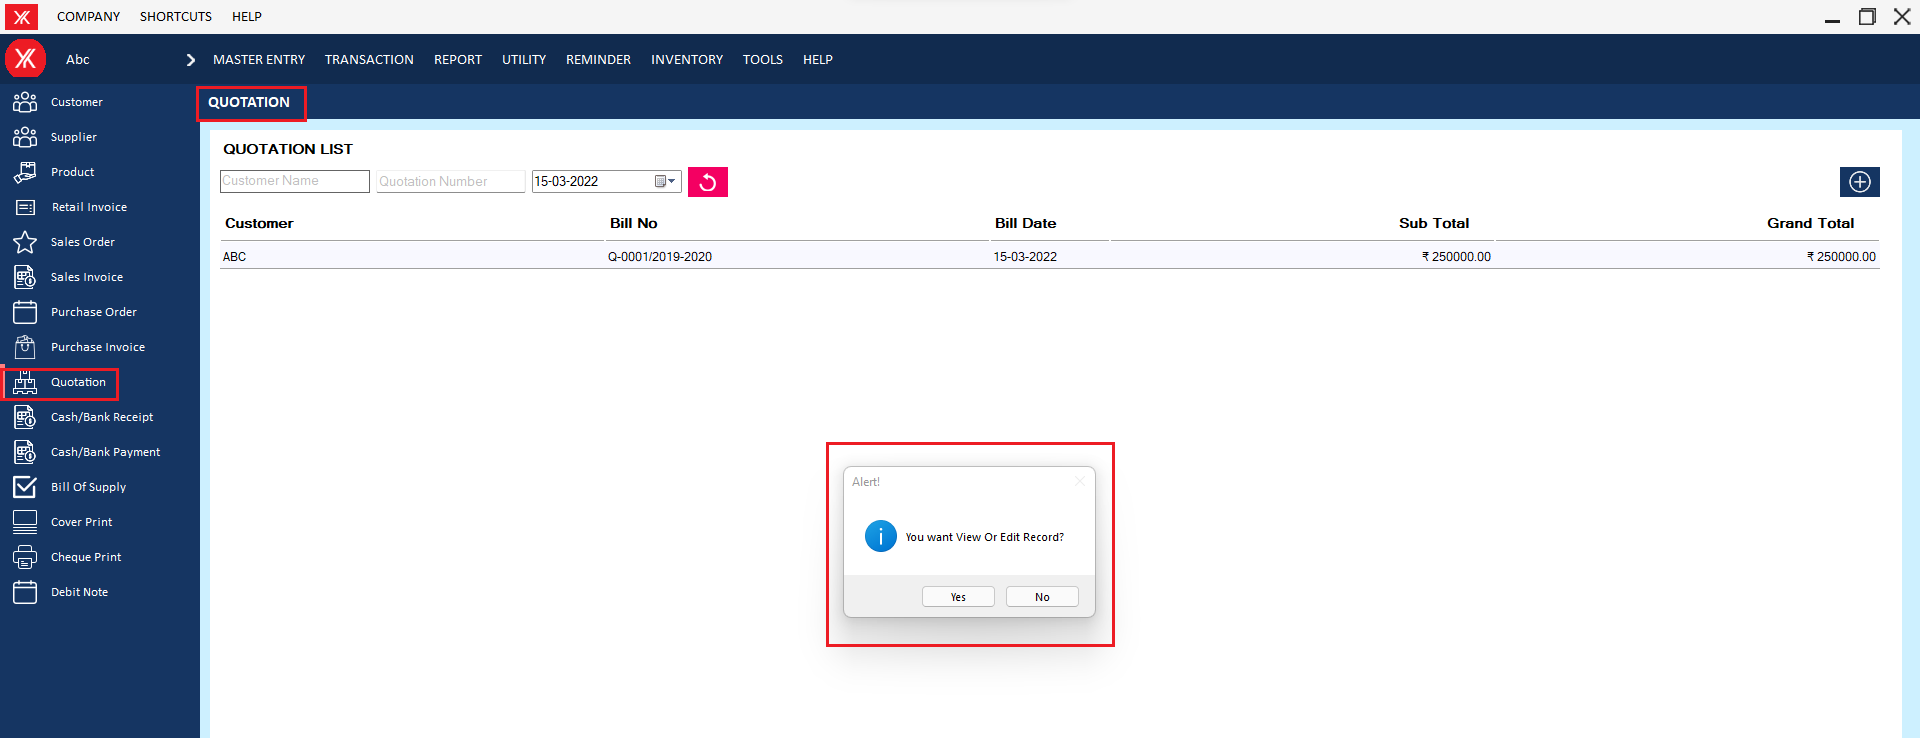
Step 3: If you click on yes then Click on delete icon
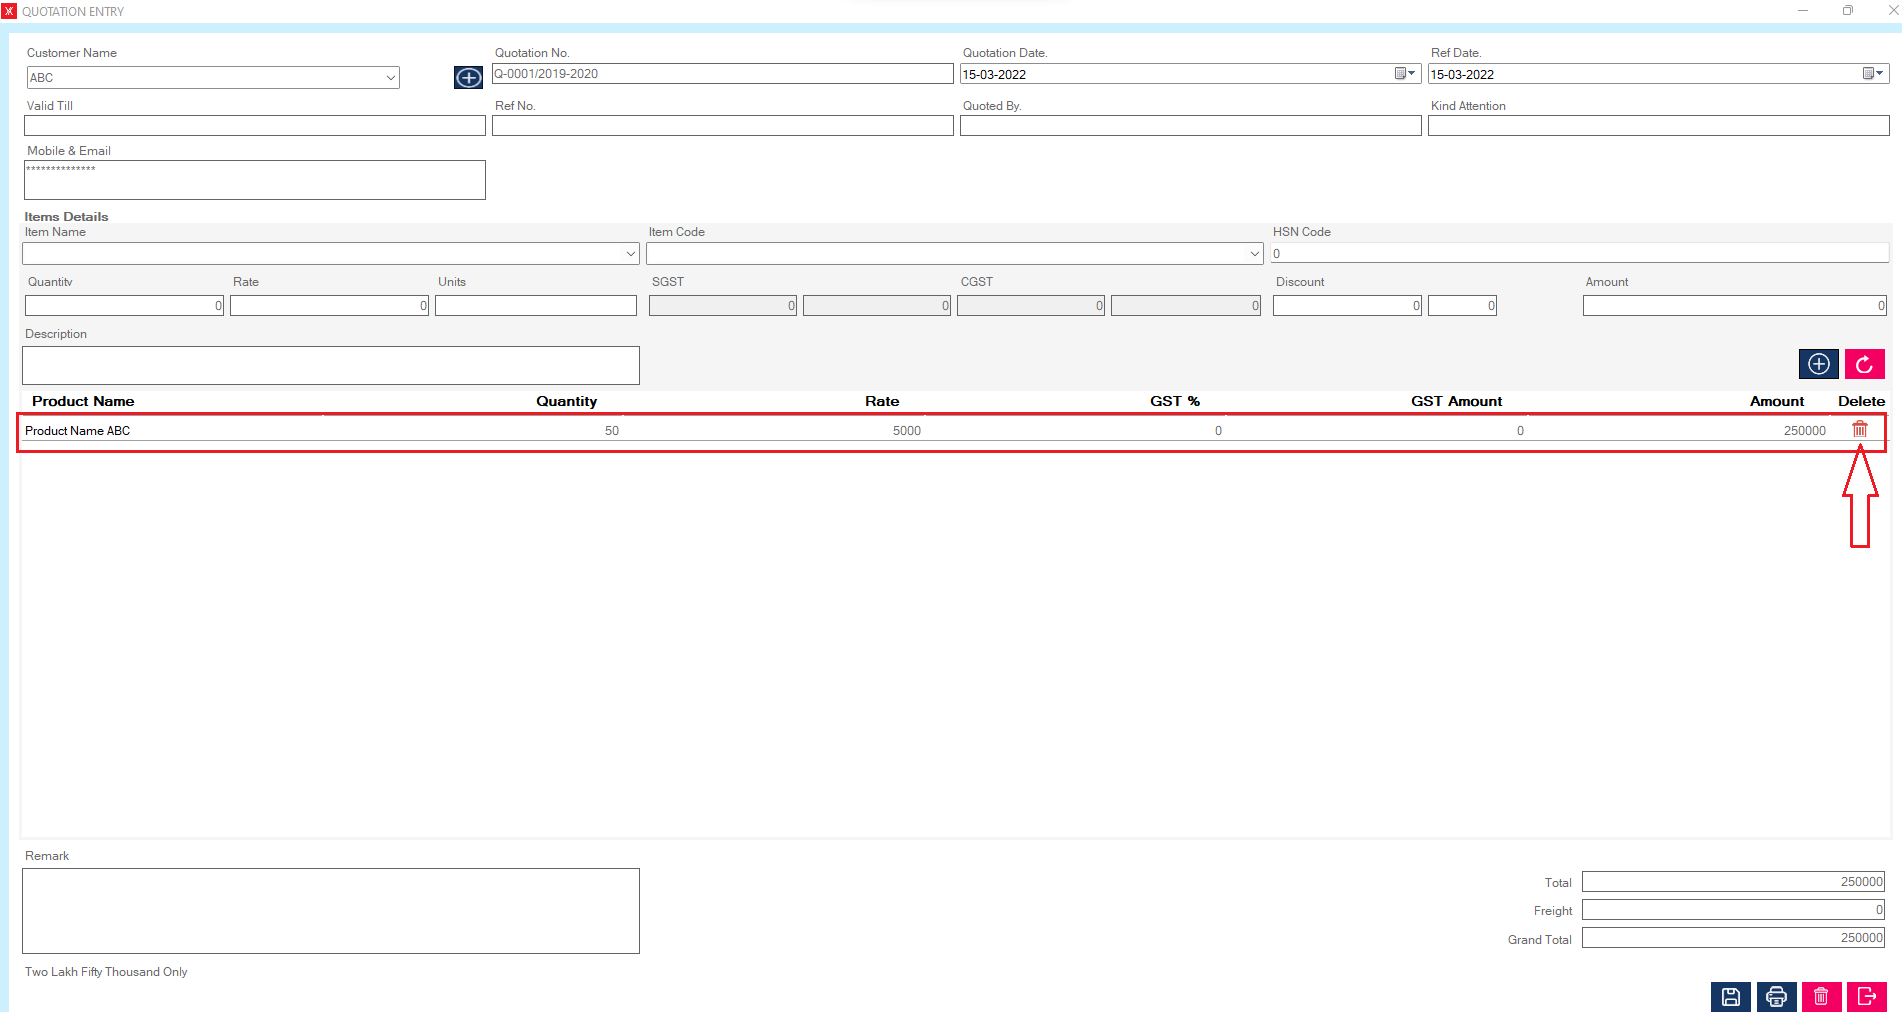
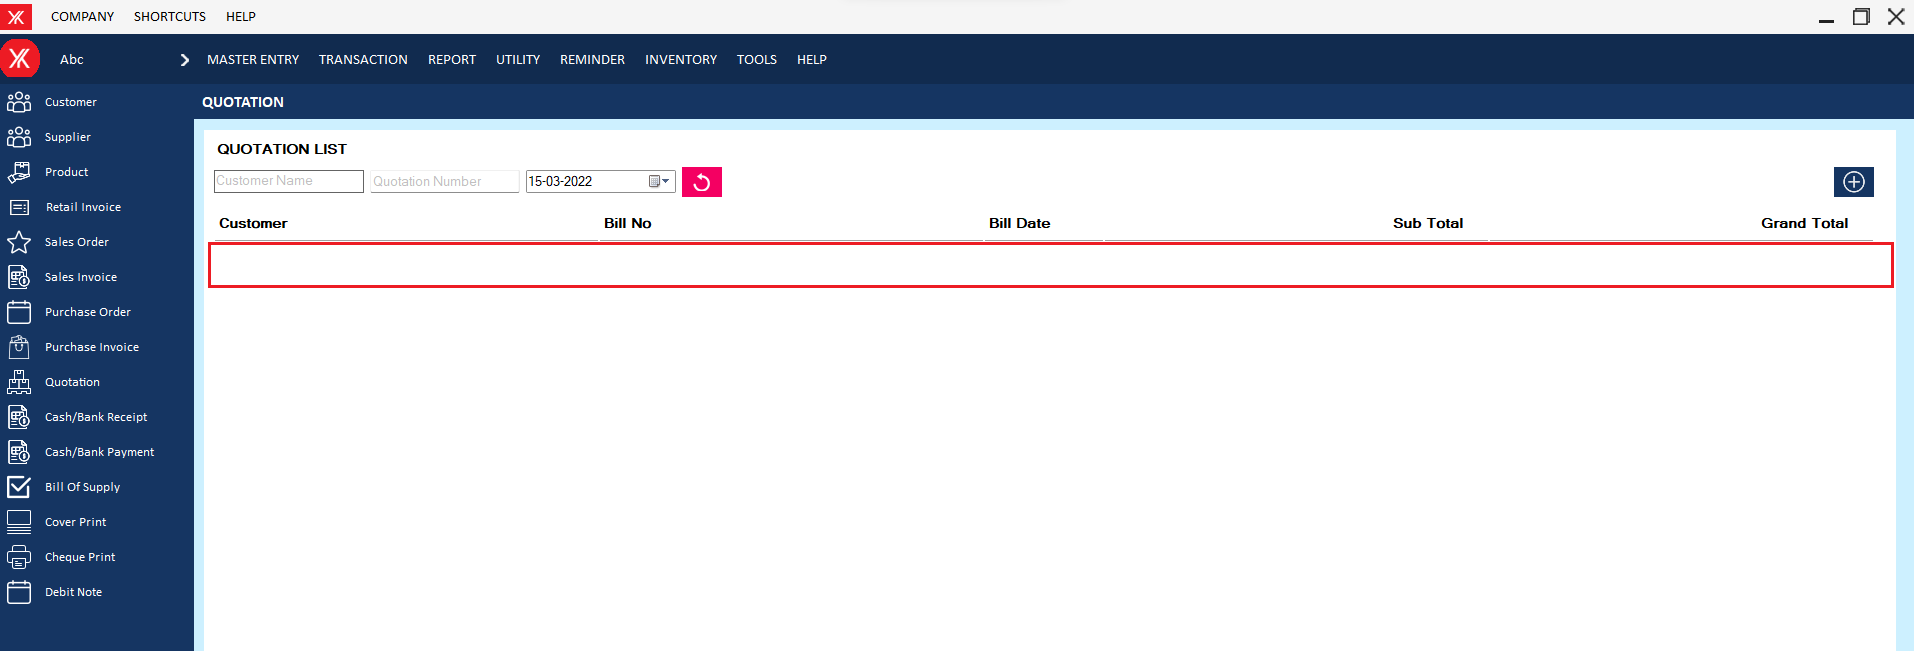
Step 4: Selected product details will be delete from the list
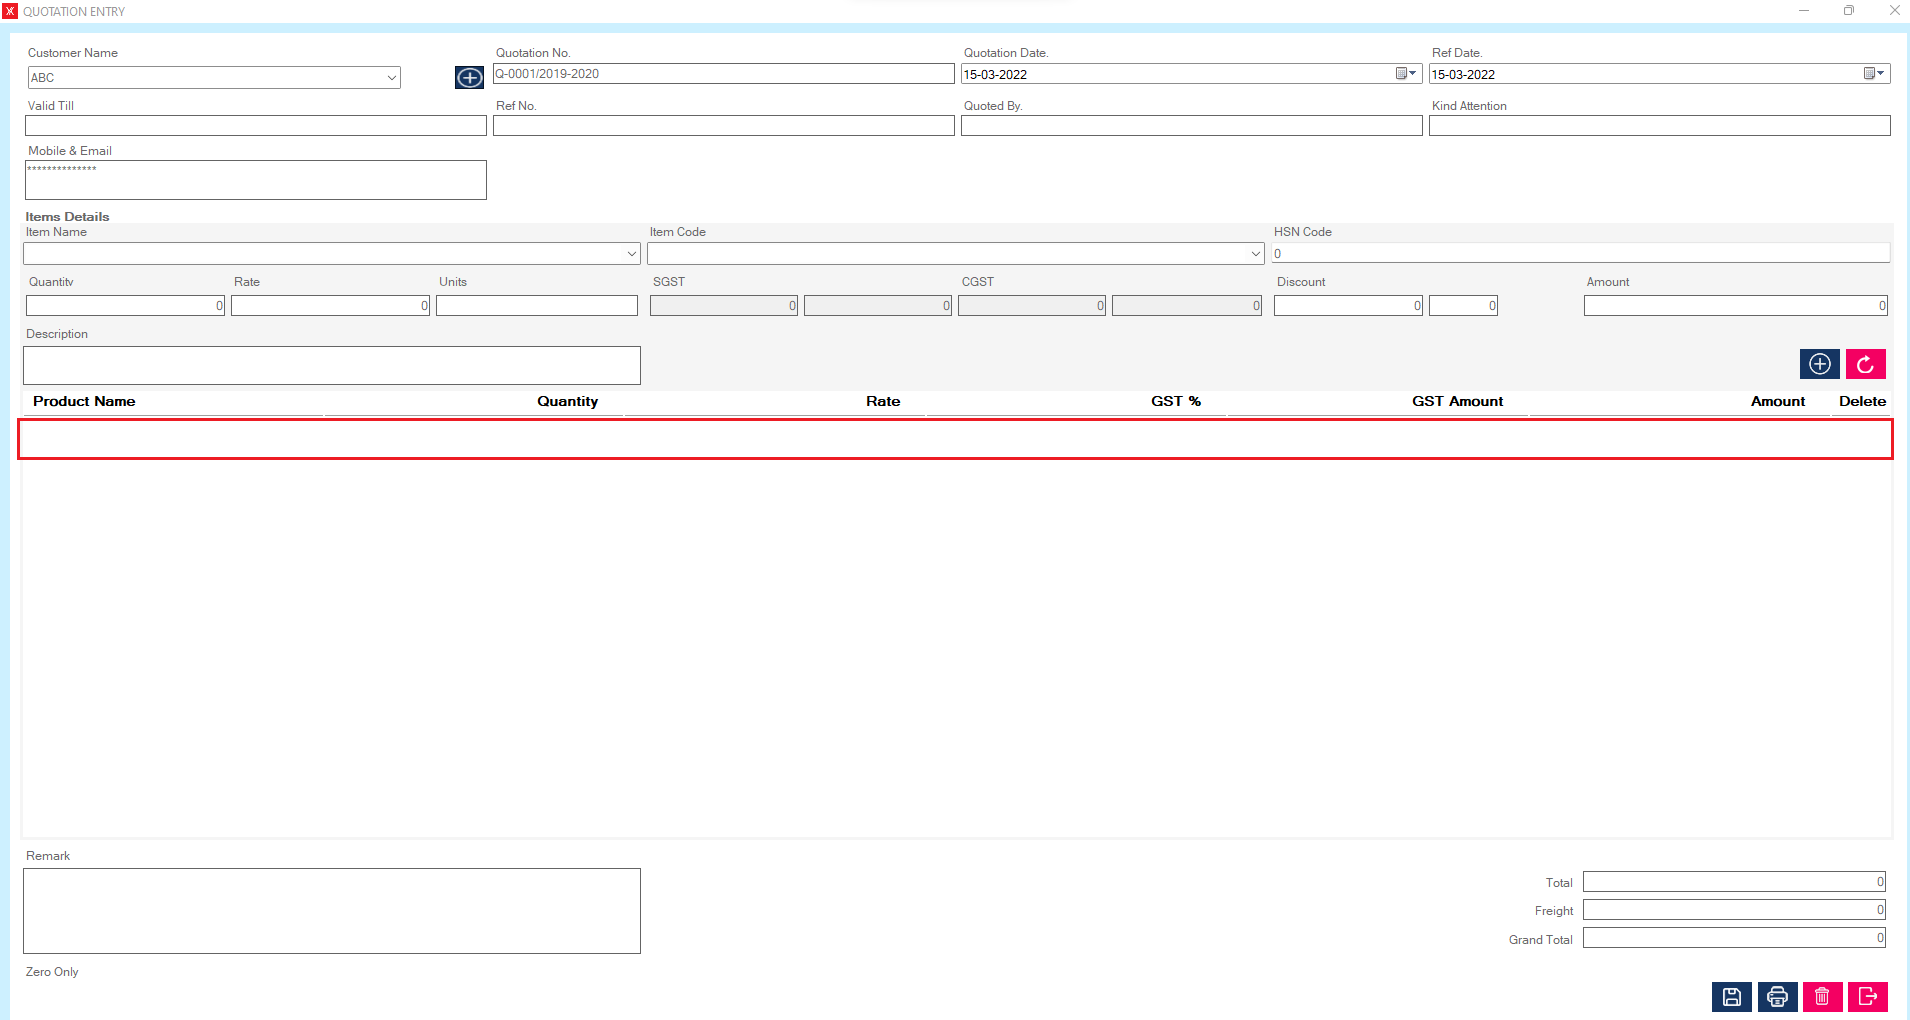
Step 5: Click on delete icon & you will get a message that “Do you want to delete this record? ”
Step 6: If you click on yes, you will get a message that “Successfully deleted”
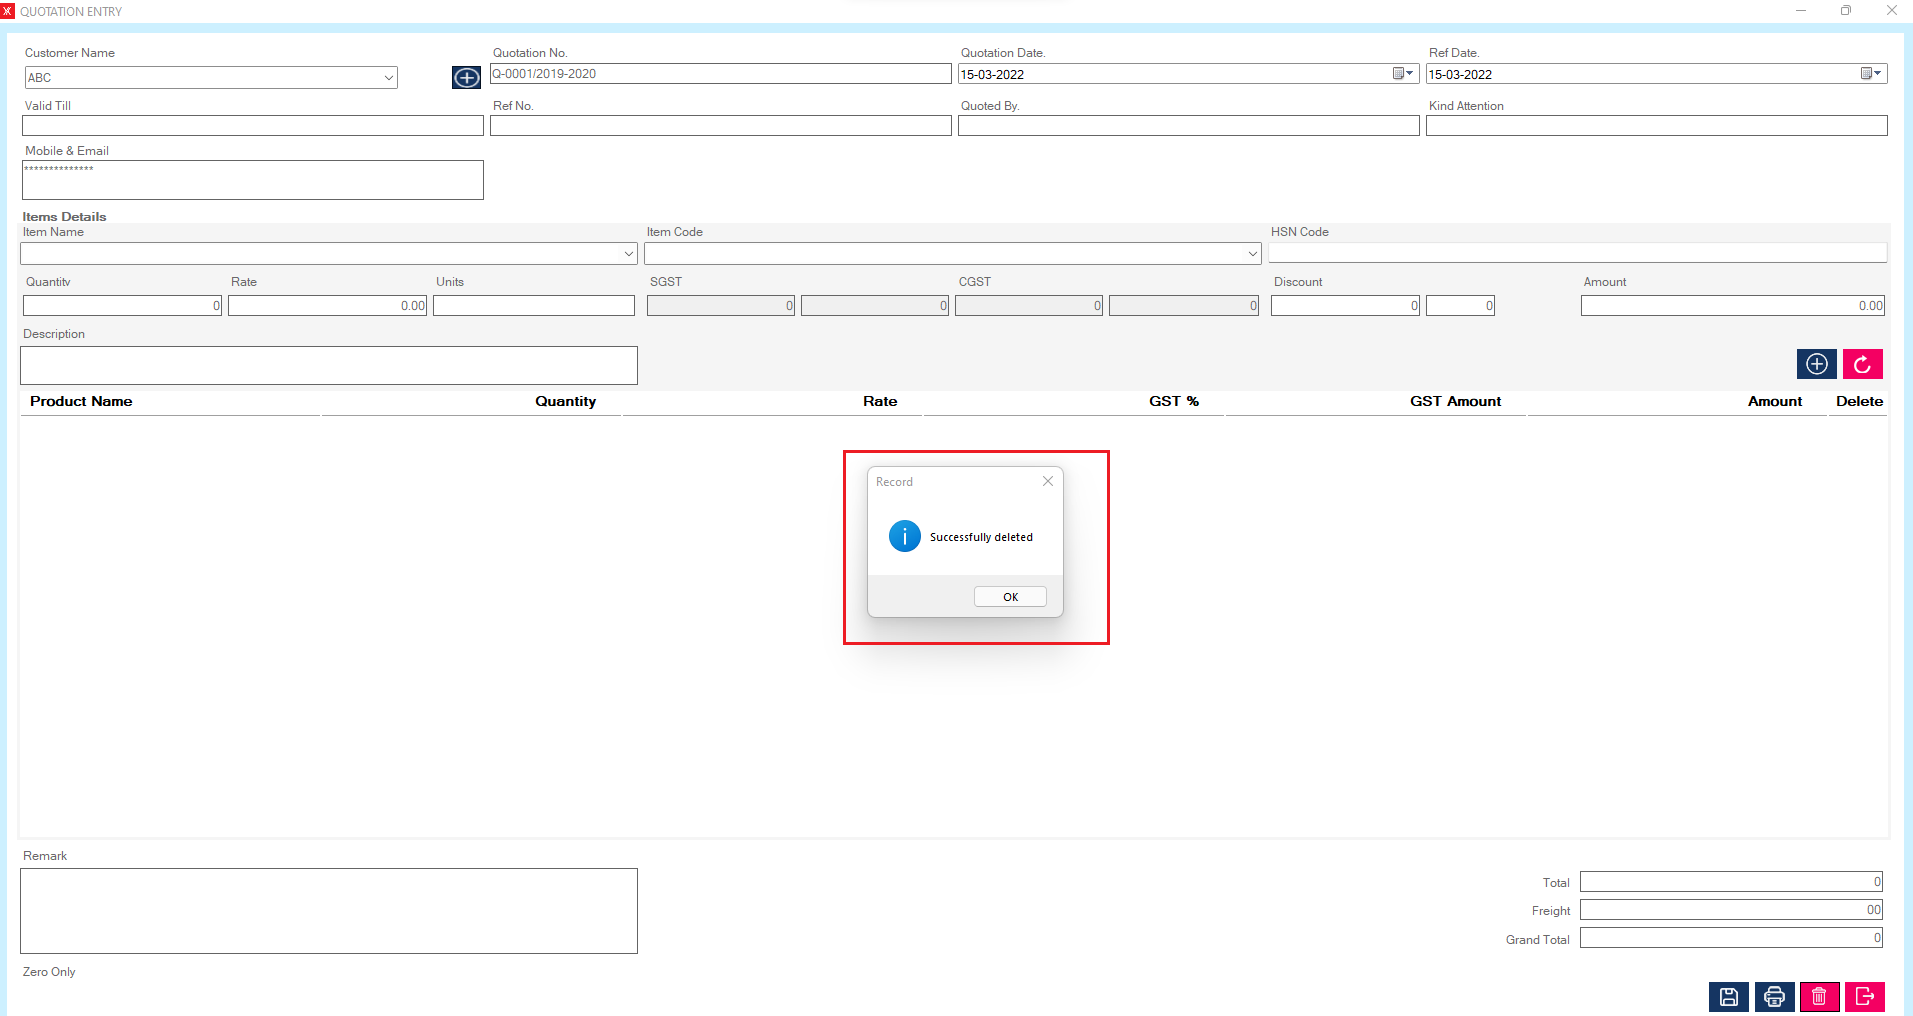
Step 7: Click on ok button, Quotation record will be delete from the list
- How to delete Purchase order for Yourkhata accounting and billing software?
Step 1: Go to purchase order, Previously created purchase order details will be listed > double click on record > you will get a message , you want to view or edit record?
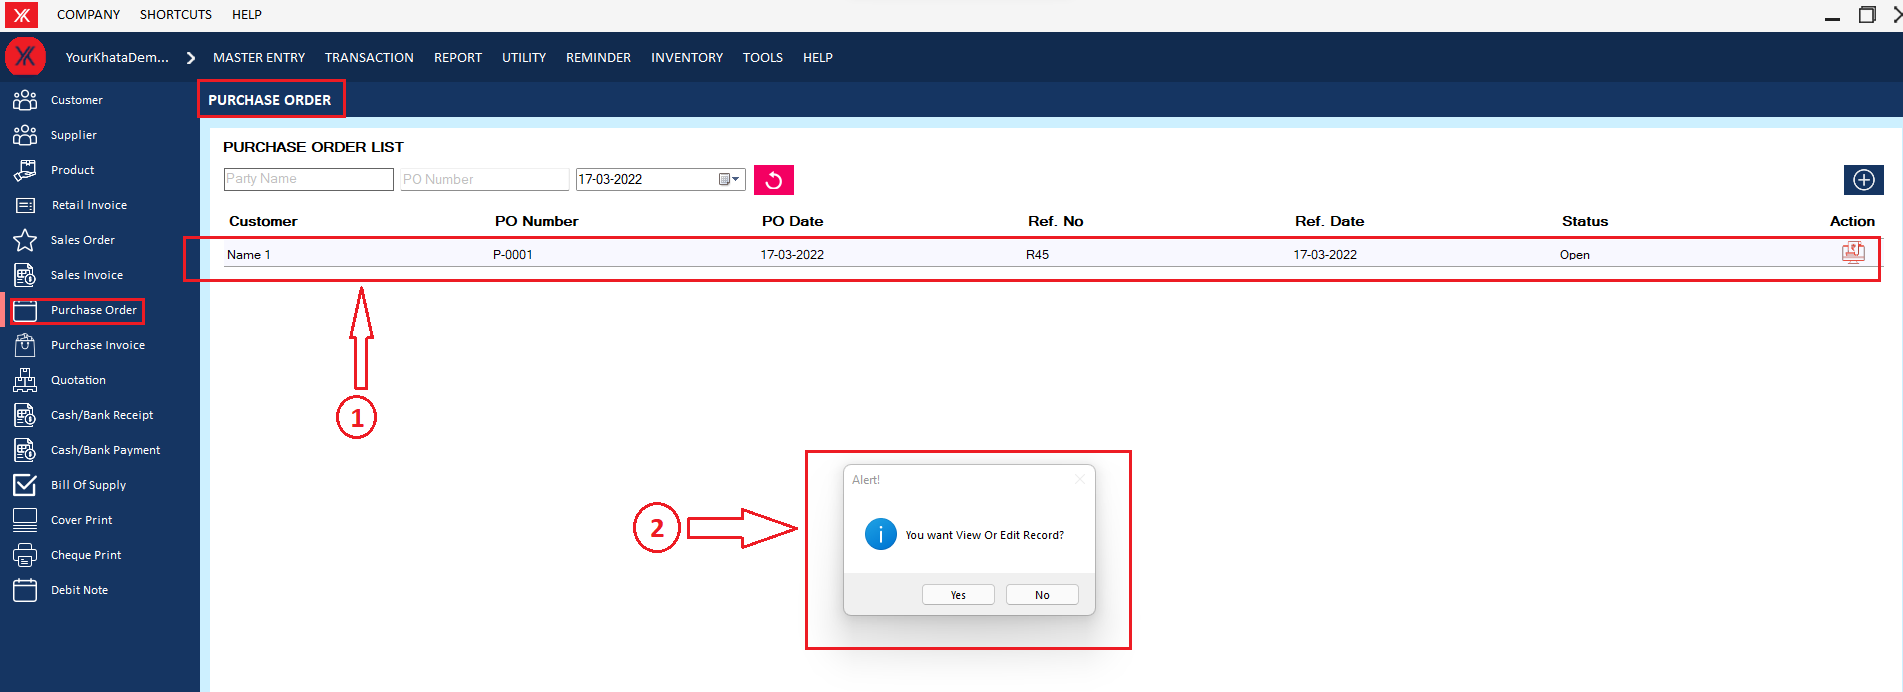
Step 2: click on delete > you will get the message “Do you really want to delete this record?”
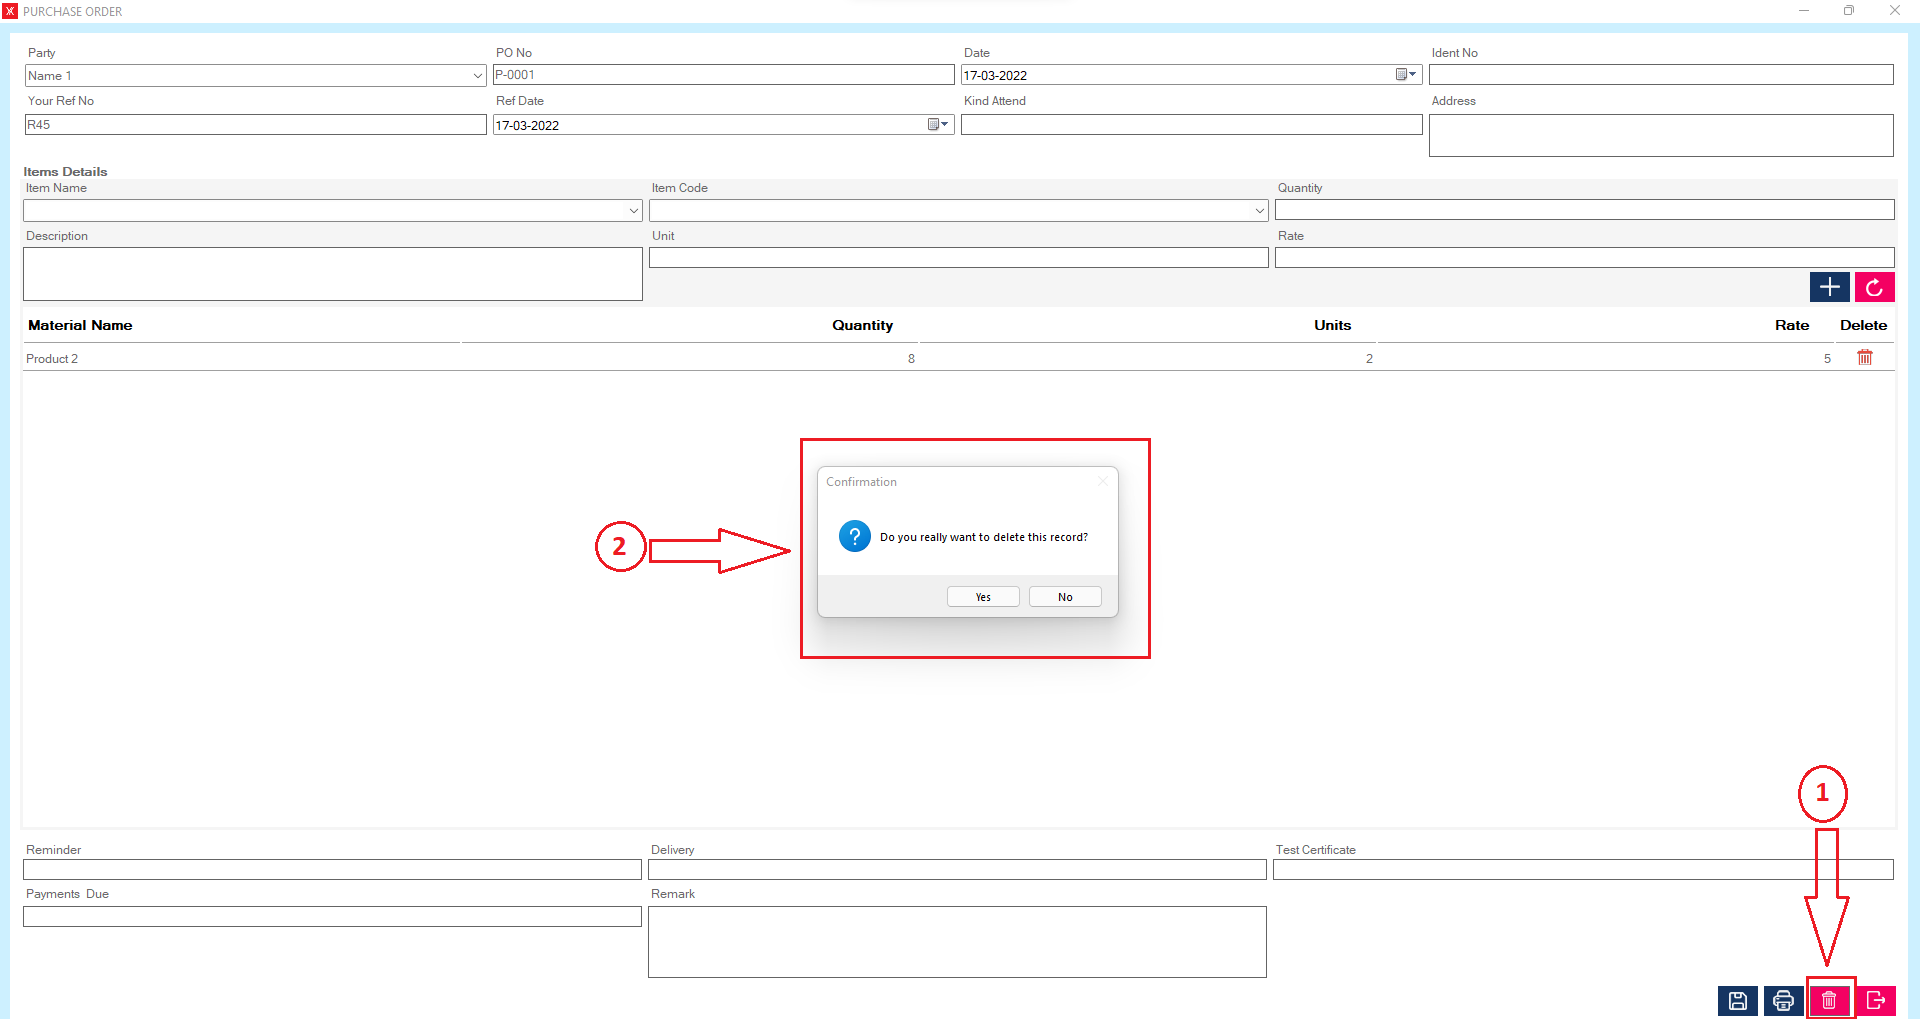
Step 3: If you click on Yes, you will get a confirmation message “successfully deleted”.
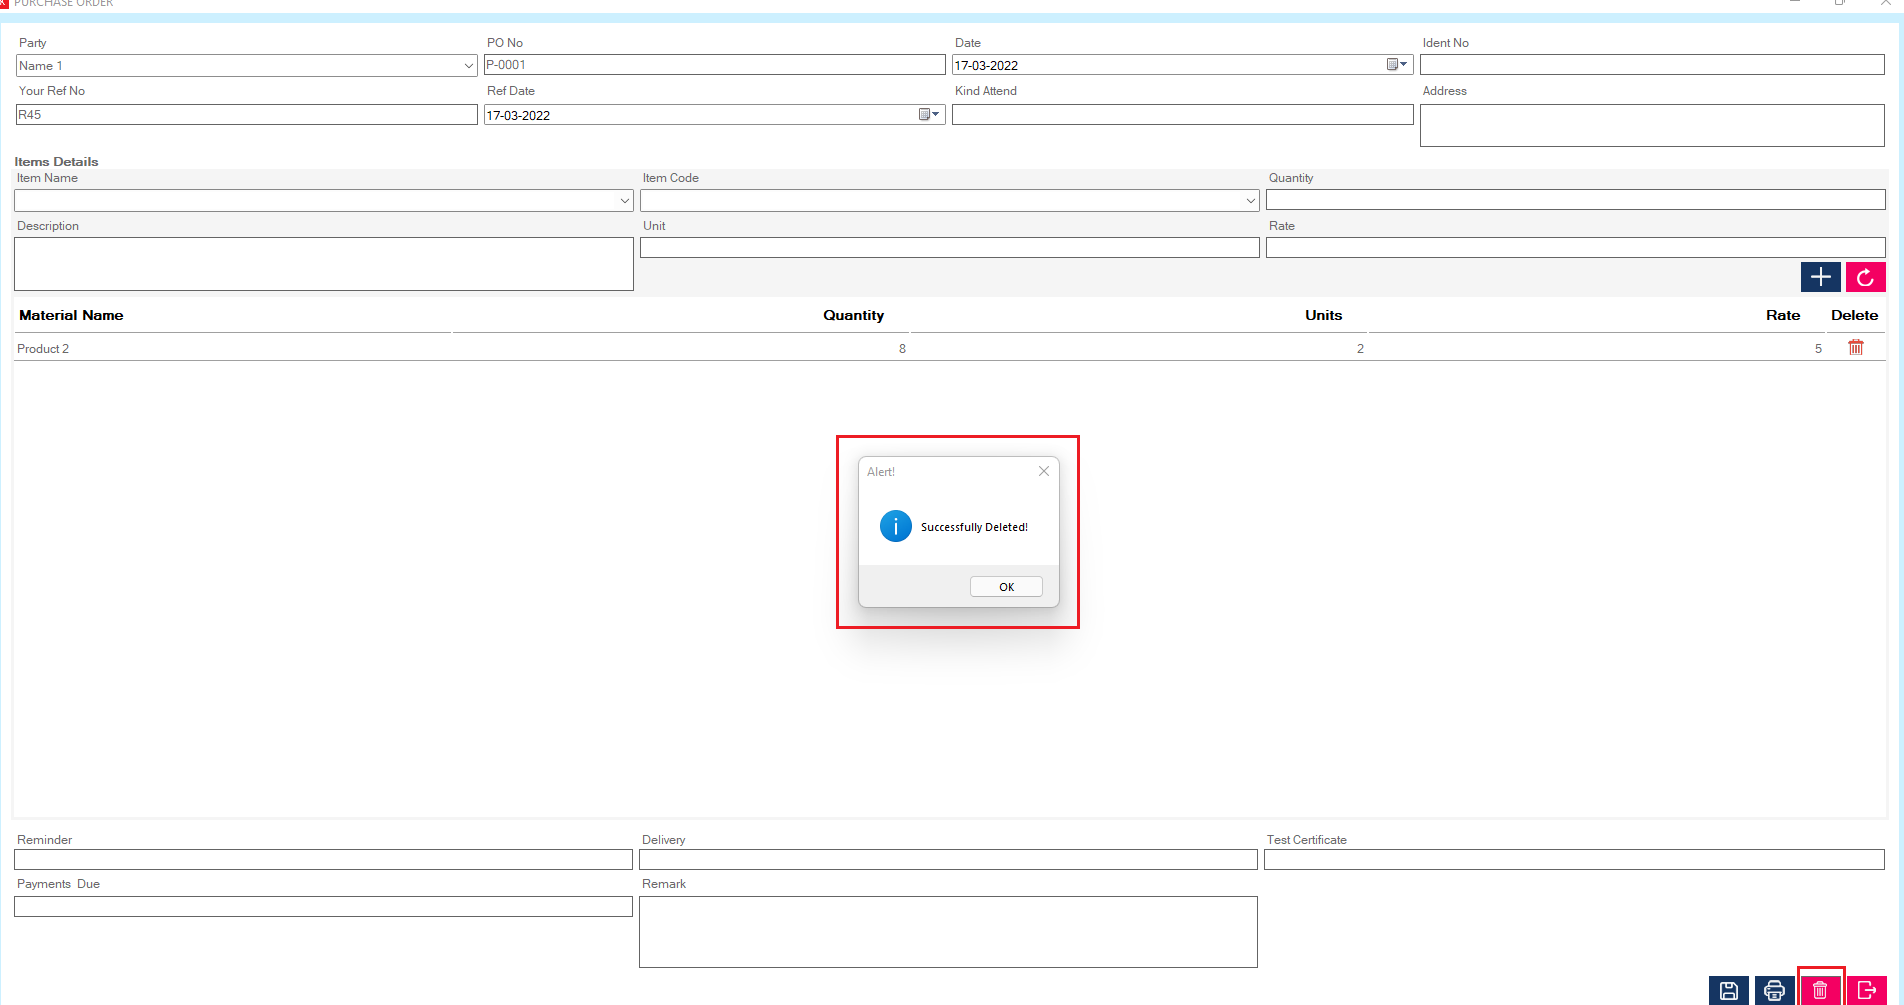
Step 4: The selected sales order will be delete from the list
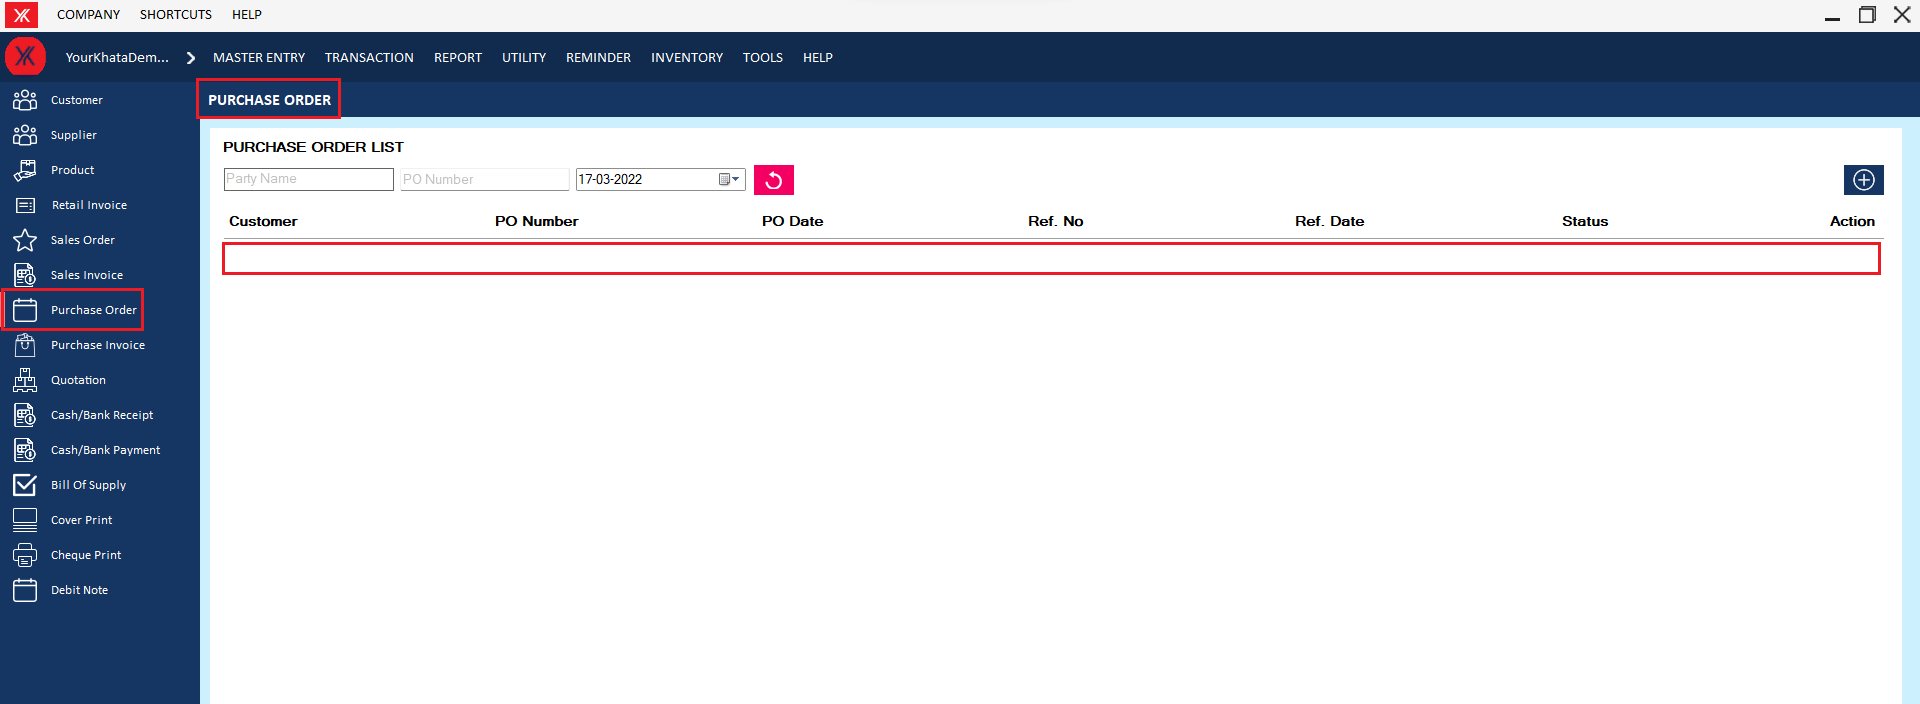
- How to delete Credit note for Yourkhata accounting and billing software?
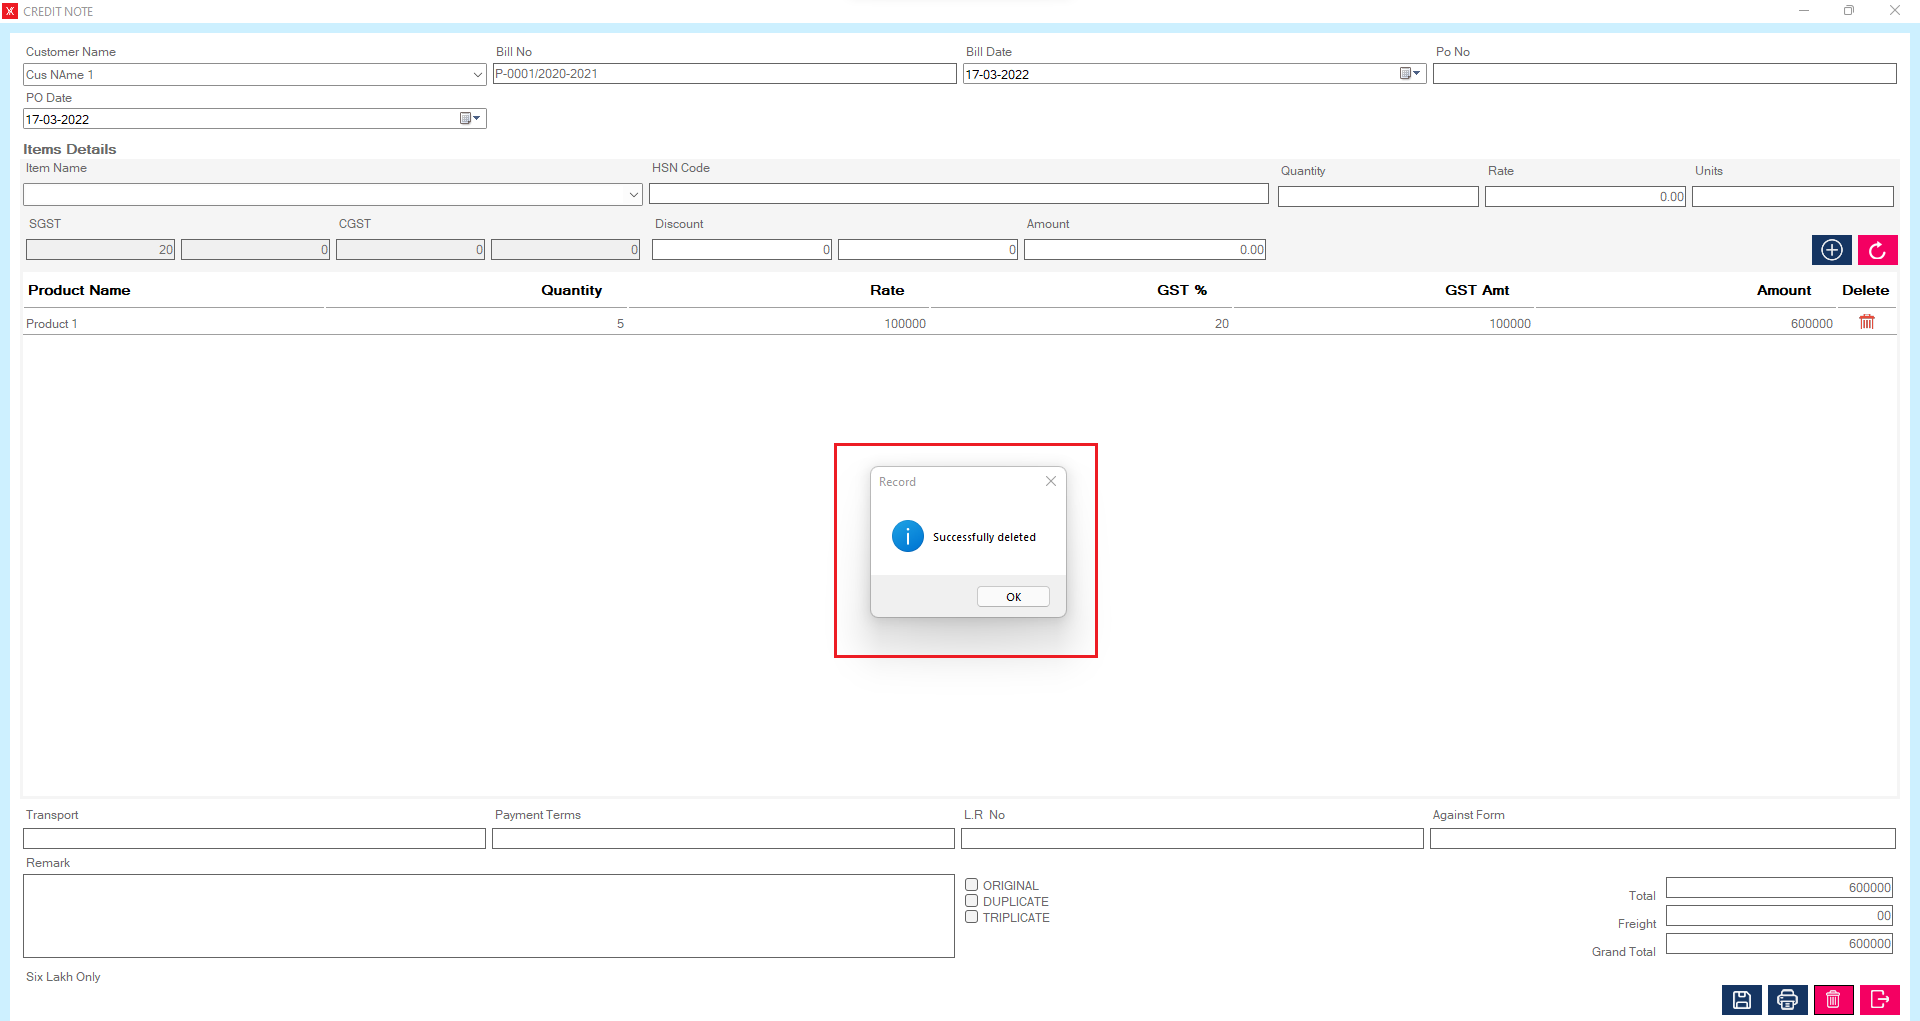
Step 1: Go to Credit note in transaction , previously created Credit note details will be listed. Select & double click on credit note & click on delete > you will get a message – “Do you want to view or edit record?”
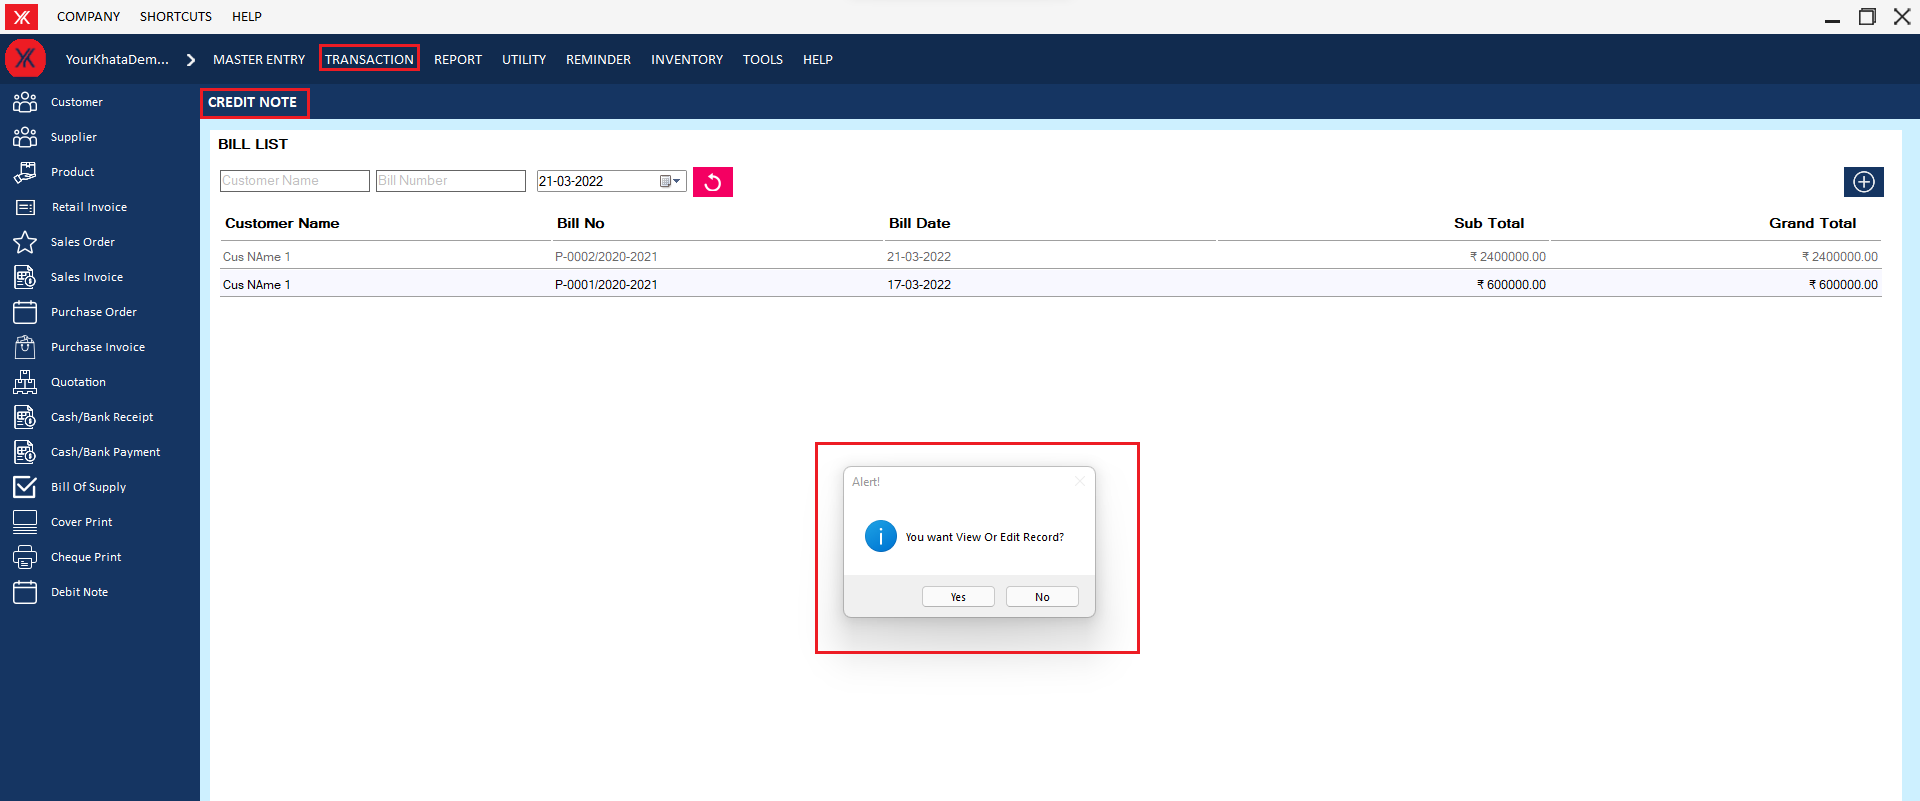
Step 2: If you click on Yes, you will get a message “Do you really want to delete this record?”
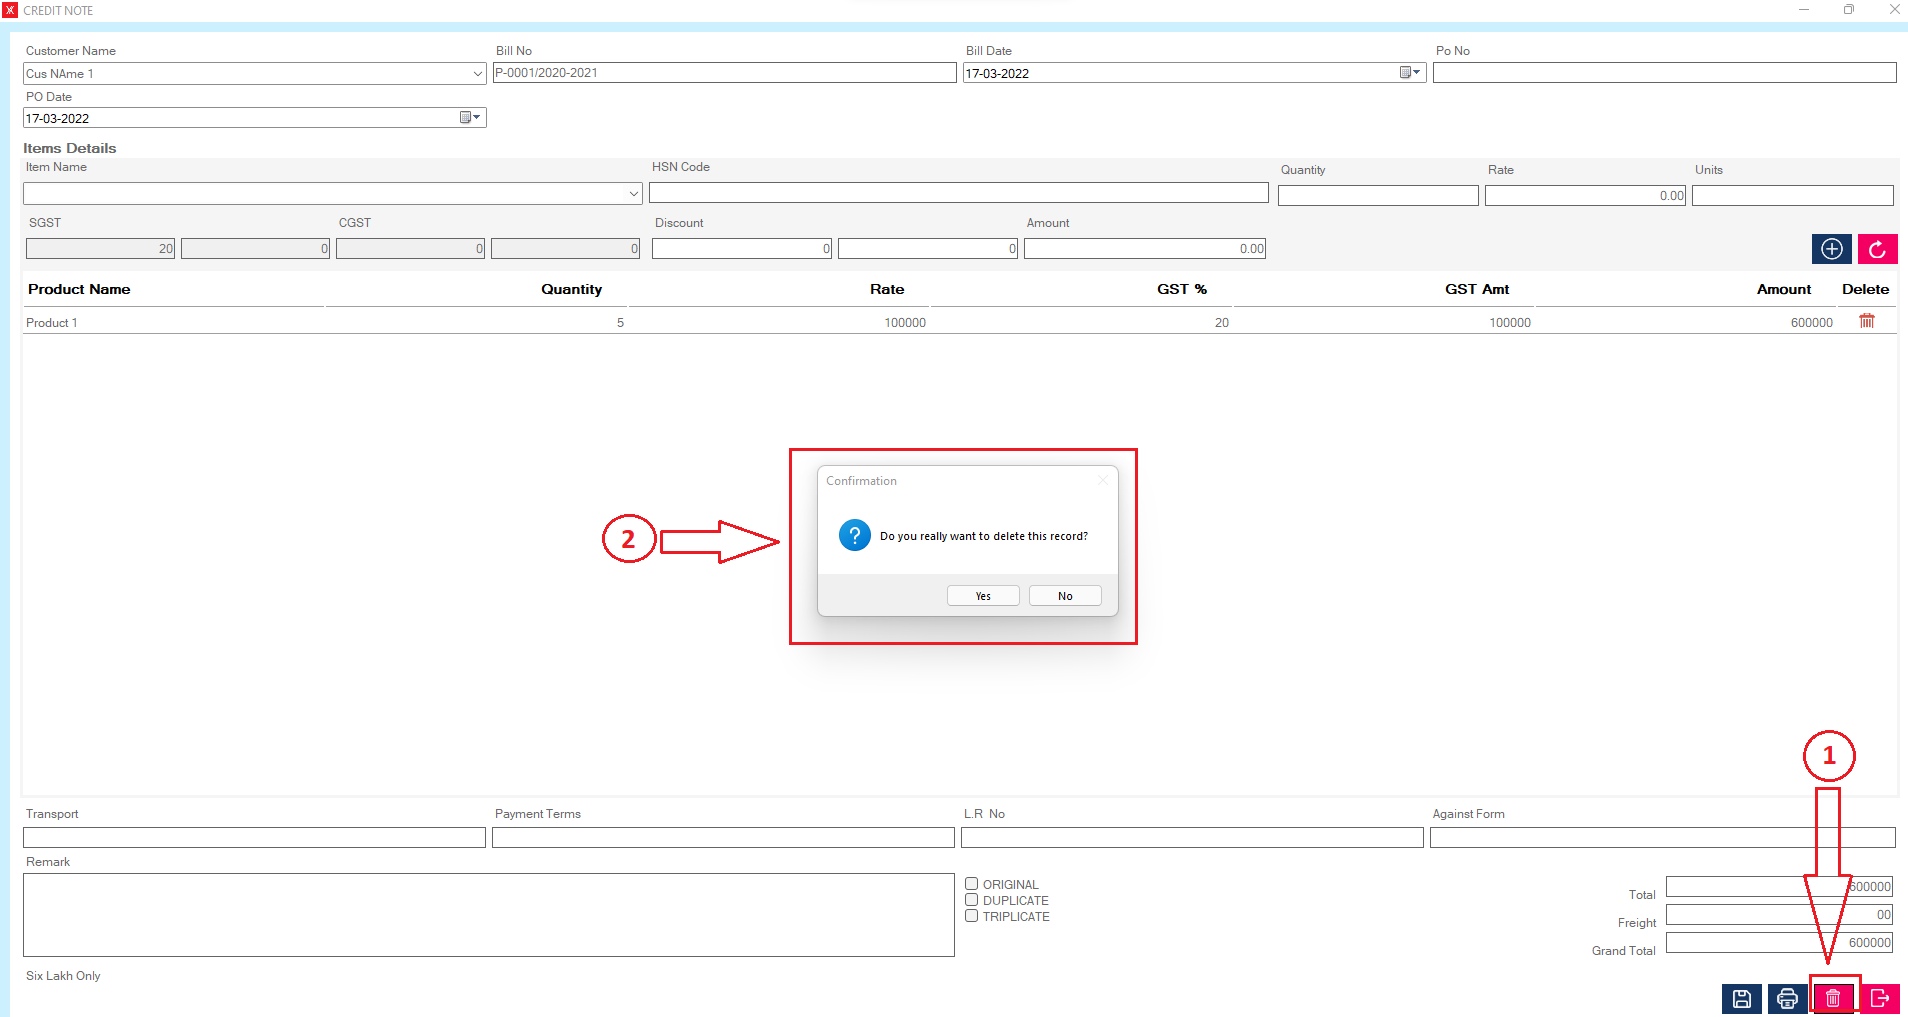
Step 3: After clicking on yes You will get a message that “Successfully Deleted”
- How to delete Debit note for Yourkhata accounting and billing software?
Step 1: Go to debit note, previously created debit note details will be listed. Select & double click on credit note & click on delete > you will get a message – “Do you want to view or edit record?”
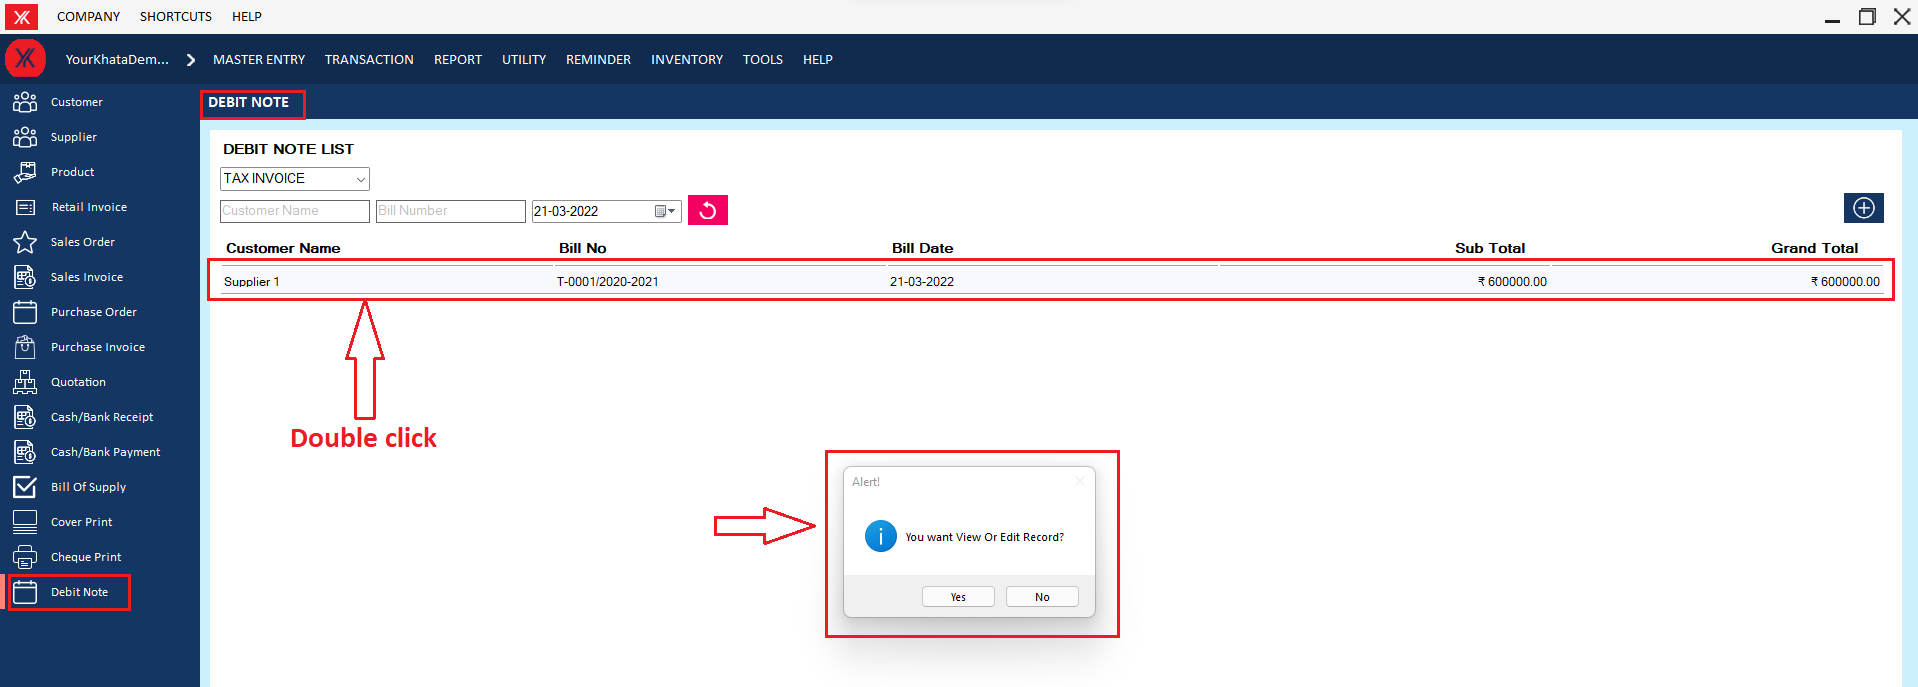
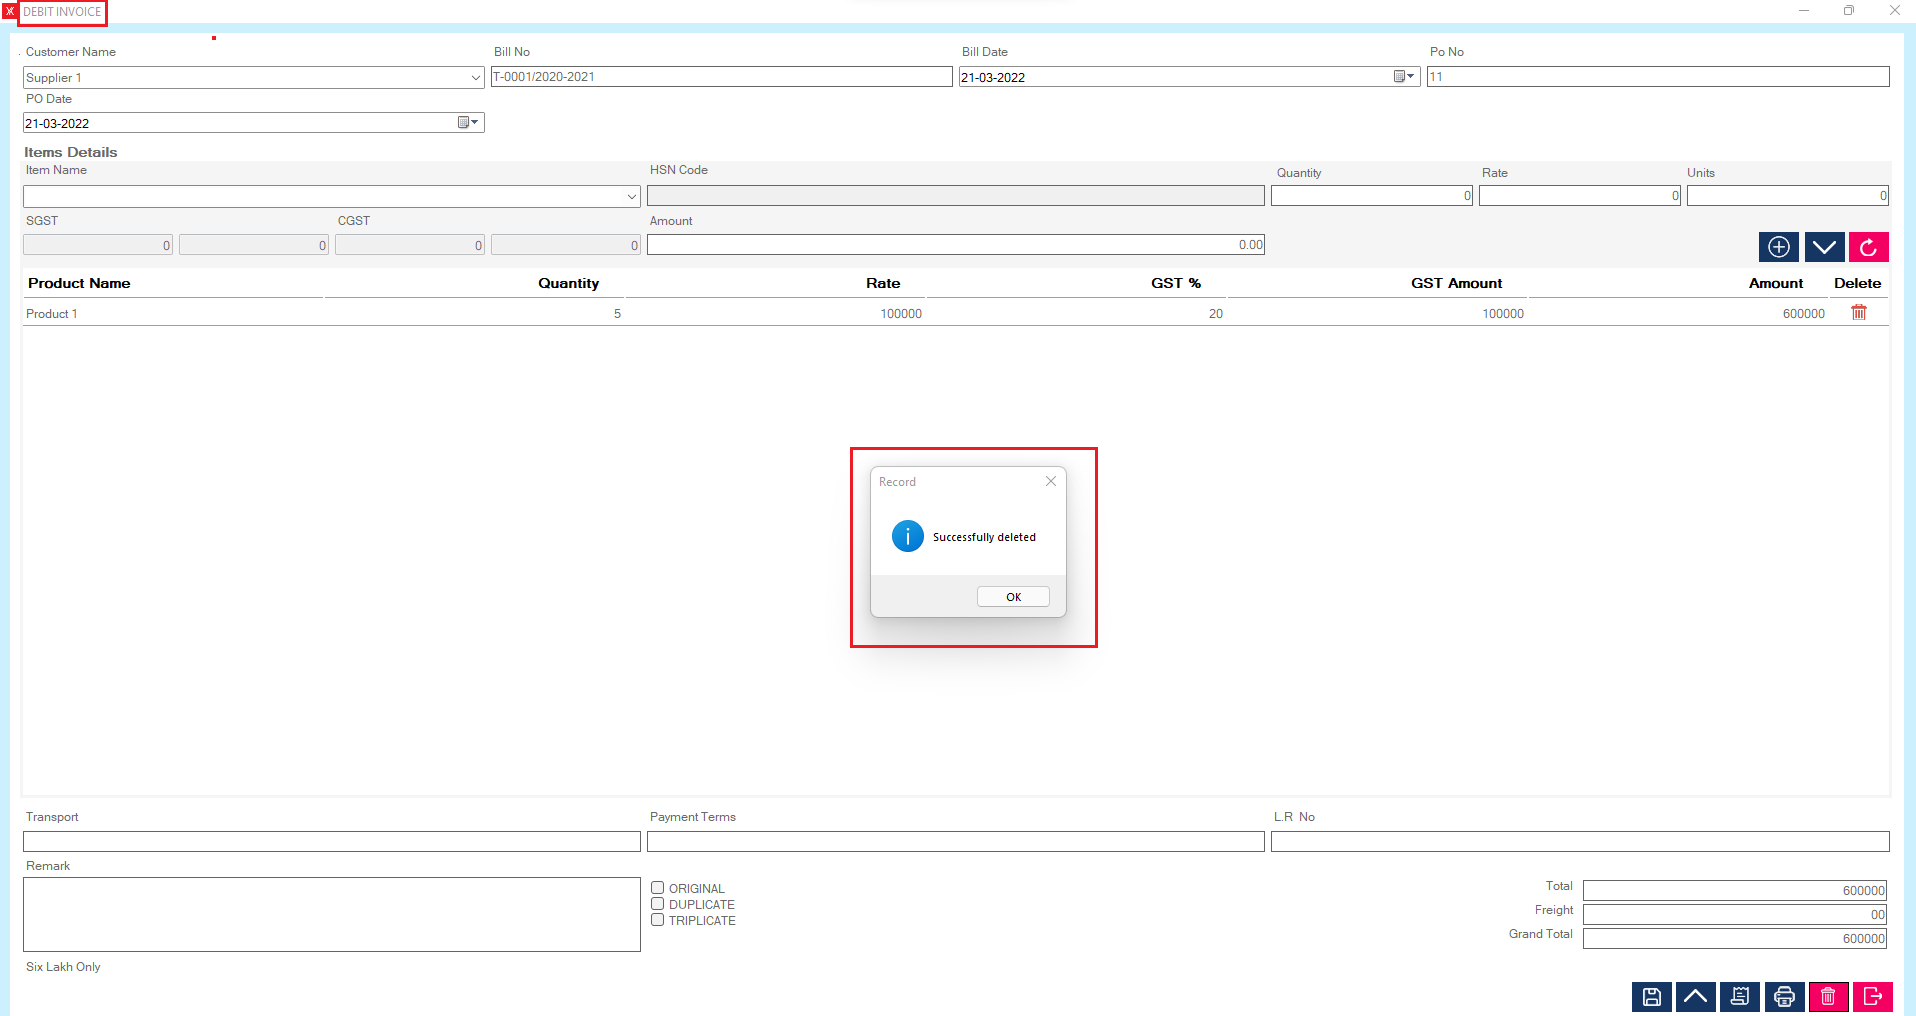
Step 2: If you click on Yes, you will get a message “Do you really want to delete this record?”

Step 3: After clicking on yes you will get a message that “Successfully Deleted”
- How to delete IGST quotation for Yourkhata accounting and billing software?
Step 1: Go to IGST quotation ,Previously created quotation details will be listed & double click on quotation details > You will get a message “You want to view or edit record?”
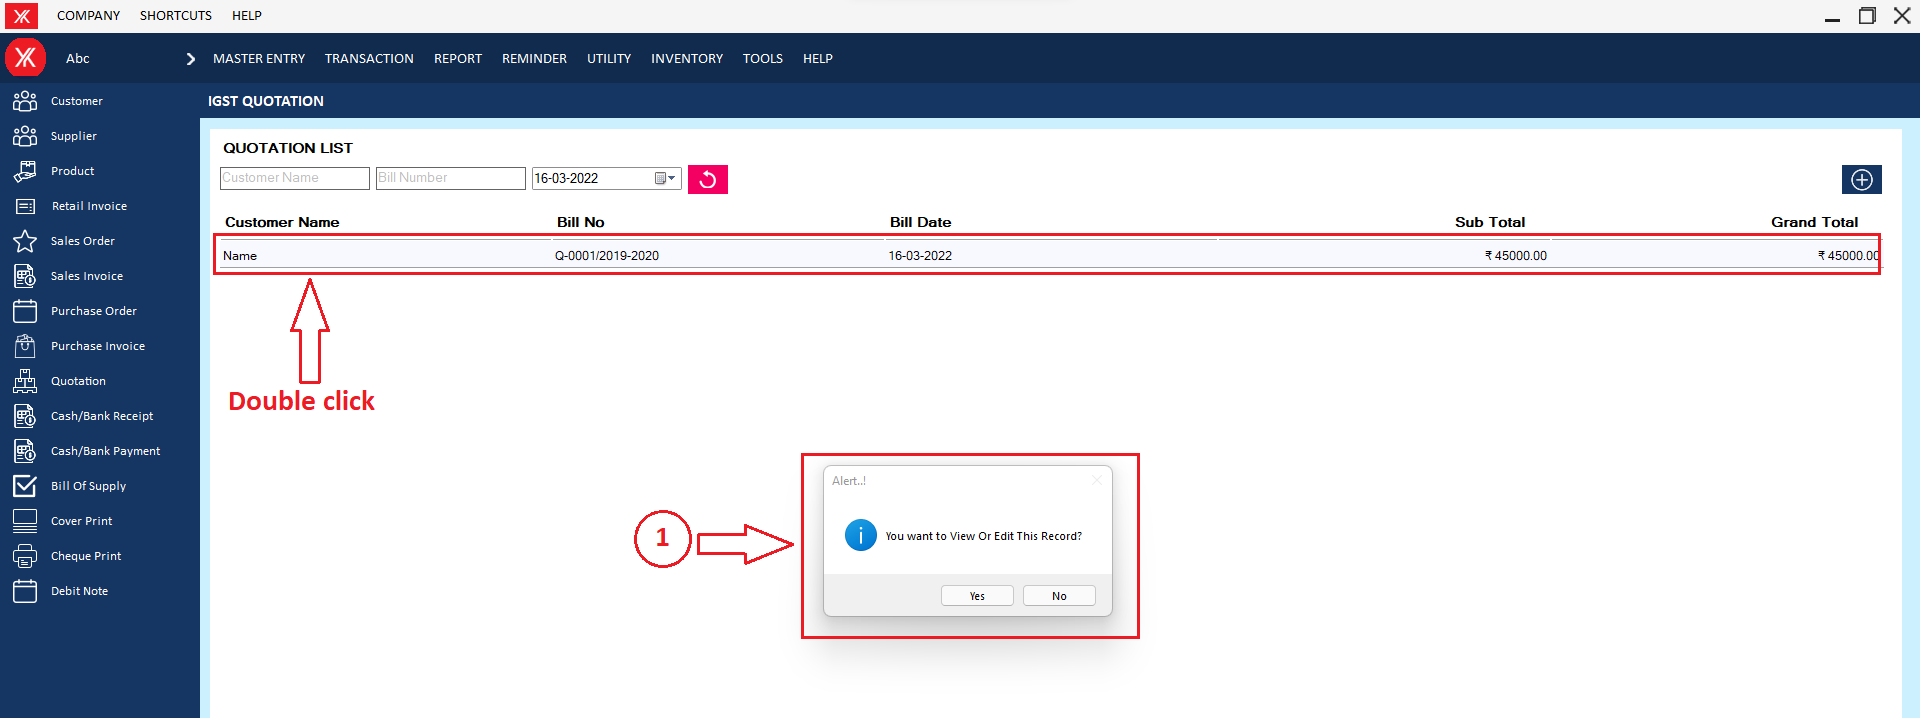
Step 2: After clicking on yes > Click on delete icon > you will get the message “Do you really want to delete this record?”

Step 3: After clicking on yes > You will get the message that “successfully deleted”
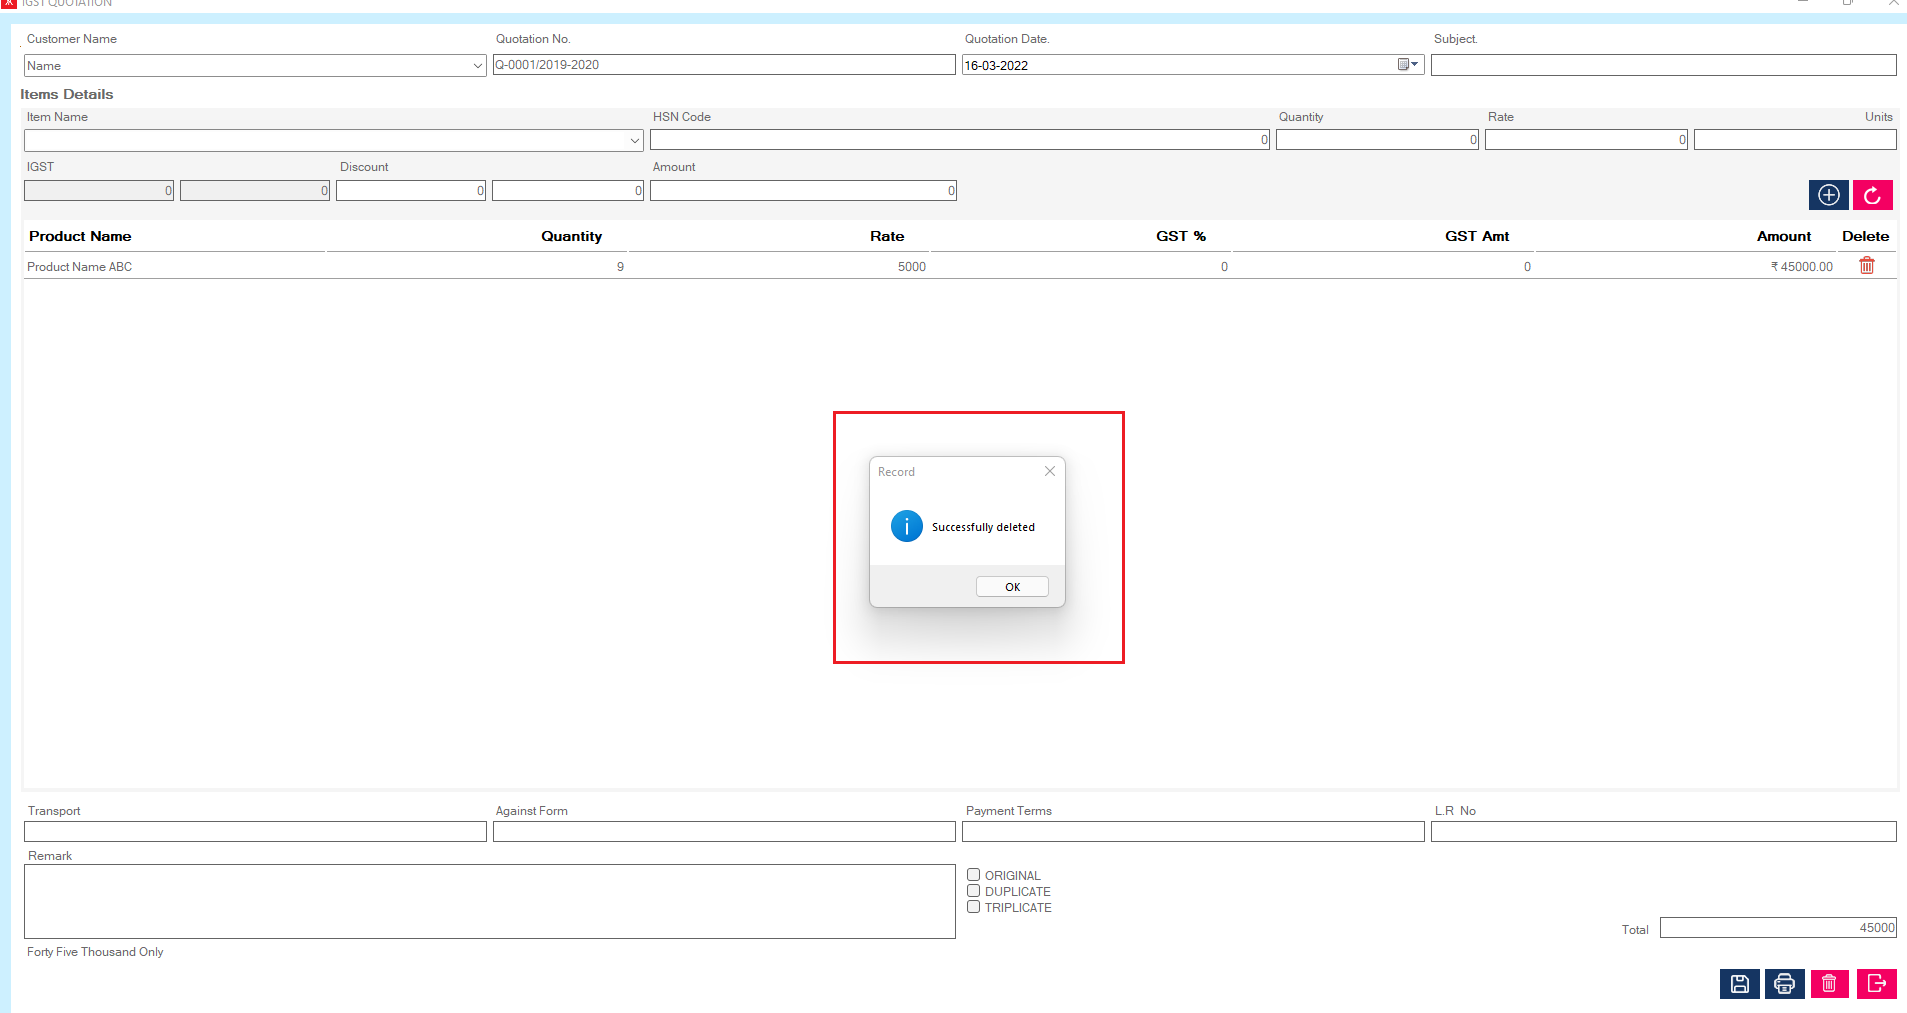
Step 4: Click on ok button, IGST Quotation record will be delete from the list
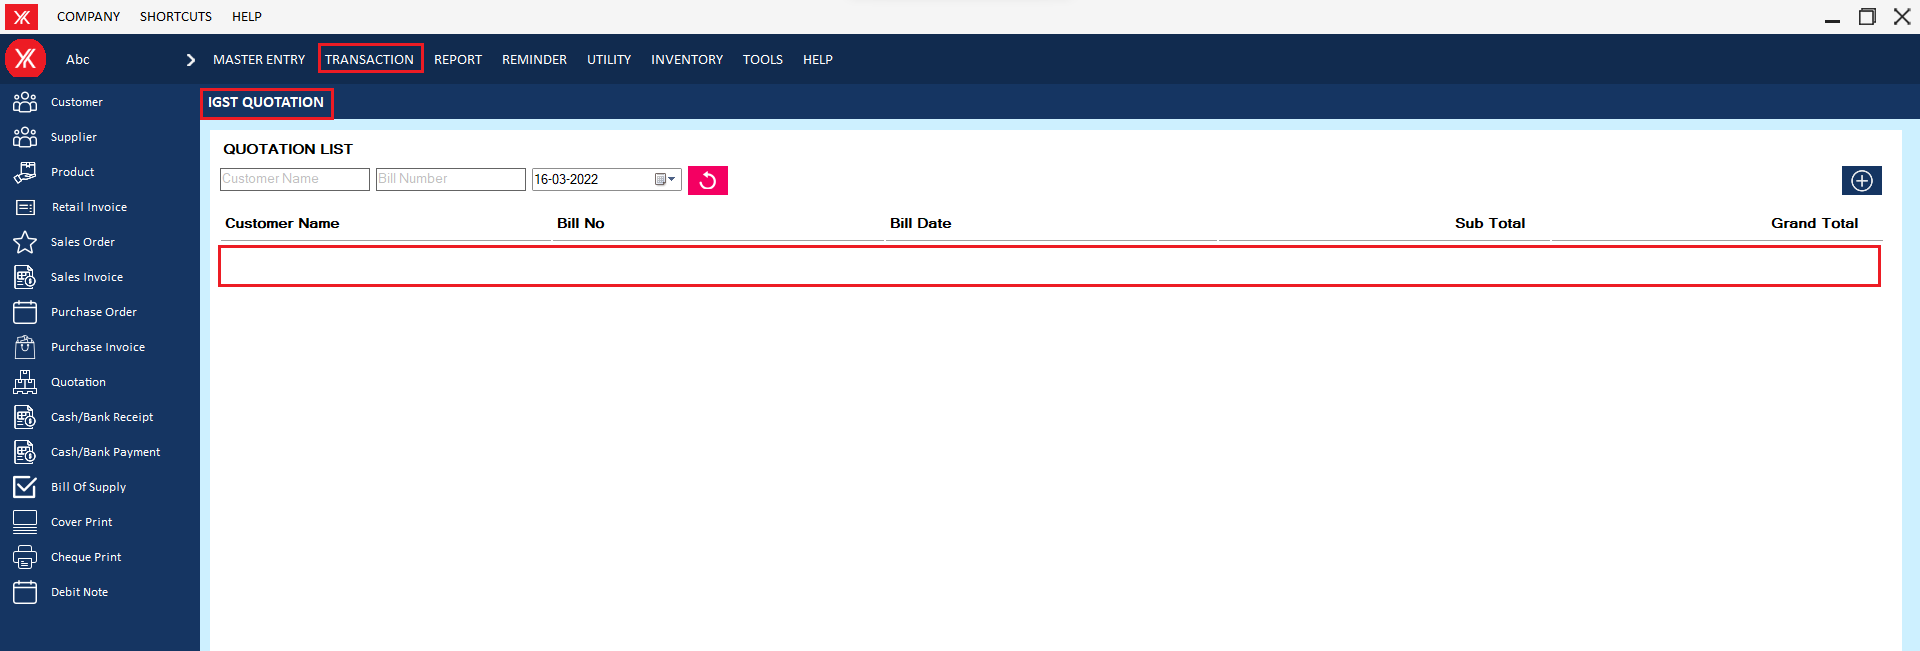
- How to delete Employee master for Yourkhata accounting and billing software?
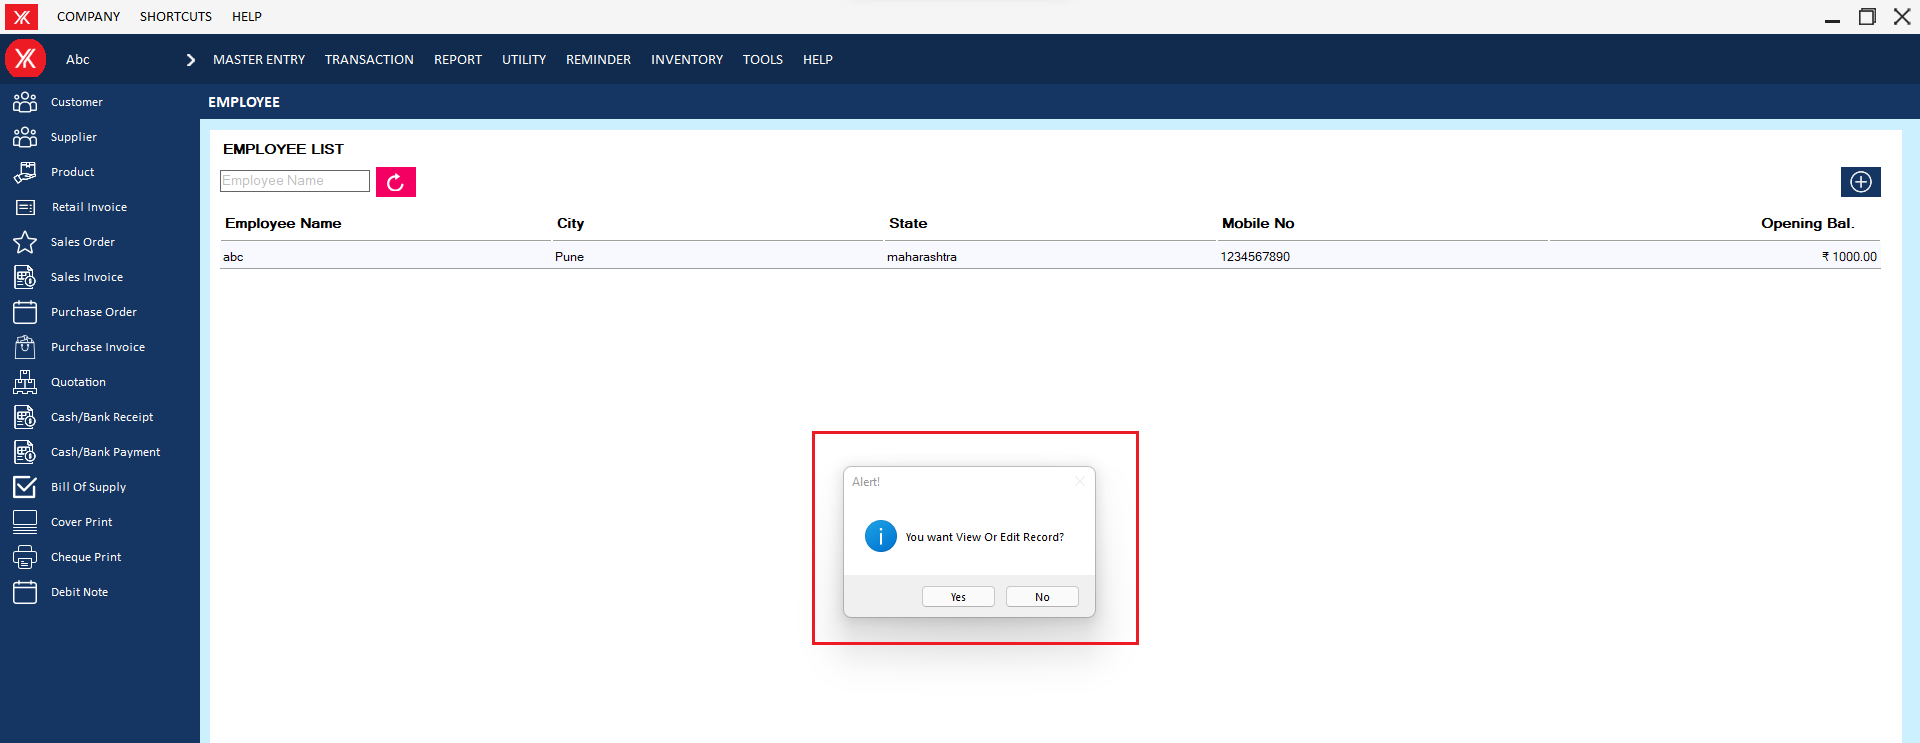
Step 1: Go to employee master, Previously created employee details will be listed. Select & double click on product master,

Step 2: you will get a message – “Do you want to view or edit record?”
Step 3:Go & click on delete, You will get a message – “Do you really want to delete the record?” If you click on Yes, you will get a confirmation message “successfully deleted”.
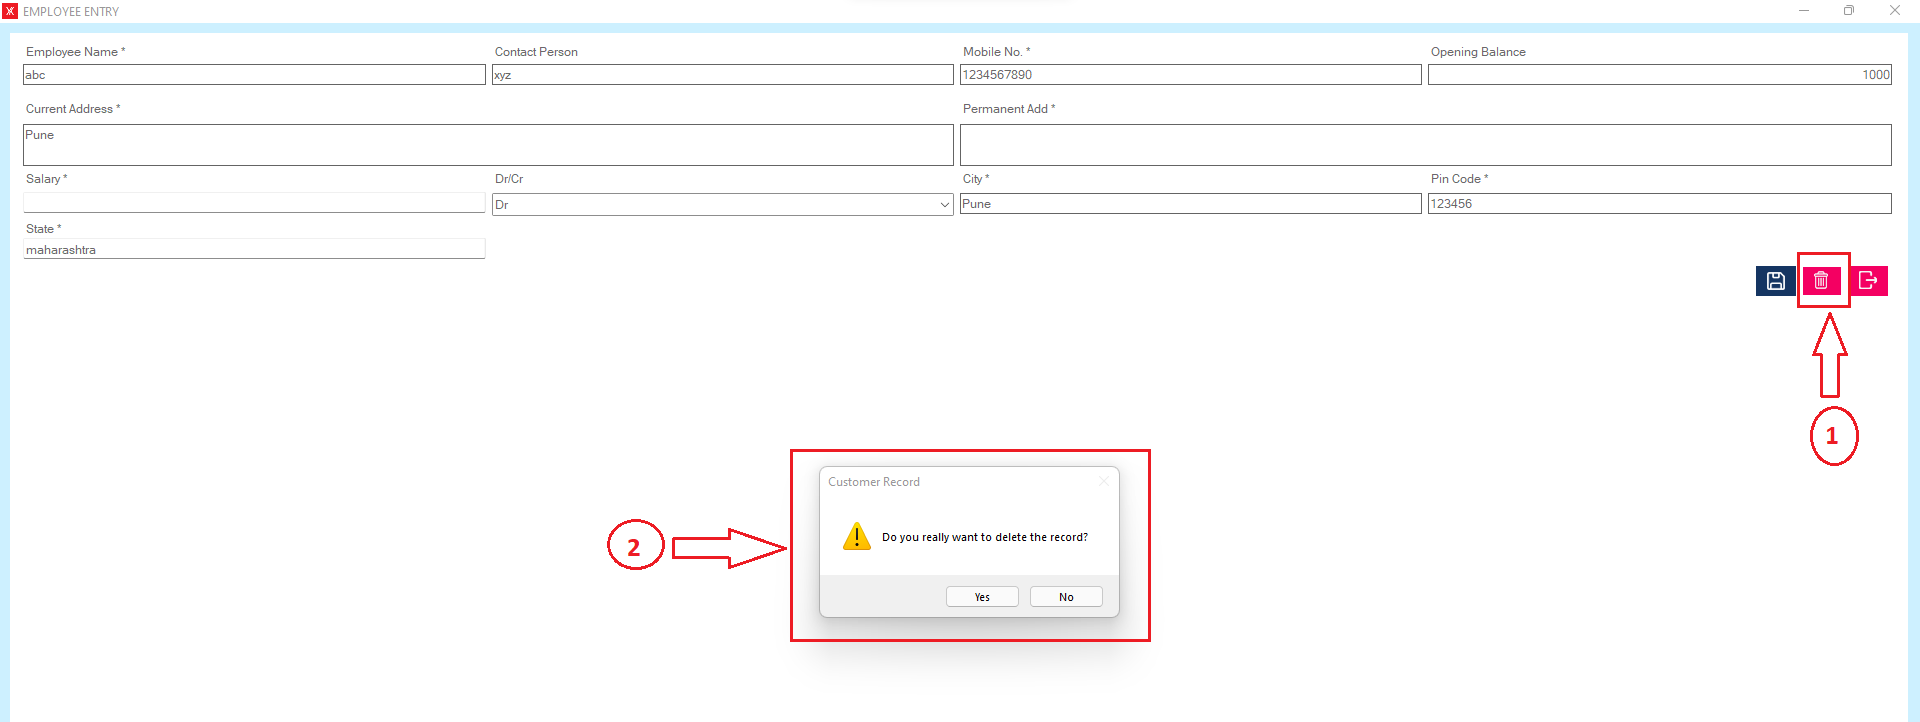
Step 4: The selected employee master will be remove from the list

- How to delete Partner master for Yourkhata accounting and billing software?
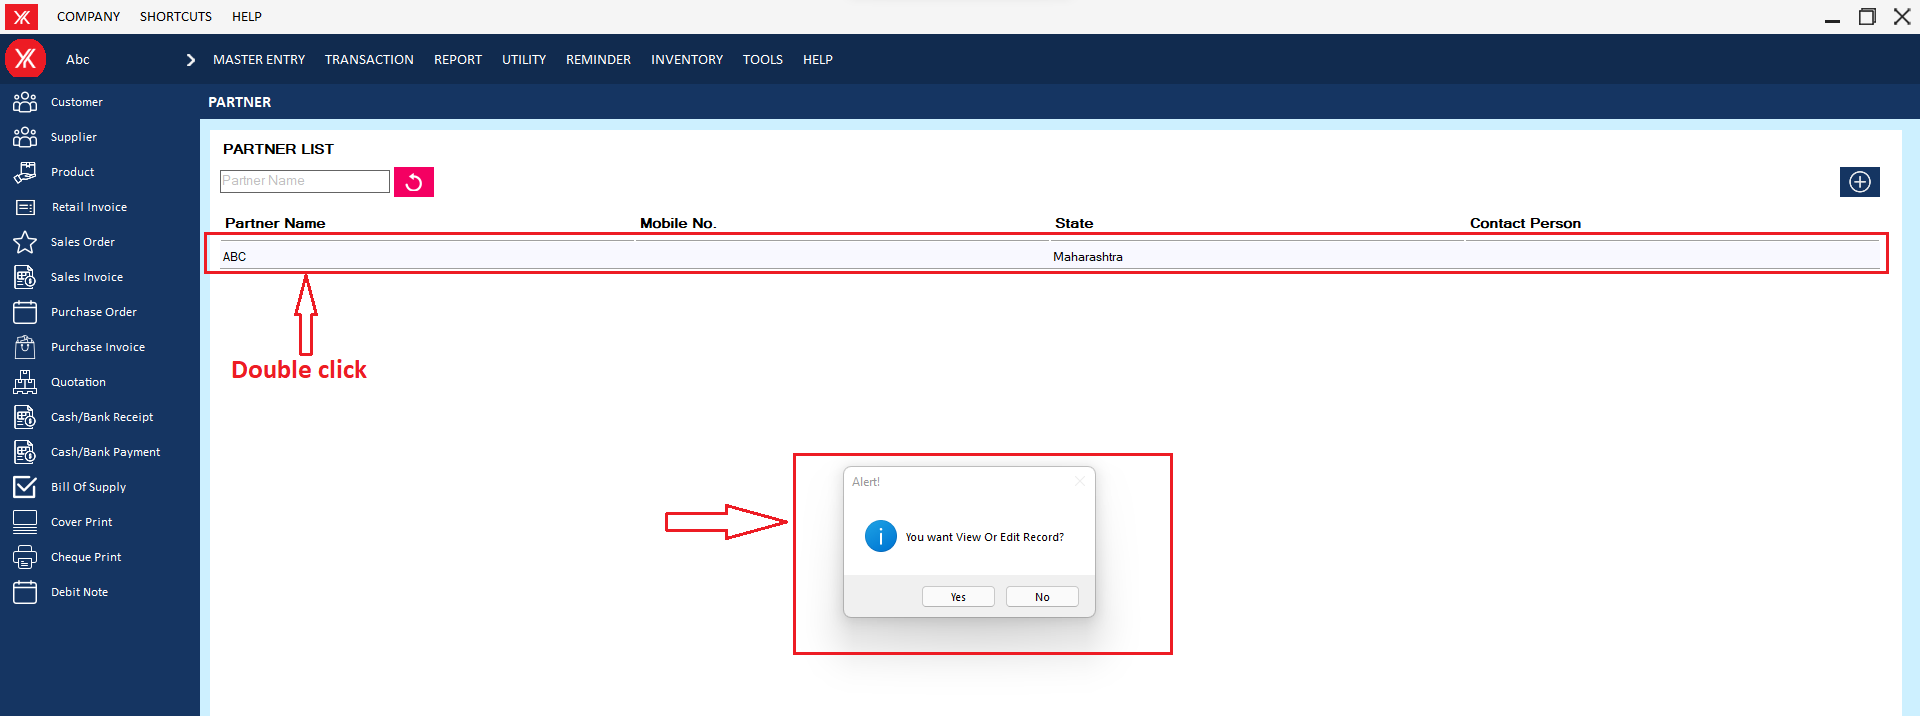
Step 1: Go to Partner master, Previously created partner details will be listed & double click on product details, You will get a message “You want to view to edit record?”.
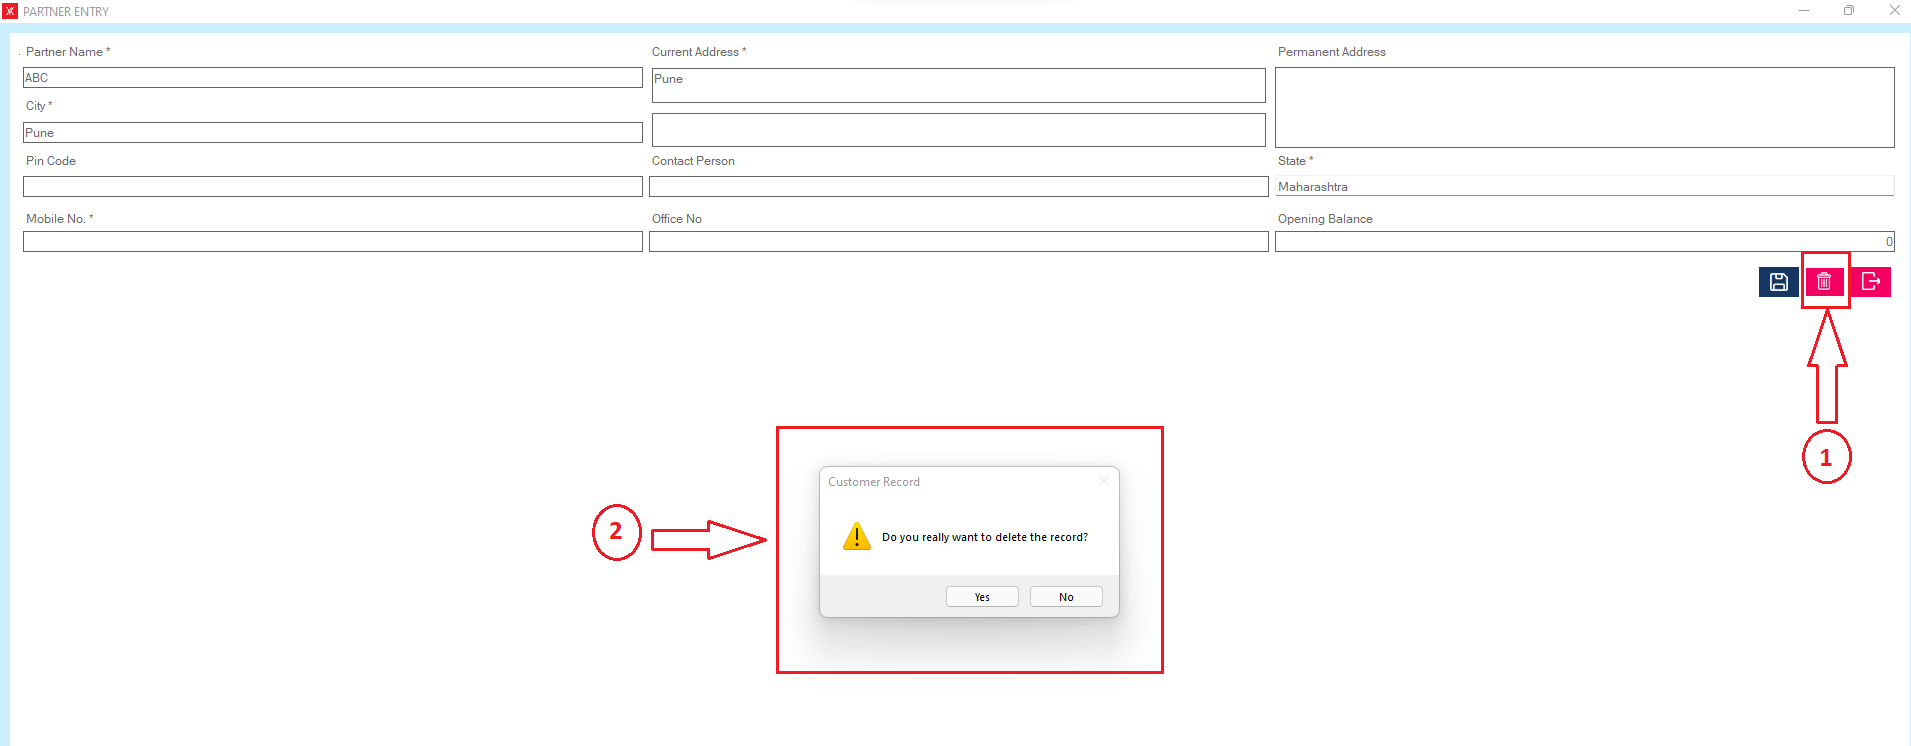
Step 3: Go & click on Delete, You will get a message – “Do you really want to delete the record?
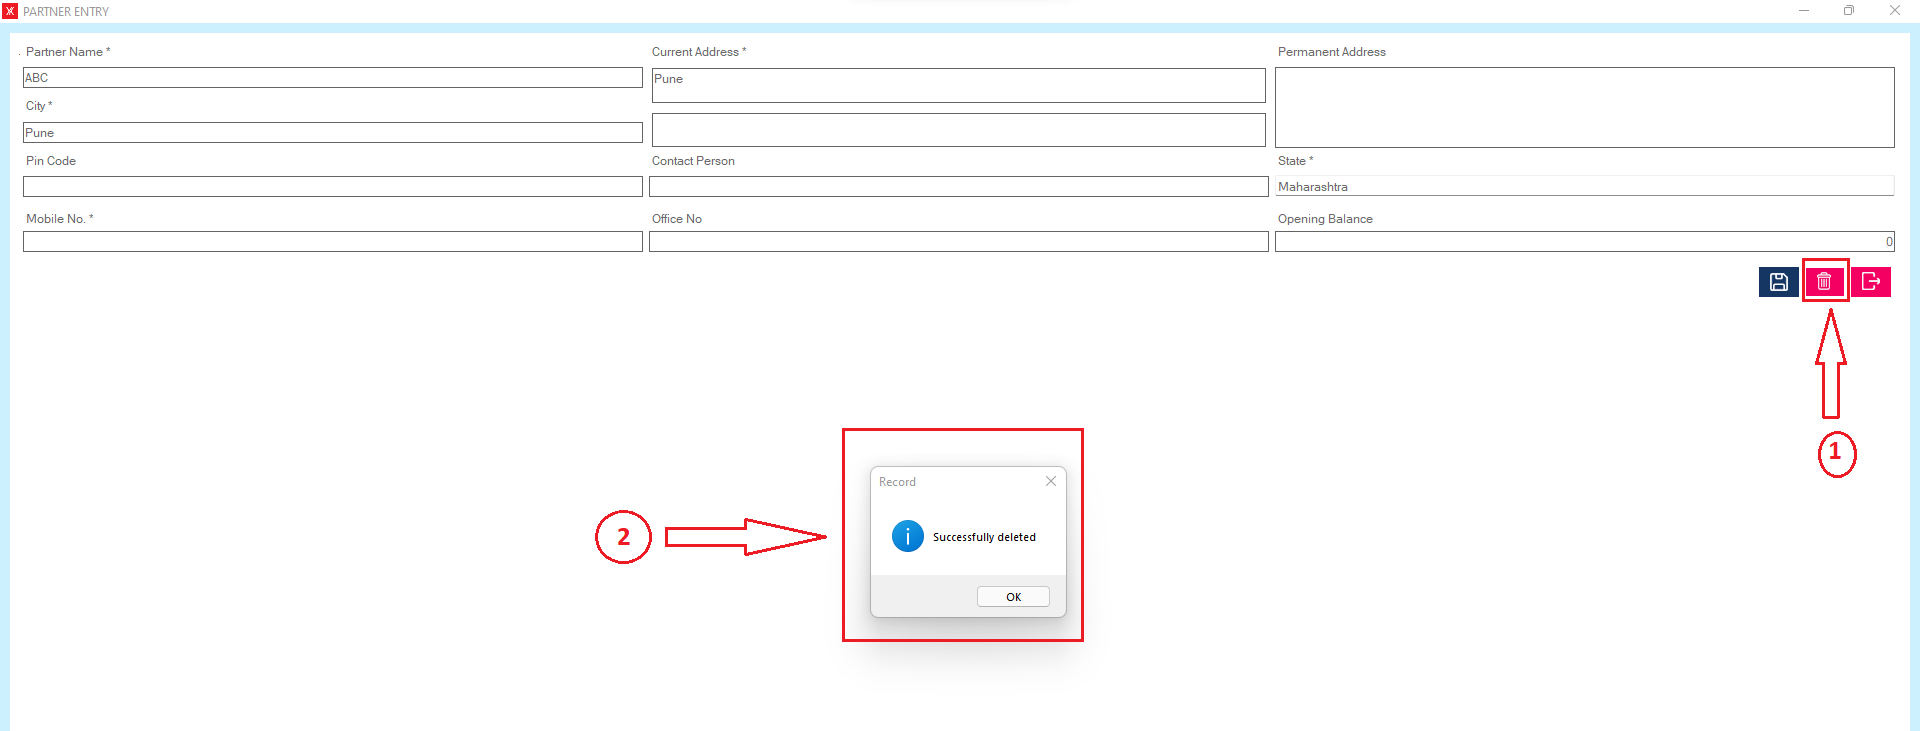
Step 4: If you click on Yes, you will get a confirmation message “successfully deleted”.
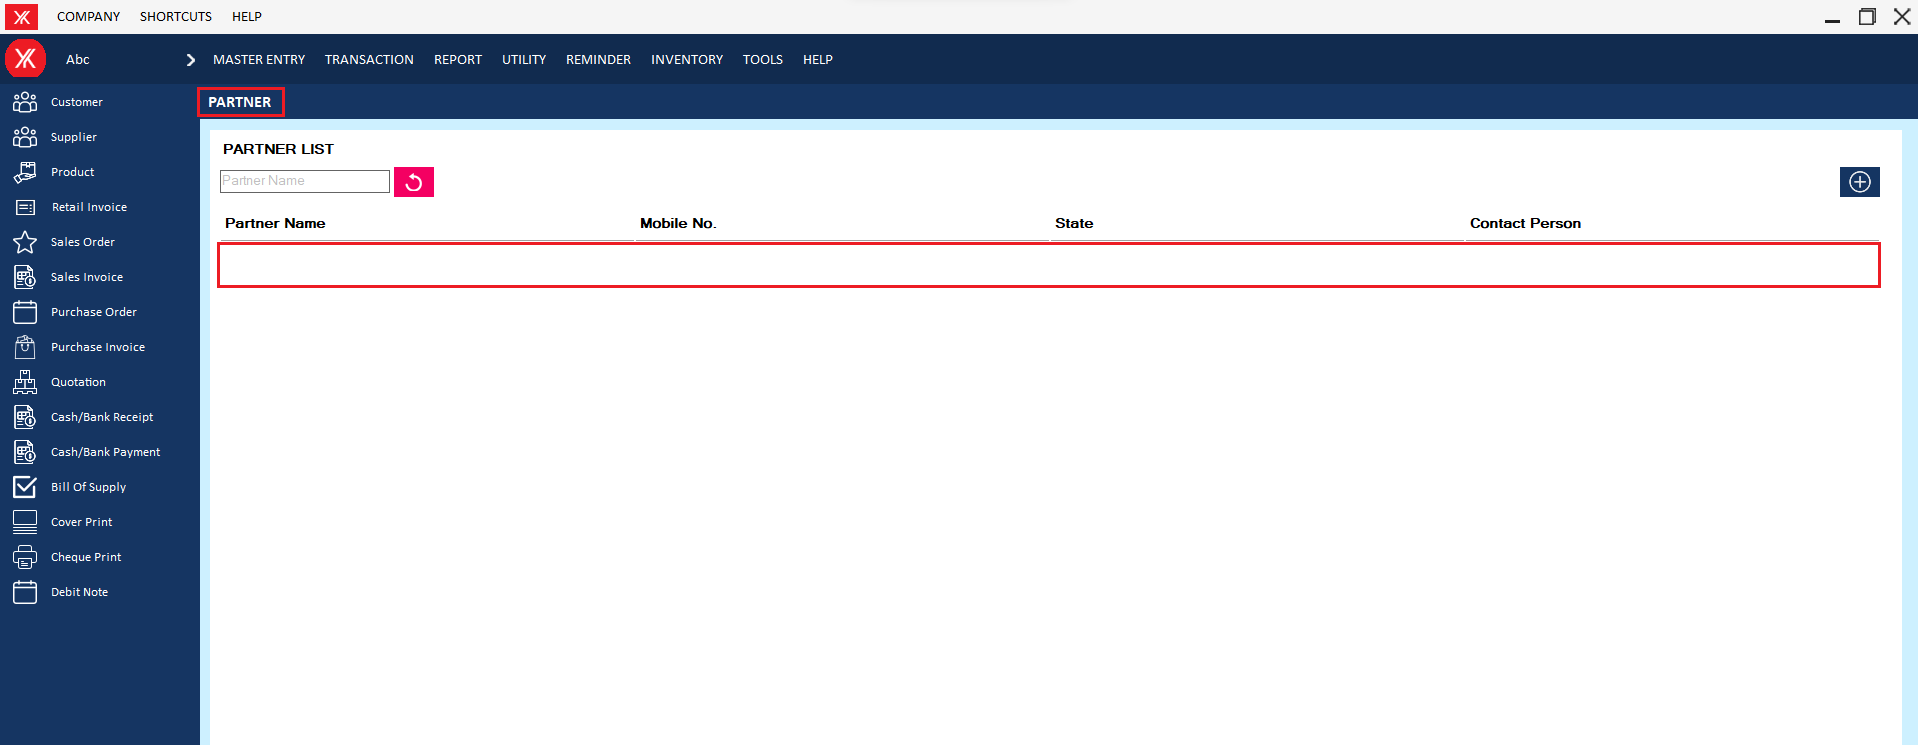
Step 5: The selected product will remove from the list
- How to delete Cash payment method for Yourkhata accounting and billing software?
Step 1: Go to cash payment method, Previously created cash payment details will be listed. Select & double click on record > click on delete , you will get a message – “Do you really want to delete the record?”
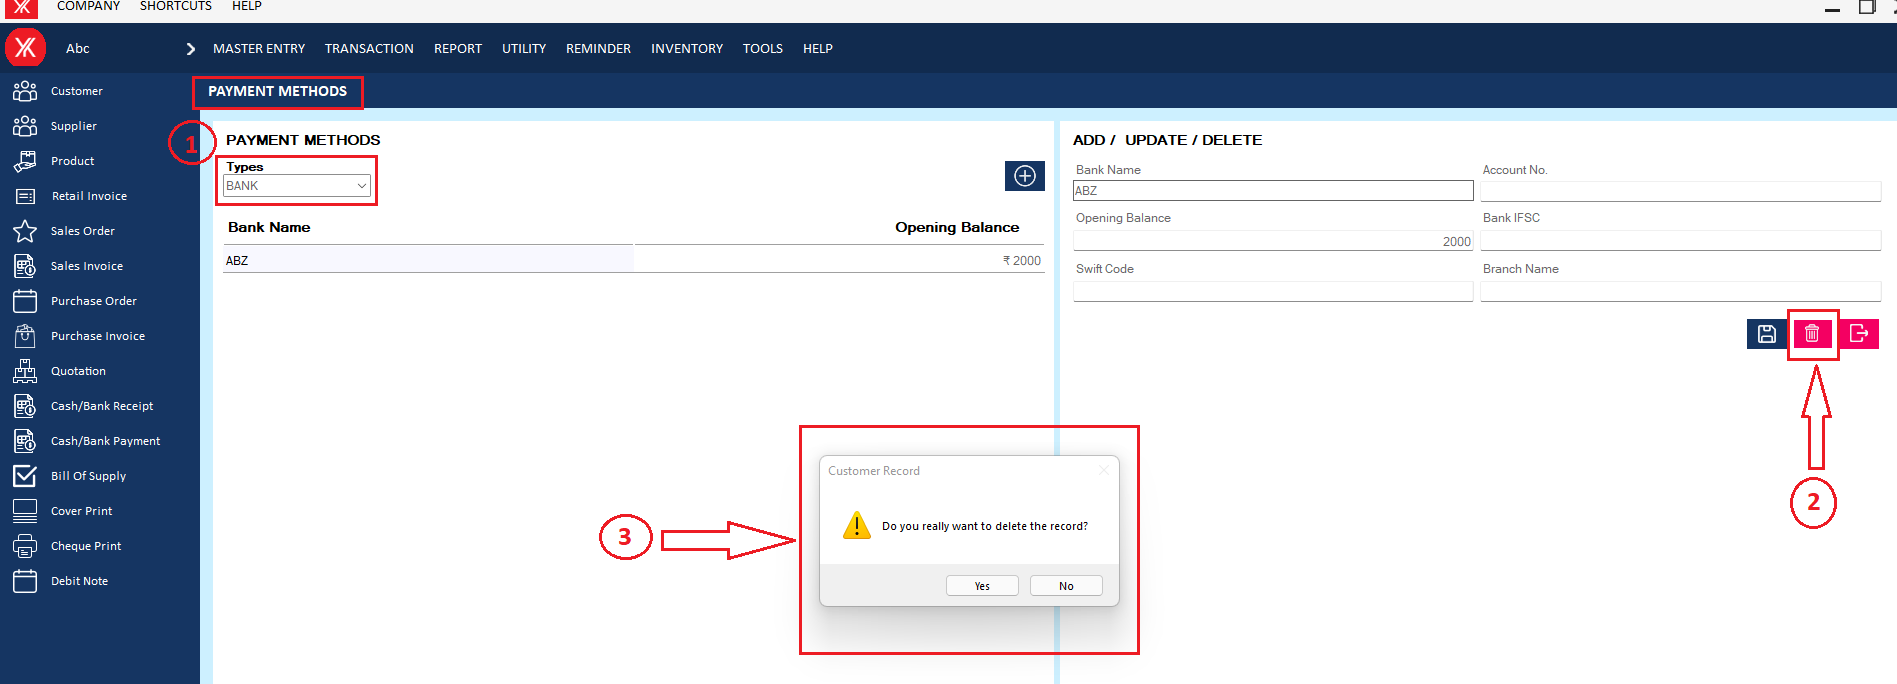
Step 2: If you click on Yes, you will get a confirmation message “Successfully deleted”.
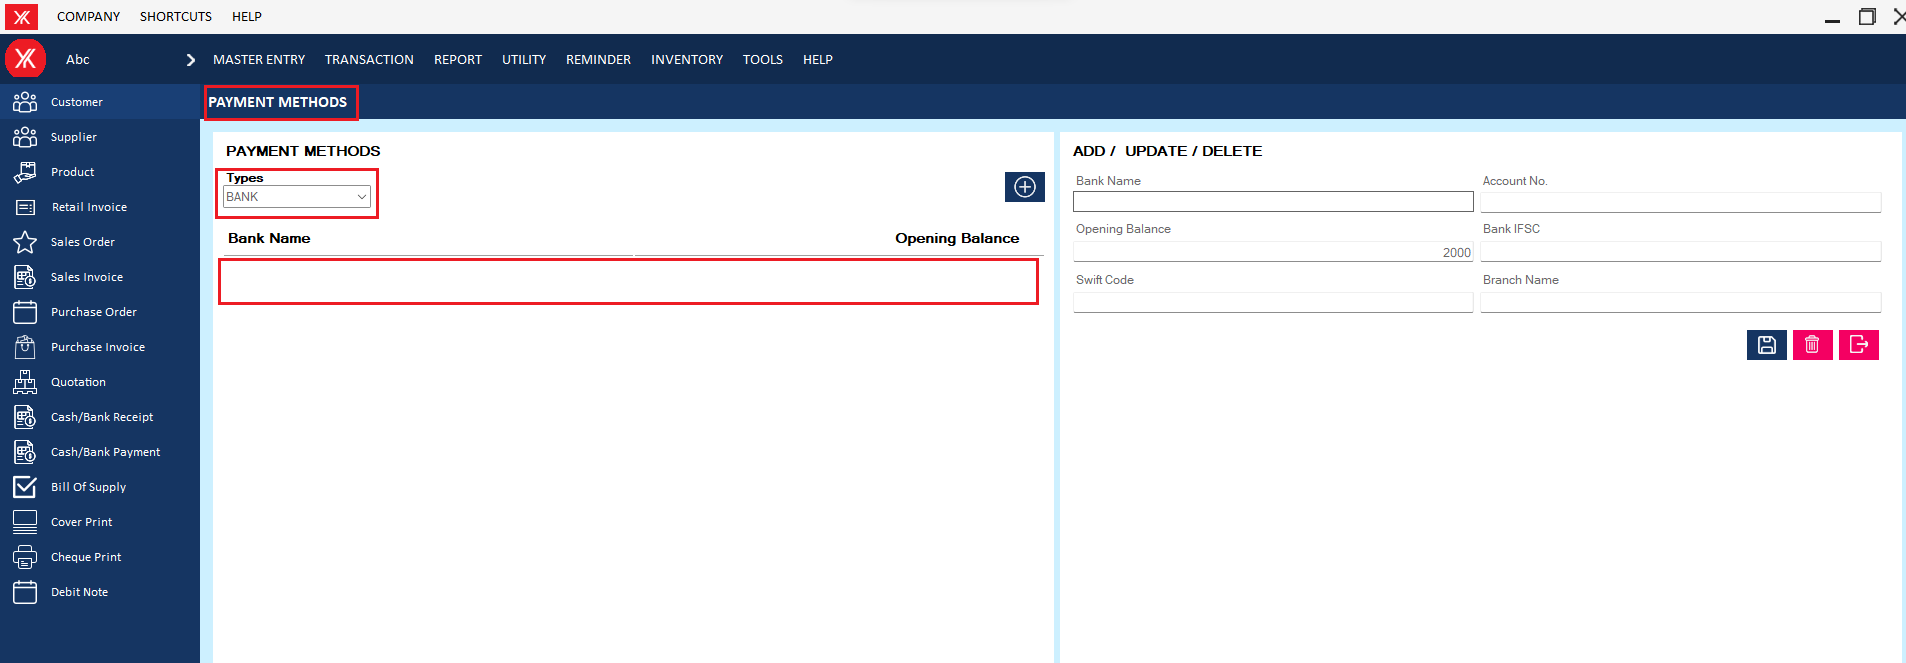
- How to delete Bank payment method for Yourkhata accounting and billing software?
Step 1: Go to bank payment method, Previously created bank payment details will be listed. Select & double click on record > click on delete, you will get a message – “Do you really want to delete the record?”
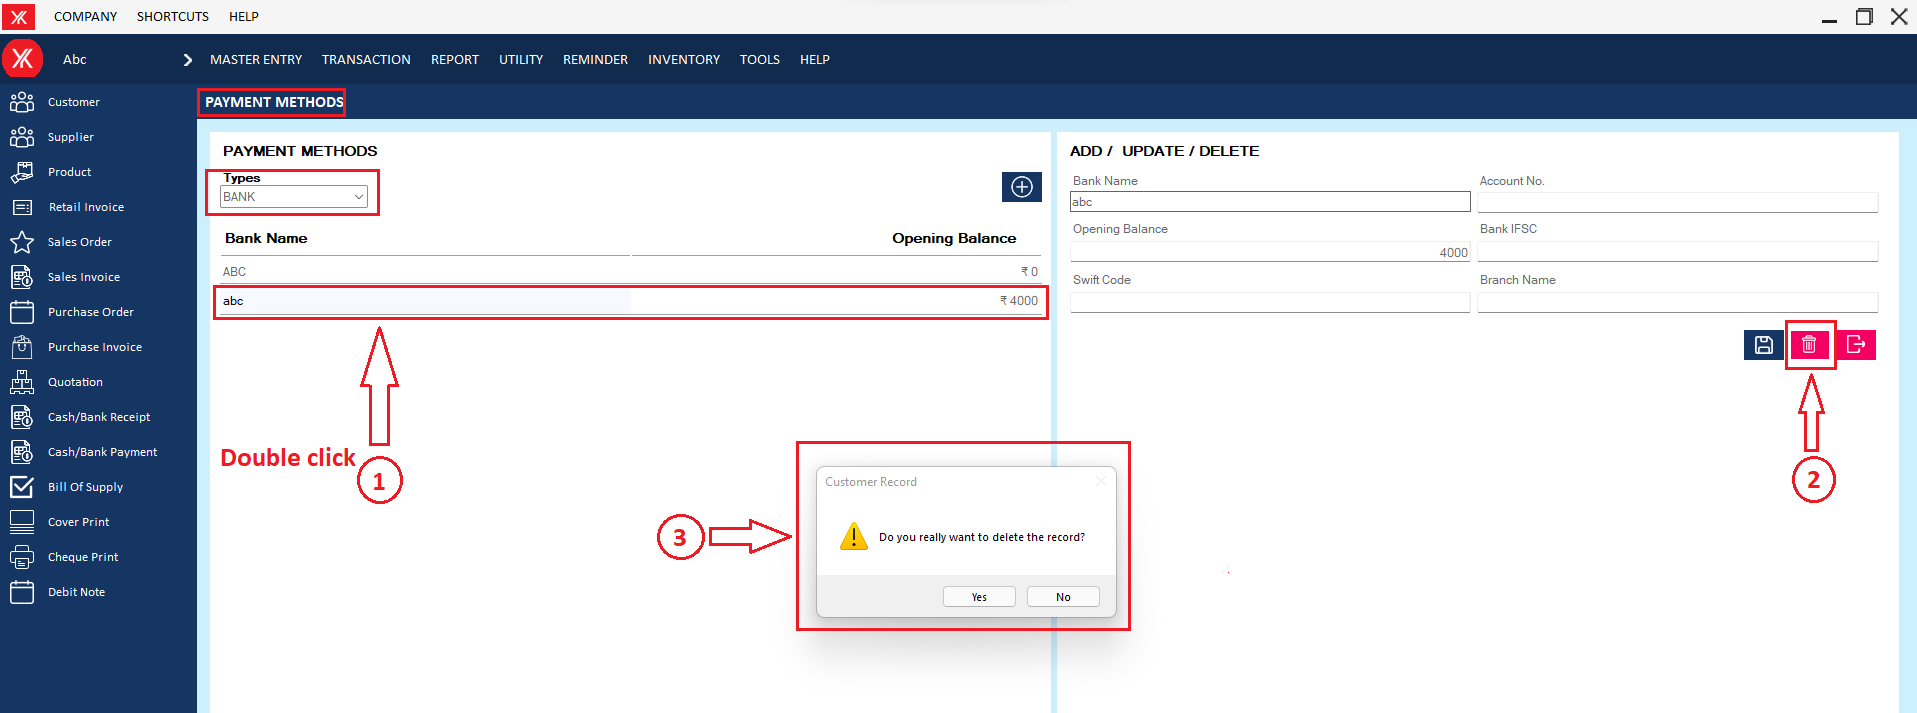
Step 2: If you click on Yes, you will get a confirmation message “Successfully deleted”.

- How to delete Paytm payment method for Yourkhata accounting and billing software?
Step 1: Go to Paytm payment method, Previously created Paytm payment details will be listed. Select & double click on record & click on delete, you will get a message – “Do you really want to delete the record?”
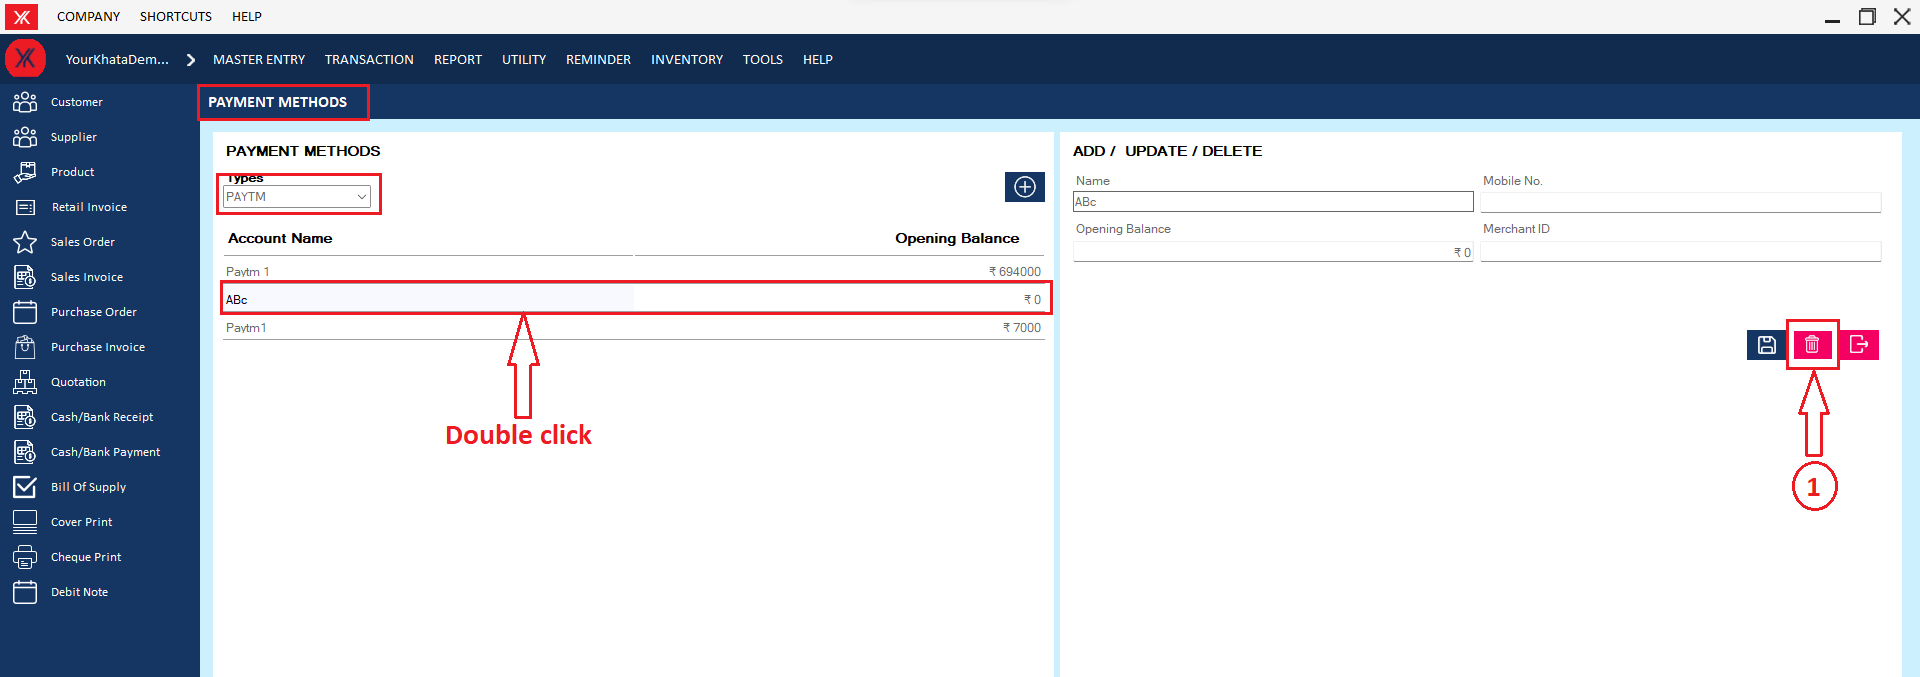
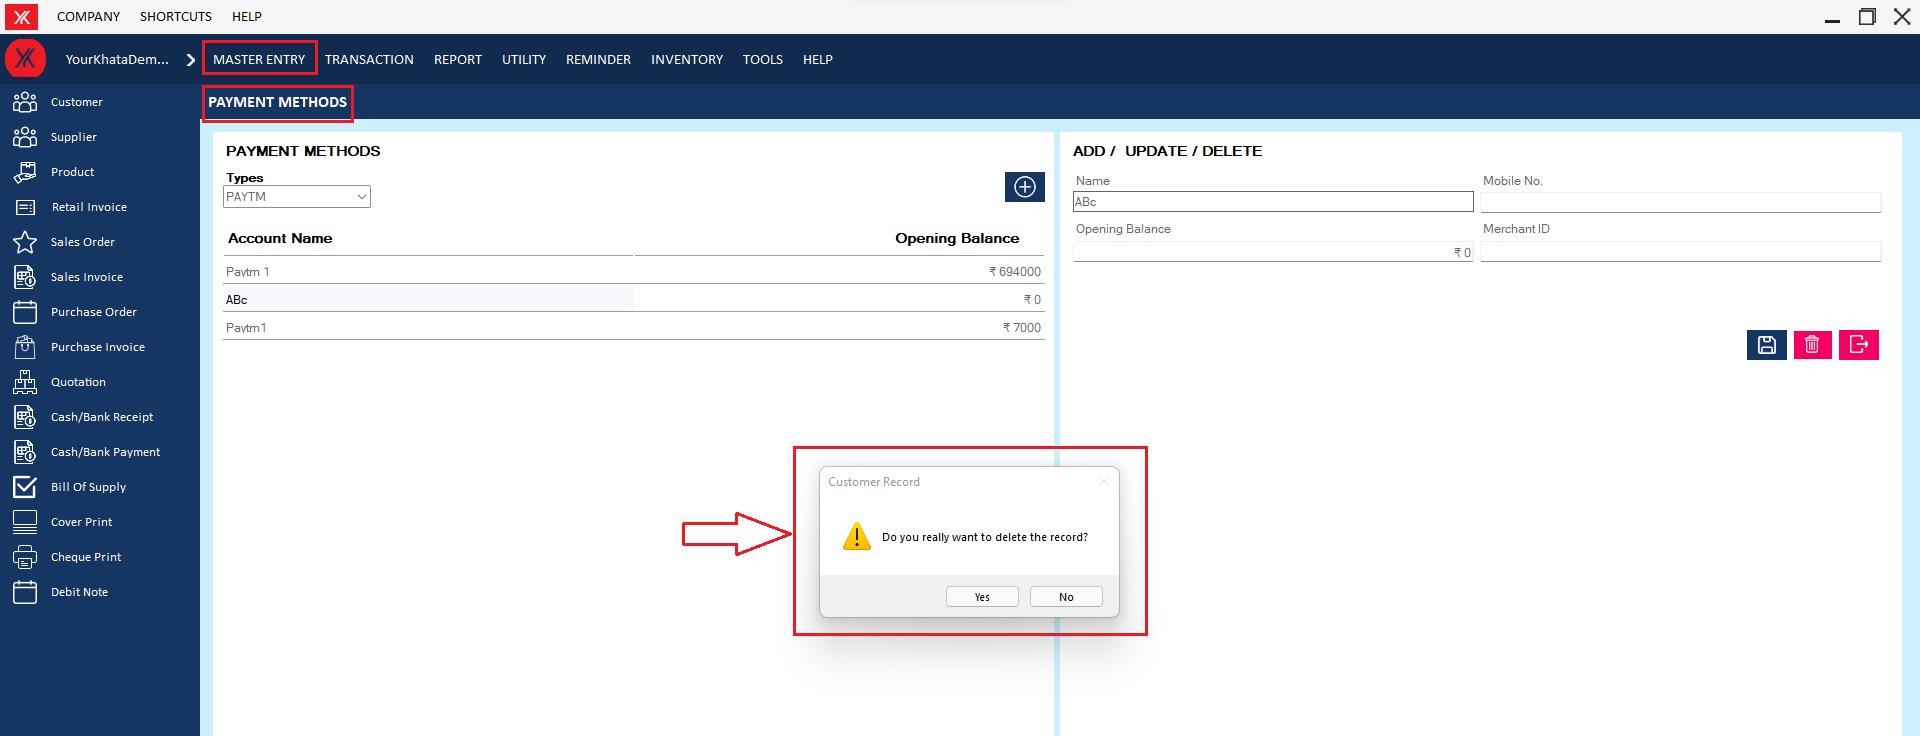
Step 2: If you click on yes, the selected Paytm method will be delete from the list
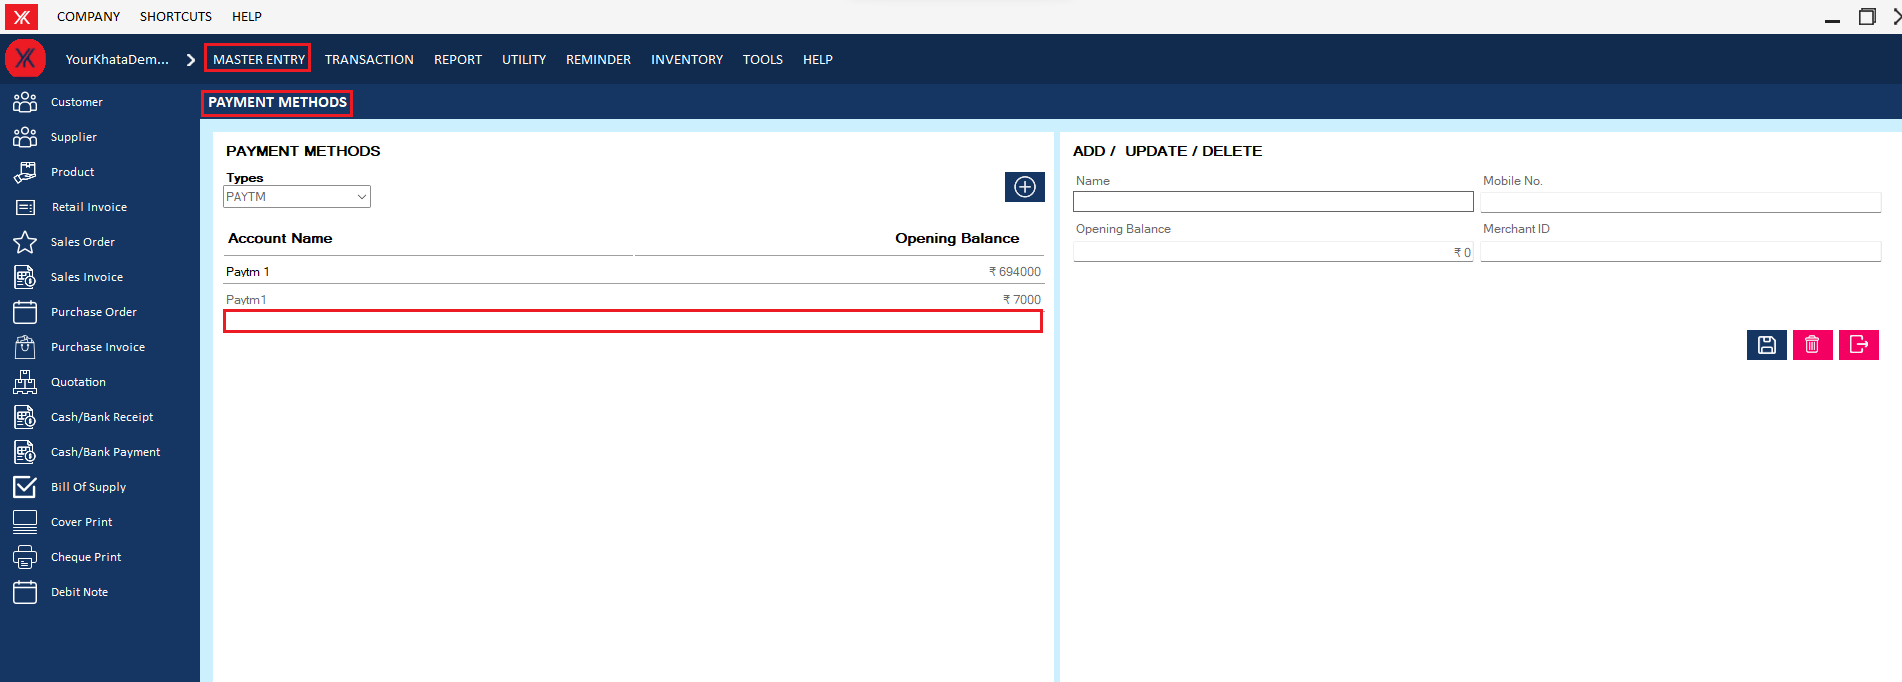
- How to delete UPI payment method for Yourkhata accounting and billing software?
Step 1: Go to UPI payment method, Previously created UPI payment details will be listed. Select & double click on record > click on delete, you will get a message – “Do you really want to delete the record?”
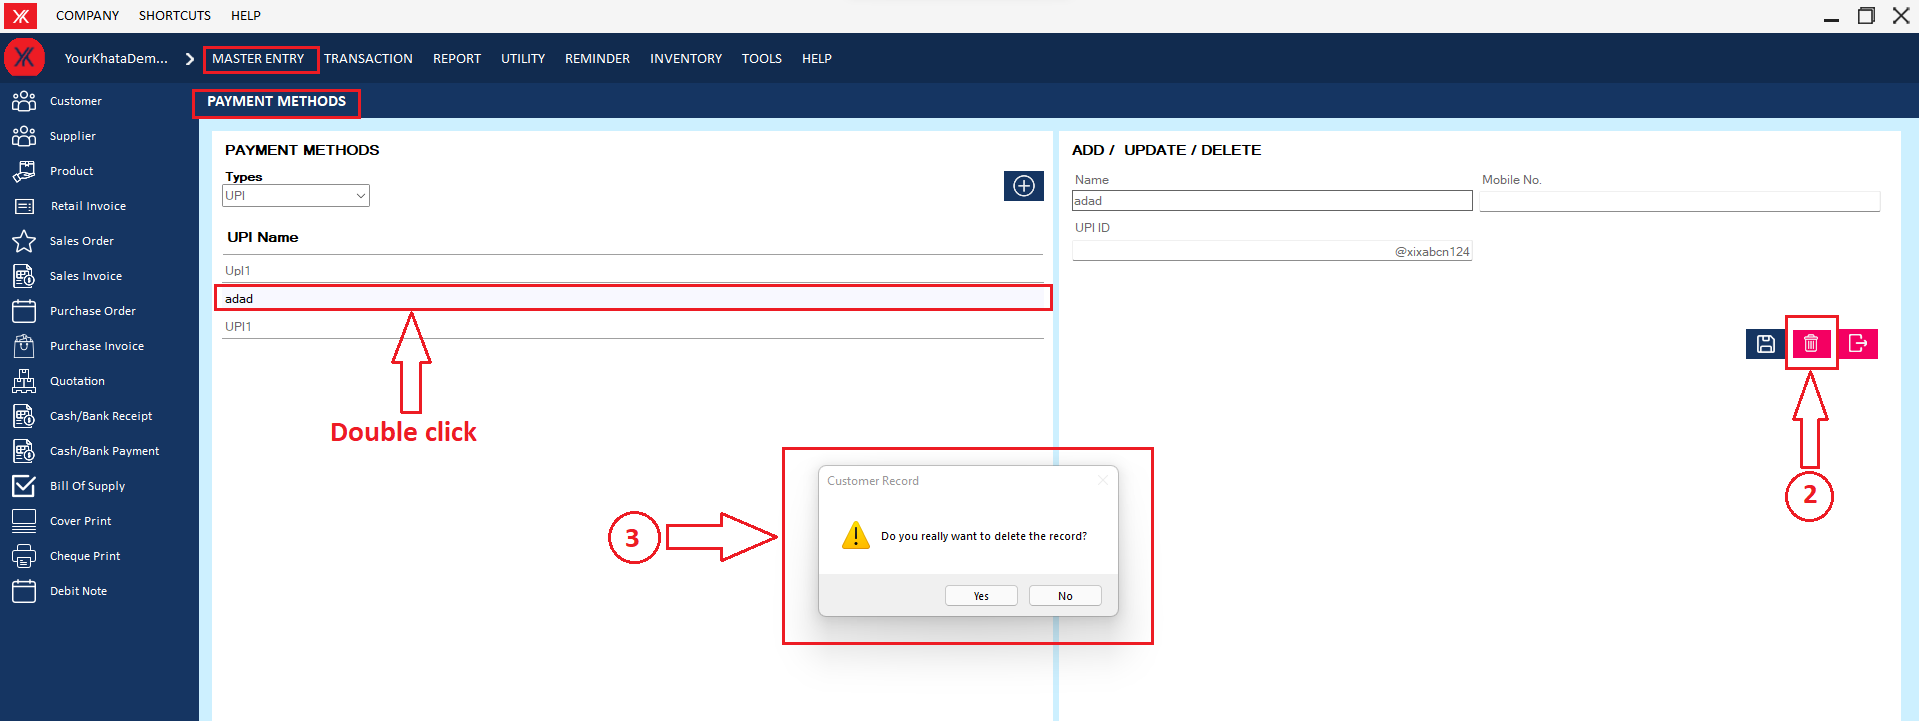
Step 2: If you click on Yes, the selected method will be delete from the list

- How to delete Bill of supply for Yourkhata accounting and billing software?
Step 1: Go to bill of supply, Previously created user details will be listed > select & double click on it > You will get a message “you want to edit or view record?”
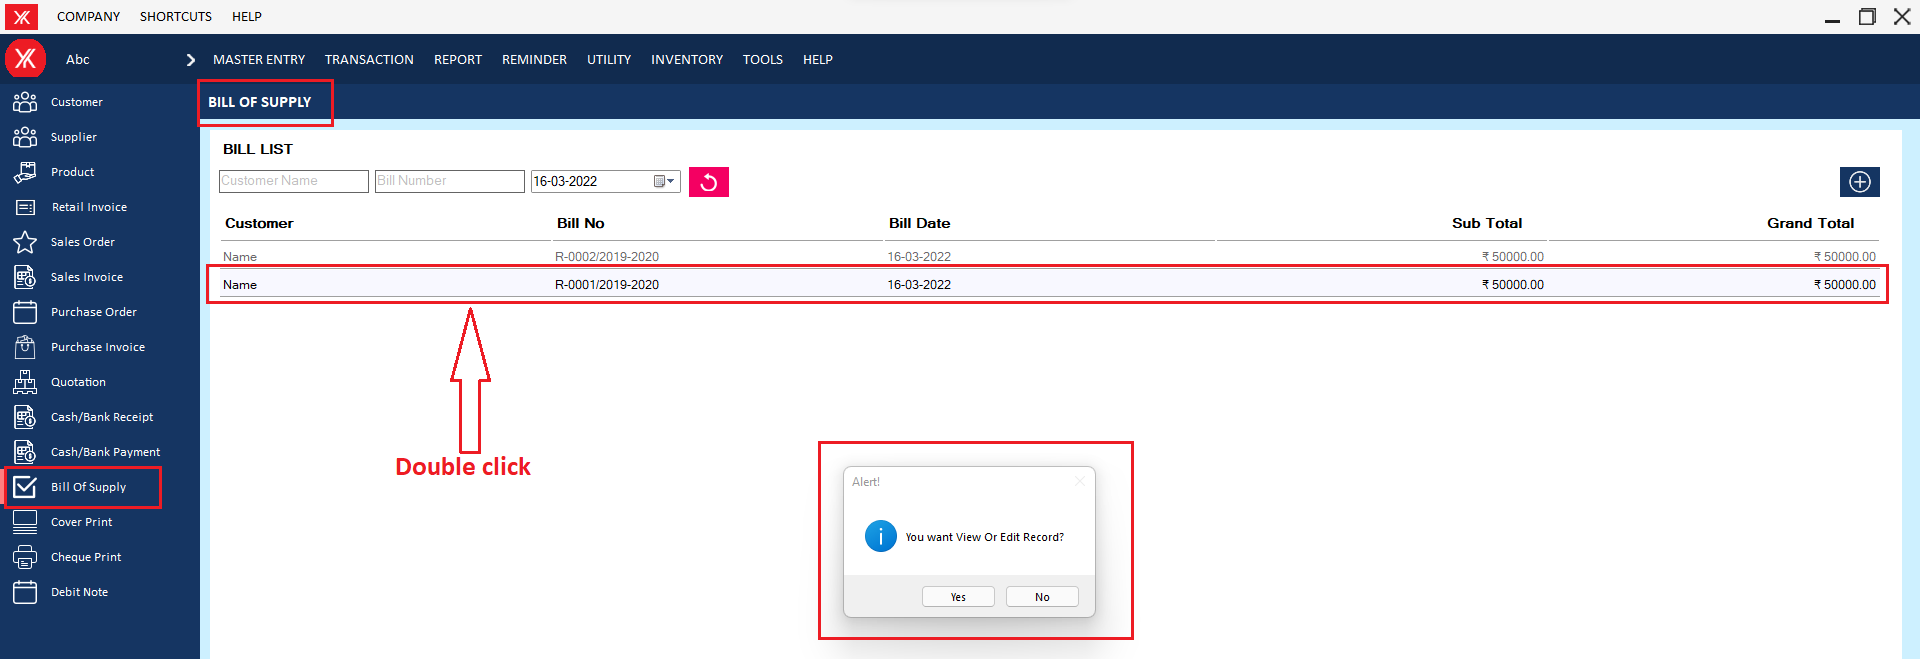
Step 2: Click on delete > you will get a message that “Do you really want to delete this record?”
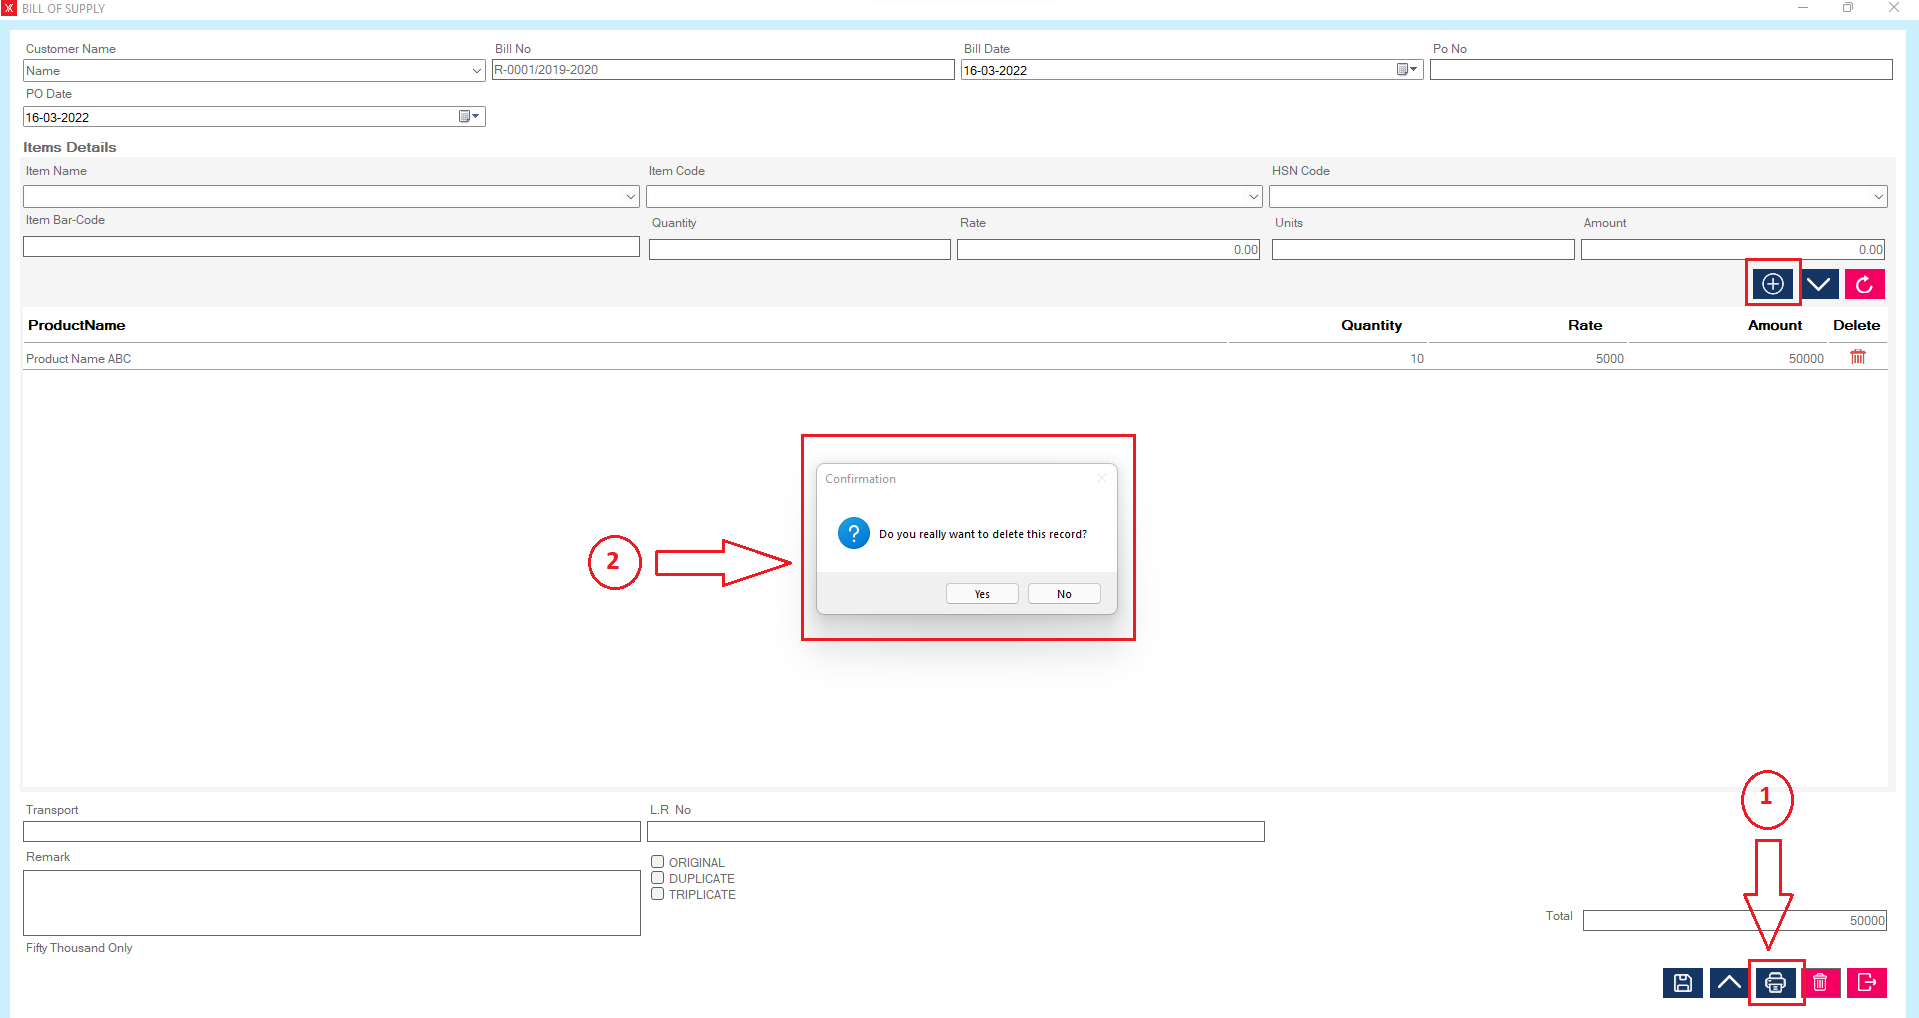
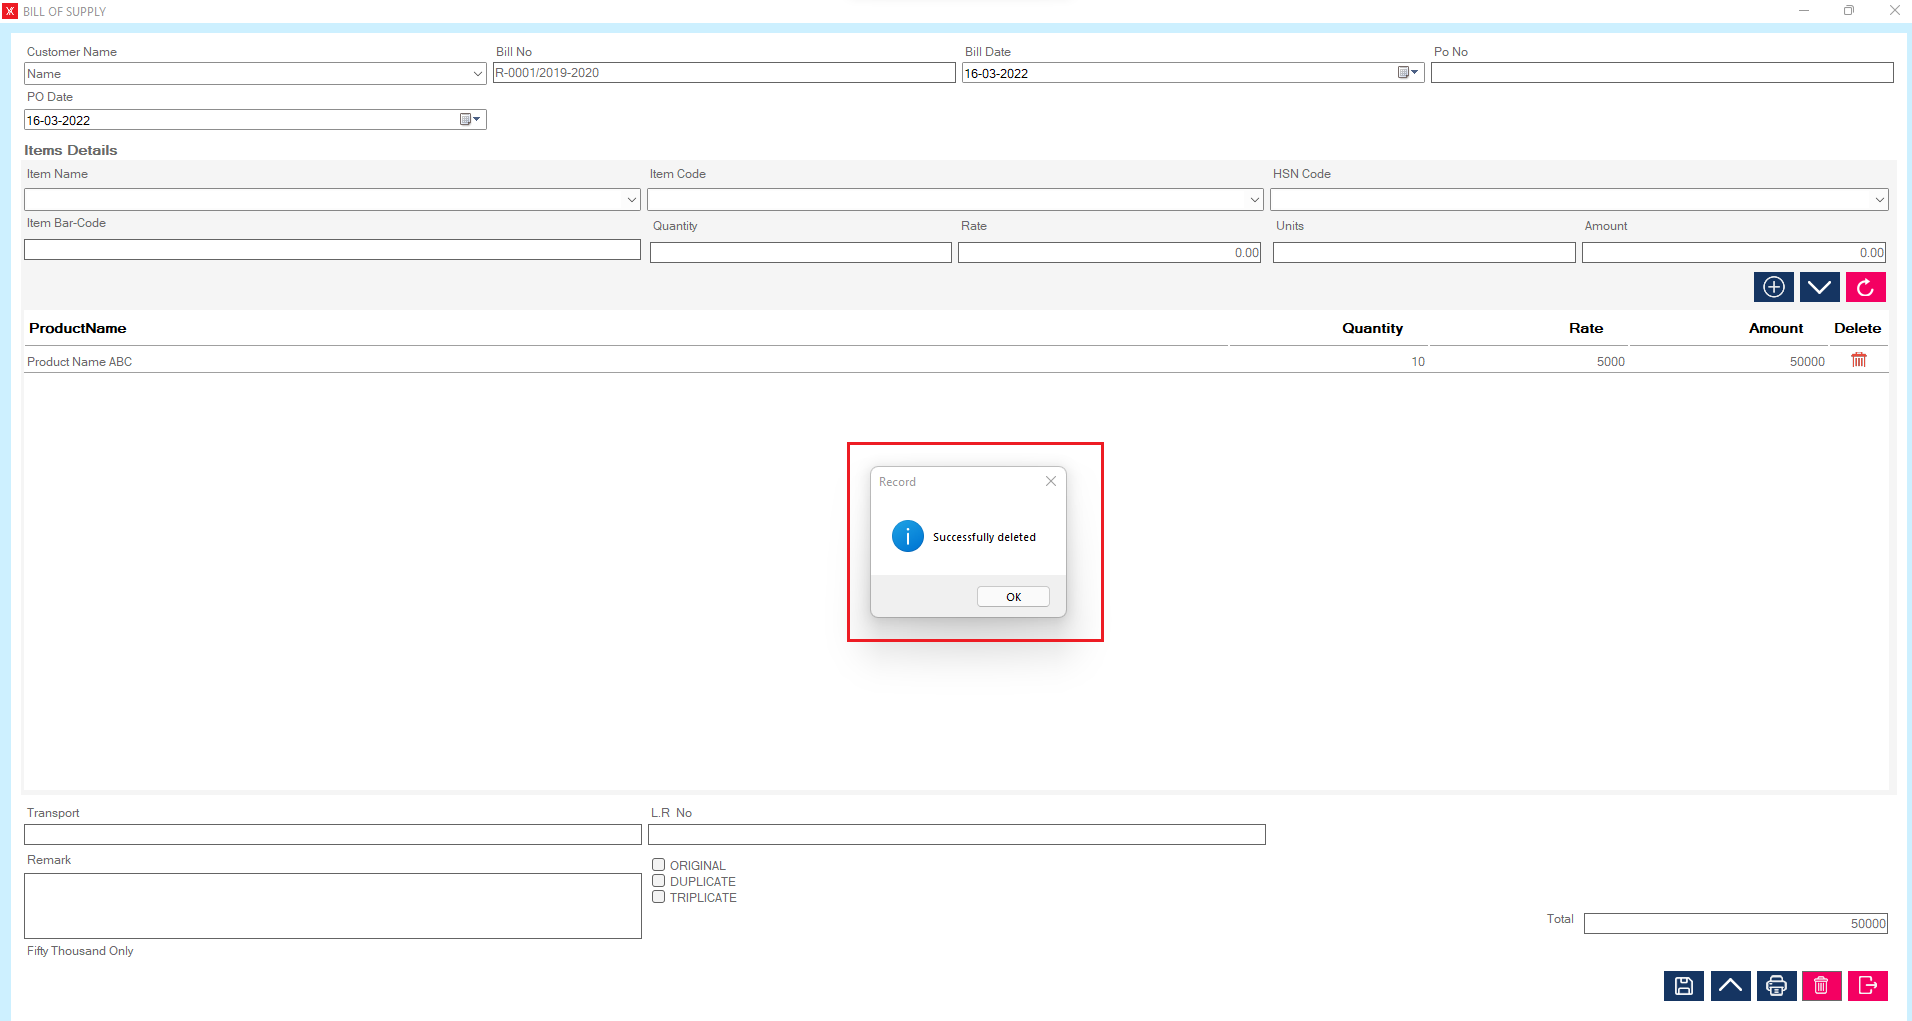
Step 3: After clicking on yes, you will get a message that “successfully deleted”
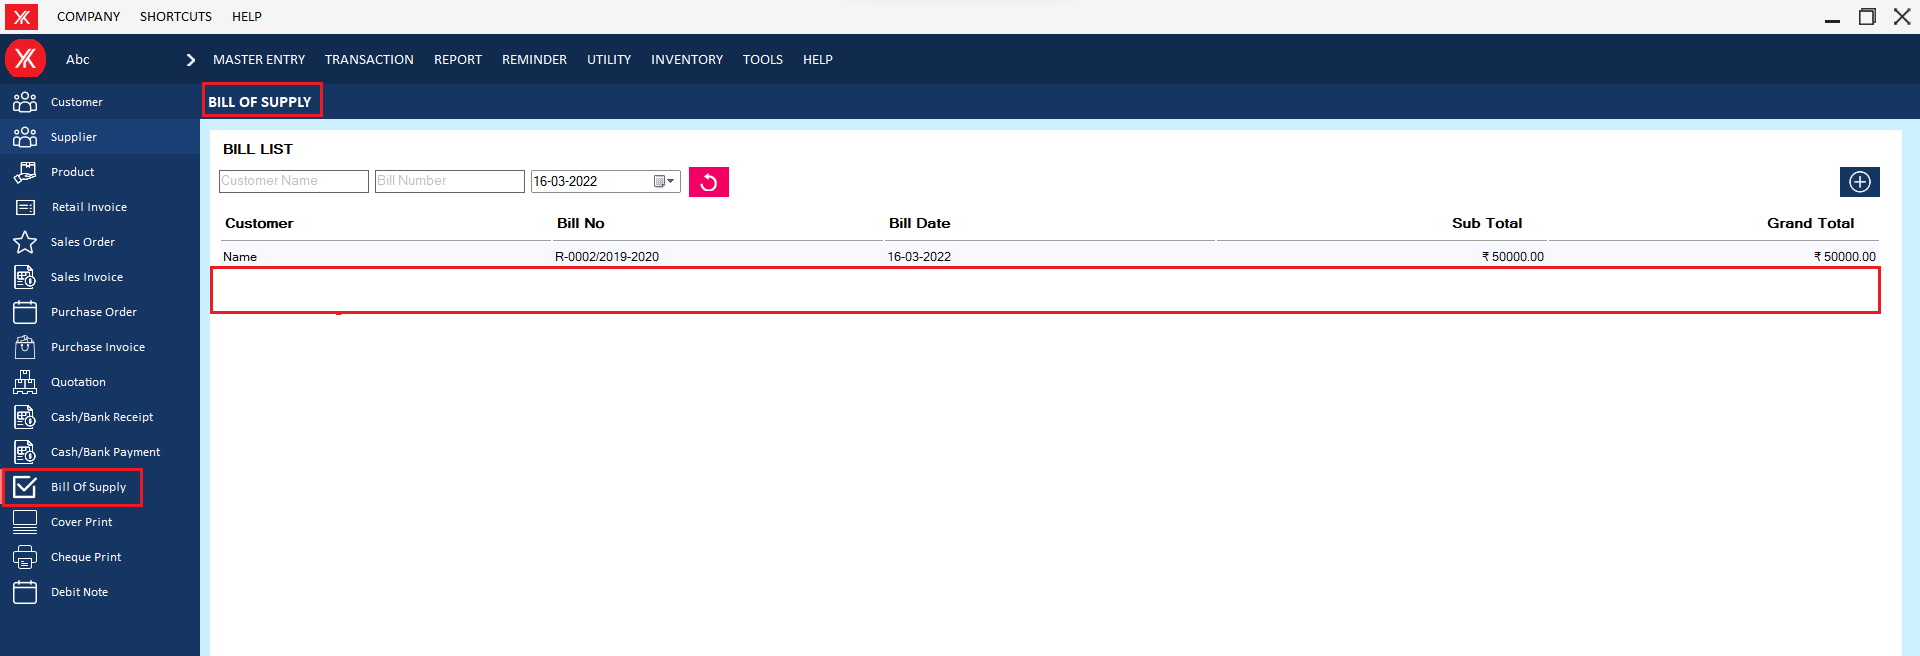
Step 4: The user will be remove from the list
- How to delete Cheque print for Yourkhata accounting and billing software?
Step 1: Go to cheque print , Previously created cheque print details will be listed > double click on record > you will get a message , you want to view or edit record?
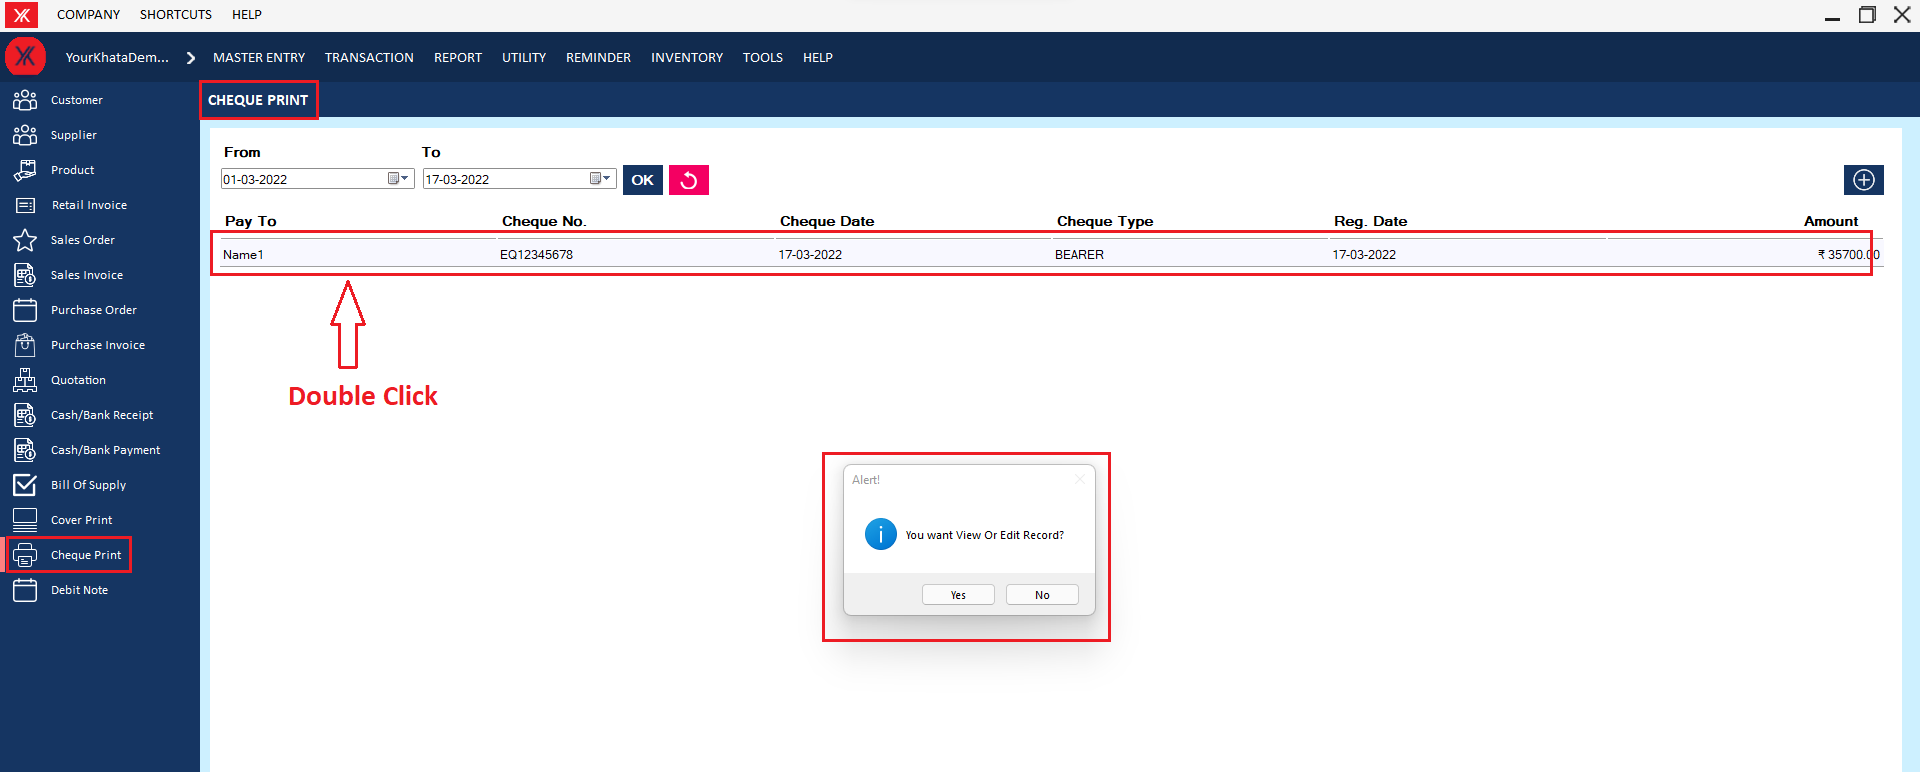
Step 2: click on delete > you will get the message “Do you really want to delete this record?”
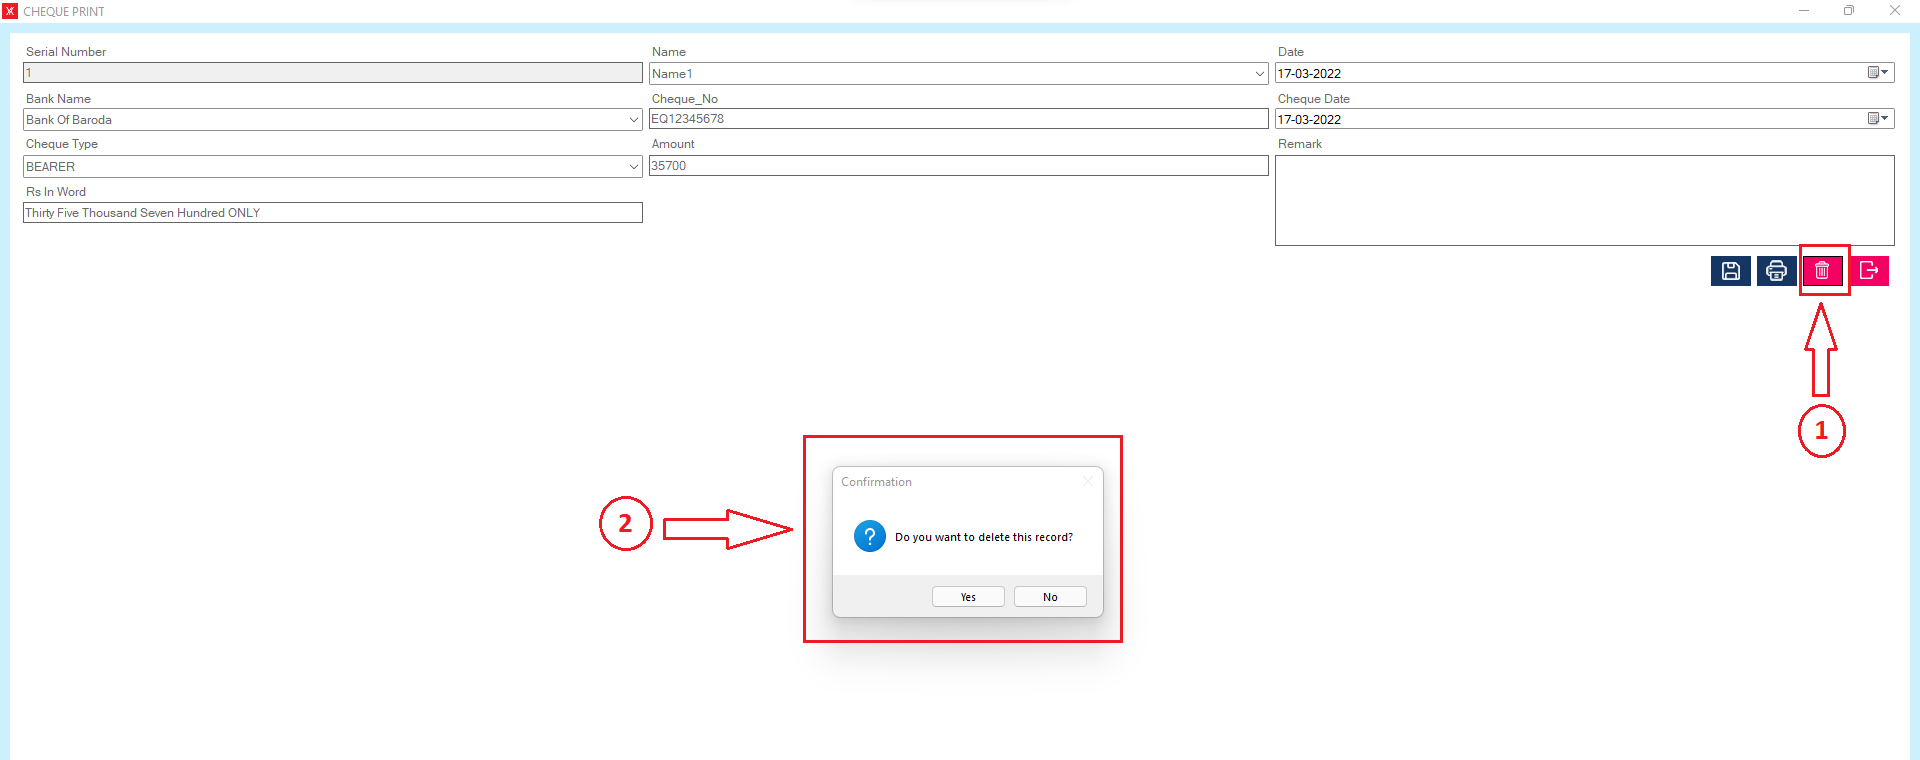
Step 3: If you click on Yes, you will get a confirmation message “successfully deleted”.
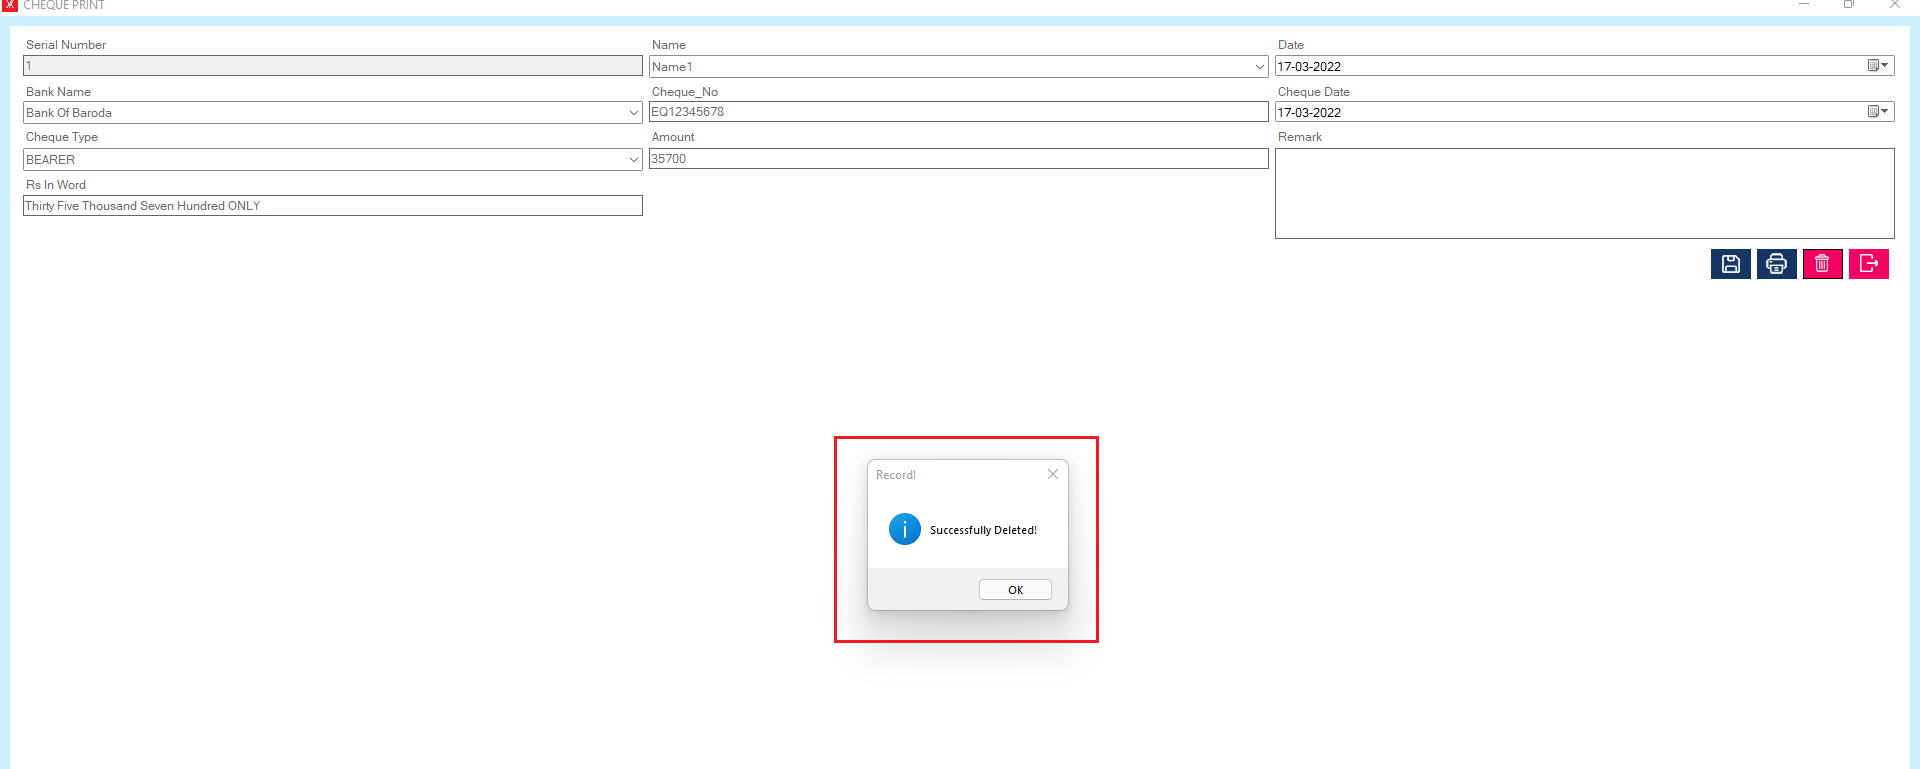
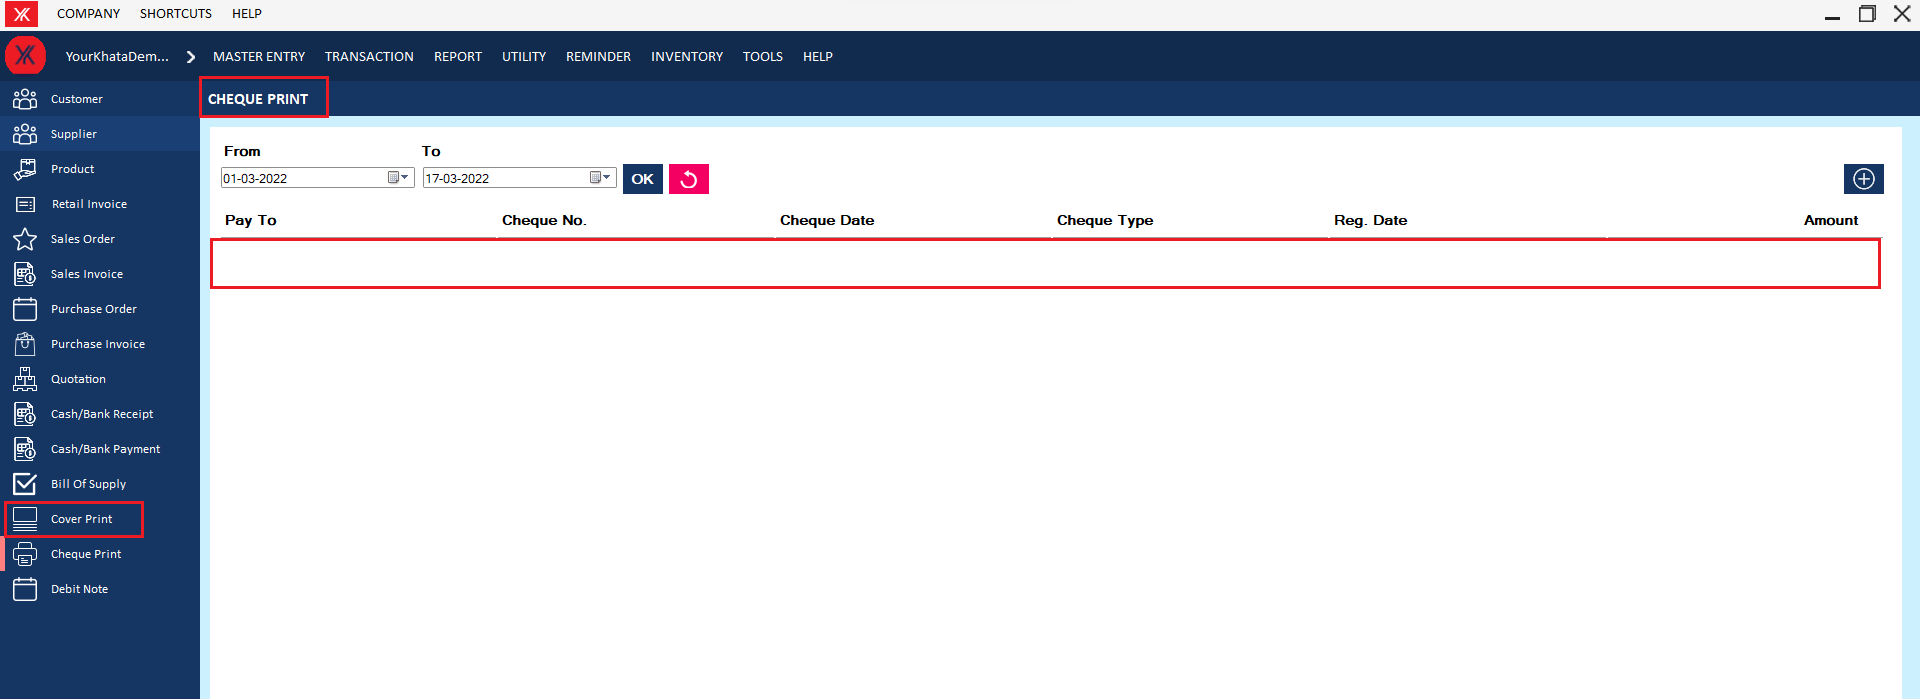
Step 4: The selected sales order will be delete from the list
- How to delete Income master for Yourkhata accounting and billing software?
Step 1: Go to income master, Previously created income details will be listed. Select & double click on income master > click on delete >: you will get a message – “Do you want to view or edit record?”
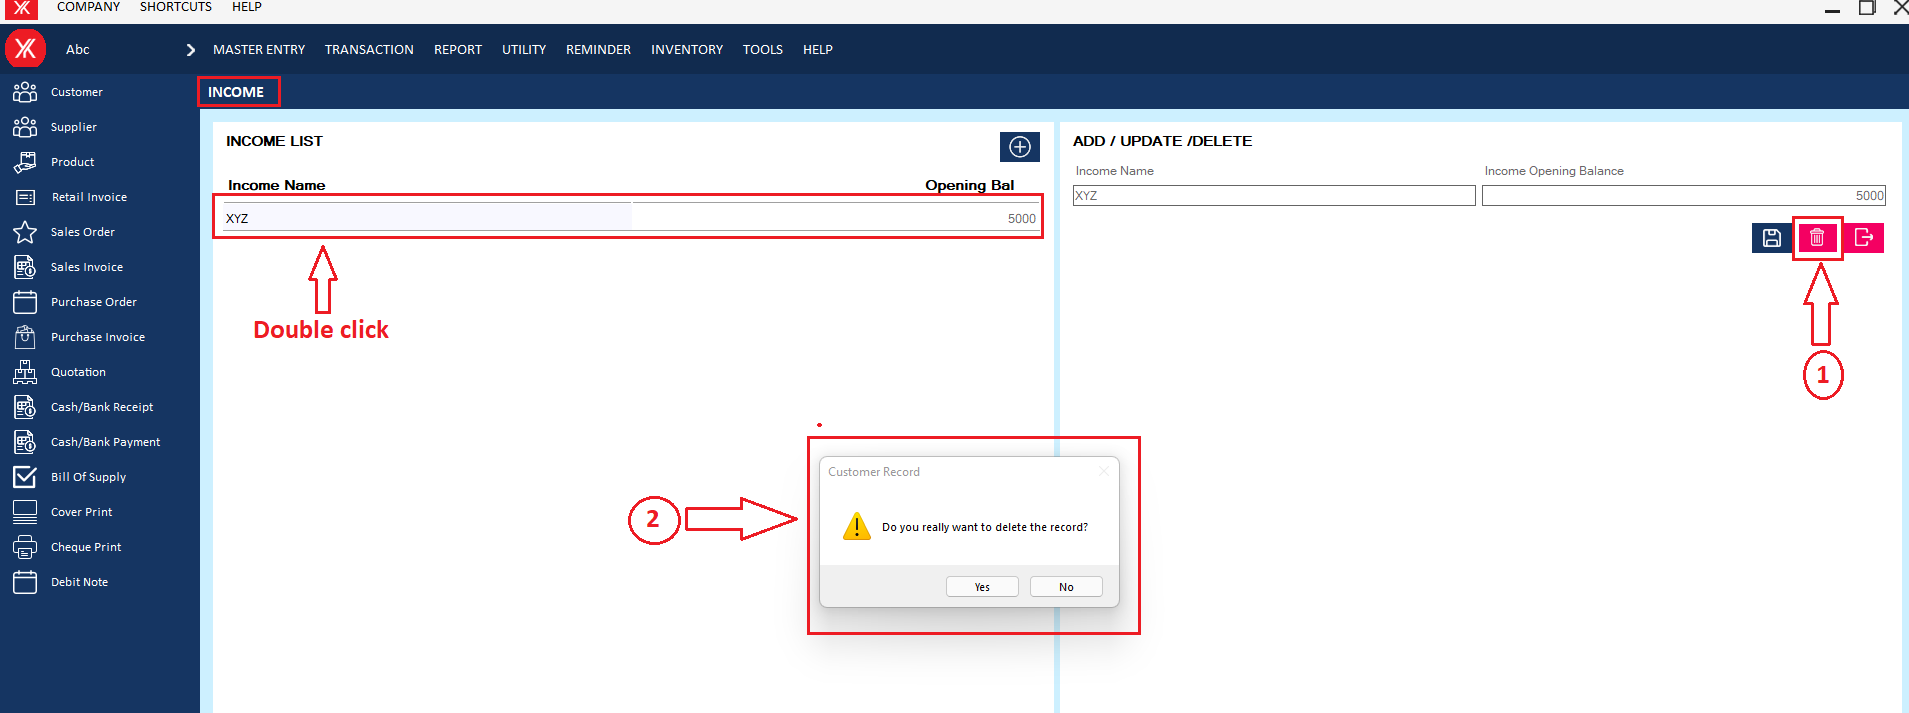
Step 2: If you click on Yes, you will get a confirmation message “Successfully deleted”.
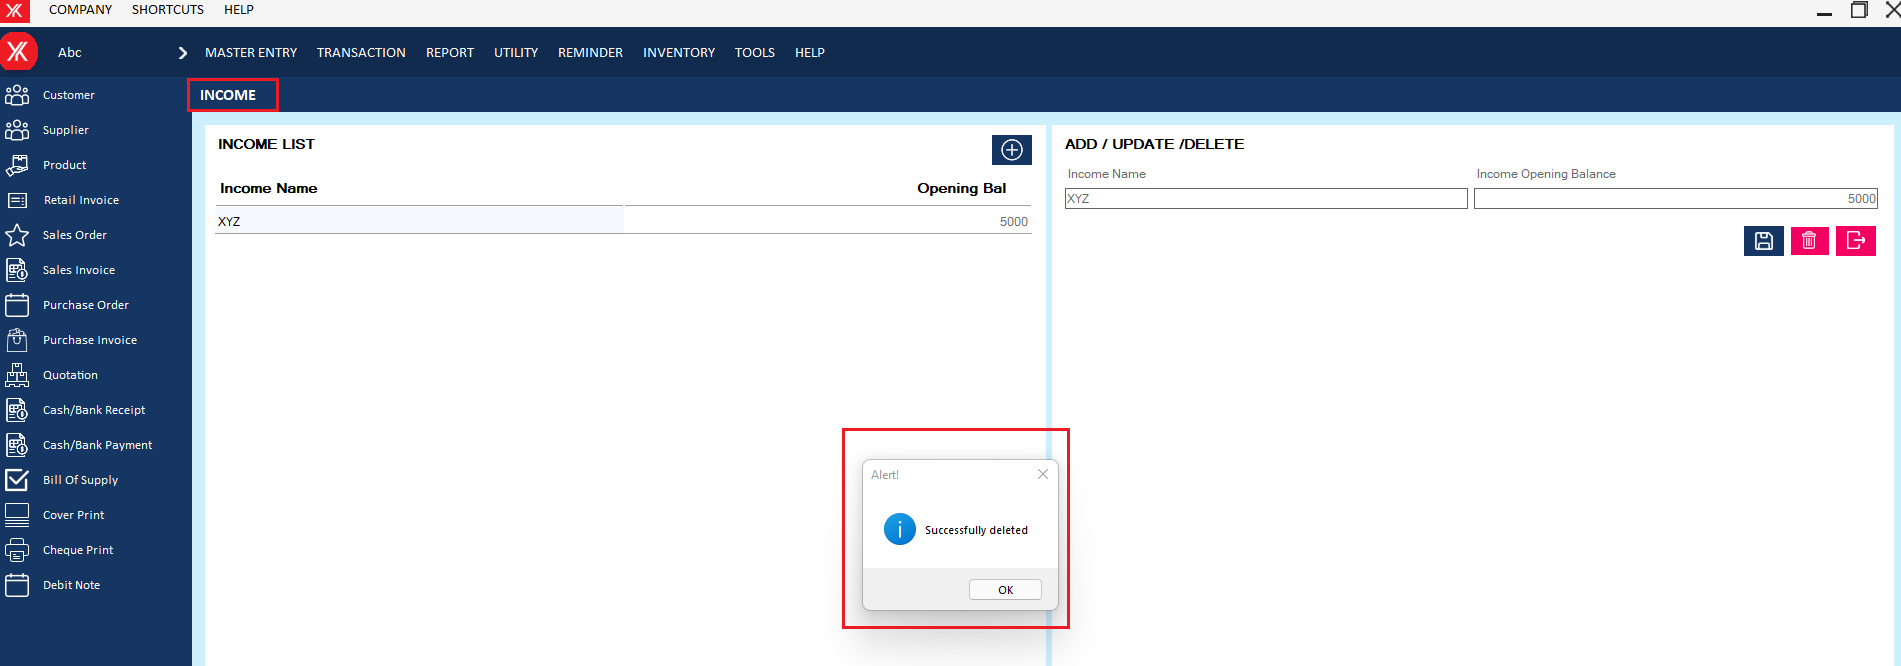
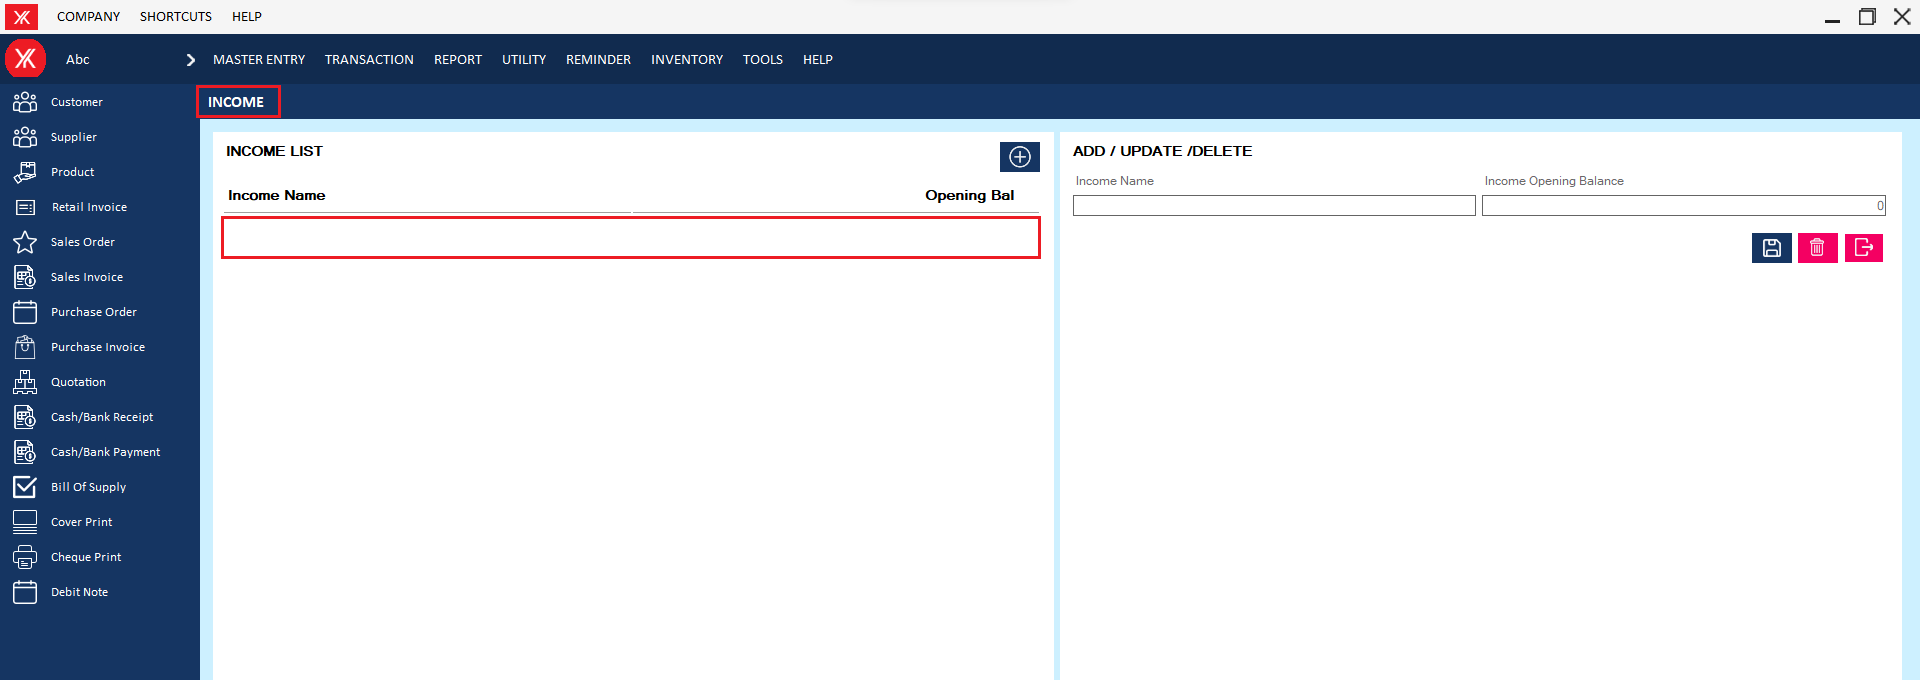
Step 3: The selected income master will be remove from the list
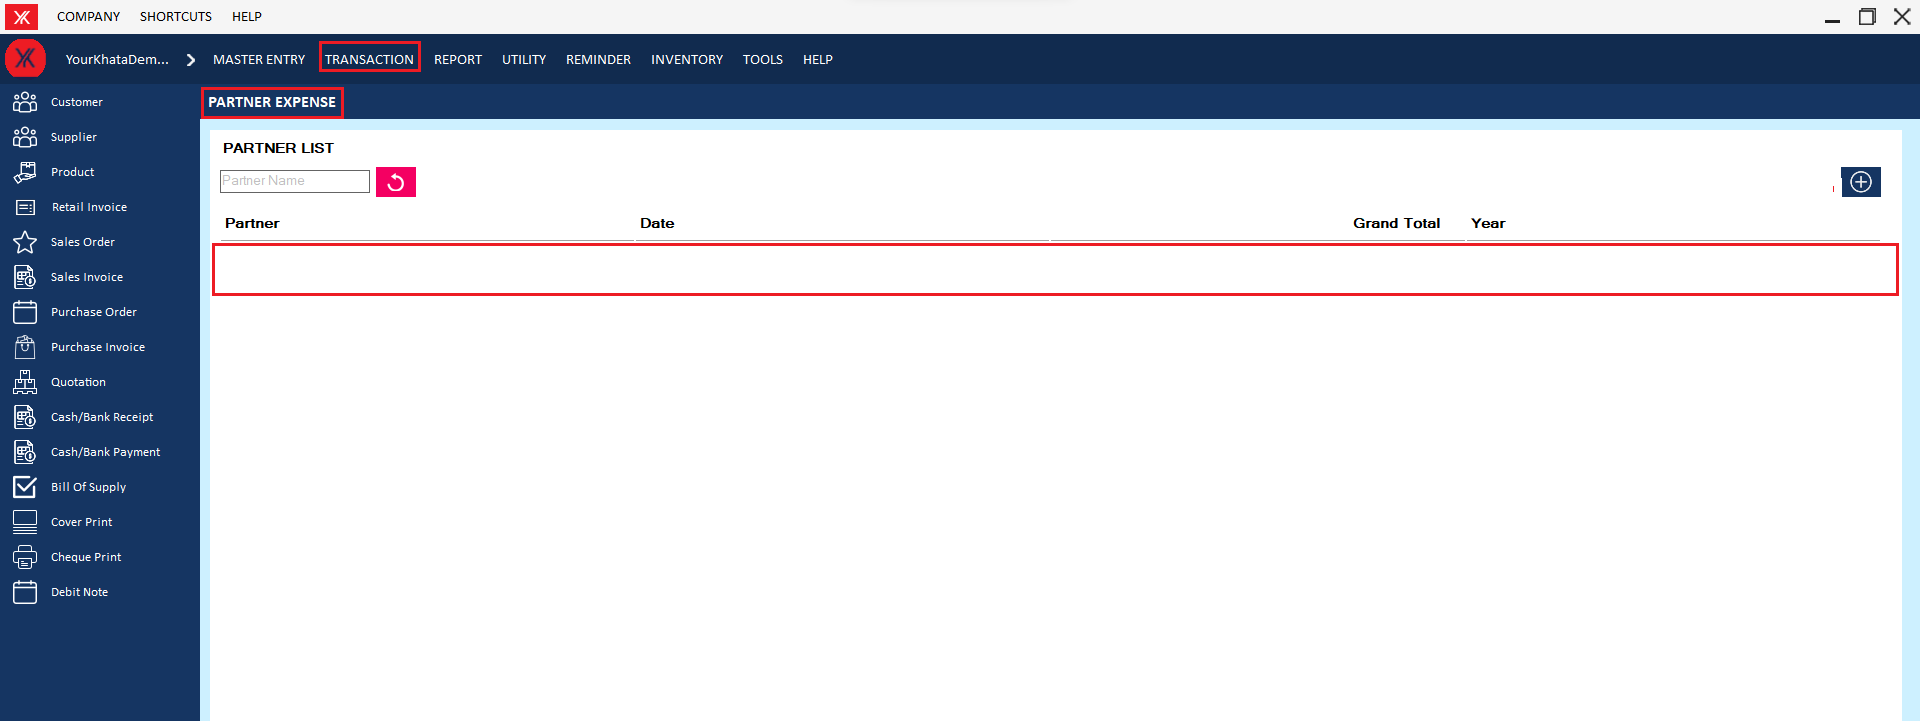
- How to delete Partner expense for Yourkhata accounting and billing software?
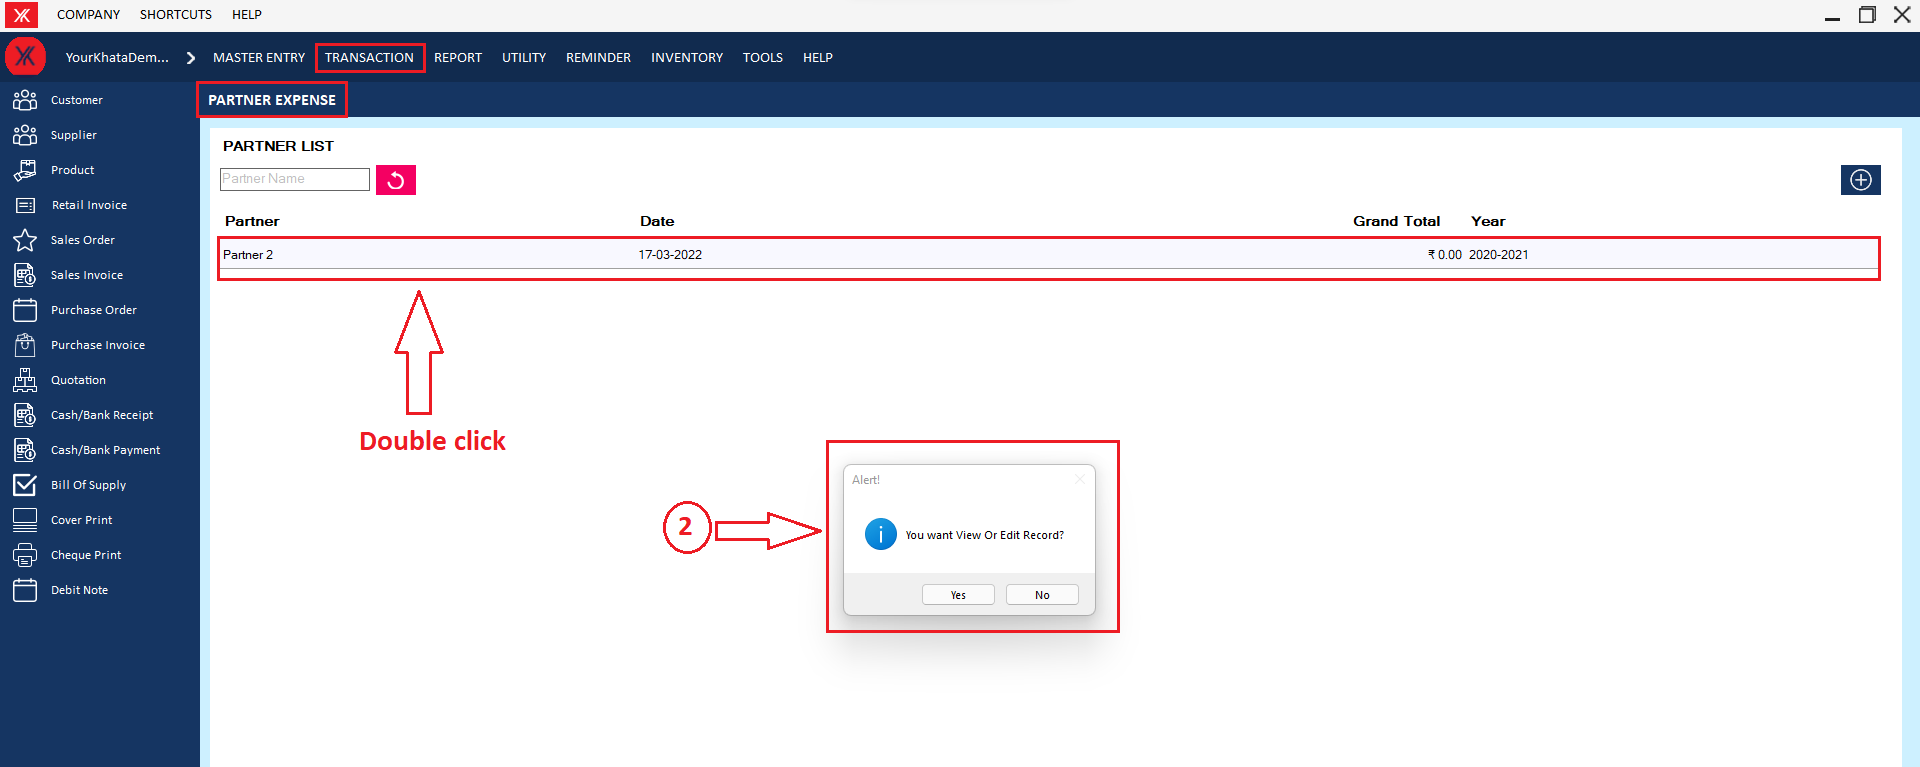
Step 1: Go to partner expense , Previously created partner expense details will be listed, double click on partner expense , You will get a message “You want to view to edit record?”
Step 2: Go & click on Delete, You will get a message – “Do you really want to delete the record?
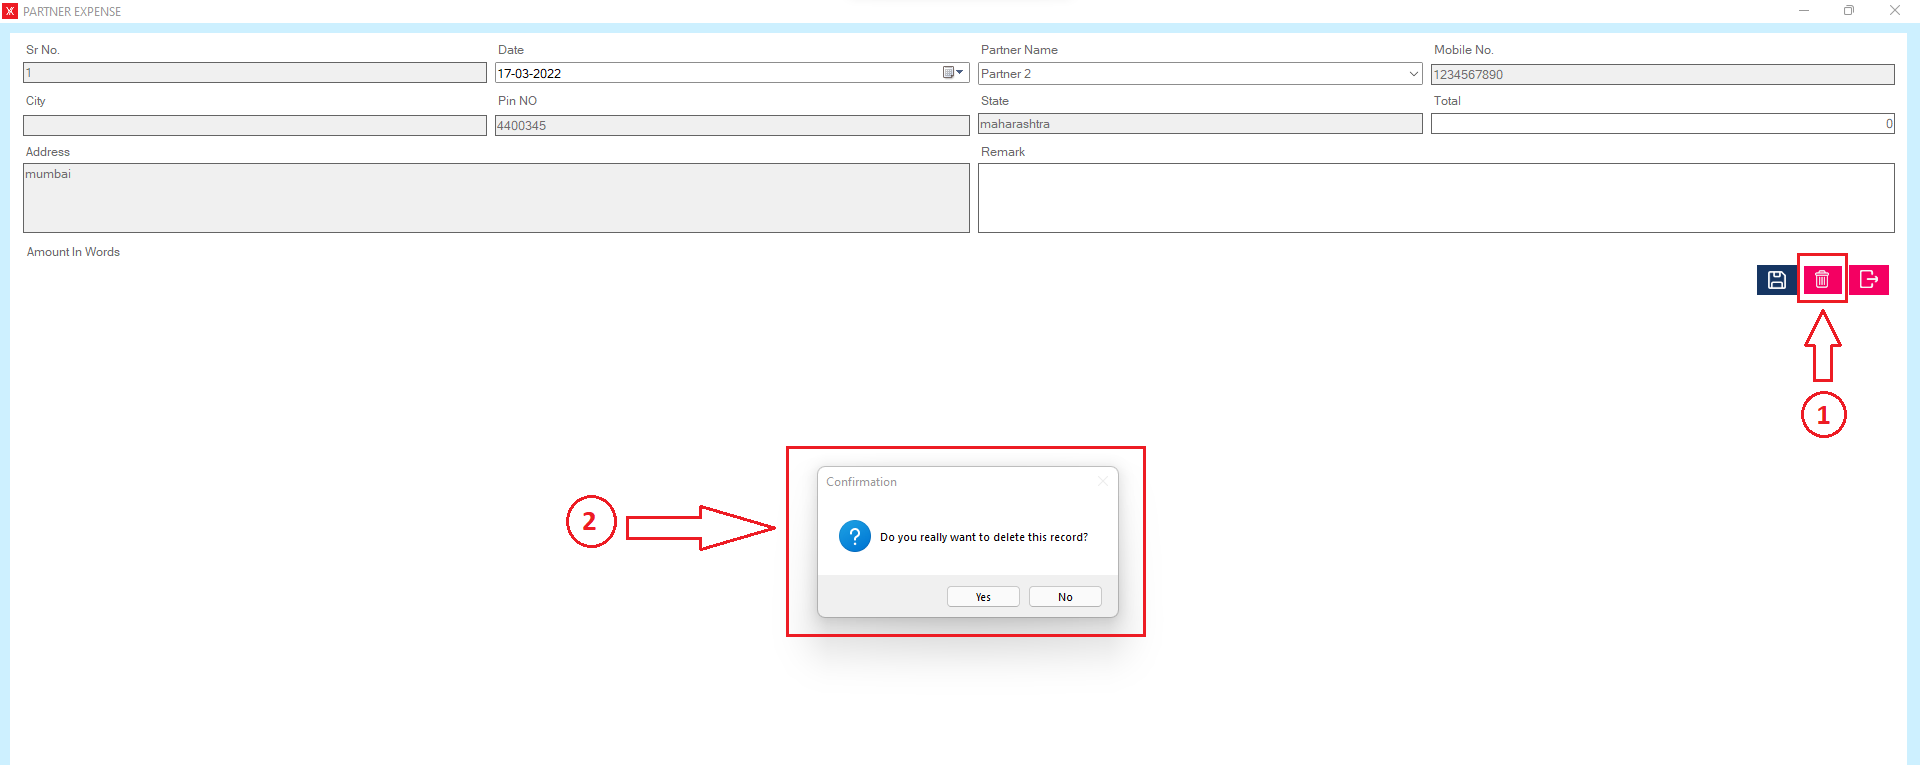
Step 3: If you click on Yes, you will get a confirmation message “successfully deleted”.
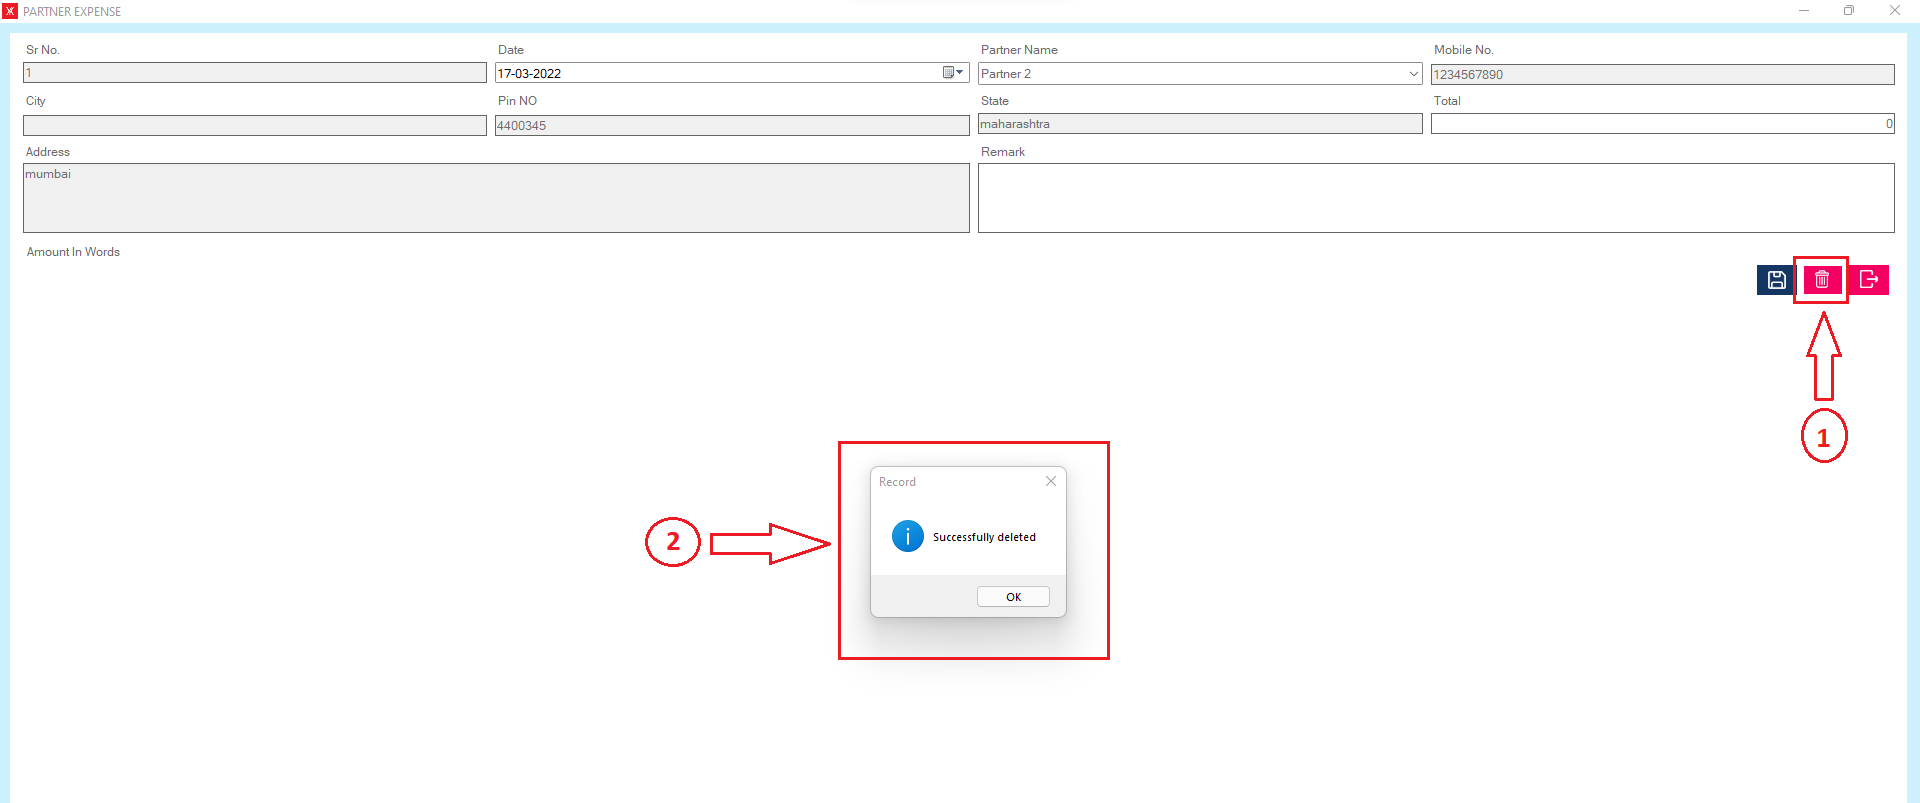
Step 4: The selected partner expense will remove from the list
- How to delete Employee attendance for Yourkhata accounting and billing software?
Step 1: Go to employee attendance, Previously created employee attendance details will be listed, double click on employee details, You will get a message “You want to view to edit record?”
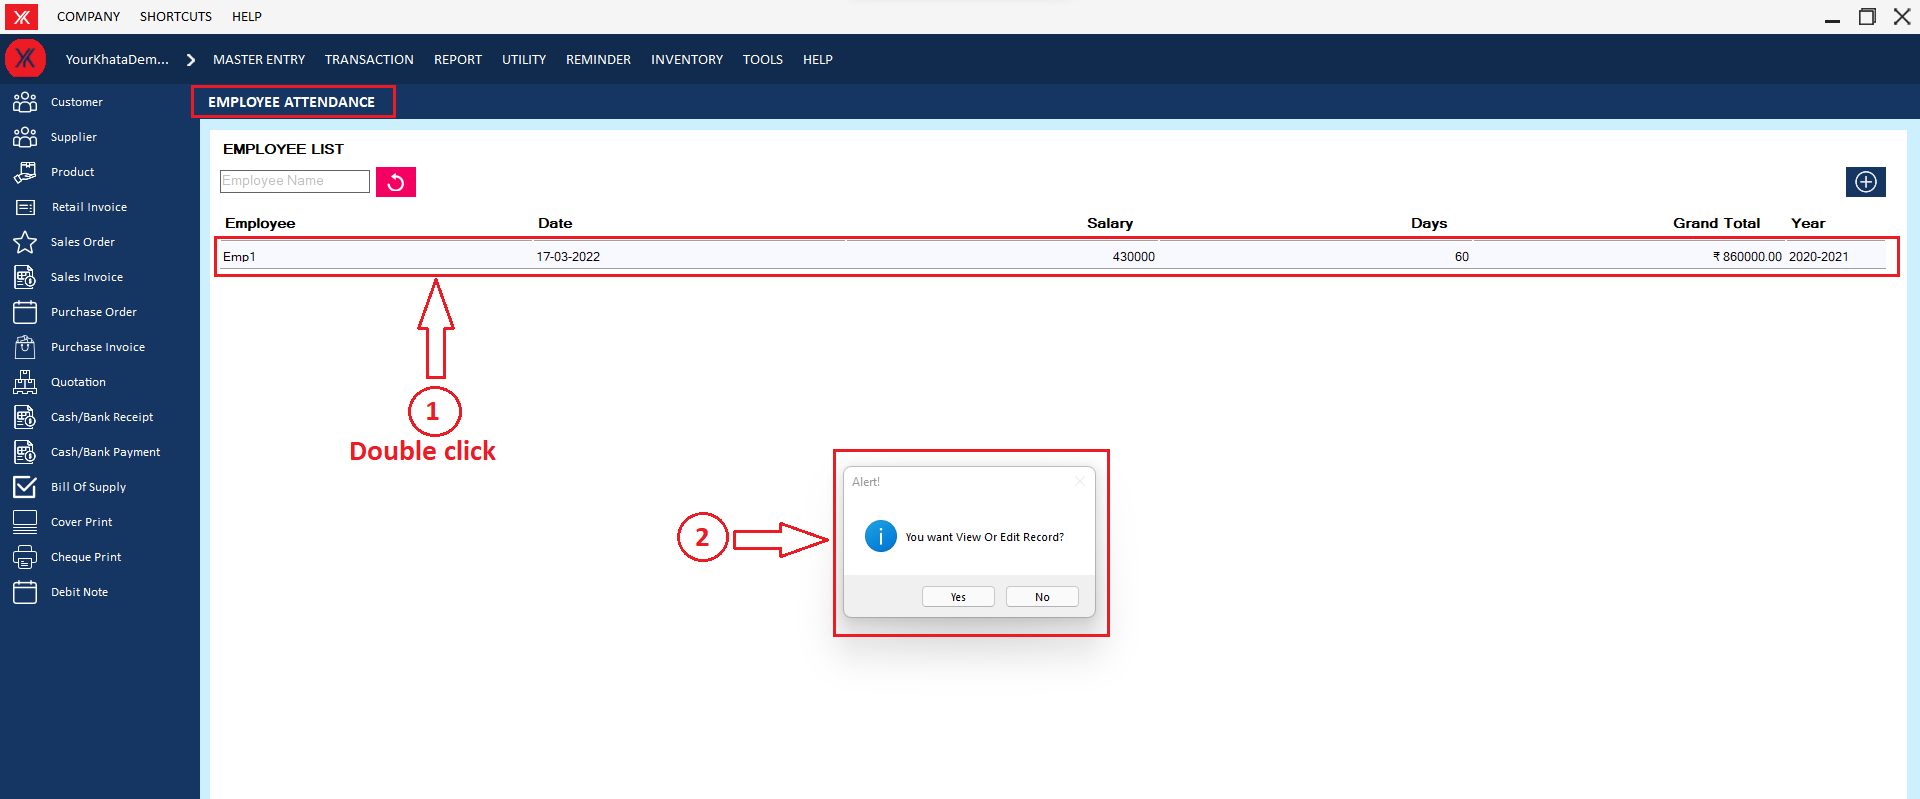
Step 2: Go & click on Delete, You will get a message – “Do you really want to delete the record?
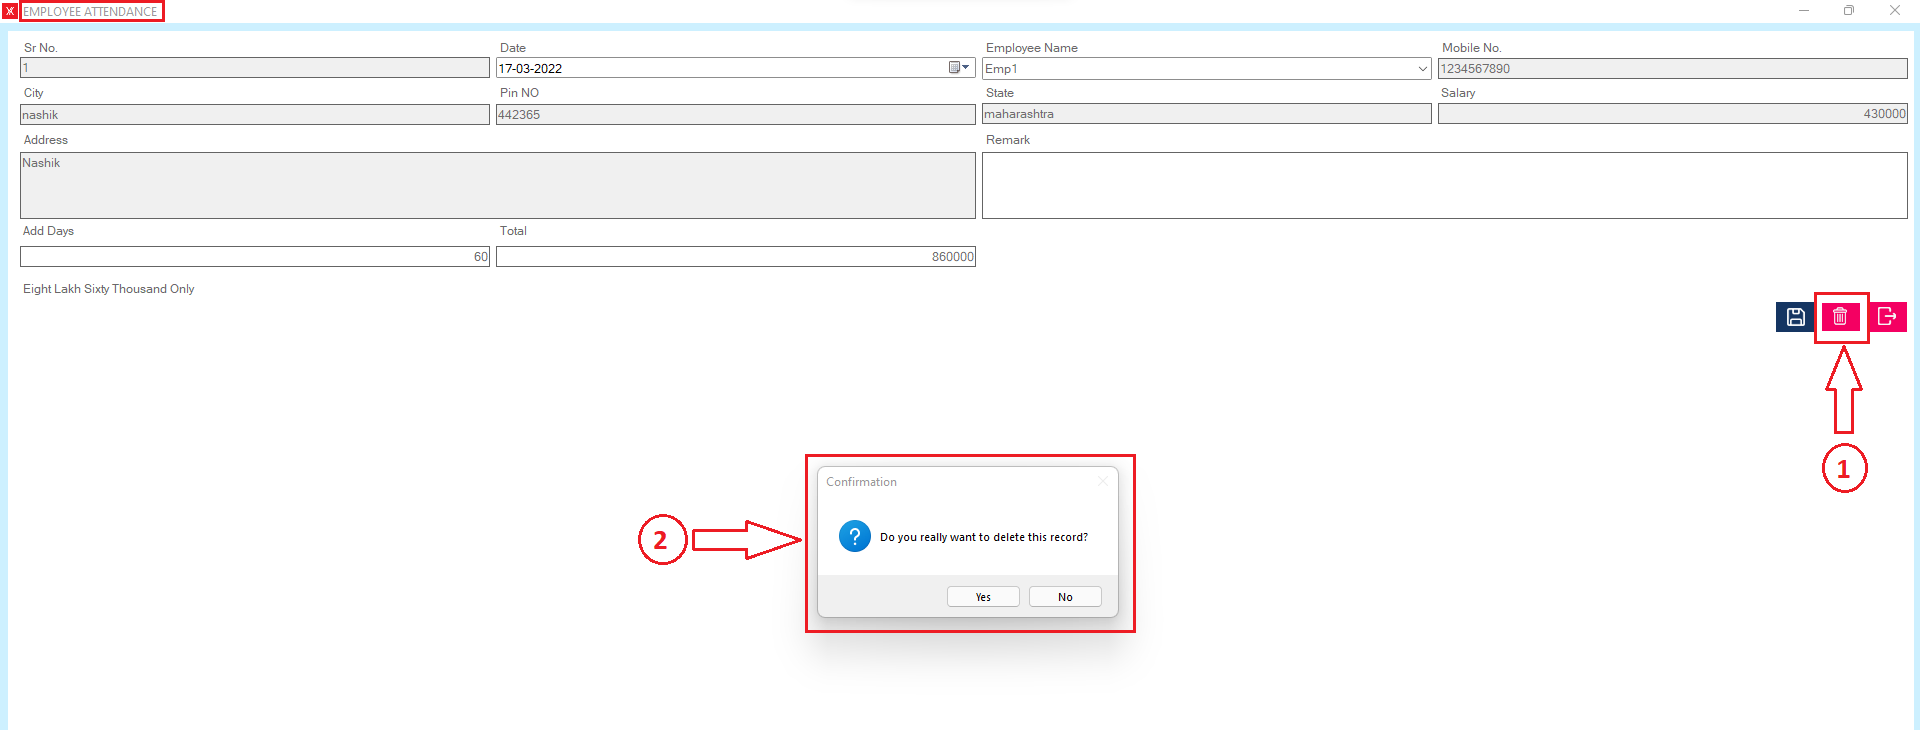
Step 3: If you click on Yes, you will get a confirmation message “successfully deleted”.
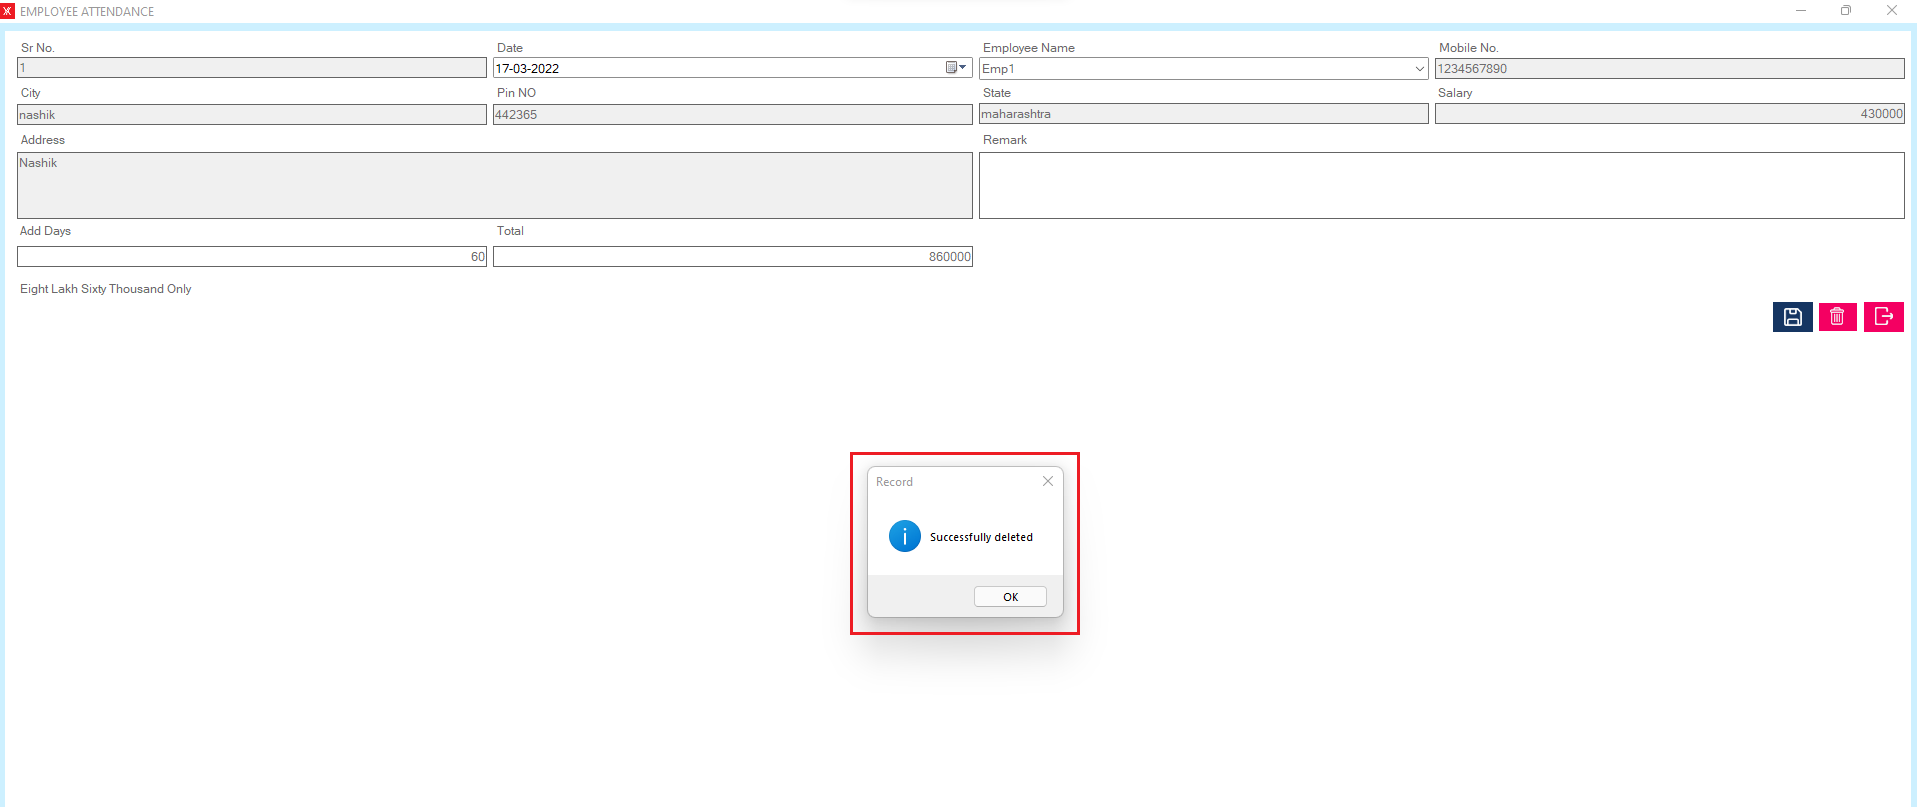
Step 4: The selected employee attendance will remove from the list
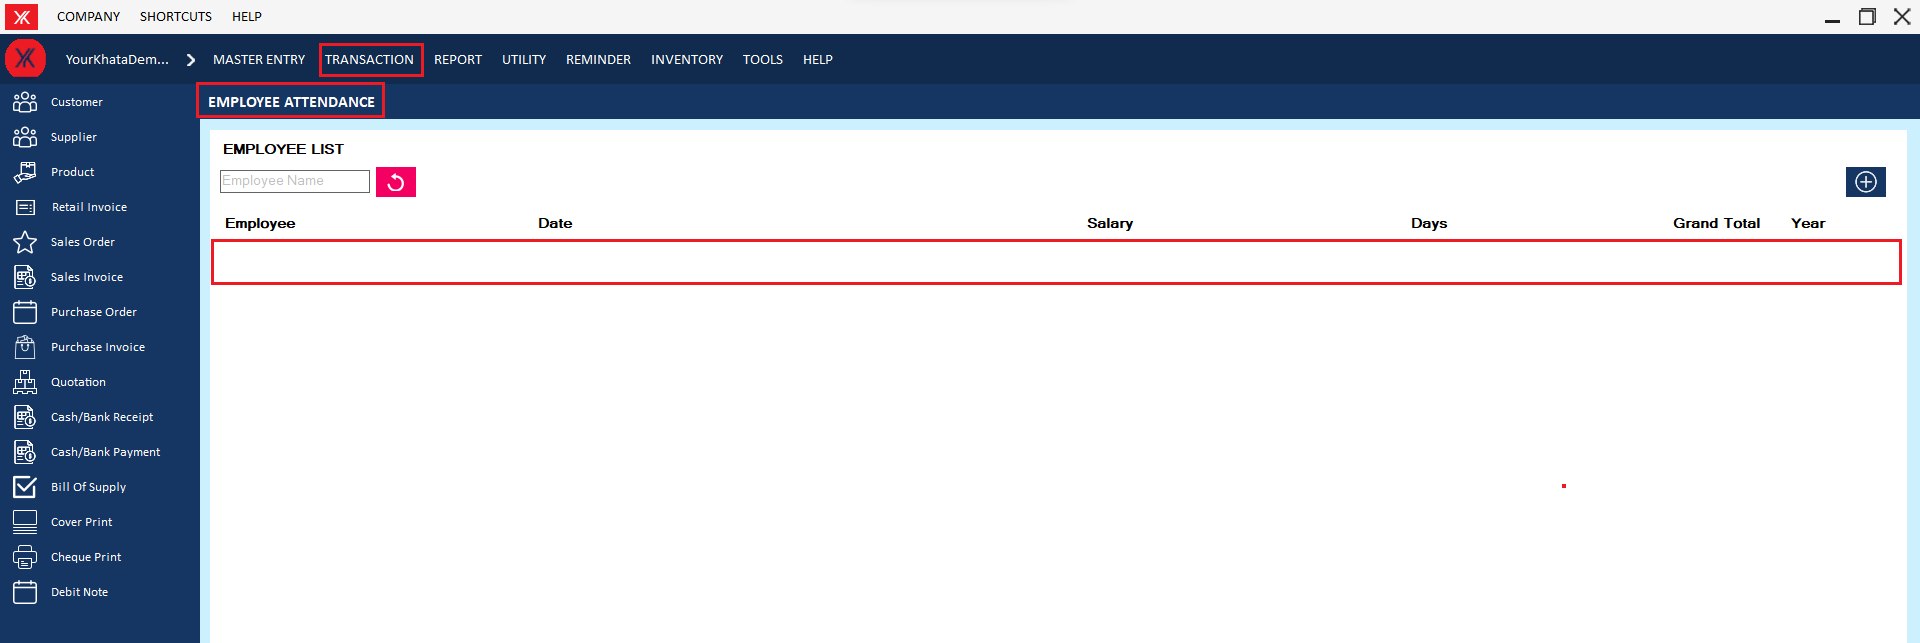
- How to delete Salary expense for Yourkhata accounting and billing software?
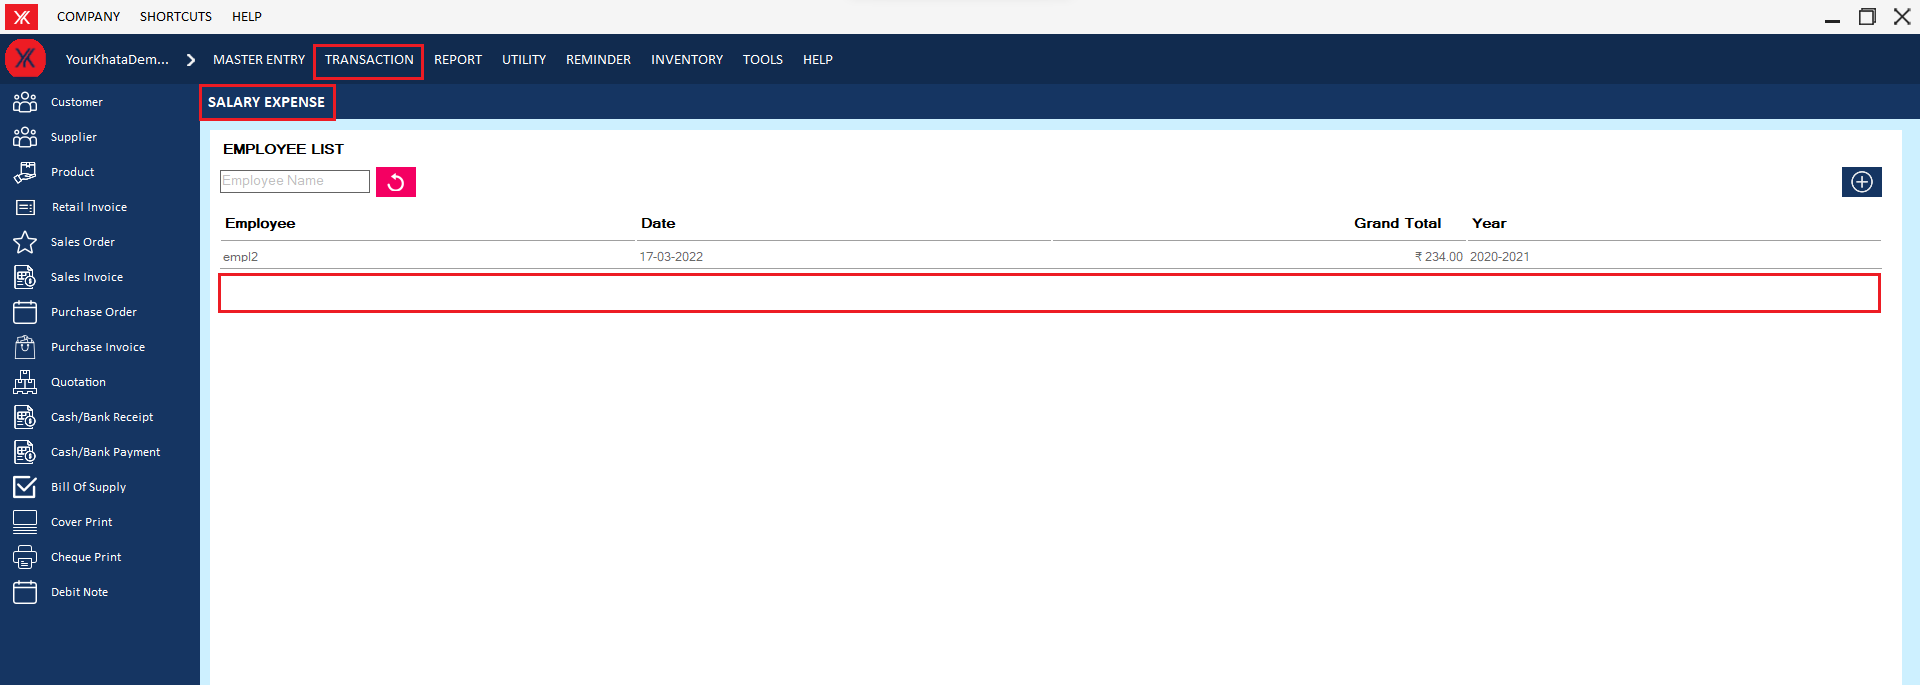
Step 1: Go to salary expense, Previously created salary expense details will be listed, double click on salary details, You will get a message “You want to view to edit record?”
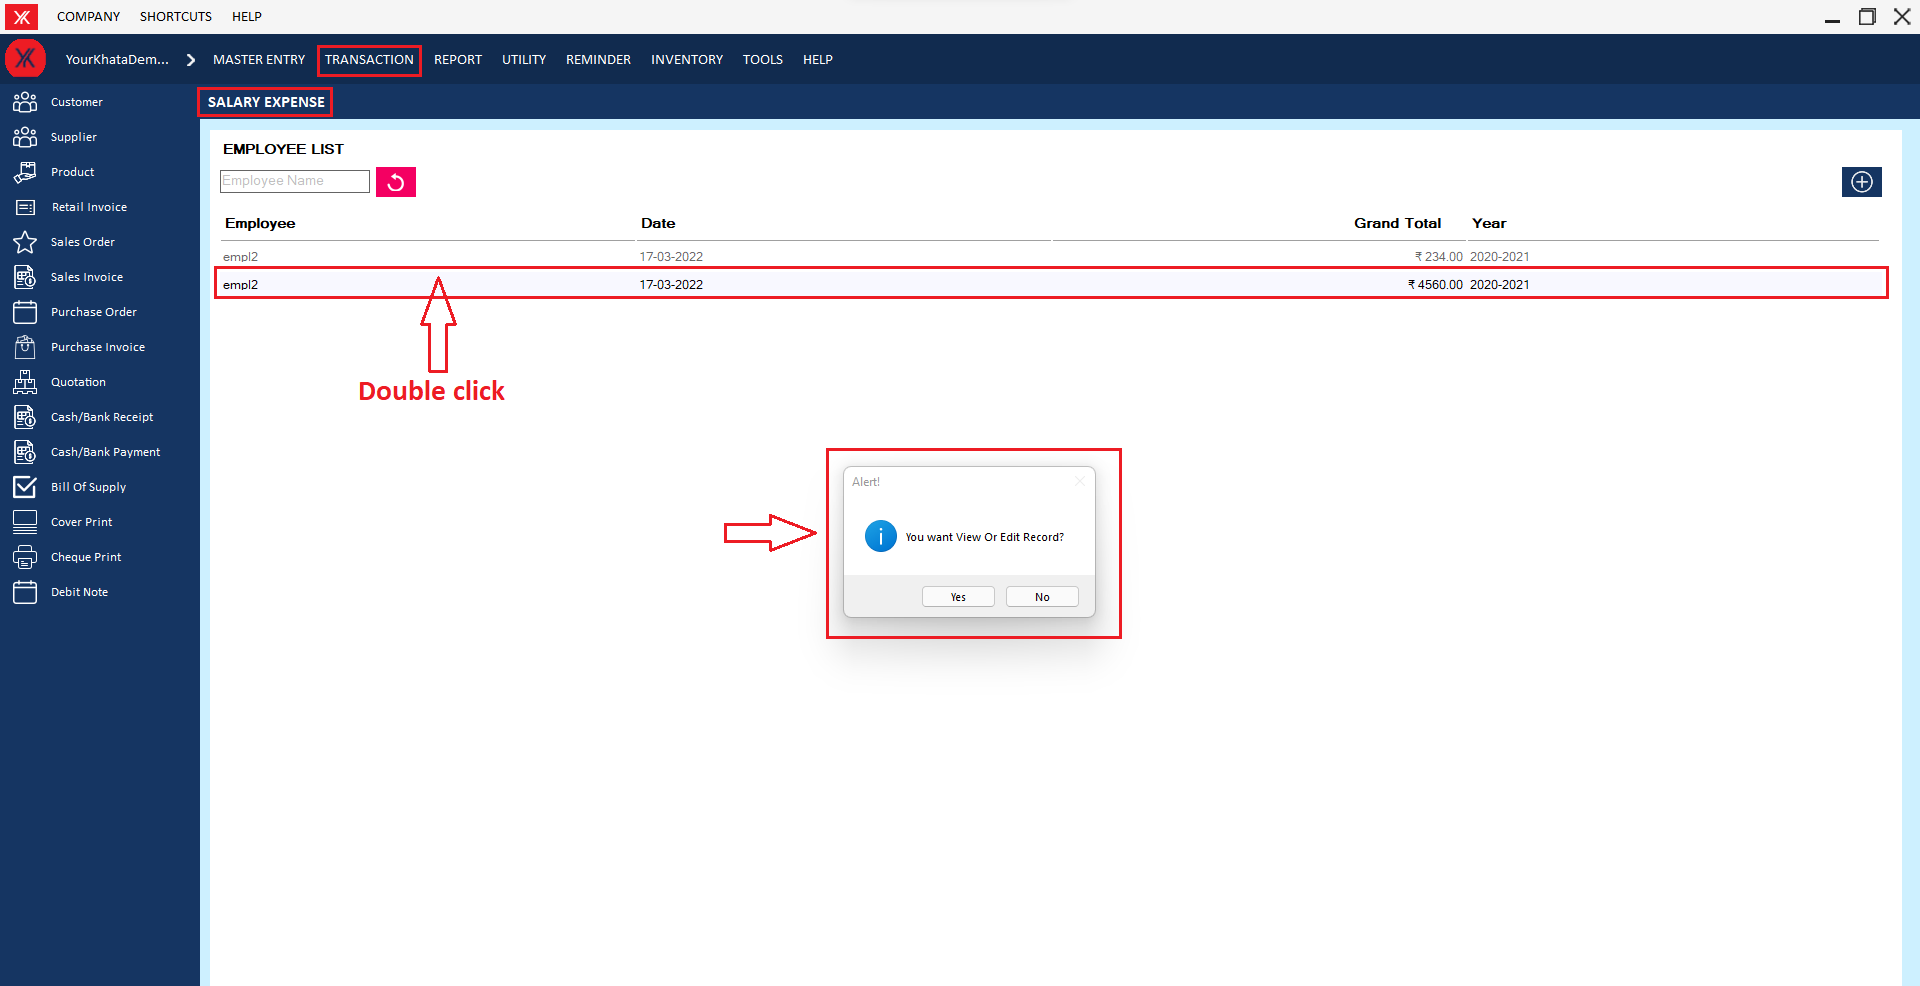
Step 2: Go & click on Delete, You will get a message – “Do you really want to delete the record?
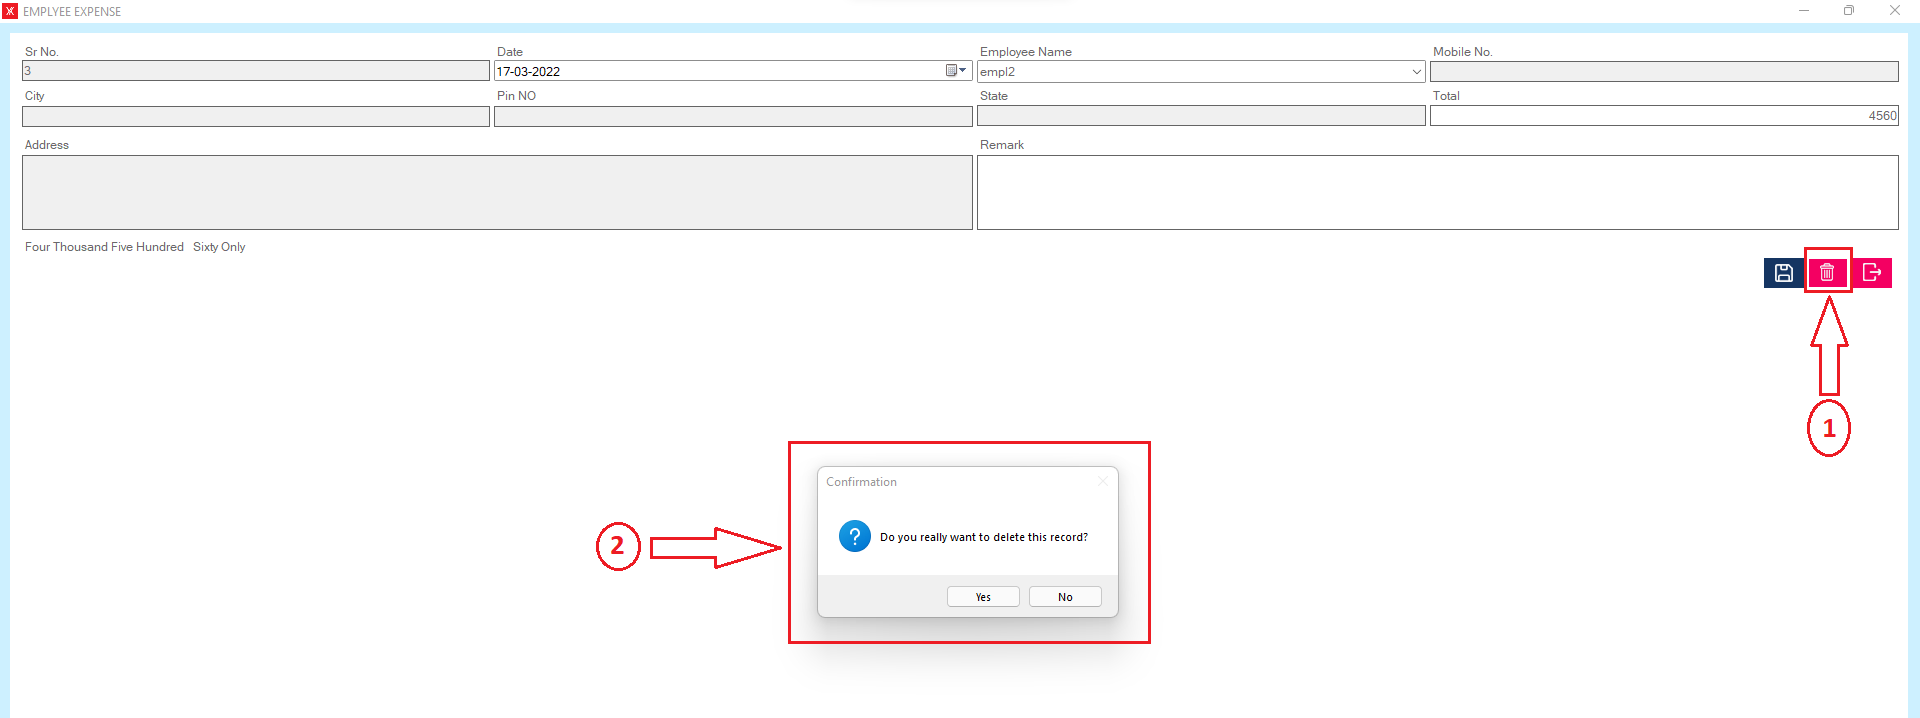
Step 3: If you click on Yes, you will get a confirmation message “successfully deleted”.
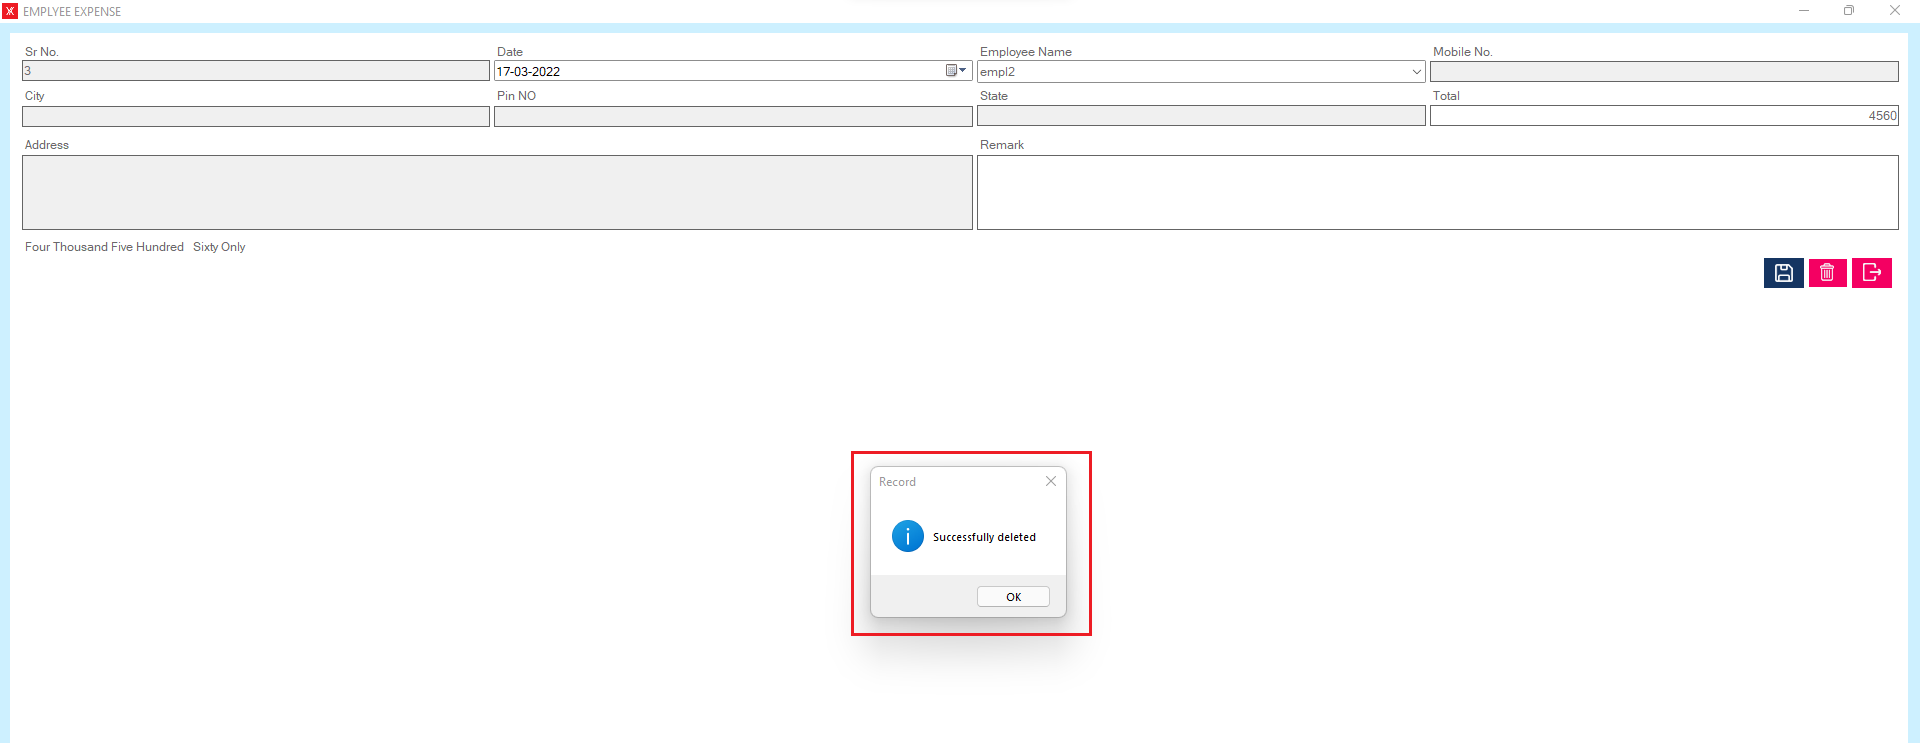
Step 4: The selected salary expense attendance will remove from the list
- How to delete Stock entry for Yourkhata accounting and billing software?
Step 1: Go to stock entry ,Previously created stock entry details will be listed > select & double click on stock entry details
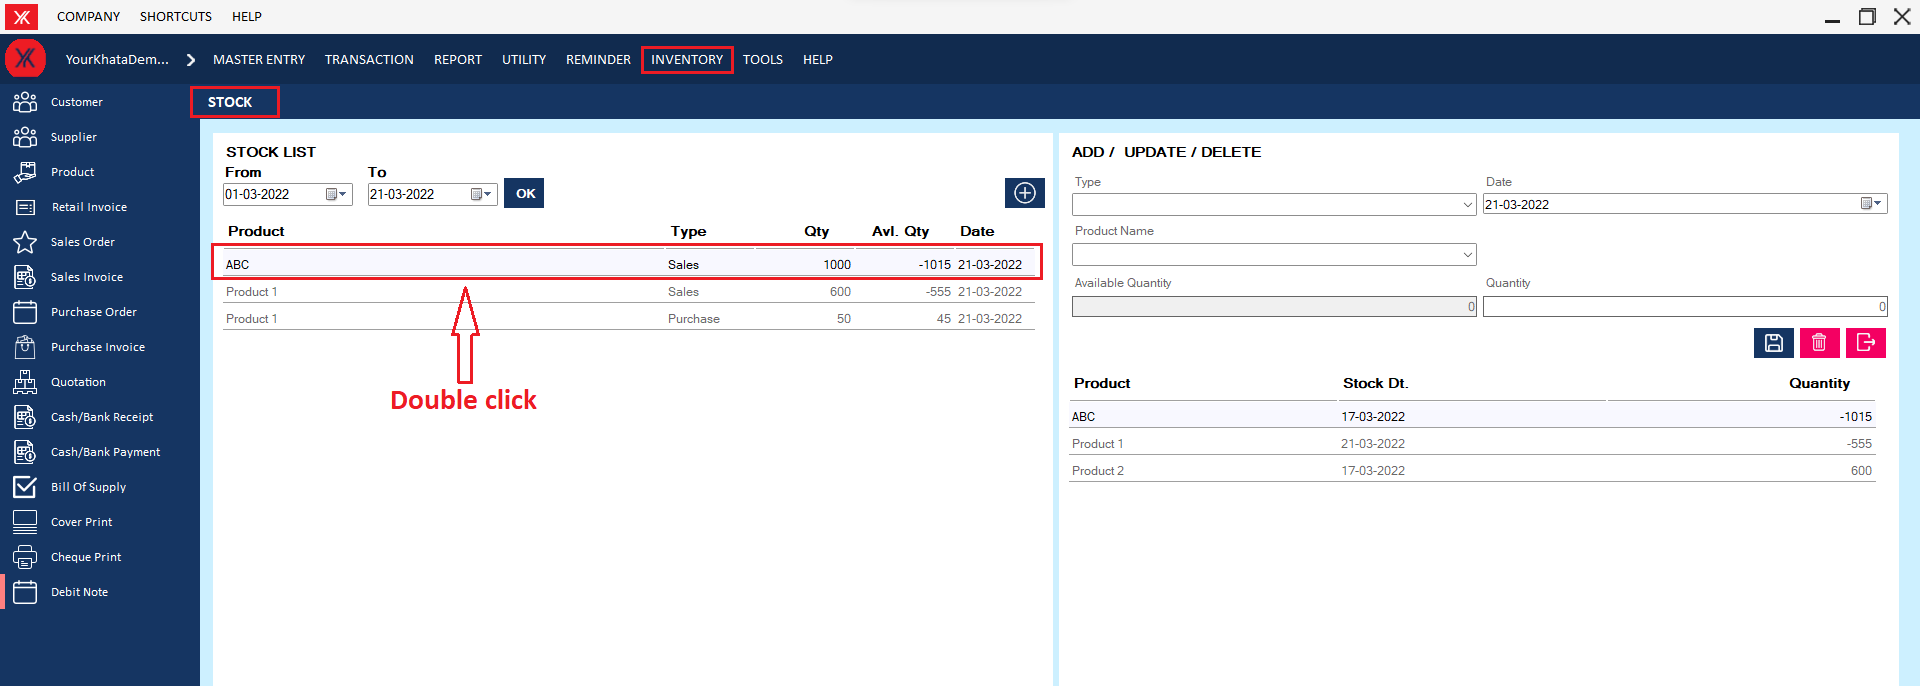
Step 2: Click on delete > you will get the message “Successfully deleted”

Step 3: Click on ok button, stock entry record will be delete from the list
